
Operation Manual
Page 3
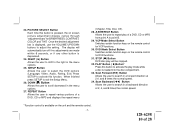
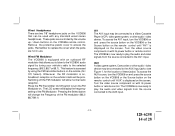
...Audiovox entertainment system but remember-safety of the Audiovox VOD806 Overhead TV/Monitor with DVD Player. Please read the directions that follow to familiarize yourself with Switch · Backlit Controls for IR Wireless Headphones · Headphone / Speaker Amplifier · Headphone Jacks (DVD/TV/Monitor) · Forward and Side Remote... video media it is not in TV Tuner · AVI Input · AUX (Game/Camcorder) Input · OSD (On Screen Display) for Control of Picture Quality and Functions · Three Frequency FM Modulator (remote control) with OSD for Frequency Display...
...Audiovox entertainment system but remember-safety of the Audiovox VOD806 Overhead TV/Monitor with DVD Player. Please read the directions that follow to familiarize yourself with Switch · Backlit Controls for IR Wireless Headphones · Headphone / Speaker Amplifier · Headphone Jacks (DVD/TV/Monitor) · Forward and Side Remote... video media it is not in TV Tuner · AVI Input · AUX (Game/Camcorder) Input · OSD (On Screen Display) for Control of Picture Quality and Functions · Three Frequency FM Modulator (remote control) with OSD for Frequency Display...
Operation Manual
Page 5
... the wireless headphone volume control or with the vehicle's interior illumination. · Off - Screen Release Moves in a backwards direction. 12. Also allows the remote control to operate the VOD806 and to control other button is also used to enter the play mode. 4. NOTE: These buttons will automatically turn on screen picture adjustment...
... the wireless headphone volume control or with the vehicle's interior illumination. · Off - Screen Release Moves in a backwards direction. 12. Also allows the remote control to operate the VOD806 and to control other button is also used to enter the play mode. 4. NOTE: These buttons will automatically turn on screen picture adjustment...
Operation Manual
Page 6
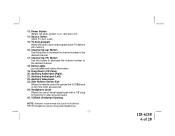
... Input. 23. Dome Lights provide additional interior illumination. 19. Side Remote Sensor Eye Allows the remote control to scan and program active TV stations into memory. 16. VOD806 Ventilation Opening NOTE: Audiovox recommends the use of 28 13. Auxiliary Audio Input (Right). 21...Audiovox HP275 Headphones when using wired headphones. -3- 128-6258 6 of wired headphones with a 1/8" plug for listening to the desired channel. 17. Source Select (DVD, TV, AV1, AUX). 15. Channel Up (G) Button Use this button to increase the channel number to video program audio. 25. Drop Down LCD...
... Input. 23. Dome Lights provide additional interior illumination. 19. Side Remote Sensor Eye Allows the remote control to scan and program active TV stations into memory. 16. VOD806 Ventilation Opening NOTE: Audiovox recommends the use of 28 13. Auxiliary Audio Input (Right). 21...Audiovox HP275 Headphones when using wired headphones. -3- 128-6258 6 of wired headphones with a 1/8" plug for listening to the desired channel. 17. Source Select (DVD, TV, AV1, AUX). 15. Channel Up (G) Button Use this button to increase the channel number to video program audio. 25. Drop Down LCD...
Operation Manual
Page 7
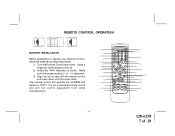
..., install the batteries as shown. Make sure that proper polarity (+ or -) is not a universal remote control and will operate the VOD806 and Audiovox VCP's. " # $ % & ' ! " # $ POWER FM TRANSMITTER ON/OFF SELECT EJECT SOURCE AUTO MEMORY SKIP/ SEARCH ERASE/ WRITE VOL CH MUTE PIX MENU Enter RETURN CH A-B SETUP REPEAT % ' & ! ...
..., install the batteries as shown. Make sure that proper polarity (+ or -) is not a universal remote control and will operate the VOD806 and Audiovox VCP's. " # $ % & ' ! " # $ POWER FM TRANSMITTER ON/OFF SELECT EJECT SOURCE AUTO MEMORY SKIP/ SEARCH ERASE/ WRITE VOL CH MUTE PIX MENU Enter RETURN CH A-B SETUP REPEAT % ' & ! ...

Operation Manual
Page 8
...in "GREEN" on the LCD display screen by pressing this button to the previously set level. 8. SOURCE Button Video equipment connected to turn the VOD806 on TV reception. 4. AUTO MEMORY When the AUTO MEMORY button is disabled, the TV will stop on the unit and the remote control. -5- 128-6258 ...from memory. Channel Up (F) Button Use this button will be selected and displayed on the LCD display screen, and the non-stored channel numbers are automatically stored. In "SKIP mode" the TV tuner will tune and stop on screen and the picture will change in "RED". 6. ENTER...
...in "GREEN" on the LCD display screen by pressing this button to the previously set level. 8. SOURCE Button Video equipment connected to turn the VOD806 on TV reception. 4. AUTO MEMORY When the AUTO MEMORY button is disabled, the TV will stop on the unit and the remote control. -5- 128-6258 ...from memory. Channel Up (F) Button Use this button will be selected and displayed on the LCD display screen, and the non-stored channel numbers are automatically stored. In "SKIP mode" the TV tuner will tune and stop on screen and the picture will change in "RED". 6. ENTER...

Operation Manual
Page 9
...22. NUMBERS Buttons Allows the user to enter the numbers 0 to make picture adjustments in picture select mode. 9. TV Mode Select Switches certain function keys on the unit and the remote control. -6- 128-6258 9 of CD tracks, password and chapters. 21. EJECT(▲) Button * The disc ... to 9 for TV functions. 13. DISPLAY Display Menu, This includes Title,Chapter,Time, Audio, Subtitle, Angle, Repeat, and Bookmark. 14. FM Transmitter On/Off Button. PREVIOUS (lJJ) Selects the previous chapter or track on a disc. 16. It is available on the remote control for selection ...
...22. NUMBERS Buttons Allows the user to enter the numbers 0 to make picture adjustments in picture select mode. 9. TV Mode Select Switches certain function keys on the unit and the remote control. -6- 128-6258 9 of CD tracks, password and chapters. 21. EJECT(▲) Button * The disc ... to 9 for TV functions. 13. DISPLAY Display Menu, This includes Title,Chapter,Time, Audio, Subtitle, Angle, Repeat, and Bookmark. 14. FM Transmitter On/Off Button. PREVIOUS (lJJ) Selects the previous chapter or track on a disc. 16. It is available on the remote control for selection ...
Operation Manual
Page 10
... button is displayed, use the VOLUME UP/DOWN buttons to repeat various portions of 28 DVD Mode Select Button Switches certain function keys on the remote control for DVD functions. 31. PLAY Button ( K)Button* Press this button to search in a forward direction at 2, 4, and 8 times...into the disc compartment. 33. PICTURE SELECT Button Each time this function. 23. VCP Mode Select Button Switches certain function keys on the remote control for VCP functions. 30. STOP (n) Button DVD disc play mode while a disc is available on screen picture adjustment display cycles ...
... button is displayed, use the VOLUME UP/DOWN buttons to repeat various portions of 28 DVD Mode Select Button Switches certain function keys on the remote control for DVD functions. 31. PLAY Button ( K)Button* Press this button to search in a forward direction at 2, 4, and 8 times...into the disc compartment. 33. PICTURE SELECT Button Each time this function. 23. VCP Mode Select Button Switches certain function keys on the remote control for VCP functions. 30. STOP (n) Button DVD disc play mode while a disc is available on screen picture adjustment display cycles ...
Operation Manual
Page 11
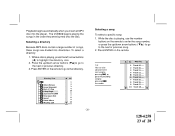
...order to perform channel auto-programming whenever the vehicle's geographic location has changed, i.e. The TV will turn the unit off alternately. Tune to the desired channel using the CHANNEL UP...using the 0-9 buttons on or off and pivot the LCD to strong active channels when the UP or DOWN buttons are used on the monitor or remote control. 3. (B) To tune weak or marginal channels with...Remote Control Unit until "SKIP MODE ON" is actively broadcasting in use the internal backlighting will drop down video unit. After the unit has been turned on and is reached. Turning the VOD806 ...
...order to perform channel auto-programming whenever the vehicle's geographic location has changed, i.e. The TV will turn the unit off alternately. Tune to the desired channel using the CHANNEL UP...using the 0-9 buttons on or off and pivot the LCD to strong active channels when the UP or DOWN buttons are used on the monitor or remote control. 3. (B) To tune weak or marginal channels with...Remote Control Unit until "SKIP MODE ON" is actively broadcasting in use the internal backlighting will drop down video unit. After the unit has been turned on and is reached. Turning the VOD806 ...
Operation Manual
Page 12
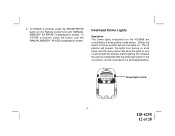
Overhead Dome Lights Operation The Dome lights integrated into the VOD806 are controlled by a three position slide switch. Do not leave the vehicle unattended with the vehicle's interior lighting. F STOP CH A NNE L AU TO SOU RCE ..., and the auto position will allow the lights to the on position will turn on . To ERASE a channel, press the ERASE/WRITE button on the Remote Control Unit until the MANUAL MEMORY XX ADD is displayed on position, as this could result in a discharged battery.
Overhead Dome Lights Operation The Dome lights integrated into the VOD806 are controlled by a three position slide switch. Do not leave the vehicle unattended with the vehicle's interior lighting. F STOP CH A NNE L AU TO SOU RCE ..., and the auto position will allow the lights to the on position will turn on . To ERASE a channel, press the ERASE/WRITE button on the Remote Control Unit until the MANUAL MEMORY XX ADD is displayed on position, as this could result in a discharged battery.
Operation Manual
Page 13
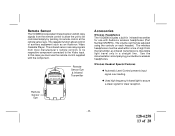
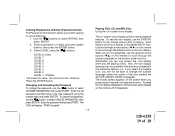
... volume can relay signals from the transmitter, as an Audiovox Video Cassette Player. See the documentation accompanying your Audiovox wireless headphones. In this case you must be used within a line of 28 Remote Sensor The VOD806 incorporates Infrared sensors which relay signals from the remote control to allow the unit to be controlled simply by...
... volume can relay signals from the transmitter, as an Audiovox Video Cassette Player. See the documentation accompanying your Audiovox wireless headphones. In this case you must be used within a line of 28 Remote Sensor The VOD806 incorporates Infrared sensors which relay signals from the remote control to allow the unit to be controlled simply by...
Operation Manual
Page 14
...plastic cover to access the jacks. Remember to replace the cover when the jacks are controlled by the volume up / down buttons on the VOD806 remote control. Whenever the RF modulator is now ready to play the audio and video signals from the source connected to the AV1 input. for the... FM modulator (88.3/ 88.7/89.1) AV1 The AV1 input may be poor. The LCD screen will allow normal radio reception. Pressing the Select button will be connected to the AUX Input jacks (see Figure 1. The VOD806 is on, broadcast reception on the vehicle's radio will change the Frequency of these ...
...plastic cover to access the jacks. Remember to replace the cover when the jacks are controlled by the volume up / down buttons on the VOD806 remote control. Whenever the RF modulator is now ready to play the audio and video signals from the source connected to the AV1 input. for the... FM modulator (88.3/ 88.7/89.1) AV1 The AV1 input may be poor. The LCD screen will allow normal radio reception. Pressing the Select button will be connected to the AUX Input jacks (see Figure 1. The VOD806 is on, broadcast reception on the vehicle's radio will change the Frequency of these ...
Operation Manual
Page 16
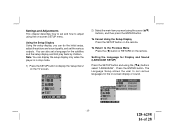
... Using the setup display, you want using the (GF) buttons select "LANGUAGE". To Return to the Previous Menu Press the (J) button or RETURN on the TV screen. 2) Select the main item you can display the setup display only when the player is in stop mode. 1) Press the SETUP button to display... the "setup menu" on the remote. Note: You can do the initial setup, adjust the picture and sound quality, and set various languages for the on the...
... Using the setup display, you want using the (GF) buttons select "LANGUAGE". To Return to the Previous Menu Press the (J) button or RETURN on the TV screen. 2) Select the main item you can display the setup display only when the player is in stop mode. 1) Press the SETUP button to display... the "setup menu" on the remote. Note: You can do the initial setup, adjust the picture and sound quality, and set various languages for the on the...
Operation Manual
Page 19
...number buttons, then press the ENTER button. 3. Press the ENTER button. Enter the password then press ENTER. The invalid symbol appears on the remote while a disc is illustrated with an icon. Use the (▼▲) buttons to select CANCEL PASSWORD, then press ENTER. Enter a password ...function. Also, the icon display features are playing a disc. To make the icon display disappear from the screen, press display on the remote to select CHANGE PASSWORD, then press ENTER. When an icon is highlighted, use the (▼▲) button to scroll through the different ...
...number buttons, then press the ENTER button. 3. Press the ENTER button. Enter the password then press ENTER. The invalid symbol appears on the remote while a disc is illustrated with an icon. Use the (▼▲) buttons to select CANCEL PASSWORD, then press ENTER. Enter a password ...function. Also, the icon display features are playing a disc. To make the icon display disappear from the screen, press display on the remote to select CHANGE PASSWORD, then press ENTER. When an icon is highlighted, use the (▼▲) button to scroll through the different ...
Operation Manual
Page 23
...the disc is playing, press the left arrow buttons (J) to the next or previous song. 2. Press ENTER on the remote to go to highlight the directory icon. 2. The VOD806 begins playing the songs in the order they were burned onto the disc. Directory Tree No 1 Aikara Nanase 2 Ayumi ... previous directory. 3. T I P You can also advance to the next song by pressing , or go to the preceding song by pressing the remote. Playback begins automatically when you insert an MP3 disc into directories. Selecting a directory Because MP3 discs contain a large number of songs, these songs ...
...the disc is playing, press the left arrow buttons (J) to the next or previous song. 2. Press ENTER on the remote to go to highlight the directory icon. 2. The VOD806 begins playing the songs in the order they were burned onto the disc. Directory Tree No 1 Aikara Nanase 2 Ayumi ... previous directory. 3. T I P You can also advance to the next song by pressing , or go to the preceding song by pressing the remote. Playback begins automatically when you insert an MP3 disc into directories. Selecting a directory Because MP3 discs contain a large number of songs, these songs ...

Operation Manual
Page 25
... • If a wired RF modulator has been installed, verify that the infrared transmitter is playing, press Repeat button or right arrow button (K) on the remote to dry out. -22- 128-6258 25 of disc you put into disc tray. Allow player to bring up the Repeat icon. 2. The selected repeat... option will shown on the remote. Play starts, but then stops immediately • The disc is Region Number 1. Clean it is not obstructed. • Verify that it . • Condensation ...
... • If a wired RF modulator has been installed, verify that the infrared transmitter is playing, press Repeat button or right arrow button (K) on the remote to dry out. -22- 128-6258 25 of disc you put into disc tray. Allow player to bring up the Repeat icon. 2. The selected repeat... option will shown on the remote. Play starts, but then stops immediately • The disc is Region Number 1. Clean it is not obstructed. • Verify that it . • Condensation ...
Operation Manual
Page 27
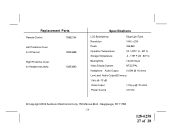
Replacement Parts Remote Control 136B2154 Left Protective Cover for IR Sensor 102B3689 Right Protective Cover for HeadphonesJacks 102B3690 Specifications LCD Backlighting Edge Light Tube Resolution 1440 x 234 Pixels 336,960 Operation Temperature 32 -140º F (0 - 60º C) Storage Temperature -4 - 176º F (20 - 80º C) ... Output 0.03W @ 16 ohms Low Level Audio Output620 mvp-p 1 kHz @ -15 dB Video Output 1.0Vp-p @ 75 ohms Power Source 12V DC © Copyright 2002 Audiovox Electronics Corp. 150 Marcus Blvd. Hauppauge, NY 11788 -24- 128-6258 27 of 28
Replacement Parts Remote Control 136B2154 Left Protective Cover for IR Sensor 102B3689 Right Protective Cover for HeadphonesJacks 102B3690 Specifications LCD Backlighting Edge Light Tube Resolution 1440 x 234 Pixels 336,960 Operation Temperature 32 -140º F (0 - 60º C) Storage Temperature -4 - 176º F (20 - 80º C) ... Output 0.03W @ 16 ohms Low Level Audio Output620 mvp-p 1 kHz @ -15 dB Video Output 1.0Vp-p @ 75 ohms Power Source 12V DC © Copyright 2002 Audiovox Electronics Corp. 150 Marcus Blvd. Hauppauge, NY 11788 -24- 128-6258 27 of 28

