
Operation Manual
Page 3
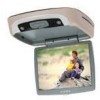
... be accomplished using the remote control, while seatbelts remain fastened. Enjoy your equipment. Safety Precaution For safety reasons, when changing video media it is recommended that follow to the system. Please read the directions that the vehicle is not in your family many years of the Audiovox VOD8521 DVD Player with Drop-Down Video /Monitor.
... be accomplished using the remote control, while seatbelts remain fastened. Enjoy your equipment. Safety Precaution For safety reasons, when changing video media it is recommended that follow to the system. Please read the directions that the vehicle is not in your family many years of the Audiovox VOD8521 DVD Player with Drop-Down Video /Monitor.

Operation Manual
Page 5
... Used to select one of 35 Auxiliary Video Input. 16. Drop Down LCD Panel. 18. Use this button to control other accessories. 17. For ejecting discs from the disc compartment. 4. Also allows the remote control to operate the VOD8521 and to raise the volume level of the ...in direction of the arrow to start playback of wired headphones with a 1/8" plug for optional TV tuner instructions. -5- 128-7256A 5 of the three sources (DVD, AV1, AUX, *TV Optional). 10. ( - ) Button - Used to the wireless headphones. VOLUME ( ) Button - SOURCE Select - Moves in the...
... Used to select one of 35 Auxiliary Video Input. 16. Drop Down LCD Panel. 18. Use this button to control other accessories. 17. For ejecting discs from the disc compartment. 4. Also allows the remote control to operate the VOD8521 and to raise the volume level of the ...in direction of the arrow to start playback of wired headphones with a 1/8" plug for optional TV tuner instructions. -5- 128-7256A 5 of the three sources (DVD, AV1, AUX, *TV Optional). 10. ( - ) Button - Used to the wireless headphones. VOLUME ( ) Button - SOURCE Select - Moves in the...

Operation Manual
Page 7
...sure that 18 proper polarity (+ or -) is not a universal remote control and will operate the VOD8521 and most Audiovox VCP's. Remote Control Operation 1 2 3 4 5 6 7 BATTERY COVER 8 9 10 11 Battery Installation 12 13 Before attempting to operate your Remote Control, install the 14 batteries as shown. IRTA IRTB 42 41... a fingernail, 16 lift the battery cover off. 17 2) Install two "AAA" batteries as described below. 15 1) Turn the Remote Control face down until the cover clicks. 21 The remote control will not control equipment from other manufacturers. -7-
...sure that 18 proper polarity (+ or -) is not a universal remote control and will operate the VOD8521 and most Audiovox VCP's. Remote Control Operation 1 2 3 4 5 6 7 BATTERY COVER 8 9 10 11 Battery Installation 12 13 Before attempting to operate your Remote Control, install the 14 batteries as shown. IRTA IRTB 42 41... a fingernail, 16 lift the battery cover off. 17 2) Install two "AAA" batteries as described below. 15 1) Turn the Remote Control face down until the cover clicks. 21 The remote control will not control equipment from other manufacturers. -7-

Operation Manual
Page 8
... are detected with signals of 35 ERASE/WRITE Button*** While tuned to turn the VOD8521 off. 2. Remote Control Function Descriptions *Function control is available on the unit and the remote control. ** Not used . SKIP/SEARCH Button*** This button selects betweeen SKIP and SEARCH mode. When... the SKIP mode is disabled, the TV will change: DVD, AV1, AUX and TV***. 3. Channel Up ( ) Button Use this button...
... are detected with signals of 35 ERASE/WRITE Button*** While tuned to turn the VOD8521 off. 2. Remote Control Function Descriptions *Function control is available on the unit and the remote control. ** Not used . SKIP/SEARCH Button*** This button selects betweeen SKIP and SEARCH mode. When... the SKIP mode is disabled, the TV will change: DVD, AV1, AUX and TV***. 3. Channel Up ( ) Button Use this button...

Operation Manual
Page 9
MUTE Button Press this button to implement a selected setting or menu option. 9. ENTER Button Used to mute the audio. 7. LEFT ( ) Button Allows the user to the previously set level. 8. DVD Mode Select button Switches certain function keys on the remote control for DVD functions. -9- 128-7256A 9 of 35 Pressing the button again restores the sound to shift left in the menu options. 10. RETURN Button** 12. TV Mode Select Button*** Switches certain function keys on the remote control for TV functions. 13. MENU Button Allows the user to access the main menu. 11.
MUTE Button Press this button to implement a selected setting or menu option. 9. ENTER Button Used to mute the audio. 7. LEFT ( ) Button Allows the user to the previously set level. 8. DVD Mode Select button Switches certain function keys on the remote control for DVD functions. -9- 128-7256A 9 of 35 Pressing the button again restores the sound to shift left in the menu options. 10. RETURN Button** 12. TV Mode Select Button*** Switches certain function keys on the remote control for TV functions. 13. MENU Button Allows the user to access the main menu. 11.

Operation Manual
Page 12
..., POD audio or SAT Audio (Second IR input). 23. NOTE: The type & number of 35 VCP Mode Select button Switches certain function keys on the remote control for subtitles vary from SAT Audio or Car Audio. 28. Each time the button is loaded into the disc compartment. 25. CHANNEL SELECT Button.... SOURCE SELECT Button** With FM ON, used to disc. 26. NOTE: The number of angles vary from disc to select from disc to search in DVD.
..., POD audio or SAT Audio (Second IR input). 23. NOTE: The type & number of 35 VCP Mode Select button Switches certain function keys on the remote control for subtitles vary from SAT Audio or Car Audio. 28. Each time the button is loaded into the disc compartment. 25. CHANNEL SELECT Button.... SOURCE SELECT Button** With FM ON, used to disc. 26. NOTE: The number of angles vary from disc to select from disc to search in DVD.

Operation Manual
Page 15
Turning the VOD8521 On or Off 1. Pressing the power button on the unit or the remote control will allow the lights to optimize the picture quality. 4. Remember to turn the system on or off position will prevent the lights from turning ... could result in use . 2. The off alternately. Dome Light Switch -15- 128-7256A 15 of 35 Sliding the screen release lock forward will unlock the LCD screen and it will turn on position will drop down slightly. When in a discharged battery. Sliding the switch to the on and off and pivot...
Turning the VOD8521 On or Off 1. Pressing the power button on the unit or the remote control will allow the lights to optimize the picture quality. 4. Remember to turn the system on or off position will prevent the lights from turning ... could result in use . 2. The off alternately. Dome Light Switch -15- 128-7256A 15 of 35 Sliding the screen release lock forward will unlock the LCD screen and it will turn on position will drop down slightly. When in a discharged battery. Sliding the switch to the on and off and pivot...

Operation Manual
Page 16
...'s remote controls to the AV 1 input. In this case you must be adjusted using the controls on each headset. The volume can relay signals from the remote control... simply by pointing its respective component connected to its remote control at the remote sensor eye. See the documentation accompanying your Audiovox wireless headphones. -16- 128-7256A 16 of auxiliary...infrared transmissions, like visible light travel only in infrared transmitter for use the remote control supplied with Audiovox wireless headphones (Part Number MVIRHS). The infrared sensor can then be used but...
...'s remote controls to the AV 1 input. In this case you must be adjusted using the controls on each headset. The volume can relay signals from the remote control... simply by pointing its respective component connected to its remote control at the remote sensor eye. See the documentation accompanying your Audiovox wireless headphones. -16- 128-7256A 16 of auxiliary...infrared transmissions, like visible light travel only in infrared transmitter for use the remote control supplied with Audiovox wireless headphones (Part Number MVIRHS). The infrared sensor can then be used but...

Operation Manual
Page 17
...local radio station overpowering the wireless FM transmitter in static, distorted sound or signal bleed thru from the source connected to a Video cassette Player (VCP), video game system, or other audio / video devices. If wireless reception is accessed by tuning your overhead pod. AV1 ...Input The AV1 video input may not be used with its power button or remote control. This feature is unsatisfactory, an optional wired relay box (Audiovox P/N SIRSWB) can be satisfactory, resulting in your vehicle's radio to the selected frequency, (88.3, 88...
...local radio station overpowering the wireless FM transmitter in static, distorted sound or signal bleed thru from the source connected to a Video cassette Player (VCP), video game system, or other audio / video devices. If wireless reception is accessed by tuning your overhead pod. AV1 ...Input The AV1 video input may not be used with its power button or remote control. This feature is unsatisfactory, an optional wired relay box (Audiovox P/N SIRSWB) can be satisfactory, resulting in your vehicle's radio to the selected frequency, (88.3, 88...

Operation Manual
Page 20
... SETUP button again or Move the highlight to continue setting the items in the diagram to confirm the selection. 5. Press the SETUP button on the remote. In order to Go to the desired page, move the highlight using the or cursor button and press enter. 4. To change to another Setup page... can set a language for the on-screen display, limit playback for children, load default settings for the picture quality etc. For example, you customize your DVD player.
... SETUP button again or Move the highlight to continue setting the items in the diagram to confirm the selection. 5. Press the SETUP button on the remote. In order to Go to the desired page, move the highlight using the or cursor button and press enter. 4. To change to another Setup page... can set a language for the on-screen display, limit playback for children, load default settings for the picture quality etc. For example, you customize your DVD player.

Operation Manual
Page 26
... is playing • ALL - Press DISPLAY button Once Twice 3 times 4 times 5 times 6 times 7 times 8 times Information display on the remote control to display the status banner. repeat the entire disc Note : Repeat Off mode has no OSD display. -26- 128-7256A 26 of 35 ...Pressing the DISPLAY button consecutively changes the options as below. Pressing REPEAT consecutively changes the repeat options: • CHAPTER - Playing DVDs Press the DISPLAY button on the screen Current title, chapter and elasped time Current subtitle information Current audio language and audio channel ...
... is playing • ALL - Press DISPLAY button Once Twice 3 times 4 times 5 times 6 times 7 times 8 times Information display on the remote control to display the status banner. repeat the entire disc Note : Repeat Off mode has no OSD display. -26- 128-7256A 26 of 35 ...Pressing the DISPLAY button consecutively changes the options as below. Pressing REPEAT consecutively changes the repeat options: • CHAPTER - Playing DVDs Press the DISPLAY button on the screen Current title, chapter and elasped time Current subtitle information Current audio language and audio channel ...

Operation Manual
Page 27
... loops repeatedly until you want to skip to a specific track by pressing ZOOM. Selecting a Play Mode In CD playback, the play the songs on the remote consecutively changes the options of tracks and the elapsed time for the track playing. play the songs in random order • SHUFFLE -play mode options...
... loops repeatedly until you want to skip to a specific track by pressing ZOOM. Selecting a Play Mode In CD playback, the play the songs on the remote consecutively changes the options of tracks and the elapsed time for the track playing. play the songs in random order • SHUFFLE -play mode options...

Operation Manual
Page 28
... tracks using numbers buttons ( 0~9 ) on a disc in the desired order using the ZOOM button. -28- 128-7256A 28 of the programmed songs has finished, the DVD player stops and the program list is being played or change to the next page. 3. After creating the programmed list, move the hightlight to START, and... displayed on the screen as shown in diagram. Program Play You can highlight and press ENTER to go to another play the tracks on the remote as shown in diagram to start playback of the programmed songs. If you want to program more than 10 songs, you can play mode using...
... tracks using numbers buttons ( 0~9 ) on a disc in the desired order using the ZOOM button. -28- 128-7256A 28 of the programmed songs has finished, the DVD player stops and the program list is being played or change to the next page. 3. After creating the programmed list, move the hightlight to START, and... displayed on the screen as shown in diagram. Program Play You can highlight and press ENTER to go to another play the tracks on the remote as shown in diagram to start playback of the programmed songs. If you want to program more than 10 songs, you can play mode using...

Operation Manual
Page 29
... to the desired song and press ENTER to the disc. The DVD player plays the songs in the player, the navigation menu appears automatically. 1. Selecting Folders and Songs When an MP3 is loaded in the order they were burned on the remote to display the current play mode and to display the songs in... MP3 format can be played on your DVD player. Press or to move the highlight to the desired folder and press ENTER to change...
... to the desired song and press ENTER to the disc. The DVD player plays the songs in the player, the navigation menu appears automatically. 1. Selecting Folders and Songs When an MP3 is loaded in the order they were burned on the remote to display the current play mode and to display the songs in... MP3 format can be played on your DVD player. Press or to move the highlight to the desired folder and press ENTER to change...
Operation Manual
Page 30
Press REPEAT consecutively to choose the desired play on the remote control to move to the previous song. Repeat the song that is playing. -30- 128-7256A 30 of 35 Selecting a Play Mode You can choose ...
Press REPEAT consecutively to choose the desired play on the remote control to move to the previous song. Repeat the song that is playing. -30- 128-7256A 30 of 35 Selecting a Play Mode You can choose ...

Operation Manual
Page 31
... sure all cables are securely inserted into disc tray. Troubleshooting PROBLEM Poor in the remote are coded by region. This DVD player is dirty. No sound or distorted sound • Make sure your DVD player is ON and the proper Frequency has been selected. If the regional codes don't... modulator has been installed, verify that it . • Condensation has formed. This DVD player only plays DVD's, audio CDs and MP3s. • Both the unit and the disc are fresh. • Verify that the remote sensor eye is not obstructed. • Verify that the infrared transmitter is affixed over...
... sure all cables are securely inserted into disc tray. Troubleshooting PROBLEM Poor in the remote are coded by region. This DVD player is dirty. No sound or distorted sound • Make sure your DVD player is ON and the proper Frequency has been selected. If the regional codes don't... modulator has been installed, verify that it . • Condensation has formed. This DVD player only plays DVD's, audio CDs and MP3s. • Both the unit and the disc are fresh. • Verify that the remote sensor eye is not obstructed. • Verify that the infrared transmitter is affixed over...

Operation Manual
Page 33
Replacement Parts Remote Control 1363855 Specifications LCD Backlighting Edge Light Tube Resolution 1440 x 234 Pixels 336,960 Operation Temperature 32 -140º F (0 - 60º C) Storage Temperature -4 - 176º F (-20 - 80º C) Backlight life 15,000 Hours Video Display System NTSC/PAL Headphone Audio Output 0.03W @ 32 ohms Video Output 1.0Vp-p @ 75 ohms Power Source 12V DC Dimensions W X H X L 10.75" X 1.5" X 14.75" (273) X (38.1) X (374.6) -33- 128-7256A 33 of 35
Replacement Parts Remote Control 1363855 Specifications LCD Backlighting Edge Light Tube Resolution 1440 x 234 Pixels 336,960 Operation Temperature 32 -140º F (0 - 60º C) Storage Temperature -4 - 176º F (-20 - 80º C) Backlight life 15,000 Hours Video Display System NTSC/PAL Headphone Audio Output 0.03W @ 32 ohms Video Output 1.0Vp-p @ 75 ohms Power Source 12V DC Dimensions W X H X L 10.75" X 1.5" X 14.75" (273) X (38.1) X (374.6) -33- 128-7256A 33 of 35

