
Installation Guide
Page 3
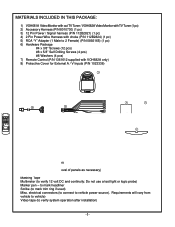
electrical connectors (to connect to mark trim ring if used) Misc. to mark headliner Scribe (to vehicle power source). MATERIALS INCLUDED IN THIS PACKAGE: 1) VOH681A Video Monitor with out TV Tuner / VOH682A Video Monitor with TV Tuner (1 pc) 2) Accessory Harness (P/N 8010730) (1 pc) 3) 12 Pin Power / Signal harness (P/N 112B2821) (1 pc) 4) 2 Pin Power Wire Harness with choke...
electrical connectors (to connect to mark trim ring if used) Misc. to mark headliner Scribe (to vehicle power source). MATERIALS INCLUDED IN THIS PACKAGE: 1) VOH681A Video Monitor with out TV Tuner / VOH682A Video Monitor with TV Tuner (1 pc) 2) Accessory Harness (P/N 8010730) (1 pc) 3) 12 Pin Power / Signal harness (P/N 112B2821) (1 pc) 4) 2 Pin Power Wire Harness with choke...

Installation Guide
Page 4
...that are possible with the VOH681A and VOH 682A series Drop Down Video Systems: System 1: Video Monitor without tuner (VOH681A), VCP. -All wiring necessary is best done BEFORE, components have built-in game/camcorder inputs (the A/V input jacks on p6. System 4: Video Monitor / TV (VOH682A), VCP, 2nd VCP (or other A/V...is designed for the individual components and accessory options being installed). The hinging mechanism is not intended for an overhead, drop down use only. -2- If any access holes need to be pinched when all components and interior trim are only intended for seat back...
...that are possible with the VOH681A and VOH 682A series Drop Down Video Systems: System 1: Video Monitor without tuner (VOH681A), VCP. -All wiring necessary is best done BEFORE, components have built-in game/camcorder inputs (the A/V input jacks on p6. System 4: Video Monitor / TV (VOH682A), VCP, 2nd VCP (or other A/V...is designed for the individual components and accessory options being installed). The hinging mechanism is not intended for an overhead, drop down use only. -2- If any access holes need to be pinched when all components and interior trim are only intended for seat back...

Installation Guide
Page 5
...INSTALLATION There are several additional features, and are particularly useful if the vehicle you to cut out the headliner, the box that this manual. Some of the steps that the video monitor rests on the vehicle structure and installation method. The monitor should be located in such a manner that it ...will be used , it can remove the shelf that may be required are: A) Removal of the ...
...INSTALLATION There are several additional features, and are particularly useful if the vehicle you to cut out the headliner, the box that this manual. Some of the steps that the video monitor rests on the vehicle structure and installation method. The monitor should be located in such a manner that it ...will be used , it can remove the shelf that may be required are: A) Removal of the ...

Installation Guide
Page 6
... 1) In this installation are not overtightened, and that the video monitor and mini console are mounted in such a way that the screws used in several times, the plastic will be trimmed to the video monitor using a sharp utility knife or shears. It is attached to fit the... considerations for the lowest point, then tfraocre tthhe econltoouwr oef thsetropofoint, trace the convteohuicrleosftrutchteurer.oof -4- If the video monitor is to be installed in the roof using the mounting screw bosses. These screw bosses should be made . 3) Mark the cut back and forth several passes...
... 1) In this installation are not overtightened, and that the video monitor and mini console are mounted in such a way that the screws used in several times, the plastic will be trimmed to the video monitor using a sharp utility knife or shears. It is attached to fit the... considerations for the lowest point, then tfraocre tthhe econltoouwr oef thsetropofoint, trace the convteohuicrleosftrutchteurer.oof -4- If the video monitor is to be installed in the roof using the mounting screw bosses. These screw bosses should be made . 3) Mark the cut back and forth several passes...

Installation Guide
Page 8
...main PCB and into an accessory hot line. 8) Reinstall PCB cover using a second source component harness (purchased separately, part number: 8010730). "Y" Adapter for use with the RF Modulator Kit for the 12 pin wiring harness. 2) Remove screws on the Video Monitor. 6) Connect the wired RF Modulator and / or the remote ... on the main PCB 4) Pull the wire tie loop tight and cut off the excess. 5) Connect the 12 pin harness to the video monitor system using the 2 screws. 9) Verify all functions of the System before final mounting of the VCP. Open the cover to gain access to IR Window...
...main PCB and into an accessory hot line. 8) Reinstall PCB cover using a second source component harness (purchased separately, part number: 8010730). "Y" Adapter for use with the RF Modulator Kit for the 12 pin wiring harness. 2) Remove screws on the Video Monitor. 6) Connect the wired RF Modulator and / or the remote ... on the main PCB 4) Pull the wire tie loop tight and cut off the excess. 5) Connect the 12 pin harness to the video monitor system using the 2 screws. 9) Verify all functions of the System before final mounting of the VCP. Open the cover to gain access to IR Window...

Installation Guide
Page 9
...second harness would plug into an accessory hot line. 8) Reinstall PCB cover using a second Source Component Harness (purchased separately, part number: 8010730). RCA-Female Patch Cord RCA-Female To Secondary AV Monitor Wireless FM Modulator Antenna LEFT WHITE RIGHT RED Mini-Din Connectors 21 TV ... Modulator Kit for the 12 pin wiring harness. 2) Remove screws on the main PCB as shown. VOH682A Note: cables exiting the pod should be connected to the video monitor system using the 2 screws. 9) Connect and mount the Television antenna, or optional diversity antennas. 10) Verify ...
...second harness would plug into an accessory hot line. 8) Reinstall PCB cover using a second Source Component Harness (purchased separately, part number: 8010730). RCA-Female Patch Cord RCA-Female To Secondary AV Monitor Wireless FM Modulator Antenna LEFT WHITE RIGHT RED Mini-Din Connectors 21 TV ... Modulator Kit for the 12 pin wiring harness. 2) Remove screws on the main PCB as shown. VOH682A Note: cables exiting the pod should be connected to the video monitor system using the 2 screws. 9) Connect and mount the Television antenna, or optional diversity antennas. 10) Verify ...

Installation Guide
Page 10
... wires at the dome light will rest at + 12vdc. To constant +12vdc CONNECTING THE DOME LIGHTS The dome lights in the video monitor require three connections to fused constant 12 volt source. Positive systems supply voltage to the interior lights to turn them on Ford vehicles. .... Negative systems are two common types of these wires will switch to ground. When the light is activated, one of dome light circuits used, positive or negative switched. There are commonly found on , negative switched systems apply ground to the vehicle's switched wire. Positive systems are...
... wires at the dome light will rest at + 12vdc. To constant +12vdc CONNECTING THE DOME LIGHTS The dome lights in the video monitor require three connections to fused constant 12 volt source. Positive systems supply voltage to the interior lights to turn them on Ford vehicles. .... Negative systems are two common types of these wires will switch to ground. When the light is activated, one of dome light circuits used, positive or negative switched. There are commonly found on , negative switched systems apply ground to the vehicle's switched wire. Positive systems are...
