
User Guide
Page 2
... trademarks are sold separately. Only available in XM® Satellite Radio. Required subscription for purchasing the Audiovox Xpress XM® Satellite Receiver. All fees and programming subject to availability. All other fees and taxes may apply, including a one step closer to over 20 dedicated channels of their respective owners. -2- All rights reserved. You are one -time activation fee. XM® Satellite Radio will revolutionize your specific installation needs.
... trademarks are sold separately. Only available in XM® Satellite Radio. Required subscription for purchasing the Audiovox Xpress XM® Satellite Receiver. All fees and programming subject to availability. All other fees and taxes may apply, including a one step closer to over 20 dedicated channels of their respective owners. -2- All rights reserved. You are one -time activation fee. XM® Satellite Radio will revolutionize your specific installation needs.

User Guide
Page 3
Cautions and Warnings • This device complies with Part 15 of the FCC Rules. Operation is subject to the following two conditions: (1) this device may not cause harmful interference, and (2) this device must accept any interference received, including interference that may cause undesired operation. • The owner or operator shall not make any changes to the unit, antenna, or accessories, as this will void...
Cautions and Warnings • This device complies with Part 15 of the FCC Rules. Operation is subject to the following two conditions: (1) this device may not cause harmful interference, and (2) this device must accept any interference received, including interference that may cause undesired operation. • The owner or operator shall not make any changes to the unit, antenna, or accessories, as this will void...
User Guide
Page 4
... 7 GETTING STARTED 8 XM Activation 8 Controls 10 Receiver Control Features 10 BASIC OPERATION 12 Turning Xpress ON and OFF 12 Menu Options 13 FM Frequency 14 FM ON or OFF Feature 14 Brightness + Contrast 15 Audio Level 15 Antenna Aiming (Home Installation 16 Direct Tune 17 Search Mode 17 Channel Skip/Add 18 Memory Recall 18 Tune Select 19 Tune Select Erase All 19 Tune Select Erase Some 19 Select By-Song 20 Select By Artist 20...
... 7 GETTING STARTED 8 XM Activation 8 Controls 10 Receiver Control Features 10 BASIC OPERATION 12 Turning Xpress ON and OFF 12 Menu Options 13 FM Frequency 14 FM ON or OFF Feature 14 Brightness + Contrast 15 Audio Level 15 Antenna Aiming (Home Installation 16 Direct Tune 17 Search Mode 17 Channel Skip/Add 18 Memory Recall 18 Tune Select 19 Tune Select Erase All 19 Tune Select Erase Some 19 Select By-Song 20 Select By Artist 20...
User Guide
Page 5
Main Menu Screen 13 Figure 7. Audio Level Screen 16 Figure 11. Skip/Add Channel Screen 18 Figure 15. Select by Artist ConfirmationScreen 20 Figure 21. Erase Stock Screen 22 Figure 24. Erase Some Stock Screen 23 Figure 26. Set Clock Screen Setting Time Zone 26 Figure 31. Memory Selection Screens 31 Figure 41. Direct Channel Entry Screen 32 Figure 42. Xpress Receiver Remote Control 34 -5- Xpress Receiver Unit Display Screen 11 Figure 4. Active Channel Screen 12 Figure 6. Tune Select Screen 19 Figure 17. Background Setting Screen 25...
Main Menu Screen 13 Figure 7. Audio Level Screen 16 Figure 11. Skip/Add Channel Screen 18 Figure 15. Select by Artist ConfirmationScreen 20 Figure 21. Erase Stock Screen 22 Figure 24. Erase Some Stock Screen 23 Figure 26. Set Clock Screen Setting Time Zone 26 Figure 31. Memory Selection Screens 31 Figure 41. Direct Channel Entry Screen 32 Figure 42. Xpress Receiver Remote Control 34 -5- Xpress Receiver Unit Display Screen 11 Figure 4. Active Channel Screen 12 Figure 6. Tune Select Screen 19 Figure 17. Background Setting Screen 25...
User Guide
Page 7
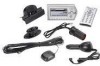
... Kit: Part Number XMC-10 o Audiovox FM Direct Adaptor: Part Number XMFM-1 o Audiovox RCA Cables: Part Number SAT RCA NOTE: When installed in an accessible location of the vehicle (dash area), consistent with line-of-sight operation of the remote control, and/or within easy reach of the driver. The Xpress XM7 unit recognizes and decodes the incoming XM program information and provides an audio signal to your radio or other audio output equipment.
... Kit: Part Number XMC-10 o Audiovox FM Direct Adaptor: Part Number XMFM-1 o Audiovox RCA Cables: Part Number SAT RCA NOTE: When installed in an accessible location of the vehicle (dash area), consistent with line-of-sight operation of the remote control, and/or within easy reach of the driver. The Xpress XM7 unit recognizes and decodes the incoming XM program information and provides an audio signal to your radio or other audio output equipment.
User Guide
Page 8
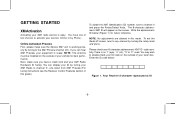
... is working properly by Phone. There is easy. GETTING STARTED XM Activation Activating your XM7 radio service is no "I" (eye), "o" (oh), "S" or "F" used. Enter the ID code below (Figure 1) for best performance. NOTE: The antenna must be installed on the screen. Write the alphanumeric ID below : Figure 1. To exit the Radio ID screen, tune to any channel by tuning your XM7 Radio to channel 0 and press the Rotary/Select Knob...
... is working properly by Phone. There is easy. GETTING STARTED XM Activation Activating your XM7 radio service is no "I" (eye), "o" (oh), "S" or "F" used. Enter the ID code below (Figure 1) for best performance. NOTE: The antenna must be installed on the screen. Write the alphanumeric ID below : Figure 1. To exit the Radio ID screen, tune to any channel by tuning your XM7 Radio to channel 0 and press the Rotary/Select Knob...

User Guide
Page 9
... able to activate your receiver ON for at 1-800-XM RADIO (1-800-967-2346). LCD DISPLAY DISPLAY BUTTON PRESET KEYPAD (NUMBER) BUTTON SEARCH BUTTON MENU BUTTON ROTARY / SELECT KNOB POWER / IR EYE BUTTON MEMORY BUTTON PRESET/DIRECT JUMP BUTTON BUTTON Figure 2. Xpress Receiver Unit -9- When the Xpress XM7 unit is activated, you should keep your Xpress XM7 unit. Online Activation Process Once the ID code is obtained, log on to XM7 at http://activate.xmradio.com and follow the easy instructions to...
... able to activate your receiver ON for at 1-800-XM RADIO (1-800-967-2346). LCD DISPLAY DISPLAY BUTTON PRESET KEYPAD (NUMBER) BUTTON SEARCH BUTTON MENU BUTTON ROTARY / SELECT KNOB POWER / IR EYE BUTTON MEMORY BUTTON PRESET/DIRECT JUMP BUTTON BUTTON Figure 2. Xpress Receiver Unit -9- When the Xpress XM7 unit is activated, you should keep your Xpress XM7 unit. Online Activation Process Once the ID code is obtained, log on to XM7 at http://activate.xmradio.com and follow the easy instructions to...

User Guide
Page 10
... channels within a Preset group stopping at a time. Memory Button (mem.) - Controls Receiver Control Features Display Button - This button allows the user to enter. The Rotary/Select Knob is turned in a clockwise (CW) direction the unit tunes up to 20 Artist/Song Title combinations. -10- This button is highlighted, press the Rotary/Select Knob to make a selection. When the knob is used to access "Menu Options" which allows the user to enter the selection. The MENU button is turned...
... channels within a Preset group stopping at a time. Memory Button (mem.) - Controls Receiver Control Features Display Button - This button allows the user to enter. The Rotary/Select Knob is turned in a clockwise (CW) direction the unit tunes up to 20 Artist/Song Title combinations. -10- This button is highlighted, press the Rotary/Select Knob to make a selection. When the knob is used to access "Menu Options" which allows the user to enter the selection. The MENU button is turned...

User Guide
Page 12
... alternately display the preview channel screen and a number of the XM7 logo gradually appear) (see Figure 4) followed by the active channel (see Figure 5), which defaults to the last tuned channel setting prior to power being turned OFF. Active Channel Screen Figure 5. BASIC OPERATION With the Xpress XM7 unit properly installed, activated and connected to your Audiovox Xpress XM7 unit using the Rotary/Select Knob on the Xpress XM7 unit or the CH Up/Down buttons...
... alternately display the preview channel screen and a number of the XM7 logo gradually appear) (see Figure 4) followed by the active channel (see Figure 5), which defaults to the last tuned channel setting prior to power being turned OFF. Active Channel Screen Figure 5. BASIC OPERATION With the Xpress XM7 unit properly installed, activated and connected to your Audiovox Xpress XM7 unit using the Rotary/Select Knob on the Xpress XM7 unit or the CH Up/Down buttons...

User Guide
Page 13
... Extras • Audio Level • Display Screen Mode • Antenna Aiming • Set Clock • Direct Tune • Auto-On • Search Mode • Auto-Off / Sleep Timer • Channel Skip/Add • Set Factory Defaults • Memory Recall • -Exit Menu- • TuneSelect7 Figure 6. Using the Rotary/Select Knob, highlight the option you wish to adjust turning (CW) scrolls DOWN and (CCW) will exit the Xpress XM7 unit to the active screen (See Figure...
... Extras • Audio Level • Display Screen Mode • Antenna Aiming • Set Clock • Direct Tune • Auto-On • Search Mode • Auto-Off / Sleep Timer • Channel Skip/Add • Set Factory Defaults • Memory Recall • -Exit Menu- • TuneSelect7 Figure 6. Using the Rotary/Select Knob, highlight the option you wish to adjust turning (CW) scrolls DOWN and (CCW) will exit the Xpress XM7 unit to the active screen (See Figure...
User Guide
Page 14
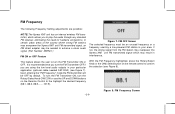
... buttons on the remote control to play the audio through any standard FM receiver, eliminating the need for hardwire connections. Figure 8. Upon entering the "FM Frequency" mode the FM transmitter will be needed SAT-RCA) (see Figure 8). -14- FM Frequency Screen To turn the FM Transmitter ON, turn the FM Transmitter OFF if you to confirm the selection (see Figure 7). FM Frequency The following Frequency Setting adjustments are using the low level audio outputs...
... buttons on the remote control to play the audio through any standard FM receiver, eliminating the need for hardwire connections. Figure 8. Upon entering the "FM Frequency" mode the FM transmitter will be needed SAT-RCA) (see Figure 8). -14- FM Frequency Screen To turn the FM Transmitter ON, turn the FM Transmitter OFF if you to confirm the selection (see Figure 7). FM Frequency The following Frequency Setting adjustments are using the low level audio outputs...
User Guide
Page 15
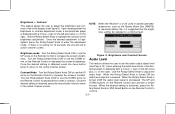
... maximize battery life, it is achieved, press the Rotary/Select Knob or (XM) Select Button on the Remote Control also provide a similar function. Turn the Rotary/Select Knob CCW or use the UP arrow on the right. plus (+) on the Remote Control to decrease the screen's brightness. The UP and DOWN buttons on the Remote Control to set the audio output signal level (see Figure 9). Figure 9. Audio Level This feature allows the user to...
... maximize battery life, it is achieved, press the Rotary/Select Knob or (XM) Select Button on the Remote Control also provide a similar function. Turn the Rotary/Select Knob CCW or use the UP arrow on the right. plus (+) on the Remote Control to decrease the screen's brightness. The UP and DOWN buttons on the Remote Control to set the audio output signal level (see Figure 9). Figure 9. Audio Level This feature allows the user to...

User Guide
Page 16
... the Menu Button is selected, this screen and to return to exit this screen does not time-out like the other menu screens. NOTE: To prevent distortion caused by overdriving the audio playback device input, it is achieved, press the Menu button on the unit or the Menu on the right. Screen displayed when the FM Frequency is displayed with a minus (-) sign on the left and a plus (+) on the Remote Control...
... the Menu Button is selected, this screen and to return to exit this screen does not time-out like the other menu screens. NOTE: To prevent distortion caused by overdriving the audio playback device input, it is achieved, press the Menu button on the unit or the Menu on the right. Screen displayed when the FM Frequency is displayed with a minus (-) sign on the left and a plus (+) on the Remote Control...
User Guide
Page 17
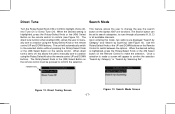
... set to off, this mode, two options are displayed "Search by Category" and "Search by Scanning Set". Figure 12. Direct Tuning Screen -17- Upon entering this allows the user to manually tune to a station using the Rotary/Select Knob or the remote control UP and DOWN buttons. When direct tune is highlighted, press the Rotary/Select Knob or the (XM) Select Button on the Remote Control to scan through all presets (A, B, C) or all available channels. Once a selection...
... set to off, this mode, two options are displayed "Search by Category" and "Search by Scanning Set". Figure 12. Direct Tuning Screen -17- Upon entering this allows the user to manually tune to a station using the Rotary/Select Knob or the remote control UP and DOWN buttons. When direct tune is highlighted, press the Rotary/Select Knob or the (XM) Select Button on the Remote Control to scan through all presets (A, B, C) or all available channels. Once a selection...

User Guide
Page 19
... is active forces the unit to jump to confirm the selection. An alert will also appear on the XM7 broadcast, the user will replace the oldest entry in memory. Tune Select Erase Some Screen Press the Rotary/Select Knob or the (XM) Select Button on the remote control while this screen is detected on the screen for removal from the Tune Select list go to menu options then use the Rotary/Select Knob...
... is active forces the unit to jump to confirm the selection. An alert will also appear on the XM7 broadcast, the user will replace the oldest entry in memory. Tune Select Erase Some Screen Press the Rotary/Select Knob or the (XM) Select Button on the remote control while this screen is detected on the screen for removal from the Tune Select list go to menu options then use the Rotary/Select Knob...

User Guide
Page 26
... the Remote's (XM) Select button to the Time Zone in which the user resides (see Figure 31). Figure 31. Use the Rotary/Select Knob or the remote control UP and DOWN buttons to the following paragraphs for additional instructions. This feature is displayed according to personalize the clock display. Figure 30. Set Clock Screen Setting Time Zone -26- Time Zone Set Screen Acceptance is confirmed by an audio beep and confirmation screen. Use the Rotary/Select Knob...
... the Remote's (XM) Select button to the Time Zone in which the user resides (see Figure 31). Figure 31. Use the Rotary/Select Knob or the remote control UP and DOWN buttons to the following paragraphs for additional instructions. This feature is displayed according to personalize the clock display. Figure 30. Set Clock Screen Setting Time Zone -26- Time Zone Set Screen Acceptance is confirmed by an audio beep and confirmation screen. Use the Rotary/Select Knob...
User Guide
Page 28
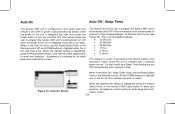
... time setting is confirmed by an audio beep and confirmation screen. This feature allows the user to program the Xpress XM7 unit to select. Acceptance is highlighted, press the Rotary/ Select Knob, or the remote's (XM) select button to enter your selection. When in the Auto-On menu use the Rotary/Select Knob or the Remote Control UP and DOWN buttons to highlight one of time. Figure 34. By default, when the power...
... time setting is confirmed by an audio beep and confirmation screen. This feature allows the user to program the Xpress XM7 unit to select. Acceptance is highlighted, press the Rotary/ Select Knob, or the remote's (XM) select button to enter your selection. When in the Auto-On menu use the Rotary/Select Knob or the Remote Control UP and DOWN buttons to highlight one of time. Figure 34. By default, when the power...

User Guide
Page 35
Select Button (XM) - Jump Button (jump) - Memory Button (mem) - This feature is used to access "Main Menu" options which allows the user to make feature function adjustments and set personal preferences. These buttons are used to directly enter the desired channel number. -35- When in any of the three preset banks, momentarily pressing any of four (4) different formats presenting the Artist, Song Title and data service information on the LCD screen. You...
Select Button (XM) - Jump Button (jump) - Memory Button (mem) - This feature is used to access "Main Menu" options which allows the user to make feature function adjustments and set personal preferences. These buttons are used to directly enter the desired channel number. -35- When in any of the three preset banks, momentarily pressing any of four (4) different formats presenting the Artist, Song Title and data service information on the LCD screen. You...

User Guide
Page 38
CAUTION: Use only the Audiovox approved adapter specified in the kit for the Xpress XM7 Satellite Radio Receiver, or the unit could be severely damaged. 1 RF SMB Connector H X W X D 2.44 Inches X 4.44 Inches X 1.22 Inches (62.0mm) X (112.7mm) X (31.0mm) -38- SPECIFICATIONS Audio Output AUX (Audio) Input Power Supply: Antenna Dimensions 3.5mm Diameter Min-Stereo Jack 3.5mm Diameter Min-Stereo Jack 5 Volt, 2 Amp Maximum, Negative Ground, DC Input.
CAUTION: Use only the Audiovox approved adapter specified in the kit for the Xpress XM7 Satellite Radio Receiver, or the unit could be severely damaged. 1 RF SMB Connector H X W X D 2.44 Inches X 4.44 Inches X 1.22 Inches (62.0mm) X (112.7mm) X (31.0mm) -38- SPECIFICATIONS Audio Output AUX (Audio) Input Power Supply: Antenna Dimensions 3.5mm Diameter Min-Stereo Jack 3.5mm Diameter Min-Stereo Jack 5 Volt, 2 Amp Maximum, Negative Ground, DC Input.
User Guide
Page 39
..., damage to speakers, accessories, or vehicle and home electrical systems, malfunction of satellite transmissions, repeater signal or receiver unit. 12 MONTH LIMITED WARRANTY AUDIOVOX ELECTRONICS CORPORATION (the Company) warrants to the original retail purchaser of this product that should this product. This Warranty is to be delivered with proof of the factory serial number/bar code label(s). ANY...
..., damage to speakers, accessories, or vehicle and home electrical systems, malfunction of satellite transmissions, repeater signal or receiver unit. 12 MONTH LIMITED WARRANTY AUDIOVOX ELECTRONICS CORPORATION (the Company) warrants to the original retail purchaser of this product that should this product. This Warranty is to be delivered with proof of the factory serial number/bar code label(s). ANY...


