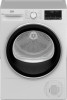
Owners Manual
Page 3
......9 1.7 Maintenance and cleaning safety 11 1.8 Lighting safety 11 1.9 Steam program safety 12 2 Environmental instructions 13 2.1 Compliance with the WEEE Regulations and Waste Disposal 13 2.2 Packaging information 13 2.3 Standard conformity and test information / EU declaration of conformity..........13 3 Your drying machine 14 3.1 Technical specifications 14 3.2 General appearance 15 3.3 Scope of delivery 15 4 Installation 16 4.1 Right place for installation 16 4.2 Removing the shipping safety group 16 4.3 Water connection...
......9 1.7 Maintenance and cleaning safety 11 1.8 Lighting safety 11 1.9 Steam program safety 12 2 Environmental instructions 13 2.1 Compliance with the WEEE Regulations and Waste Disposal 13 2.2 Packaging information 13 2.3 Standard conformity and test information / EU declaration of conformity..........13 3 Your drying machine 14 3.1 Technical specifications 14 3.2 General appearance 15 3.3 Scope of delivery 15 4 Installation 16 4.1 Right place for installation 16 4.2 Removing the shipping safety group 16 4.3 Water connection...

Owners Manual
Page 4
... 6.7 Starting the program 24 6.8 Child Lock...24 6.9 Changing the program after it is started 24 6.10 Cancelling the program 25 6.11 End of program 25 6.12 Odour feature 25 7 Maintenance and cleaning 26 7.1 Lint Filter / Loading Door Inner Surface 26 7.2 Cleaning the sensors 26 7.3 Draining the water tank 27 7.4 For the condenser 27 8 Troubleshooting 28 9. Electrical Connection 30 9.1 Attention!...30 9.2 Electrical requirements 30 9.3 Fitting a different plug 30 4 Dryer / User manual 6 Running the product 20 6.1 Control Panel...
... 6.7 Starting the program 24 6.8 Child Lock...24 6.9 Changing the program after it is started 24 6.10 Cancelling the program 25 6.11 End of program 25 6.12 Odour feature 25 7 Maintenance and cleaning 26 7.1 Lint Filter / Loading Door Inner Surface 26 7.2 Cleaning the sensors 26 7.3 Draining the water tank 27 7.4 For the condenser 27 8 Troubleshooting 28 9. Electrical Connection 30 9.1 Attention!...30 9.2 Electrical requirements 30 9.3 Fitting a different plug 30 4 Dryer / User manual 6 Running the product 20 6.1 Control Panel...
Owners Manual
Page 5
... not be used by Authorized Service. • Use original spare parts and accessories only. • Do not repair or replace any component of the product unless it is clearly specified in the operation manual. • Do not modify the product. 1.1 Intended use • Product is a possibility and/ or vulnerable to external elements. 1 Safety Instructions This section includes the safety instructions necessary to...
... not be used by Authorized Service. • Use original spare parts and accessories only. • Do not repair or replace any component of the product unless it is clearly specified in the operation manual. • Do not modify the product. 1.1 Intended use • Product is a possibility and/ or vulnerable to external elements. 1 Safety Instructions This section includes the safety instructions necessary to...
Owners Manual
Page 6
.... • Cleaning and user maintenance operations must not be plugged in contact with any heat source. • Do not use an extension cord, multi-plug or adaptor to a circuit that may occur. • Do not tuck the power cord under the product or to the rear of the product, cut the power cord and destroy the loading door. 1.3 Electrical Safety • The product must not be connected to operate your...
.... • Cleaning and user maintenance operations must not be plugged in contact with any heat source. • Do not use an extension cord, multi-plug or adaptor to a circuit that may occur. • Do not tuck the power cord under the product or to the rear of the product, cut the power cord and destroy the loading door. 1.3 Electrical Safety • The product must not be connected to operate your...
Owners Manual
Page 7
... it is in operation. • The product shall not be installed against a door, sliding door where the product loading door cannot be completely opened, or behind a hinged door where the product hinge is damaged. • Do not remove the adjustable stand. • Place the product on the product before installing it is proper by checking the information in the user manual. 1.4 Transporting safety...
... it is in operation. • The product shall not be installed against a door, sliding door where the product loading door cannot be completely opened, or behind a hinged door where the product hinge is damaged. • Do not remove the adjustable stand. • Place the product on the product before installing it is proper by checking the information in the user manual. 1.4 Transporting safety...
Owners Manual
Page 8
... of water contact. • The new hose sets supplied with the product shall be used to exhaust the smoke of load. • Washing machine cannot be around 180 kg. • Install the product where periodic maintenance and cleaning can carry adequate amount of devices that consume gas or other fuels (for models with flue). • The ventilation hose shall not be connected to a heating...
... of water contact. • The new hose sets supplied with the product shall be used to exhaust the smoke of load. • Washing machine cannot be around 180 kg. • Install the product where periodic maintenance and cleaning can carry adequate amount of devices that consume gas or other fuels (for models with flue). • The ventilation hose shall not be connected to a heating...
Owners Manual
Page 9
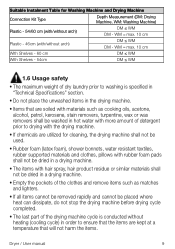
... not stop the drying machine before drying cycle completed. • The last part of the drying machine cycle is conducted without arch) DM ≤ WM DM - WM = max. 10 cm Plastic - 46cm (with /without heating (cooling cycle) in order to drying with the drying machine. • If chemicals are utilized for Washing Machine and Drying Machine Connection Kit Type Depth Measurement (DM: Drying Machine, WM: Washing...
... not stop the drying machine before drying cycle completed. • The last part of the drying machine cycle is conducted without arch) DM ≤ WM DM - WM = max. 10 cm Plastic - 46cm (with /without heating (cooling cycle) in order to drying with the drying machine. • If chemicals are utilized for Washing Machine and Drying Machine Connection Kit Type Depth Measurement (DM: Drying Machine, WM: Washing...
Owners Manual
Page 10
... around the drying machine. • To prevent back draft of the drum while adding or removing clothes during operation. Do not keep flammable/explosive materials. • Do not touch the drum as gas heater and a chimney. The drum surface is open fire, appropriate ventilation shall be hot during a continuing program. Unplug the product (or shut down the connected fuse) and call the authorized service. •...
... around the drying machine. • To prevent back draft of the drum while adding or removing clothes during operation. Do not keep flammable/explosive materials. • Do not touch the drum as gas heater and a chimney. The drum surface is open fire, appropriate ventilation shall be hot during a continuing program. Unplug the product (or shut down the connected fuse) and call the authorized service. •...

Owners Manual
Page 11
After each drying cycle, clean the fibre filter and the inner surface of the loading door. • Clean the fibre accumulation on it. Dryer / User manual 11 Do not use a pressure cleaner, steam cleaner, hose or pressurised gun to clean the product. • Do not use sharp or abrasive tools to clean the product. • The fibre filter shall be regularly cleaned. You can clean by spraying or pouring water on...
After each drying cycle, clean the fibre filter and the inner surface of the loading door. • Clean the fibre accumulation on it. Dryer / User manual 11 Do not use a pressure cleaner, steam cleaner, hose or pressurised gun to clean the product. • Do not use sharp or abrasive tools to clean the product. • The fibre filter shall be regularly cleaned. You can clean by spraying or pouring water on...
Owners Manual
Page 16
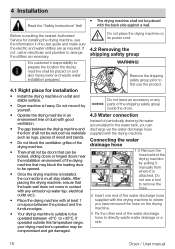
If operated outside this temperature range, your drying machine's operation may block the loading door to be doors that the back wall does not come in the user guide and make sure the electric and water utilities are as necessary. Do not leave an accessory or any extrusion (a water tap, electrical outlet etc.). • Place the drying machine with the back side against a wall. Do not use the product...
If operated outside this temperature range, your drying machine's operation may block the loading door to be doors that the back wall does not come in the user guide and make sure the electric and water utilities are as necessary. Do not leave an accessory or any extrusion (a water tap, electrical outlet etc.). • Place the drying machine with the back side against a wall. Do not use the product...
Owners Manual
Page 17
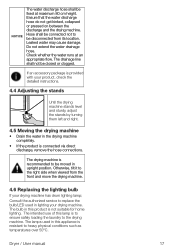
... drum lighting lamp; Otherwise, tilt it to heavy physical conditions such as temperatures over 50°C. The drying machine is recommended to the drying machine. The bulb in this product is connected via direct discharge, remove the hose connections. The intended use of this appliance is resistant to the right side when viewed from its location. NOTICE The water discharge hose shall be fixed at an appropriate flow. Leaked water...
... drum lighting lamp; Otherwise, tilt it to heavy physical conditions such as temperatures over 50°C. The drying machine is recommended to the drying machine. The bulb in this product is connected via direct discharge, remove the hose connections. The intended use of this appliance is resistant to the right side when viewed from its location. NOTICE The water discharge hose shall be fixed at an appropriate flow. Leaked water...
Owners Manual
Page 18
..., metal parts, needles, nails, screws, stones etc. may damage the drum group of laundry together. Therefore you are required to open the loading door, do not open for details. • For models with flue, follow the flue connection rules specified in the guides and clean the flue. • During drying session, properly ventilate the environment in which the drying machine is dirty. 18 Dryer / User manual
..., metal parts, needles, nails, screws, stones etc. may damage the drum group of laundry together. Therefore you are required to open the loading door, do not open for details. • For models with flue, follow the flue connection rules specified in the guides and clean the flue. • During drying session, properly ventilate the environment in which the drying machine is dirty. 18 Dryer / User manual
Owners Manual
Page 23
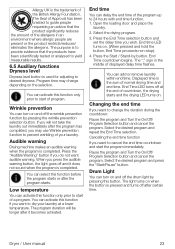
... "Start/Pause" button. Dryer / User manual 23 Open the loading door and place the laundry. 2. Press the End Time selection button and set the delay time you do not want to start of the program up to change depending on . (When pressed and hold the button, End Time proceeds non-stop). 4. Drum Light You can turn on and off the drum light by button. Allergy UK is the trademark of displayed delay time flashes. Wrinkle...
... "Start/Pause" button. Dryer / User manual 23 Open the loading door and place the laundry. 2. Press the End Time selection button and set the delay time you do not want to start of the program up to change depending on . (When pressed and hold the button, End Time proceeds non-stop). 4. Drum Light You can turn on and off the drum light by button. Allergy UK is the trademark of displayed delay time flashes. Wrinkle...

Owners Manual
Page 24
... button is displaced. 6.9 Changing the program after it is completed, the warning indicator for 3 seconds. The drying operation stops. • Open the loading door while in order to show that filter drawer must be heard. When the Child Lock is turned, a double beeping noise will be able to interfere with a different program after the drying program starts: • Press the Start/Stand-by button to put the drying...
... button is displaced. 6.9 Changing the program after it is completed, the warning indicator for 3 seconds. The drying operation stops. • Open the loading door while in order to show that filter drawer must be heard. When the Child Lock is turned, a double beeping noise will be able to interfere with a different program after the drying program starts: • Press the Start/Stand-by button to put the drying...
Owners Manual
Page 28
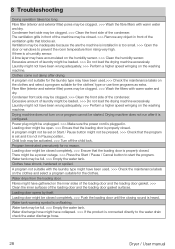
.... >>> Open the door or windows to the water drain check the water discharge hose. 28 Dryer / User manual There might be full. >>> Empty the water tank. Loading door might be full. >>> Empty the water tank. Water tank may be open. >>> Ensure that blocks air. Loading door might be activated. >>> Turn off the child lock. Program terminated prematurely for the laundry type may be closed . Clothes come out damp after it is heard. Fibre filter (interior and exterior filter...
.... >>> Open the door or windows to the water drain check the water discharge hose. 28 Dryer / User manual There might be full. >>> Empty the water tank. Loading door might be full. >>> Empty the water tank. Water tank may be open. >>> Ensure that blocks air. Loading door might be activated. >>> Turn off the child lock. Program terminated prematurely for the laundry type may be closed . Clothes come out damp after it is heard. Fibre filter (interior and exterior filter...

Owners Manual
Page 29
... exterior filters to proximity. The lighting inside the drying machine does not turn on. (In models with lamp) The drying machine might be unclean. >>> Wash the filters with warm water and dry.. The lighting inside the drying machine turns on. (In models with lamp) If the drying machine is plugged to the power outlet, the On/Off button is pressed and the door is open; Install the filter cloth to the plastic part if...
... exterior filters to proximity. The lighting inside the drying machine does not turn on. (In models with lamp) The drying machine might be unclean. >>> Wash the filters with warm water and dry.. The lighting inside the drying machine turns on. (In models with lamp) If the drying machine is plugged to the power outlet, the On/Off button is pressed and the door is open; Install the filter cloth to the plastic part if...
Owners Manual
Page 30
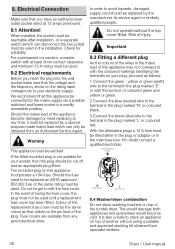
... to the terminal in doubt contact a qualified electrician. With the alternative plugs a 13 A fuse must be obtained from an Authorised Service Agent. In order to be replaced an ASTA approved BS1362 fuse of the wires in the main fuse box. If in the plug marked 'L' or coloured red. Do not operate without using a suitable and approved stacking kit obtained from any time, it must...
... to the terminal in doubt contact a qualified electrician. With the alternative plugs a 13 A fuse must be obtained from an Authorised Service Agent. In order to be replaced an ASTA approved BS1362 fuse of the wires in the main fuse box. If in the plug marked 'L' or coloured red. Do not operate without using a suitable and approved stacking kit obtained from any time, it must...
Owners Manual
Page 31
... to ice trays, scrapers, cutlery baskets, filters and light bulbs. • Repairs necessary as a result of faulty materials, defective components or manufacturing defects. • Functional replacement parts to carry out the repair. If you purchased the product. Accidental damage, misuse or abuse of repairing the product. Professional installation by this guarantee. Dryer / User manual 31 Installation or use of repairing the product). 5. The product must...
... to ice trays, scrapers, cutlery baskets, filters and light bulbs. • Repairs necessary as a result of faulty materials, defective components or manufacturing defects. • Functional replacement parts to carry out the repair. If you purchased the product. Accidental damage, misuse or abuse of repairing the product. Professional installation by this guarantee. Dryer / User manual 31 Installation or use of repairing the product). 5. The product must...
Owners Manual
Page 32
... apply. Our Engineers work Monday to Friday 9.00am to the replacement product; Will there be extended to in accordance with company registration number 02415578. The Manufacturer reserves the right to terminate the guarantee if you live in another part of the United Kingdom, in our Standard Guarantee Terms and Conditions. 32 Dryer / User manual Does Beko offer replacements? On occasion, the...
... apply. Our Engineers work Monday to Friday 9.00am to the replacement product; Will there be extended to in accordance with company registration number 02415578. The Manufacturer reserves the right to terminate the guarantee if you live in another part of the United Kingdom, in our Standard Guarantee Terms and Conditions. 32 Dryer / User manual Does Beko offer replacements? On occasion, the...
Owners Manual
Page 34
... call us on the Rating Label affixed to the appliance. • The Retailer (Purchased from the list of Ireland visit beko.ie/register. 34 Dryer / User manual Please visit our website, click Contact Us and choose a product support topic from ) and Date of purchase will be printed on the Operating Instruction Booklet / User guide • The product model and serial number is your purchase...
... call us on the Rating Label affixed to the appliance. • The Retailer (Purchased from the list of Ireland visit beko.ie/register. 34 Dryer / User manual Please visit our website, click Contact Us and choose a product support topic from ) and Date of purchase will be printed on the Operating Instruction Booklet / User guide • The product model and serial number is your purchase...


