Owners Manual
Page 3
......9 1.7 Maintenance and cleaning safety 10 1.8 Lighting safety 11 1.9 Steam program safety 12 2 Environmental instructions 13 2.1 Compliance with the WEEE Regulations and Waste Disposal 13 2.2 Packaging information 13 2.3 Standard conformity and test information / EU declaration of conformity..........13 3 Your drying machine 14 3.1 Technical specifications 14 3.2 General appearance 15 3.3 Scope of delivery 15 4 Installation 16 4.1 Right place for installation 16 4.2 Removing the shipping safety group 16 4.3 Water connection...
......9 1.7 Maintenance and cleaning safety 10 1.8 Lighting safety 11 1.9 Steam program safety 12 2 Environmental instructions 13 2.1 Compliance with the WEEE Regulations and Waste Disposal 13 2.2 Packaging information 13 2.3 Standard conformity and test information / EU declaration of conformity..........13 3 Your drying machine 14 3.1 Technical specifications 14 3.2 General appearance 15 3.3 Scope of delivery 15 4 Installation 16 4.1 Right place for installation 16 4.2 Removing the shipping safety group 16 4.3 Water connection...
Owners Manual
Page 4
... 6.8 Child Lock...24 6.9 Changing the program after it is started 24 6.10 Cancelling the program 25 6.11 End of program 25 6.12 Odour feature 25 6.13 SteamCure Odour and Wrinkle Removal Function 25 7 Maintenance and cleaning 27 7.1 Fibre Filters (internal and external filters) / Cleaning of the Interior Surface of the Loading Door...27 7.2 Cleaning the sensor 28 7.3 Emptying the water tank 29 7.4 Cleaning the condenser 29 8 Troubleshooting 31 9. 6 Running...
... 6.8 Child Lock...24 6.9 Changing the program after it is started 24 6.10 Cancelling the program 25 6.11 End of program 25 6.12 Odour feature 25 6.13 SteamCure Odour and Wrinkle Removal Function 25 7 Maintenance and cleaning 27 7.1 Fibre Filters (internal and external filters) / Cleaning of the Interior Surface of the Loading Door...27 7.2 Cleaning the sensor 28 7.3 Emptying the water tank 29 7.4 Cleaning the condenser 29 8 Troubleshooting 31 9. 6 Running...
Owners Manual
Page 5
... install or operate the product where freezing is a possibility and/ or vulnerable to external elements. Cleaning and maintenance should not tamper with water and drying machine safe. 1.2 Safety of children, vulnerable persons and pets • This product may cause damages • Product can only be used by Authorized Service. • Use original spare parts and accessories only. • Do not repair or replace...
... install or operate the product where freezing is a possibility and/ or vulnerable to external elements. Cleaning and maintenance should not tamper with water and drying machine safe. 1.2 Safety of children, vulnerable persons and pets • This product may cause damages • Product can only be used by Authorized Service. • Use original spare parts and accessories only. • Do not repair or replace...
Owners Manual
Page 6
... power cord, but the plug. 6 Dryer / User manual Children and pets shall not play with a tool. • The plug shall be kinked, pinched and shall not come in during installation, maintenance, cleaning, repair and transporting operations. • If the power the cord is regularly opened and closed with the product, climb on the power cord. Power cord shall not be easily accessible. If this is not possible, a mechanism that meets the electrical...
... power cord, but the plug. 6 Dryer / User manual Children and pets shall not play with a tool. • The plug shall be kinked, pinched and shall not come in during installation, maintenance, cleaning, repair and transporting operations. • If the power the cord is regularly opened and closed with the product, climb on the power cord. Power cord shall not be easily accessible. If this is not possible, a mechanism that meets the electrical...
Owners Manual
Page 7
... use the extruding parts of dust with good ventilation. • Do not install the product in the user manual. These operations shall be completely opened, or behind a hinged door where the product hinge is in upright position. Do not have the product installed if it is faced against a door, sliding door where the product loading door cannot be undertaken by yourself. • Take required...
... use the extruding parts of dust with good ventilation. • Do not install the product in the user manual. These operations shall be completely opened, or behind a hinged door where the product hinge is in upright position. Do not have the product installed if it is faced against a door, sliding door where the product loading door cannot be undertaken by yourself. • Take required...
Owners Manual
Page 8
... could be directed to a grounded outlet protected with an appropriate fuse in the guide (for models with flue). • Plug the product to flue which is placed on a sturdy floor that consume gas or other fuels (for models with flue). • The ventilation hose shall not be connected to a heating stove or a chimney flue (for models with flue). • The exhaust air shall not...
... could be directed to a grounded outlet protected with an appropriate fuse in the guide (for models with flue). • Plug the product to flue which is placed on a sturdy floor that consume gas or other fuels (for models with flue). • The ventilation hose shall not be connected to a heating stove or a chimney flue (for models with flue). • The exhaust air shall not...
Owners Manual
Page 10
...candles, cigarettes, etc.) on the loading door when it is open fire, appropriate ventilation shall be hot during operation. Unplug the product (or shut down the connected fuse) and call the authorized service. • Unplug the product when not in use. 1.7 Maintenance and cleaning safety • Do not wash the...Do not touch the drum as gas heater and a chimney. Do not use a pressure cleaner, steam cleaner, hose or pressurised gun to clean the product. • Do not use sharp or abrasive tools to catch fire. (for models with flue). • Do not operate the product together with...
...candles, cigarettes, etc.) on the loading door when it is open fire, appropriate ventilation shall be hot during operation. Unplug the product (or shut down the connected fuse) and call the authorized service. • Unplug the product when not in use. 1.7 Maintenance and cleaning safety • Do not wash the...Do not touch the drum as gas heater and a chimney. Do not use a pressure cleaner, steam cleaner, hose or pressurised gun to clean the product. • Do not use sharp or abrasive tools to catch fire. (for models with flue). • Do not operate the product together with...
Owners Manual
Page 16
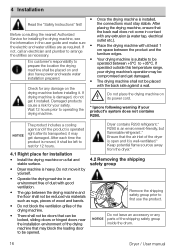
... drying machine is operated right after its power cord. * Ignore following warning if your safety. 4 Installation Read the "Safety Instructions" first! If drying machine is open and it . If operated outside this temperature range, your drying machine's operation may block the loading door to +35°C. Before consulting the nearest Authorized Service for any NOTICE parts of the drying machine that the back wall does not come in an environment free...
... drying machine is operated right after its power cord. * Ignore following warning if your safety. 4 Installation Read the "Safety Instructions" first! If drying machine is open and it . If operated outside this temperature range, your drying machine's operation may block the loading door to +35°C. Before consulting the nearest Authorized Service for any NOTICE parts of the drying machine that the back wall does not come in an environment free...
Owners Manual
Page 17
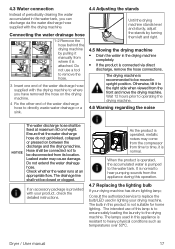
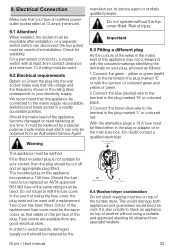
... hose supplied with the drying machine. The intended use a tool to operating the drying machine. 4.6 Warning regarding the noise NOTICE The water discharge hose shall be moved in upright position. Dryer / User manual 17 4.3 Water connection Instead of periodically draining the water accumulated in the water tank, you can discharge via direct discharge, remove the hose connections. Connecting the water drainage hose 1-2 Remove the 1 2 hose behind the drying machine by turning them left and right. 4.5 Moving the drying...
... hose supplied with the drying machine. The intended use a tool to operating the drying machine. 4.6 Warning regarding the noise NOTICE The water discharge hose shall be moved in upright position. Dryer / User manual 17 4.3 Water connection Instead of periodically draining the water accumulated in the water tank, you can discharge via direct discharge, remove the hose connections. Connecting the water drainage hose 1-2 Remove the 1 2 hose behind the drying machine by turning them left and right. 4.5 Moving the drying...
Owners Manual
Page 18
..., hooks and clasps, button up the covers' buttons, tie textile belts and apron belts. 5.4 What to maintenance and cleaning for drying in drying machine NOTICE Laundry that will be dried in the user manual for program selection. • During drying do for too long. • Do not add wet laundry as coins, metal parts, needles, nails, screws, stones etc. Refer to do not open for energy saving • Use...
..., hooks and clasps, button up the covers' buttons, tie textile belts and apron belts. 5.4 What to maintenance and cleaning for drying in drying machine NOTICE Laundry that will be dried in the user manual for program selection. • During drying do for too long. • Do not add wet laundry as coins, metal parts, needles, nails, screws, stones etc. Refer to do not open for energy saving • Use...
Owners Manual
Page 20
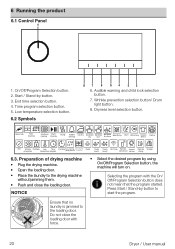
... button. 6 Running the product 6.1 Control Panel 1 1. Wrinkle prevention selection button/ Drum light button. 8. Press Start / Stand-by Drying Audible warning Iron Dry Wardrobe Wardrobe Wardrobe Wool drying Silent Refreshing Hygiene Dry Dry+ Dry Extra (Baby+) Feather End Wrinkle Child lock Low Timer prevention temperature program End time Environmentally- Do not close the loading door. Water tank Filter cleaning Condenser Start/ cleaning Stand-by button to the loading door. Preparation of drying machine • Plug the drying machine. • Open the loading...
... button. 6 Running the product 6.1 Control Panel 1 1. Wrinkle prevention selection button/ Drum light button. 8. Press Start / Stand-by Drying Audible warning Iron Dry Wardrobe Wardrobe Wardrobe Wool drying Silent Refreshing Hygiene Dry Dry+ Dry Extra (Baby+) Feather End Wrinkle Child lock Low Timer prevention temperature program End time Environmentally- Do not close the loading door. Water tank Filter cleaning Condenser Start/ cleaning Stand-by button to the loading door. Preparation of drying machine • Plug the drying machine. • Open the loading...
Owners Manual
Page 23
...). 4. Open the loading door and place the laundry. 2. Press the Start / Stand-by pressing the wrinkle prevention selection button. Select the desired program and repeat the End Time selection. Drum Light You can activate this function only prior to start of a program. Dryer / User manual 23 You can turn on . End Time countdown begins. End Time LED turns off at a lower temperature. End time You can add or remove laundry...
...). 4. Open the loading door and place the laundry. 2. Press the Start / Stand-by pressing the wrinkle prevention selection button. Select the desired program and repeat the End Time selection. Drum Light You can activate this function only prior to start of a program. Dryer / User manual 23 You can turn on . End Time countdown begins. End Time LED turns off at a lower temperature. End time You can add or remove laundry...
Owners Manual
Page 25
... for any problem. Do not touch the inner surface of operation. the program terminates. Turn the On/Off/Program Selection button to On/Off position in stand-by them from the wing during filling will not cause any reason after the drying machine starts running program terminates. Level must be used. To remove wrinkles, tap or drinking water should be filled manually into the...
... for any problem. Do not touch the inner surface of operation. the program terminates. Turn the On/Off/Program Selection button to On/Off position in stand-by them from the wing during filling will not cause any reason after the drying machine starts running program terminates. Level must be used. To remove wrinkles, tap or drinking water should be filled manually into the...

Owners Manual
Page 27
...; Remove the second part (outer filter) by the Fibre Filter. • Open both filters under water running in the filters with a soft brush. Do not operate the product without the fibre filters. 7 Maintenance and cleaning Ensure that are installed. You can clean the hair in reverse direction of fibre accumulation or with a vacuum cleaner. Your drying machine has 2 fibre NOTICE filters with the brush on the air deflector. Dryer / User manual 27 Dry the filter...
...; Remove the second part (outer filter) by the Fibre Filter. • Open both filters under water running in the filters with a soft brush. Do not operate the product without the fibre filters. 7 Maintenance and cleaning Ensure that are installed. You can clean the hair in reverse direction of fibre accumulation or with a vacuum cleaner. Your drying machine has 2 fibre NOTICE filters with the brush on the air deflector. Dryer / User manual 27 Dry the filter...
Owners Manual
Page 31
... that blocks air. There might have been used .>>> Check the maintenance labels on the humidity sensor. >>> Clean the humidity sensor. A program not suitable with the laundry type might be a power outage. >>> Press the Start / Pause / Cancel button to prevent the room temperature from the loading door. Water tank may be unplugged. >>> Make sure the power cord is too small. >>> Open the door or windows to start the program. Water discharge hose might be...
... that blocks air. There might have been used .>>> Check the maintenance labels on the humidity sensor. >>> Clean the humidity sensor. A program not suitable with the laundry type might be a power outage. >>> Press the Start / Pause / Cancel button to prevent the room temperature from the loading door. Water tank may be unplugged. >>> Make sure the power cord is too small. >>> Open the door or windows to start the program. Water discharge hose might be...
Owners Manual
Page 32
... to repair your device, you can request a replacement by consulting to the power outlet, the On/Off button is pressed and the door is not installed. Fibre filters may be unclean. >>> Wash the filters with lamp) If the drying machine is plugged to the nearest authorised service with the device model number. 32 Dryer / User manual If you use double filter, as an internal and external filter, on the cover area...
... to repair your device, you can request a replacement by consulting to the power outlet, the On/Off button is pressed and the door is not installed. Fibre filters may be unclean. >>> Wash the filters with lamp) If the drying machine is plugged to the nearest authorised service with the device model number. 32 Dryer / User manual If you use double filter, as an internal and external filter, on the cover area...
Owners Manual
Page 33
... Service Agent. Do not operate without using a suitable and approved stacking kit obtained from any time, it must be replaced by the N Blue or black L Brown or red 9.4 Washer/dryer combination Do not stack washing machine on the pin face of the appliance become void. Should the fuse need replacing at 13 amps (minimum). 9.1 Attention! With the alternative plugs a 13 A fuse must not be used until a replacement fuse cover...
... Service Agent. Do not operate without using a suitable and approved stacking kit obtained from any time, it must be replaced by the N Blue or black L Brown or red 9.4 Washer/dryer combination Do not stack washing machine on the pin face of the appliance become void. Should the fuse need replacing at 13 amps (minimum). 9.1 Attention! With the alternative plugs a 13 A fuse must not be used until a replacement fuse cover...
Owners Manual
Page 34
... use fails to meet the requirements contained in connection with your statutory rights in this guarantee? • Repairs to the product required as a result of faulty materials, defective components or manufacturing defects. • Functional replacement parts to repair a product. • The costs of a Beko Approved Engineer to ice trays, scrapers, cutlery baskets, filters and light bulbs. • Repairs necessary as a consumer. The standard guarantee starts...
... use fails to meet the requirements contained in connection with your statutory rights in this guarantee? • Repairs to the product required as a result of faulty materials, defective components or manufacturing defects. • Functional replacement parts to repair a product. • The costs of a Beko Approved Engineer to ice trays, scrapers, cutlery baskets, filters and light bulbs. • Repairs necessary as a consumer. The standard guarantee starts...
Owners Manual
Page 35
... guarantee with company registration number 02415578. Beko plc is a repair-only guarantee. Will there be guaranteed. It is covered by this guarantee. • Where a service call in accordance with the User Instructions Booklet. • That the fault was caused by this guarantee will not be guaranteed. Dryer / User manual 35 Optional extras, where available (i.e. Our Engineers work Monday to Friday 9.00am...
... guarantee with company registration number 02415578. Beko plc is a repair-only guarantee. Will there be guaranteed. It is covered by this guarantee. • Where a service call in accordance with the User Instructions Booklet. • That the fault was caused by this guarantee will not be guaranteed. Dryer / User manual 35 Optional extras, where available (i.e. Our Engineers work Monday to Friday 9.00am...
Owners Manual
Page 37
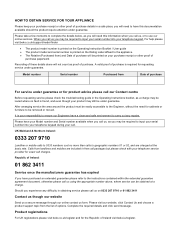
... the Operating Instruction Booklet / User guide • The product model and serial number is your responsibility to the appliance. • The Retailer (Purchased from the list of Ireland visit beko.ie/register. Republic of Ireland: 01 862 3411 Service once the manufacturers guarantee has expired If you have your Model number and Serial number available when you call us, as you may be removed or...
... the Operating Instruction Booklet / User guide • The product model and serial number is your responsibility to the appliance. • The Retailer (Purchased from the list of Ireland visit beko.ie/register. Republic of Ireland: 01 862 3411 Service once the manufacturers guarantee has expired If you have your Model number and Serial number available when you call us, as you may be removed or...


