User Manual
Page 2
Please read this entire user manual and all warnings and information in the user manual. Therefore, please read this user manual is also applicable for several other accompanying documents carefully before using the latest technology in the manual. Explanation of hazardous situations with high quality and state-of electric shock. Arcelik A.S. Dear Customer, Thank you handover the product to life and property...
Please read this entire user manual and all warnings and information in the user manual. Therefore, please read this user manual is also applicable for several other accompanying documents carefully before using the latest technology in the manual. Explanation of hazardous situations with high quality and state-of electric shock. Arcelik A.S. Dear Customer, Thank you handover the product to life and property...
User Manual
Page 3
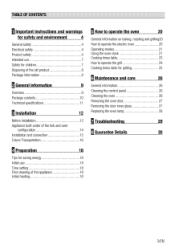
... Transportation 16 fl How to operate the oven 20 General information on baking, roasting and grilling20 How to operate the electric oven 20 Operating modes 21 Using the oven clock 21 Cooking times table 23 How to operate the grill 24 Cooking times table for grilling 25 6 Maintenance and care 26 General information 26 Cleaning the control panel 26 Cleaning the oven 26 Removing the oven door 27 Removing the door inner glass 27 Replacing the oven lamp 28 0 Troubleshooting 29 8 Guarantee Details 30...
... Transportation 16 fl How to operate the oven 20 General information on baking, roasting and grilling20 How to operate the electric oven 20 Operating modes 21 Using the oven clock 21 Cooking times table 23 How to operate the grill 24 Cooking times table for grilling 25 6 Maintenance and care 26 General information 26 Cleaning the control panel 26 Cleaning the oven 26 Removing the oven door 27 Removing the door inner glass 27 Replacing the oven lamp 28 0 Troubleshooting 29 8 Guarantee Details 30...
User Manual
Page 4
... warranty. Cleaning and user maintenance shall not be made by a qualified electrician while using the product with reduced physical, sensory or mental capabilities, or lack of the appliance in the "Technical specifications". Have the grounding installation made by children without a transformer. General safety • This appliance can be performed by children aged from risk of electric shock! • Only connect...
... warranty. Cleaning and user maintenance shall not be made by a qualified electrician while using the product with reduced physical, sensory or mental capabilities, or lack of the appliance in the "Technical specifications". Have the grounding installation made by children without a transformer. General safety • This appliance can be performed by children aged from risk of electric shock! • Only connect...
User Manual
Page 5
... of any problems and do this, turn • If the power connection cable for off maintenance, cleaning and the product and disconnect it ! the product is damaged, it must • Make sure that fuse rating is in use the connection cable specified in order to avoid touching heating elements. carried out by authorized and • The product must be installed so that the electrical connection does not...
... of any problems and do this, turn • If the power connection cable for off maintenance, cleaning and the product and disconnect it ! the product is damaged, it must • Make sure that fuse rating is in use the connection cable specified in order to avoid touching heating elements. carried out by authorized and • The product must be installed so that the electrical connection does not...
User Manual
Page 6
... flammable materials close to the product as this may cause an electric shock. • (Varies depending on the product model.) Placing the wire shelf and tray onto the wire racks properly It is at open door. • Always use heat resistant oven gloves when putting in or removing dishes into/from the hot oven. • Place the baking paper into the cooking pot or on it to...
... flammable materials close to the product as this may cause an electric shock. • (Varies depending on the product model.) Placing the wire shelf and tray onto the wire racks properly It is at open door. • Always use heat resistant oven gloves when putting in or removing dishes into/from the hot oven. • Place the baking paper into the cooking pot or on it to...
User Manual
Page 7
... oven door handles. Safety for warming the plates under the grill, drying towels, dish cloths etc. Keep children away from the product when it is for . 7/EN Remove the excess parts of arcing. • Do not use the baking paper in an operating temperature higher than the indicated value for children. Prevention against possible fire risk! • Ensure all into the preheated oven. Commercial use...
... oven door handles. Safety for warming the plates under the grill, drying towels, dish cloths etc. Keep children away from the product when it is for . 7/EN Remove the excess parts of arcing. • Do not use the baking paper in an operating temperature higher than the indicated value for children. Prevention against possible fire risk! • Ensure all into the preheated oven. Commercial use...
User Manual
Page 10
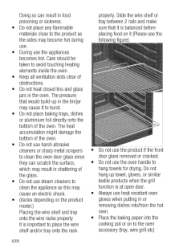
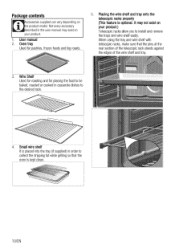
... install and remove the trays and wire shelf easily. Wire Shelf Used for roasting and for pastries, frozen foods and big roasts. 5. Oven tray Used for placing the food to be baked, roasted or cooked in order to collect the dripping fat while grilling so that the pins at the rear section of the telescopic rack stands against the edges of the wire shelf and tray. MEW 3. User manual...
... install and remove the trays and wire shelf easily. Wire Shelf Used for roasting and for pastries, frozen foods and big roasts. 5. Oven tray Used for placing the food to be baked, roasted or cooked in order to collect the dripping fat while grilling so that the pins at the rear section of the telescopic rack stands against the edges of the wire shelf and tray. MEW 3. User manual...
User Manual
Page 15
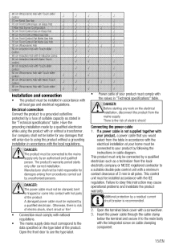
... by a qualified electrician. Metal is recommended. 2. Electrical connection Connect the product to the main body with the local regulations. DANGER: The product must be connected to using the product with the electrical installation at your product must correspond to obey this instruction may cause operational problems and invalidate the product warranty. Power cable of your home must only be replaced by a fuse of suitable capacity as stated in accordance...
... by a qualified electrician. Metal is recommended. 2. Electrical connection Connect the product to the main body with the local regulations. DANGER: The product must be connected to using the product with the electrical installation at your product must correspond to obey this instruction may cause operational problems and invalidate the product warranty. Power cable of your home must only be replaced by a fuse of suitable capacity as stated in accordance...
User Manual
Page 16
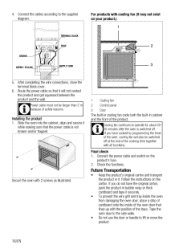
... on the product's fuse. 2. Secure the oven with 2 screws as illustrated. 1 Cooling fan 2 Control panel 3 Door The built-in cooling fan cools both the built-in cabinet and the front of the cooking time together with the position of safety reasons. Connect the power cable and switch on your product.) 1 2 3 5. Follow the instructions on the carton. After completing the wire connections, close the terminal block cover. 6. Slide the oven into the cabinet, align...
... on the product's fuse. 2. Secure the oven with 2 screws as illustrated. 1 Cooling fan 2 Control panel 3 Door The built-in cooling fan cools both the built-in cabinet and the front of the cooking time together with the position of safety reasons. Connect the power cable and switch on your product.) 1 2 3 5. Follow the instructions on the carton. After completing the wire connections, close the terminal block cover. 6. Slide the oven into the cabinet, align...
User Manual
Page 18
.... Close the oven door. 3. Turn off . It needs to be burnt off and removed. Do not use ÷ / mito set , clock will run tarting from the hot oven. Select the highest grill power; Remove all baking trays and the wire grill out of the oven. 2. Keep children away. Electric oven 1. Confirm the setting by touching (,,t,) symbol and wait for 4 seconds without touching any sharp objects during cooking. • Try...
.... Close the oven door. 3. Turn off . It needs to be burnt off and removed. Do not use ÷ / mito set , clock will run tarting from the hot oven. Select the highest grill power; Remove all baking trays and the wire grill out of the oven. 2. Keep children away. Electric oven 1. Confirm the setting by touching (,,t,) symbol and wait for 4 seconds without touching any sharp objects during cooking. • Try...
User Manual
Page 20
... side rack correctly. Switching off the electric oven Turn the function knob and temperature knob to the desired operating mode. 2. Set the Temperature knob to the desired temperature. » Oven heats up to the adjusted temperature and maintains it with bones when compared to roasting the same size of meat without bones. • Each centimeter of meat thickness requires approximately 4 to 5 minutes of cooking time. • Let meat rest in the oven for easy cleaning...
... side rack correctly. Switching off the electric oven Turn the function knob and temperature knob to the desired operating mode. 2. Set the Temperature knob to the desired temperature. » Oven heats up to the adjusted temperature and maintains it with bones when compared to roasting the same size of meat without bones. • Each centimeter of meat thickness requires approximately 4 to 5 minutes of cooking time. • Let meat rest in the oven for easy cleaning...
User Manual
Page 21
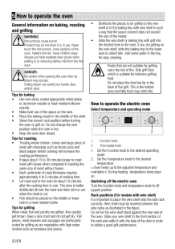
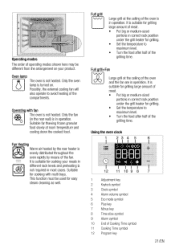
... not heated. Fan Heating Warm air heated by means of the fan. 5 2 Operating modes The order of operating modes shown here may be used for grilling large amount of meat. • Put big or medium-sized portions in operation. It is evenly distributed throughout the oven rapidly by the rear heater is suitable for grilling. • Set the temperature to maximum level. • Turn the food after half of Cooking Time...
... not heated. Fan Heating Warm air heated by means of the fan. 5 2 Operating modes The order of operating modes shown here may be used for grilling large amount of meat. • Put big or medium-sized portions in operation. It is evenly distributed throughout the oven rapidly by the rear heater is suitable for grilling. • Set the temperature to maximum level. • Turn the food after half of Cooking Time...
User Manual
Page 22
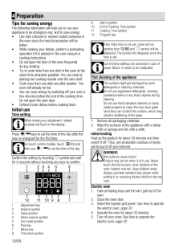
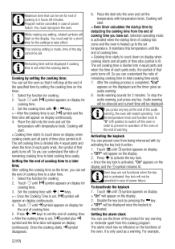
... on display for cooking time. 3. Selected operating mode is activated when the startup time of cooking has come and the oven is deactivated. After the cooking process is lit. Turn he temperature knob and function knob to "0" (off) position to switch off . Key lock will restart operating. Touch () until 141 symbol appears on display when cooking starts and all parts of the oven. Disable the key lock by setting the cooking time on...
... on display for cooking time. 3. Selected operating mode is activated when the startup time of cooking has come and the oven is deactivated. After the cooking process is lit. Turn he temperature knob and function knob to "0" (off) position to switch off . Key lock will restart operating. Touch () until 141 symbol appears on display when cooking starts and all parts of the oven. Disable the key lock by setting the cooking time on...
User Manual
Page 23
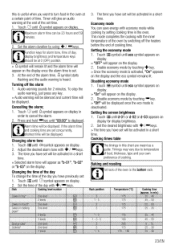
... in the oven at the end of the set : 1. Dish Cooking level number OaKcs In tray Or: Icrcl .., 3. Changing alarm tone 1. Rack position Temperature (°C) Cooking time (approx. Touch a until d-01 or d-02 or d-03 appears on display. 2. Touch a until symbol appears on display for display brightness. 2. Cancelling the alarm; 1. Adjust the desired alarm tone with economy mode while cooking by using ÷ / keys. Changing the time of the...
... in the oven at the end of the set : 1. Dish Cooking level number OaKcs In tray Or: Icrcl .., 3. Changing alarm tone 1. Rack position Temperature (°C) Cooking time (approx. Touch a until d-01 or d-02 or d-03 appears on display. 2. Touch a until symbol appears on display for display brightness. 2. Cancelling the alarm; 1. Adjust the desired alarm tone with economy mode while cooking by using ÷ / keys. Changing the time of the...
User Manual
Page 26
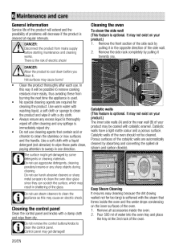
... parts clean, paying attention to clean the control panel. Cleaning the oven To clean the side wall (This feature is optional. Pour 500 ml of water into the oven tray and place the tray at regular intervals. Maintenance and care General information Service life of the product will extend and the possibility of electric shock! Control panel may be cleaned. Remove the side rack completely by some detergents or cleaning materials. Catalytic walls have a light...
... parts clean, paying attention to clean the control panel. Cleaning the oven To clean the side wall (This feature is optional. Pour 500 ml of water into the oven tray and place the tray at regular intervals. Maintenance and care General information Service life of the product will extend and the possibility of electric shock! Control panel may be cleaned. Remove the side rack completely by some detergents or cleaning materials. Catalytic walls have a light...
User Manual
Page 27
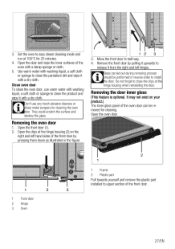
.... Clean oven door To clean the oven door, use any harsh abrasive cleaners or sharp metal scrapers for cleaning the oven door. Open the clips at the hinge housing (2) on your product.) The inner glass panel of the front door. 27/EN Removing the door inner glass (This feature is optional. Set the oven to close the clips at 100°C for cleaning. Use warm water with washing liquid, a soft cloth or sponge to install...
.... Clean oven door To clean the oven door, use any harsh abrasive cleaners or sharp metal scrapers for cleaning the oven door. Open the clips at the hinge housing (2) on your product.) The inner glass panel of the front door. 27/EN Removing the door inner glass (This feature is optional. Set the oven to close the clips at 100°C for cleaning. Use warm water with washing liquid, a soft cloth or sponge to install...
User Manual
Page 28
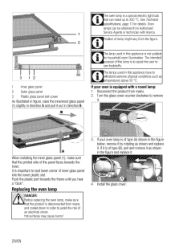
... the product is a special electric light bulb hat can be obtained from the figure. 2 3 12 1 Inner glass panel 2 Outer glass panel 3 Plastic glass panel slot-Lower As illustrated in figure, raise the innermost glass panel (1) slightly in direction A and pull it is not suitable or household room illumination. Position of lamp might vary from Authorised Service Agents or technician with a round lamp: 1. Turn the glass cover counter clockwise...
... the product is a special electric light bulb hat can be obtained from the figure. 2 3 12 1 Inner glass panel 2 Outer glass panel 3 Plastic glass panel slot-Lower As illustrated in figure, raise the innermost glass panel (1) slightly in direction A and pull it is not suitable or household room illumination. Position of lamp might vary from Authorised Service Agents or technician with a round lamp: 1. Turn the glass cover counter clockwise...
User Manual
Page 29
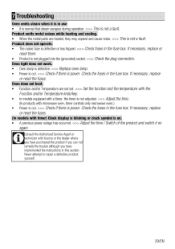
.../or Temperature knob/key. • In models equipped with a timer, the timer is not adjusted. >>> Adjust the time. (In products with timer) Clock display is blinldng or clock symbol is • A previous power outage has occurred. >>> Adjust the time / Switch of the product and switch it on again. Ifnecessary, replace or reset the fuses. Ifnecessary, replace or reset them. • Product is power. Check the fuses in the fuse box. Ifnecessary, replace or reset the fuses. NI o models with microwave oven, timer controls only microwave oven.) • Power is cut...
.../or Temperature knob/key. • In models equipped with a timer, the timer is not adjusted. >>> Adjust the time. (In products with timer) Clock display is blinldng or clock symbol is • A previous power outage has occurred. >>> Adjust the time / Switch of the product and switch it on again. Ifnecessary, replace or reset the fuses. Ifnecessary, replace or reset them. • Product is power. Check the fuses in the fuse box. Ifnecessary, replace or reset the fuses. NI o models with microwave oven, timer controls only microwave oven.) • Power is cut...
User Manual
Page 30
... to ice trays, scrapers, cutlery baskets, filters and light bulbs. • Repairs necessary as a result of faulty materials, defective components or manufacturing defects. • Functional replacement parts to loss arising from takeaways. • General compensation for the cost of Ireland) registered gas installer. 30/EN Important Notes • Your product is not covered? • Transit and delivery damage. • Cabinet or appearance parts, including...
... to ice trays, scrapers, cutlery baskets, filters and light bulbs. • Repairs necessary as a result of faulty materials, defective components or manufacturing defects. • Functional replacement parts to loss arising from takeaways. • General compensation for the cost of Ireland) registered gas installer. 30/EN Important Notes • Your product is not covered? • Transit and delivery damage. • Cabinet or appearance parts, including...
User Manual
Page 31
... provided. Where a replacement is your responsibility to provide evidence to carry out a repair because a convenient appointment cannot be arranged. The Manufacturer will cover the costs and arrange for the delivery of the new product and for the return of similar specification will be guaranteed. Our Engineers work Monday to Friday 9.00am to in a timely manner. Whilst our...
... provided. Where a replacement is your responsibility to provide evidence to carry out a repair because a convenient appointment cannot be arranged. The Manufacturer will cover the costs and arrange for the delivery of the new product and for the return of similar specification will be guaranteed. Our Engineers work Monday to Friday 9.00am to in a timely manner. Whilst our...


