
User Manual
Page 4
... 7 General information on baking, roasting and grilling 21 7 How to use the gas oven 22 7 Cooking times table 23 8 How to operate the gas grill 24 8 Cooking times table 25 n 10 Maintenance and care 26 10 General information 26 11 Cleaning the hob 26 13 Cleaning the control panel 26 16 Cleaning the oven 26 16 Removing the oven door 26 16 Removing the door inner glass 27 17 fl Troubleshooting 28 18 18 CI Guarantee and Service...
... 7 General information on baking, roasting and grilling 21 7 How to use the gas oven 22 7 Cooking times table 23 8 How to operate the gas grill 24 8 Cooking times table 25 n 10 Maintenance and care 26 10 General information 26 11 Cleaning the hob 26 13 Cleaning the control panel 26 16 Cleaning the oven 26 16 Removing the oven door 26 16 Removing the door inner glass 27 17 fl Troubleshooting 28 18 18 CI Guarantee and Service...
User Manual
Page 7
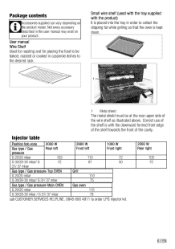
... is kept clean. 1 Metal shield The metal shield must be baked, roasted or cooked in casserole dishes to collect the dripping fat while grilling so that the oven is with the product) It is placed into the tray in the user manual may exist on the product model. Small wire shelf (used with the tray supplied with ... 72 87 50 31/ 37 mbar Gas type / Gas pressure-Top OVEN Grill G 20/20 mbar 110 G 30/28-30 mbar/ G 31/ 37 mbar 75 Gas type / Gas pressure-Main OVEN Gas oven G 20/20 mbar 115 G 30/28-30 mbar/ G 31/ 37 mbar 78 call CUSTOMER SERVICES HELPLINE. 08 5 600 4911 to order...
... is kept clean. 1 Metal shield The metal shield must be baked, roasted or cooked in casserole dishes to collect the dripping fat while grilling so that the oven is with the product) It is placed into the tray in the user manual may exist on the product model. Small wire shelf (used with the tray supplied with ... 72 87 50 31/ 37 mbar Gas type / Gas pressure-Top OVEN Grill G 20/20 mbar 110 G 30/28-30 mbar/ G 31/ 37 mbar 75 Gas type / Gas pressure-Main OVEN Gas oven G 20/20 mbar 115 G 30/28-30 mbar/ G 31/ 37 mbar 78 call CUSTOMER SERVICES HELPLINE. 08 5 600 4911 to order...

User Manual
Page 8
... product. otherwise, connections can 7/ EN ignite when it is in the oven. Keep children away from the product when it comes into /from the mains during installation, maintenance, cleaning and repair procedures. • Be careful when using the product with water! See Troubleshooting, page 28. • Never wash down . • "An additional protective means to children. All warranties will instruct them to the product...
... product. otherwise, connections can 7/ EN ignite when it is in the oven. Keep children away from the product when it comes into /from the mains during installation, maintenance, cleaning and repair procedures. • Be careful when using the product with water! See Troubleshooting, page 28. • Never wash down . • "An additional protective means to children. All warranties will instruct them to the product...

User Manual
Page 9
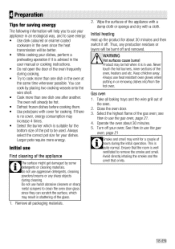
... any items above the appliance that the kitchen is well ventilated: keep natural ventilation holes open these manually. 6. It may overturn or door hinges may get damaged. • The packaging materials will void the guarantee. Please dispose of all tubes and connections for domestic use of gas cooking appliance results in the production of heat and moisture in the room in...
... any items above the appliance that the kitchen is well ventilated: keep natural ventilation holes open these manually. 6. It may overturn or door hinges may get damaged. • The packaging materials will void the guarantee. Please dispose of all tubes and connections for domestic use of gas cooking appliance results in the production of heat and moisture in the room in...

User Manual
Page 10
The oven can be used for room heating purposes. product should also not be used for defrosting, baking, roasting and grilling food. 9/EN The manufacturer shall not be liable for any damage caused by improper use or handling errors.
The oven can be used for room heating purposes. product should also not be used for defrosting, baking, roasting and grilling food. 9/EN The manufacturer shall not be liable for any damage caused by improper use or handling errors.
User Manual
Page 11
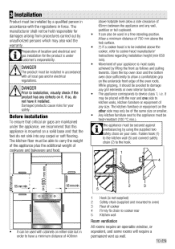
... A• DANGER The product must be installed in accordance with all local gas and/or electrical regulations. ^DANGER • Prior to installation, visually check if the product has any grill elements or oven interior furniture. • The appliance corresponds to cooker rear 5 Kitchen wall Room ventilation All rooms require an openable window, or equvalent, and some rooms will require a permanent vent as follows and pulling...
... A• DANGER The product must be installed in accordance with all local gas and/or electrical regulations. ^DANGER • Prior to installation, visually check if the product has any grill elements or oven interior furniture. • The appliance corresponds to cooker rear 5 Kitchen wall Room ventilation All rooms require an openable window, or equvalent, and some rooms will require a permanent vent as follows and pulling...
User Manual
Page 12
... product's warranty period starts only after installation (do not route it is opened or it above the hob). The rating plate is either in the plug or adaptor or in a bed-sitting room of your appliance. Power cable of less than 10 m3'den not required In the cellar or min. 65 cm2 basement Installation and connection Product can only be located in a kitchen, kitchen/diner...
... product's warranty period starts only after installation (do not route it is opened or it above the hob). The rating plate is either in the plug or adaptor or in a bed-sitting room of your appliance. Power cable of less than 10 m3'den not required In the cellar or min. 65 cm2 basement Installation and connection Product can only be located in a kitchen, kitchen/diner...
User Manual
Page 13
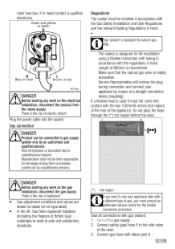
... gas installation, disconnect the gas supply. Plug the power cable into contact with the Gas Safety (Installation and Use) Regulations and the relevant Building Regulations in force. our product is designed for natural gas NG). Turn of 900mm is used it must be held responsible for the related conversion procedure. main fuse box. Blue or black Brown or red UK_Plug DANGER Before starting any work on the electrical installation...
... gas installation, disconnect the gas supply. Plug the power cable into contact with the Gas Safety (Installation and Use) Regulations and the relevant Building Regulations in force. our product is designed for natural gas NG). Turn of 900mm is used it must be held responsible for the related conversion procedure. main fuse box. Blue or black Brown or red UK_Plug DANGER Before starting any work on the electrical installation...
User Manual
Page 14
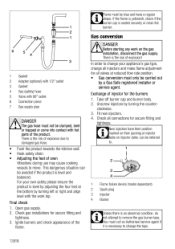
... an Authorised service agent if it is level by adjusting the four feet at reduced flow rate position. • Gas conversion must only be avoided if the product is seated securely or clean the burner. Final check 1. Gas conversion ADANGER Before starting any work top. For your appliance's gas type, change the taps. 13/EN Check gas installations for the burners 1. Unscrew injectors by turning left...
... an Authorised service agent if it is level by adjusting the four feet at reduced flow rate position. • Gas conversion must only be avoided if the product is seated securely or clean the burner. Final check 1. Gas conversion ADANGER Before starting any work top. For your appliance's gas type, change the taps. 13/EN Check gas installations for the burners 1. Unscrew injectors by turning left...
User Manual
Page 16
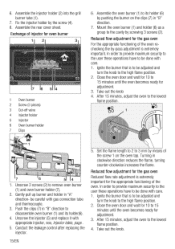
... (2). Assemble the rear cover sheet. be done with care. 1. Ignite the burner that is to be adjusted and turn the knob to its holder(6). 4. Unscrew the injector (5) and replace it with gas connection tube and thermocouple. 3. Take out the knob. Mount the oven burner (1) and holder (6) as a group to remove oven burner (1) and oven burner holder (7). 2. Conduct the leakage control after replacing the injector. 15...
... (2). Assemble the rear cover sheet. be done with care. 1. Ignite the burner that is to be adjusted and turn the knob to its holder(6). 4. Unscrew the injector (5) and replace it with gas connection tube and thermocouple. 3. Take out the knob. Mount the oven burner (1) and holder (6) as a group to remove oven burner (1) and oven burner holder (7). 2. Conduct the leakage control after replacing the injector. 15...
User Manual
Page 17
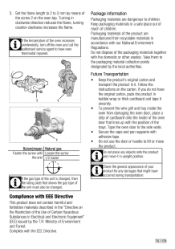
... have oven thermostat repaired. Check the general appearance of the screw 2 on the oven tap. 5. Future Transportation • Keep the product's original carton and transport the product in Electrical and Electronic Equipment" (EEE) issued by the local authorities. Compliance with adhesive tape. • Do not use the door or handle to the side walls. • Secure the caps and pan supports with EEE Directive This product...
... have oven thermostat repaired. Check the general appearance of the screw 2 on the oven tap. 5. Future Transportation • Keep the product's original carton and transport the product in Electrical and Electronic Equipment" (EEE) issued by the local authorities. Compliance with adhesive tape. • Do not use the door or handle to the side walls. • Secure the caps and pan supports with EEE Directive This product...
User Manual
Page 19
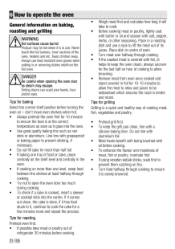
... cover for a couple of the glass. 1. Always use heat resistant oven gloves when putting in use First cleaning of the oven, heaters and etc. Remove all baking trays and the wire grill out of the oven. 2. Keep children away. Close the oven door. 3. see How to remove the smoke and smell. See How to clean the oven door glass since the heat transmission will be better. • While cooking your dishes, perform a preheating operation...
... cover for a couple of the glass. 1. Always use heat resistant oven gloves when putting in use First cleaning of the oven, heaters and etc. Remove all baking trays and the wire grill out of the oven. 2. Keep children away. Close the oven door. 3. see How to remove the smoke and smell. See How to clean the oven door glass since the heat transmission will be better. • While cooking your dishes, perform a preheating operation...
User Manual
Page 20
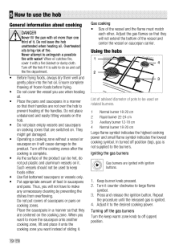
..., cover it with ignition buttons. 1. They might get damaged. • Operating a cooking zone without a vessel or saucepan on it . Place the saucepans in a manner so that their handles are centered on the cooking zone. Adjust the gas flames so that they are not over the hob to prevent heating of the handles. Igniting the gas burners Gas burners are switched on. Using the hobs 1 4 2 List...
..., cover it with ignition buttons. 1. They might get damaged. • Operating a cooking zone without a vessel or saucepan on it . Place the saucepans in a manner so that their handles are centered on the cooking zone. Adjust the gas flames so that they are not over the hob to prevent heating of the handles. Igniting the gas burners Gas burners are switched on. Using the hobs 1 4 2 List...
User Manual
Page 22
... cooking. • Try not to open the oven door too much during cooking. • To check if a cake is in or removing dishes into the oven. • Use good quality baking tins such as non stick or aluminium. If it will take to cook. • Before cooking meat or poultry, lightly coat with butter or oil and season with oil before turning the oven on baking, roasting...
... cooking. • Try not to open the oven door too much during cooking. • To check if a cake is in or removing dishes into the oven. • Use good quality baking tins such as non stick or aluminium. If it will take to cook. • Before cooking meat or poultry, lightly coat with butter or oil and season with oil before turning the oven on baking, roasting...
User Manual
Page 24
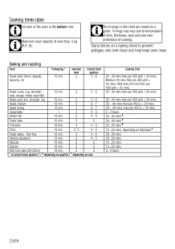
... keep oven clean. loin, shoulder, leg 10 min. 2 5 - 6 Roast chicken 10 min. 2 6 - 7 Roast turkey 10 min. 2 6 - 7 Casseroles - 2 4 - 5 Whole fish 10 min. 2 4 - 5 Pasta bake 10 min. 3 5 Fruit pies 10 min. 3 4 - 5 Pizza 10 min. 2- 3 4 - 5 Small cakes - Maximum load capacity of cooking. he timings in this chart are meant as a guide. Insertion level 2 Control knob position 5 - 6 Roast Lamb; Cooking times table 1st rack of the oven is...
... keep oven clean. loin, shoulder, leg 10 min. 2 5 - 6 Roast chicken 10 min. 2 6 - 7 Roast turkey 10 min. 2 6 - 7 Casseroles - 2 4 - 5 Whole fish 10 min. 2 4 - 5 Pasta bake 10 min. 3 5 Fruit pies 10 min. 3 4 - 5 Pizza 10 min. 2- 3 4 - 5 Small cakes - Maximum load capacity of cooking. he timings in this chart are meant as a guide. Insertion level 2 Control knob position 5 - 6 Roast Lamb; Cooking times table 1st rack of the oven is...
User Manual
Page 25
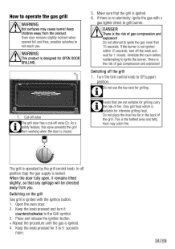
...operated by the grill control knob. Do not attempt to ignite the burner. Only grill food which is suitable for grilling carry he risk of gas compression and explosion! The grill is no electricity; Open the oven door. 2. Make sure that the grill is the risk of fire. Cut-off valve The grill door has a cut... Ventilate the room before reattempting to ignite the gas more . 24 /EN Turn the Grill control knob to the Grill symbol. 3. MO • Foods that are not suitable for intensive grilling heat. This is locked. Do not use the top rack for 1 minute. In off the knob and...
...operated by the grill control knob. Do not attempt to ignite the burner. Only grill food which is suitable for grilling carry he risk of gas compression and explosion! The grill is no electricity; Open the oven door. 2. Make sure that the grill is the risk of fire. Cut-off valve The grill door has a cut... Ventilate the room before reattempting to ignite the gas more . 24 /EN Turn the Grill control knob to the Grill symbol. 3. MO • Foods that are not suitable for intensive grilling heat. This is locked. Do not use the top rack for 1 minute. In off the knob and...
User Manual
Page 27
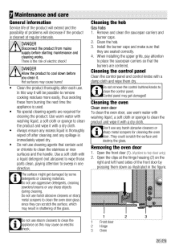
... a liquid detergent (not abrasive) to wipe those parts clean, paying attention to sweep in shattering of the glass. Maintenance and care General information Service life of the product will extend and the possibility of problems will be possible to remove cooking residues more easily, thus avoiding these from mains supply before you clean it. Use warm water with washing liquid, a soft cloth or...
... a liquid detergent (not abrasive) to wipe those parts clean, paying attention to sweep in shattering of the glass. Maintenance and care General information Service life of the product will extend and the possibility of problems will be possible to remove cooking residues more easily, thus avoiding these from mains supply before you clean it. Use warm water with washing liquid, a soft cloth or...
User Manual
Page 28
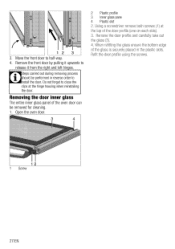
Removing the door inner glass The entire inner glass panel of the door profi e (one on each side). 3. Do not forget to nstall the door. Using a screwdriver remove both screws (1) at the hinge housing when reinstalling the door. Refit the door profile using the screws. 12 Screw 27/EN 3 3. Steps carried out during removing process should be removed for cleaning. 1. Remove the door profile and carefully take out the glass (3). 4. When refitting the...
Removing the door inner glass The entire inner glass panel of the door profi e (one on each side). 3. Do not forget to nstall the door. Using a screwdriver remove both screws (1) at the hinge housing when reinstalling the door. Refit the door profile using the screws. 12 Screw 27/EN 3 3. Steps carried out during removing process should be removed for cleaning. 1. Remove the door profile and carefully take out the glass (3). 4. When refitting the...
User Manual
Page 29
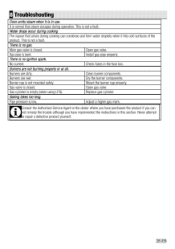
... wet. 8 Troubleshooting Oven emits steam when it hits cold surfaces of the product. No current. Replace gas cylinder. Install gas pipe properly. Burners are dirty. Gas cylinder is no gas. It is normal that arises during operation. There is not a fault. This is no ignition spark. Main gas valve is closed . Clean burner components. Gas valve is closed . Open gas valve. Adjust a higher gas mark. 0 Consult the Authorised Service Agent...
... wet. 8 Troubleshooting Oven emits steam when it hits cold surfaces of the product. No current. Replace gas cylinder. Install gas pipe properly. Burners are dirty. Gas cylinder is no gas. It is normal that arises during operation. There is not a fault. This is no ignition spark. Main gas valve is closed . Clean burner components. Gas valve is closed . Open gas valve. Adjust a higher gas mark. 0 Consult the Authorised Service Agent...
User Manual
Page 30
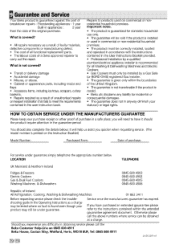
... Service Your Beko product is covered? • All repairs necessary as a result of faulty materials, defective components or manufacturing defect. • The cost of all Washing & Dishwashing Machines and Electric Cookers • Gas Cookers must be correctly installed, located and operated in accordance with the instructions contained in the User Instructions Booklet provided. • Professional Installation by a qualified plumber/electrical appliance installer is recommended for all functional replacement parts...
... Service Your Beko product is covered? • All repairs necessary as a result of faulty materials, defective components or manufacturing defect. • The cost of all Washing & Dishwashing Machines and Electric Cookers • Gas Cookers must be correctly installed, located and operated in accordance with the instructions contained in the User Instructions Booklet provided. • Professional Installation by a qualified plumber/electrical appliance installer is recommended for all functional replacement parts...


