User Manual
Page 2
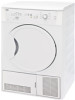
... of symbols Throughout this manual carefully before installing and starting your product. • In particular, follow the instructions related to life and property. We thank you to initial operation of the product! Remember...control procedure, will • Help you very good results. Warning for hazardous situations with other models. Warning for hot surfaces. Caution; It is marked with this purpose. Warning for supply voltage. We advise you doing your product and keep it off in a fast and safe way. • Read the User Manual before using your part...
... of symbols Throughout this manual carefully before installing and starting your product. • In particular, follow the instructions related to life and property. We thank you to initial operation of the product! Remember...control procedure, will • Help you very good results. Warning for hazardous situations with other models. Warning for hot surfaces. Caution; It is marked with this purpose. Warning for supply voltage. We advise you doing your product and keep it off in a fast and safe way. • Read the User Manual before using your part...
User Manual
Page 3
...4 Technical Specifications 5 2 Important safety information6 General safety 6 Intended use 7 Children's safety 7 3 Installation 8 Appropriate installation location............8 Removing the transportation safety assembly 8 Under counter installation 8 Mounting over a washing machine.......8 Connection to water drain 8 Adjusting the feet 9 First use 9 Disposing of packaging material...........9 Transportation of the machine 9 Disposing of the old machine 9 4 Electrical Connection 10 Attention 10 Electrical requirements 10 Fitting a different plug 10 Washer/dryer combination...
...4 Technical Specifications 5 2 Important safety information6 General safety 6 Intended use 7 Children's safety 7 3 Installation 8 Appropriate installation location............8 Removing the transportation safety assembly 8 Under counter installation 8 Mounting over a washing machine.......8 Connection to water drain 8 Adjusting the feet 9 First use 9 Disposing of packaging material...........9 Transportation of the machine 9 Disposing of the old machine 9 4 Electrical Connection 10 Attention 10 Electrical requirements 10 Fitting a different plug 10 Washer/dryer combination...
User Manual
Page 5
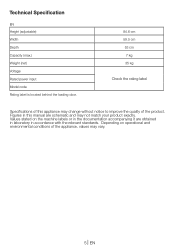
... relevant standards. Technical Specification EN Height (adjustable) Width Depth Capacity (max.) Weight (net) Voltage Rated power input Model code Rating label is located behind the loading door. 2 84.6 cm 59.5 cm 53 cm 7 kg 35 kg Check the rating label Specifications of this manual are obtained in laboratory in the documentation accompanying it are schematic and may vary. 5 EN Figures in this appliance may change without notice...
... relevant standards. Technical Specification EN Height (adjustable) Width Depth Capacity (max.) Weight (net) Voltage Rated power input Model code Rating label is located behind the loading door. 2 84.6 cm 59.5 cm 53 cm 7 kg 35 kg Check the rating label Specifications of this manual are obtained in laboratory in the documentation accompanying it are schematic and may vary. 5 EN Figures in this appliance may change without notice...
User Manual
Page 6
...; Do not dry items cleaned with industrial General safety chemicals in the dryer. • Do not dry unwashed items in the dryer. • Never place the machine on the plug connection, have a qualified personnel. This will cause problems with your dryer without the lint filter • Do not perform any repair or part replacing installed. resistant textiles, materials with rubber • The product should installation, maintenance and repair works. persons...
...; Do not dry items cleaned with industrial General safety chemicals in the dryer. • Do not dry unwashed items in the dryer. • Never place the machine on the plug connection, have a qualified personnel. This will cause problems with your dryer without the lint filter • Do not perform any repair or part replacing installed. resistant textiles, materials with rubber • The product should installation, maintenance and repair works. persons...
User Manual
Page 7
... will instruct them and dissipate the heat. • Remove the door of the drying compartment before the drying cycle comes to an end unless you leave the area where the product is located. 7 EN Do not operate the machine if the power cable or plug is taken out following the information given in use . Keep children away from the mains before loading. • At times...
... will instruct them and dissipate the heat. • Remove the door of the drying compartment before the drying cycle comes to an end unless you leave the area where the product is located. 7 EN Do not operate the machine if the power cable or plug is taken out following the information given in use . Keep children away from the mains before loading. • At times...
User Manual
Page 8
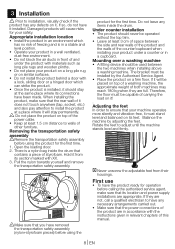
.... Removing the transportation safety aAssReemmobvley the transportation safety assembly before using the product for operation before using the product for your product in a well ventilated, dust-free environment. • Do not block the air ducts in front of and under a counter or in a cupboard. There is installed, it from their housings. AMake sure that its section marked with the instructions given...
.... Removing the transportation safety aAssReemmobvley the transportation safety assembly before using the product for operation before using the product for your product in a well ventilated, dust-free environment. • Do not block the air ducts in front of and under a counter or in a cupboard. There is installed, it from their housings. AMake sure that its section marked with the instructions given...
User Manual
Page 9
... recyclable materials. Remove the water drain and vent connections (if any). 3. Refer to your local dealer or solid waste collection centre in your product are dangerous to children. Disposing of packaging material Packaging materials are manufactured from the mains. 2. Before disposing of your old machine, cut off the power cable plug and make the loading door lock unusable to...
... recyclable materials. Remove the water drain and vent connections (if any). 3. Refer to your local dealer or solid waste collection centre in your product are dangerous to children. Disposing of packaging material Packaging materials are manufactured from the mains. 2. Before disposing of your old machine, cut off the power cable plug and make the loading door lock unusable to...

User Manual
Page 10
... the replacement fuse cover must be used . Fuse covers are available from a Authorised Service Agent. If in doubt contact a qualified electrician. For a permanent connection, a master switch with the symbol or coloured green and yellow or green. 2 Connect the blue (neutral) wire to the terminal in the plug marked 'N' or coloured black. 3 Connect the brown (live) wire to the terminal in the plug marked 'L' or coloured red. Electrical requirements Before...
... the replacement fuse cover must be used . Fuse covers are available from a Authorised Service Agent. If in doubt contact a qualified electrician. For a permanent connection, a master switch with the symbol or coloured green and yellow or green. 2 Connect the blue (neutral) wire to the terminal in the plug marked 'N' or coloured black. 3 Connect the brown (live) wire to the terminal in the plug marked 'L' or coloured red. Electrical requirements Before...
User Manual
Page 11
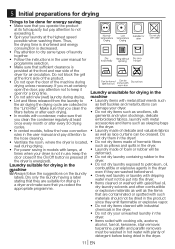
... removers must be washed in hot water with lamps, at the front side of the product. • Do not open for a long time. in the user manual and pay attention not to dry same types of laundry lnm together. • Follow the instructions in the user manual for programme selection. • Make sure that are suitable for air circulation. door closed if the On/Off button...
... removers must be washed in hot water with lamps, at the front side of the product. • Do not open for a long time. in the user manual and pay attention not to dry same types of laundry lnm together. • Follow the instructions in the user manual for programme selection. • Make sure that are suitable for air circulation. door closed if the On/Off button...
User Manual
Page 12
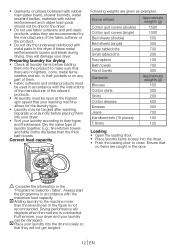
... softener or the product. • Do not dry the underwear reinforced with metal parts in the door. to the machine more than the thick bath towels. Correct load capacity Following weights are given as examples. Home articles Approximate weights (g) Cotton quit covers (double) Cotton quit covers (single) Bed sheets (double) Bed sheets (single) Large tablecloths Small tablecloths Tea napkins...
... softener or the product. • Do not dry the underwear reinforced with metal parts in the door. to the machine more than the thick bath towels. Correct load capacity Following weights are given as examples. Home articles Approximate weights (g) Cotton quit covers (double) Cotton quit covers (single) Bed sheets (double) Bed sheets (single) Large tablecloths Small tablecloths Tea napkins...
User Manual
Page 13
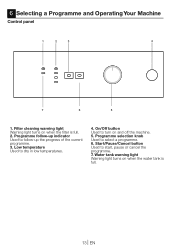
...-up the progress of the current programme. 3. Water tank warning light Warning light turns on when the filter is full. 13 EN Start/Pause/Cancel button Used to dry in low temperatures. 4. Low temperature Used to start, pause or cancel the programme. 7. Filter cleaning warning light Warning light turns on when the water tank is full. 2. 6 Selecting a Programme and Operating Your Machine Control panel 1 2 3 4 7 6 5 1. On/Off button Used to turn on and off the machine. 5.
...-up the progress of the current programme. 3. Water tank warning light Warning light turns on when the filter is full. 13 EN Start/Pause/Cancel button Used to dry in low temperatures. 4. Low temperature Used to start, pause or cancel the programme. 7. Filter cleaning warning light Warning light turns on when the water tank is full. 2. 6 Selecting a Programme and Operating Your Machine Control panel 1 2 3 4 7 6 5 1. On/Off button Used to turn on and off the machine. 5.
User Manual
Page 14
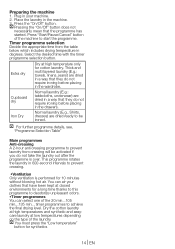
.... Cupboard dry Normal laundry (E.g.: tablecloths, underwear) are dried in a way that the programme has started. This programme rotates the laundry in the machine. 3C. care laundry at high temperature only for a long time thanks to this programme to prevent creasing. •Ventilation Only ventilation is over. You must press the "Low temperature" button for 10 minutes without blowing hot air. Place...
.... Cupboard dry Normal laundry (E.g.: tablecloths, underwear) are dried in a way that the programme has started. This programme rotates the laundry in the machine. 3C. care laundry at high temperature only for a long time thanks to this programme to prevent creasing. •Ventilation Only ventilation is over. You must press the "Low temperature" button for 10 minutes without blowing hot air. Place...
User Manual
Page 15
... Coloreds A Cupboard dry A Iron dry Synthetics B Cupboard dry Energy consumption values Programmes Cottons cupboard dry* Cottons iron dry Synthetics cupboard dry Capacity (kg) Spin speed in washing machine (rpm) Approximate amount of Drying time remaining (minutes) ...Capacity (kg) 7 7 Spin speed in washing machine (rpm) Approximate amount of remaining humidity Energy consumption value kWh 1000 60 % 4.48 1000 60 % 3.40 3.5 800 40 % 1.60 * : Energy Label standard programme (EN 61121:2005) All values given in the table have been fixed according to the laundry type, laundry spin...
... Coloreds A Cupboard dry A Iron dry Synthetics B Cupboard dry Energy consumption values Programmes Cottons cupboard dry* Cottons iron dry Synthetics cupboard dry Capacity (kg) Spin speed in washing machine (rpm) Approximate amount of Drying time remaining (minutes) ...Capacity (kg) 7 7 Spin speed in washing machine (rpm) Approximate amount of remaining humidity Energy consumption value kWh 1000 60 % 4.48 1000 60 % 3.40 3.5 800 40 % 1.60 * : Energy Label standard programme (EN 61121:2005) All values given in the table have been fixed according to the laundry type, laundry spin...

User Manual
Page 16
... programme selection button selection button is selected first will turn on the programme follow -up during a programme running. Child-proof lock is deactivated when the machine is full with wet continuously, please refer to prevent any selected programme; Press the "Start/Pause/Cancel" button to switch the machine to start a new programme after the temperatures and therefore saves energy. Open the door at the...
... programme selection button selection button is selected first will turn on the programme follow -up during a programme running. Child-proof lock is deactivated when the machine is full with wet continuously, please refer to prevent any selected programme; Press the "Start/Pause/Cancel" button to switch the machine to start a new programme after the temperatures and therefore saves energy. Open the door at the...
User Manual
Page 17
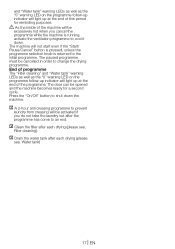
... door can be excessively hot when you do not take the laundry out after each drying (please see , Water tank) 17 EN A As the inside of the machine will not start even if the "Start/ Pause/Cancel" button is pressed, unless the programme selection knob is running, activate the ventilation programme to change the drying programme. The machine will be opened...
... door can be excessively hot when you do not take the laundry out after each drying (please see , Water tank) 17 EN A As the inside of the machine will not start even if the "Start/ Pause/Cancel" button is pressed, unless the programme selection knob is running, activate the ventilation programme to change the drying programme. The machine will be opened...
User Manual
Page 18
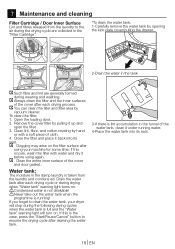
... You can clean the filter drying process. Open the loading door. 2. Water tank; and filter area by vacuum cleaner. Clean lint, fibre, and cotton raveling by hand or with water and dry it under running ! If this occurs, wash the filter with a soft piece of the cover and door gasket. 7 Maintenance and cleaning Filter Cartridge / Door Inner Surface Lint and fibres released from the laundry to the air during the drying cycle are generally formed...
... You can clean the filter drying process. Open the loading door. 2. Water tank; and filter area by vacuum cleaner. Clean lint, fibre, and cotton raveling by hand or with water and dry it under running ! If this occurs, wash the filter with a soft piece of the cover and door gasket. 7 Maintenance and cleaning Filter Cartridge / Door Inner Surface Lint and fibres released from the laundry to the air during the drying cycle are generally formed...
User Manual
Page 19
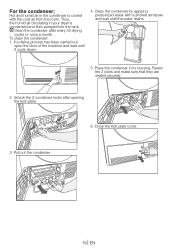
... cold air from the room. drying cycles or once a month. Thus, the humid air circulating in your dryer is cooled with a shower armature and wait until it cools down. 4. Fasten the 2 locks and make sure that they are seated securely. 2. Unlock the 2 condenser locks after opening the kick plate. 6. To clean the condenser: 1. If a drying process has been carried out, open the door of...
... cold air from the room. drying cycles or once a month. Thus, the humid air circulating in your dryer is cooled with a shower armature and wait until it cools down. 4. Fasten the 2 locks and make sure that they are seated securely. 2. Unlock the 2 condenser locks after opening the kick plate. 6. To clean the condenser: 1. If a drying process has been carried out, open the door of...

User Manual
Page 20
... lock. Drum lightning does not come to replace the bulb. A Call an authorized service if the problem persists. 20 EN Make sure that the dryer is on . • Bulb may be ajar. Make sure that the loading door is plugged in . Clean the cover filter. Wash with water. • Excessive laundry might have not been used. "0" LED is not activated when set or the «Start/Pause/Cancel» button...
... lock. Drum lightning does not come to replace the bulb. A Call an authorized service if the problem persists. 20 EN Make sure that the dryer is on . • Bulb may be ajar. Make sure that the loading door is plugged in . Clean the cover filter. Wash with water. • Excessive laundry might have not been used. "0" LED is not activated when set or the «Start/Pause/Cancel» button...
User Manual
Page 21
... repair. What is covered? • Repairs necessary as a result of unauthorised repair or inexpert installation that fails to meet the requirements contained in the user instruction book. • Repairs to products used in commercial or nonresidential domestic household premises. • The product must be correctly installed, located and operated in accordance with the instructions contained in the User Instructions Booklet provided. • Professional installation by a Gas safe registered Gas Installer...
... repair. What is covered? • Repairs necessary as a result of unauthorised repair or inexpert installation that fails to meet the requirements contained in the user instruction book. • Repairs to products used in commercial or nonresidential domestic household premises. • The product must be correctly installed, located and operated in accordance with the instructions contained in the User Instructions Booklet provided. • Professional installation by a Gas safe registered Gas Installer...

User Manual
Page 22
... Dryers Dishwashers Before requesting service please check the trouble-shooting guide in the Operating Instructions as a charge may still be under guarantee. Should you have it will need to have purchased an extended guarantee please refer to the appliance) Model No: Serial No: Retailer: Date of purchase: Republic of purchase in obtaining service please contact the Customer Help-Line. You should the product require...
... Dryers Dishwashers Before requesting service please check the trouble-shooting guide in the Operating Instructions as a charge may still be under guarantee. Should you have it will need to have purchased an extended guarantee please refer to the appliance) Model No: Serial No: Retailer: Date of purchase: Republic of purchase in obtaining service please contact the Customer Help-Line. You should the product require...


