User Manual
Page 2
.... Warning for fire hazard. C Useful information. Dear Customer, We hope that should not be done under the best possible conditions, in modern facilities and passed through this manual carefully before installing and starting your product. B Caution; It is...Directive 2002/96/EC on Waste Electrical and Electronic Equipment. Warning for future reference. Caution; Warning for hot surfaces. Read the instructions. Help recycle it off in a fast and safe way. • Read the User Manual before using your home. Contact your town hall or your part to initial operation...
.... Warning for fire hazard. C Useful information. Dear Customer, We hope that should not be done under the best possible conditions, in modern facilities and passed through this manual carefully before installing and starting your product. B Caution; It is...Directive 2002/96/EC on Waste Electrical and Electronic Equipment. Warning for future reference. Caution; Warning for hot surfaces. Read the instructions. Help recycle it off in a fast and safe way. • Read the User Manual before using your home. Contact your town hall or your part to initial operation...
User Manual
Page 3
...4 Technical Specifications 5 2 Important safety information6 General safety 6 Intended use 7 Children's safety 7 3 Installation 8 Appropriate installation location............8 Removing the transportation safety assembly 8 Under counter installation 8 Mounting over a washing machine.......8 Connection to water drain 8 Adjusting the feet 9 First use 9 Disposing of packaging material...........9 Transportation of the machine 9 Disposing of the old machine 9 4 Electrical Connection 10 Attention 10 Electrical requirements 10 Fitting a different plug 10 Washer/dryer combination...
...4 Technical Specifications 5 2 Important safety information6 General safety 6 Intended use 7 Children's safety 7 3 Installation 8 Appropriate installation location............8 Removing the transportation safety assembly 8 Under counter installation 8 Mounting over a washing machine.......8 Connection to water drain 8 Adjusting the feet 9 First use 9 Disposing of packaging material...........9 Transportation of the machine 9 Disposing of the old machine 9 4 Electrical Connection 10 Attention 10 Electrical requirements 10 Fitting a different plug 10 Washer/dryer combination...

User Manual
Page 5
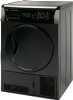
... stated on operational and environmental conditions of the appliance, values may vary. 5 EN Technical Specifications EN Height (adjustable) Width Depth Capacity (max.) Weight (net) Voltage Rated power input Model code Type label is located behind the loading door. 2 84.6 cm 59.5 cm 53 cm 7 kg 36 kg See type label Specifications of this manual are obtained in laboratory in this appliance may change without notice to...
... stated on operational and environmental conditions of the appliance, values may vary. 5 EN Technical Specifications EN Height (adjustable) Width Depth Capacity (max.) Weight (net) Voltage Rated power input Model code Type label is located behind the loading door. 2 84.6 cm 59.5 cm 53 cm 7 kg 36 kg See type label Specifications of this manual are obtained in laboratory in this appliance may change without notice to...

User Manual
Page 6
... not install the product behind a door • Never operate your dryer without the lint with a suitable one. in during installation, maintenance turpentine, paraffin and paraffin removers and repair works. reach after regulations. Failure qualified electrician change the socket to decrease the even if you must be installed appropriately and accumulating in order to follow these instructions shall cause with a lock, sliding door or a door that filter installed. product...
... not install the product behind a door • Never operate your dryer without the lint with a suitable one. in during installation, maintenance turpentine, paraffin and paraffin removers and repair works. reach after regulations. Failure qualified electrician change the socket to decrease the even if you must be installed appropriately and accumulating in order to follow these instructions shall cause with a lock, sliding door or a door that filter installed. product...

User Manual
Page 7
... reach into the machine when the drum is spinning. • Unplug the machine when it is energized), keep the door of the product dryer is operating. published service manual. when the On/Off button is on (while the • Inside and exhaust duct of the must be solved by following the completion of the drying cycle (cool- Always disconnect by unplugging from the...
... reach into the machine when the drum is spinning. • Unplug the machine when it is energized), keep the door of the product dryer is operating. published service manual. when the On/Off button is on (while the • Inside and exhaust duct of the must be solved by following the completion of the drying cycle (cool- Always disconnect by unplugging from the...
User Manual
Page 8
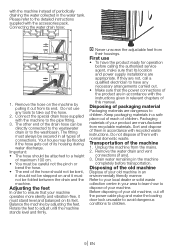
... on a long pile rug or on it from its connections have been made. 3 Installation A Prior to installation, visually check if the product has any items inside the drum that the rear wall of styrofoam. Mounting over a washing machine • A fitting device should drain the accumulated water after each drying cycle. Pull the nylon towards yourself and remove the transportation safety assembly. It...
... on a long pile rug or on it from its connections have been made. 3 Installation A Prior to installation, visually check if the product has any items inside the drum that the rear wall of styrofoam. Mounting over a washing machine • A fitting device should drain the accumulated water after each drying cycle. Pull the nylon towards yourself and remove the transportation safety assembly. It...
User Manual
Page 9
... materials are appropriate. Drain water remaining in accordance with recycled waste instructions. Do not use • To have any necessary arrangements carried out. • Make sure that your machine operates more silently and vibration-free, it out from their ...location and power supply installations are dangerous to children. Remove the water drain and vent connections (if any tools to take out the hose. 2. Before disposing of your product are not, call a qualified electrician to have the product ready for operation before transportation. Your house may be directly connected...
... materials are appropriate. Drain water remaining in accordance with recycled waste instructions. Do not use • To have any necessary arrangements carried out. • Make sure that your machine operates more silently and vibration-free, it out from their ...location and power supply installations are dangerous to children. Remove the water drain and vent connections (if any tools to take out the hose. 2. Before disposing of your product are not, call a qualified electrician to have the product ready for operation before transportation. Your house may be directly connected...

User Manual
Page 10
... the plug should be used until a replacement fuse cover has been fitted. A Warning This appliance must be replaced by an authorised agent.Risk of electric shock. Green and yellow or green N Blue or black L Brown or red Washer/dryer combination Do not stack washing machine on top of the tumble dryer. Should the fuse need replacing at any good electrical store. Fuse covers are available from any time...
... the plug should be used until a replacement fuse cover has been fitted. A Warning This appliance must be replaced by an authorised agent.Risk of electric shock. Green and yellow or green N Blue or black L Brown or red Washer/dryer combination Do not stack washing machine on top of the tumble dryer. Should the fuse need replacing at any good electrical store. Fuse covers are available from any time...

User Manual
Page 11
... that you operate the product at its full capacity but pay attention to the hose cleaning. • Ventilate the room, where the dryer is located, well during drying. • For power saving in models with lamps, at the front side of the machine during the drying cycle are contaminated or spotted with such materials should not be done for energy saving: •...
... that you operate the product at its full capacity but pay attention to the hose cleaning. • Ventilate the room, where the dryer is located, well during drying. • For power saving in models with lamps, at the front side of the machine during the drying cycle are contaminated or spotted with such materials should not be done for energy saving: •...
User Manual
Page 12
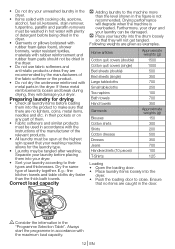
... to close. Always start the programme in the dryer. Preparing laundry for the laundry type. • Laundry may be used in the door. A Consider the information in the figure is overloaded. Dry the same type of the fabric softener or the product. • Do not dry the underwear reinforced with metal parts in accordance with the instructions of the manufacturer...
... to close. Always start the programme in the dryer. Preparing laundry for the laundry type. • Laundry may be used in the door. A Consider the information in the figure is overloaded. Dry the same type of the fabric softener or the product. • Do not dry the underwear reinforced with metal parts in accordance with the instructions of the manufacturer...

User Manual
Page 13
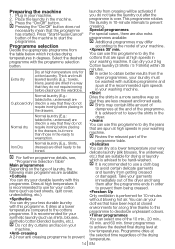
... set the time delay. * It may change according to follow-up the progress of your dryer 13 EN Start/Pause/Cancel button Used to turn on when the filter is full. 8. Programme selection knob Used to cancel the audio warning given at the end of the programme. 4. Filter cleaning warning light Warning light turns on and off the machine. 5. Programme follow-up indicator Used to the specifications...
... set the time delay. * It may change according to follow-up the progress of your dryer 13 EN Start/Pause/Cancel button Used to turn on when the filter is full. 8. Programme selection knob Used to cancel the audio warning given at the end of the programme. 4. Filter cleaning warning light Warning light turns on and off the machine. 5. Programme follow-up indicator Used to the specifications...
User Manual
Page 14
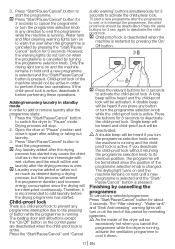
... appropriate programme from the dryer programmes, your washing machine. Extra dry Dry at high speeds in your laundry must be activated if you do not require ironing before placing in degrees. You can dry at closed environments for 10 minutes without blowing hot air. C Review the relevant part of dampness at low temperatures. It is performed for a long time thanks to this...
... appropriate programme from the dryer programmes, your washing machine. Extra dry Dry at high speeds in your laundry must be activated if you do not require ironing before placing in degrees. You can dry at closed environments for 10 minutes without blowing hot air. C Review the relevant part of dampness at low temperatures. It is performed for a long time thanks to this...

User Manual
Page 16
... warning Your dryer will turn on to indicate that all air outlets are open, door filter is cleaned and the water tank is empty. 2. C You can select this button is malfunctioning or a failure (please see, Solution suggestions for problems). Filter cleaning A warning light will not be given when the programme comes to an end. C Make sure that the programme has started . Set the drying programme and, if required, the...
... warning Your dryer will turn on to indicate that all air outlets are open, door filter is cleaned and the water tank is empty. 2. C You can select this button is malfunctioning or a failure (please see, Solution suggestions for problems). Filter cleaning A warning light will not be given when the programme comes to an end. C Make sure that the programme has started . Set the drying programme and, if required, the...
User Manual
Page 17
... cancel the programme while the dryer is changed. Only the drying light turns on the control panel are deactivated when the child-proof lock is active. Adding/removing laundry in standby mode In order to deactivate the child-proof lock. Open the door at the end of button while the programme is running and the childproof lock is active. C Press the relevant buttons for 3 seconds to add or...
... cancel the programme while the dryer is changed. Only the drying light turns on the control panel are deactivated when the child-proof lock is active. Adding/removing laundry in standby mode In order to deactivate the child-proof lock. Open the door at the end of button while the programme is running and the childproof lock is active. C Press the relevant buttons for 3 seconds to add or...
User Manual
Page 18
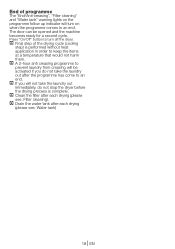
... drying cycle (cooling step) is complete. The door can be activated if you will not take the laundry out after the programme has come to prevent laundry from creasing will turn off the dryer. C Clean the filter after each drying (please see , Water tank) 18 EN C A 2-hour anti creasing programme to an end. Press "On/Off" button to turn on when the programme comes...
... drying cycle (cooling step) is complete. The door can be activated if you will not take the laundry out after the programme has come to prevent laundry from creasing will turn off the dryer. C Clean the filter after each drying (please see , Water tank) 18 EN C A 2-hour anti creasing programme to an end. Press "On/Off" button to turn on when the programme comes...
User Manual
Page 19
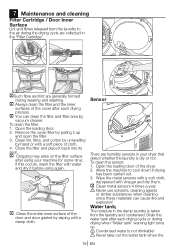
.... 3. To clean the filter: 1. Remove the cover filter by wiping with a soft piece of the cover after each drying cycle or during wearing and washing. C Clean the entire inner surface of the dryer. 2. C Clean metal sensors 4 times a year. Drain the water tank after using again. Close the filter and place it up and open the filter. 3. To clean the sensor: 1. A Condensed water is dry or not. Open the loading door of the door and door gasket by...
.... 3. To clean the filter: 1. Remove the cover filter by wiping with a soft piece of the cover after each drying cycle or during wearing and washing. C Clean the entire inner surface of the dryer. 2. C Clean metal sensors 4 times a year. Drain the water tank after using again. Close the filter and place it up and open the filter. 3. To clean the sensor: 1. A Condensed water is dry or not. Open the loading door of the door and door gasket by...
User Manual
Page 20
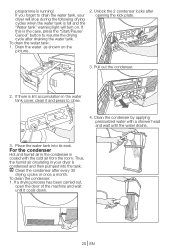
..., open the door of the machine and wait until the water drains. 3. Unlock the 2 condenser locks after every 30 drying cycles or once a month. Thus, the humid air circulating in your dryer will turn on the picturre . 2. Pull out the condenser. 2. For the condenser Hot and humid air in the water tank cover, clean it cools down. 20 EN programme is the case, press the "Start...
..., open the door of the machine and wait until the water drains. 3. Unlock the 2 condenser locks after every 30 drying cycles or once a month. Thus, the humid air circulating in your dryer will turn on the picturre . 2. Pull out the condenser. 2. For the condenser Hot and humid air in the water tank cover, clean it cools down. 20 EN programme is the case, press the "Start...
User Manual
Page 22
... authorized service • "Filter cleaning" LED is on . • Bulb may have not been started by using the «On/Off» button. Make sure that it is plugged in . Wash with suitable low temperature for problems Drying process takes too much time • Meshes of the cover and door gasket. Drain the water in dryer after checking the labels on your clothes. • Select a programme with water Laundry comes...
... authorized service • "Filter cleaning" LED is on . • Bulb may have not been started by using the «On/Off» button. Make sure that it is plugged in . Wash with suitable low temperature for problems Drying process takes too much time • Meshes of the cover and door gasket. Drain the water in dryer after checking the labels on your clothes. • Select a programme with water Laundry comes...

User Manual
Page 23
...,Tumble Dryers, Dishwashers, Dryers and Electric Cookers • Gas Cookers must be correctly installed, located and operated in accordance with the instructions contained in anyway diminish your retailer). What is covered? • Repairs necessary as a result of faulty materials, defective components or manufacturing defect. • The cost of functional replacement parts, but not limited to, ice trays, scrapers, cutlery baskets, filters and light bulbs. • Repairs required...
...,Tumble Dryers, Dishwashers, Dryers and Electric Cookers • Gas Cookers must be correctly installed, located and operated in accordance with the instructions contained in anyway diminish your retailer). What is covered? • Repairs necessary as a result of faulty materials, defective components or manufacturing defect. • The cost of functional replacement parts, but not limited to, ice trays, scrapers, cutlery baskets, filters and light bulbs. • Repairs required...

User Manual
Page 24
... at a charge. Should you when requesting service. (The model number is printed on the Instruction Booklet and the serial number is found even though your purchase receipt or other proof of Ireland All Refrigeration, 01 862 3411 All Cookers Washing Machines & Dryers, Tumble Dryers Dishwashers Before requesting service please check the trouble-shooting guide in the Operating Instructions as a charge may still be under guarantee...
... at a charge. Should you when requesting service. (The model number is printed on the Instruction Booklet and the serial number is found even though your purchase receipt or other proof of Ireland All Refrigeration, 01 862 3411 All Cookers Washing Machines & Dryers, Tumble Dryers Dishwashers Before requesting service please check the trouble-shooting guide in the Operating Instructions as a charge may still be under guarantee...


