User Manual
Page 3
... has started 24 6.14 Child-proof lock 24 6.15 Finishing by cancelling the programme...25 6.16 End of programme 25 7 Maintenance and cleaning 26 7.1 Cleaning Lint Filter / Loading Door Inner Surface 26 7.2 Cleaning the sensor 27 7.3 Draining the water tank 27 7.4 For the condenser 28 8 Suggested solutions for problems 29 9 Guarantee 30 What is covered 30 What is not covered 30 Important notes 30 10 Service 31
... has started 24 6.14 Child-proof lock 24 6.15 Finishing by cancelling the programme...25 6.16 End of programme 25 7 Maintenance and cleaning 26 7.1 Cleaning Lint Filter / Loading Door Inner Surface 26 7.2 Cleaning the sensor 27 7.3 Draining the water tank 27 7.4 For the condenser 28 8 Suggested solutions for problems 29 9 Guarantee 30 What is covered 30 What is not covered 30 Important notes 30 10 Service 31

User Manual
Page 4
... any warranty. 1.1 General safety • The dryer can be held liable for damages that may arise from risk of the product and the risks it ! 1 Important safety and environmental instructions This section contains safety instructions that will cause problems with the dryer. • Always have the installation and repairing procedures carried out by the Authorised Service. Manufacturer shall not be used...
... any warranty. 1.1 General safety • The dryer can be held liable for damages that may arise from risk of the product and the risks it ! 1 Important safety and environmental instructions This section contains safety instructions that will cause problems with the dryer. • Always have the installation and repairing procedures carried out by the Authorised Service. Manufacturer shall not be used...
User Manual
Page 5
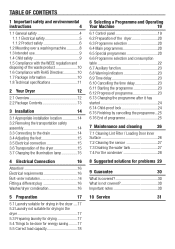
... plug must be easily accessible after installation. Important safety and environmental instructions 1.1.1 Electrical safety A Electrical safety instructions should be changed notifying the Authorised Service. Never unplug by pulling on the type label. (See 2.1 Overview) Have the grounding installation performed by an authorised service agent! Dryer / User Manual 5 / 32 EN There is repaired by a qualified electrician. B Damaged mains cable should be followed while electrical connection is made during installation, maintenance, cleaning and repair works...
... plug must be easily accessible after installation. Important safety and environmental instructions 1.1.1 Electrical safety A Electrical safety instructions should be changed notifying the Authorised Service. Never unplug by pulling on the type label. (See 2.1 Overview) Have the grounding installation performed by an authorised service agent! Dryer / User Manual 5 / 32 EN There is repaired by a qualified electrician. B Damaged mains cable should be followed while electrical connection is made during installation, maintenance, cleaning and repair works...

User Manual
Page 6
... stains must be dried in hot water with industrial chemicals. Clothes that you must not be washed in the dryer due to dissipate the heat. Never stop your dryer. Below specified laundry or items must do this use adequate detergent and choose a high washing temperature. Items such as lighter, match, coins, metal parts, needle etc. For this , remove all the laundry...
... stains must be dried in hot water with industrial chemicals. Clothes that you must not be washed in the dryer due to dissipate the heat. Never stop your dryer. Below specified laundry or items must do this use adequate detergent and choose a high washing temperature. Items such as lighter, match, coins, metal parts, needle etc. For this , remove all the laundry...
User Manual
Page 7
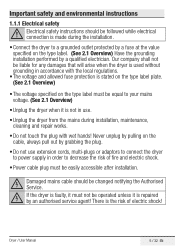
... be dried in the operating instructions or the published service manual. Important safety and environmental instructions • You must provide enough ventilation in order to prevent gases exiting from devices operating with the instructions of their manufacturers. Never operate the dryer without the lint filter installed. • Never attempt to the back fire effect. Check the inside of the dryer before or after each loading. Dryer / User Manual 7 / 32...
... be dried in the operating instructions or the published service manual. Important safety and environmental instructions • You must provide enough ventilation in order to prevent gases exiting from devices operating with the instructions of their manufacturers. Never operate the dryer without the lint filter installed. • Never attempt to the back fire effect. Check the inside of the dryer before or after each loading. Dryer / User Manual 7 / 32...

User Manual
Page 9
... tamper with the dryer. C Child-proof lock is on the control panel. (See Child lock) • Keep loading door closed even when the dryer is operating. It is not suitable for the children. Do not let them tamper with the dryer. Use the child-proof lock in order to prevent the children to repair the dryer for a period of its intended use. • Use the dryer only for drying laundry that...
... tamper with the dryer. C Child-proof lock is on the control panel. (See Child lock) • Keep loading door closed even when the dryer is operating. It is not suitable for the children. Do not let them tamper with the dryer. Use the child-proof lock in order to prevent the children to repair the dryer for a period of its intended use. • Use the dryer only for drying laundry that...
User Manual
Page 11
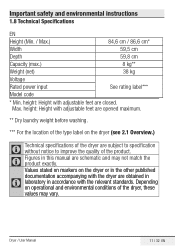
... in accordance with adjustable feet are opened maximum. ** Dry laundry weight before washing. *** For the location of the type label on operational and environmental conditions of the product. Dryer / User Manual 11 / 32 EN height: Height with the relevant standards. height: Height with adjustable feet are schematic and may vary. Important safety and environmental instructions 1.8 Technical Specifications EN Height (Min. / Max.) 2 84...
... in accordance with adjustable feet are opened maximum. ** Dry laundry weight before washing. *** For the location of the type label on operational and environmental conditions of the product. Dryer / User Manual 11 / 32 EN height: Height with the relevant standards. height: Height with adjustable feet are schematic and may vary. Important safety and environmental instructions 1.8 Technical Specifications EN Height (Min. / Max.) 2 84...

User Manual
Page 14
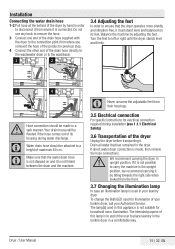
... /32 EN Dryer / User Manual A Prior to installation, visually check if the dryer has any defects on the power cable. 3.2 Removing the transportation safety assembly A Remove the transportation safety assembly before using the dryer for the first time. • Open the loading door. • There is a nylon bag inside the drum. 3.3 Connecting to make sure that electrical installation and water drain is appropriate referring to the user's manual. (See 3.3 Connecting to the drain and 3.5 Electrical connection) If...
... /32 EN Dryer / User Manual A Prior to installation, visually check if the dryer has any defects on the power cable. 3.2 Removing the transportation safety assembly A Remove the transportation safety assembly before using the dryer for the first time. • Open the loading door. • There is a nylon bag inside the drum. 3.3 Connecting to make sure that electrical installation and water drain is appropriate referring to the user's manual. (See 3.3 Connecting to the drain and 3.5 Electrical connection) If...
User Manual
Page 15
... position. If it is not stepped on its housing during installation (see 1.1.1 Electrical Safety) 3.6 Transportation of maximum 80 cm. The lamp(s) used for electrical connection required during water discharge. Dryer / User Manual 15 / 32 EN C Water drain hose should be attached to disconnect it from their housings. 3.5 Electrical connection For specific instructions for illumination of the drain hose directly to the wastewater drain or to the washbasin. 1 2 3.4 Adjusting...
... position. If it is not stepped on its housing during installation (see 1.1.1 Electrical Safety) 3.6 Transportation of maximum 80 cm. The lamp(s) used for electrical connection required during water discharge. Dryer / User Manual 15 / 32 EN C Water drain hose should be attached to disconnect it from their housings. 3.5 Electrical connection For specific instructions for illumination of the drain hose directly to the wastewater drain or to the washbasin. 1 2 3.4 Adjusting...
User Manual
Page 16
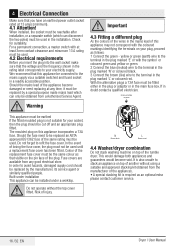
... same rating must be used. 4.2 Electrical requirements Before you have an earthed power outlet socket rated at least 3mm contact clearance and minumum 13 A rating must be used until a replacement fuse cover has been fitted. Should the fuse need replacing at any good electrical store. For a permanent connection, a master switch with the symbol or coloured green and yellow or green. 2 Connect the blue (neutral) wire to the terminal in the plug marked...
... same rating must be used. 4.2 Electrical requirements Before you have an earthed power outlet socket rated at least 3mm contact clearance and minumum 13 A rating must be used until a replacement fuse cover has been fitted. Should the fuse need replacing at any good electrical store. For a permanent connection, a master switch with the symbol or coloured green and yellow or green. 2 Connect the blue (neutral) wire to the terminal in the plug marked...

User Manual
Page 17
... to dry Dry-cleanable Drying Settings Iron - Thus, the drying time is shortened and energy consumption is located, well during drying unless necessary. For example thin kitchen towels and table clothes dries earlier than thick bathroom towels. • Follow the instructions in the user manual for programme selection. • Do not open for a long time. • Do not add wet laundry while the dryer is in operation • Clean the lint filter...
... to dry Dry-cleanable Drying Settings Iron - Thus, the drying time is shortened and energy consumption is located, well during drying unless necessary. For example thin kitchen towels and table clothes dries earlier than thick bathroom towels. • Follow the instructions in the user manual for programme selection. • Do not open for a long time. • Do not add wet laundry while the dryer is in operation • Clean the lint filter...
User Manual
Page 19
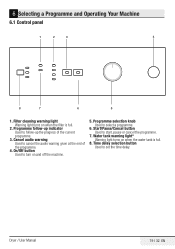
Start/Pause/Cancel button Used to set the time delay. Time delay selection button Used to start, pause or cancel the programme. 7. Water tank warning light* Warning light turns on when the filter is full. 8. Filter cleaning warning light Warning light turns on when the water tank is full. 2. Programme follow -up indicator Used to cancel the audio warning given at the end of the current programme. 3. Cancel audio warning Used to follow...
Start/Pause/Cancel button Used to set the time delay. Time delay selection button Used to start, pause or cancel the programme. 7. Water tank warning light* Warning light turns on when the filter is full. 8. Filter cleaning warning light Warning light turns on when the water tank is full. 2. Programme follow -up indicator Used to cancel the audio warning given at the end of the current programme. 3. Cancel audio warning Used to follow...

User Manual
Page 20
... and Operating Your Machine 6.2 Preparation of the dryer • Plug in the dryer. • Open the loading door. • Place the laundry in the machine without compressing. • Push the loading door to the model of your machine. •Xpress 35' min. A Ensure that the programme has started. Press "Start/Pause/Cancel" button of laundry, the following main programmes are spun at high temperature...
... and Operating Your Machine 6.2 Preparation of the dryer • Plug in the dryer. • Open the loading door. • Place the laundry in the machine without compressing. • Push the loading door to the model of your machine. •Xpress 35' min. A Ensure that the programme has started. Press "Start/Pause/Cancel" button of laundry, the following main programmes are spun at high temperature...

User Manual
Page 23
... that all air outlets are open, door filter is cleaned and the water tank is empty. • • Set the drying programme and, if required, the auxiliary functions. • When the time programming button is pressed once, a 3 hour delay is pressed one LED light up and light of a running . C Make sure that the programme has started by pressing the "Start/Pause/Cancel" button after the programme starts. 6.8 Warning indicators...
... that all air outlets are open, door filter is cleaned and the water tank is empty. • • Set the drying programme and, if required, the auxiliary functions. • When the time programming button is pressed once, a 3 hour delay is pressed one LED light up and light of a running . C Make sure that the programme has started by pressing the "Start/Pause/Cancel" button after the programme starts. 6.8 Warning indicators...
User Manual
Page 24
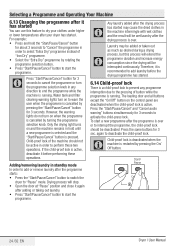
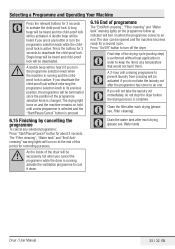
... has started You can use this process will extend the C programme duration and increase energy consumption since the drying will be interrupted continuously. However, the warning lights do not turn on the control panel are deactivated when the child-proof lock is cancelled by pressing the "Start/Pause/Cancel" button for 3 seconds to start the programme. To start the programme. The loading door and all buttons except...
... has started You can use this process will extend the C programme duration and increase energy consumption since the drying will be interrupted continuously. However, the warning lights do not turn on the control panel are deactivated when the child-proof lock is cancelled by pressing the "Start/Pause/Cancel" button for 3 seconds to start the programme. To start the programme. The loading door and all buttons except...
User Manual
Page 25
... inside of the drying cycle (cooling step) C is active. Press "On/Off" button to activate the child-proof lock. C Clean the filter after each drying (please see , Water tank) Dryer / User Manual 25 / 32 EN A long beep will be heard and the child-proof lock will be deactivated. Selecting a Programme and Operating Your Machine C Press the relevant buttons for 3 seconds to turn off the dryer. A double beep will be excessively hot when you...
... inside of the drying cycle (cooling step) C is active. Press "On/Off" button to activate the child-proof lock. C Clean the filter after each drying (please see , Water tank) Dryer / User Manual 25 / 32 EN A long beep will be heard and the child-proof lock will be deactivated. Selecting a Programme and Operating Your Machine C Press the relevant buttons for 3 seconds to turn off the dryer. A double beep will be excessively hot when you...
User Manual
Page 26
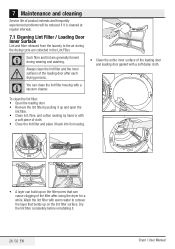
... lint filter completely before reinstalling it. 26 /32 EN Dryer / User Manual Wash the lint filter with warm water to the air during the drying cycle are generally formed during wearing and washing. A Always clean the lint filter and the inner surfaces of the loading door after using the dryer for a while. 7 Maintenance and cleaning Service life of product extends and frequently experienced problems will be reduced if it is cleaned at regular intervals. 7.1 Cleaning Lint Filter / Loading Door...
... lint filter completely before reinstalling it. 26 /32 EN Dryer / User Manual Wash the lint filter with warm water to the air during the drying cycle are generally formed during wearing and washing. A Always clean the lint filter and the inner surfaces of the loading door after using the dryer for a while. 7 Maintenance and cleaning Service life of product extends and frequently experienced problems will be reduced if it is cleaned at regular intervals. 7.1 Cleaning Lint Filter / Loading Door...
User Manual
Page 27
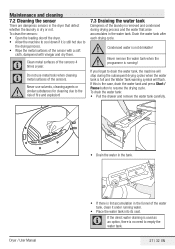
... in the water tank. To clean the sensors: • Open the loading doorof the dryer. • Allow the machine to cool down if it under running ! Drain the water tank after each drying cycle. A Condensed water is dry or not. To drain the water tank: • Pull the drawer and remove the water tank carefully. C If the direct water draining is used as an option, there is still hot due to...
... in the water tank. To clean the sensors: • Open the loading doorof the dryer. • Allow the machine to cool down if it under running ! Drain the water tank after each drying cycle. A Condensed water is dry or not. To drain the water tank: • Pull the drawer and remove the water tank carefully. C If the direct water draining is used as an option, there is still hot due to...

User Manual
Page 29
...-creasing" LED flashes. • The 2-hour anti creasing programme to start . Drum lightning does not come to an end. Call your authorised service • "Filter cleaning" LED is closed . • Programme might have not been set . • It might have not been plugged in dryer after checking the labels on . • Filter might have not been used. "Water comes out the cover" • Clean the entire inner...
...-creasing" LED flashes. • The 2-hour anti creasing programme to start . Drum lightning does not come to an end. Call your authorised service • "Filter cleaning" LED is closed . • Programme might have not been set . • It might have not been plugged in dryer after checking the labels on . • Filter might have not been used. "Water comes out the cover" • Clean the entire inner...

User Manual
Page 30
.... • Cabinet or appearance parts, including knobs, flaps, handles or container lids. • Accessories or consumable items including but not limited to, ice trays, scrapers, cutlery baskets, filters and light bulbs. • Repairs required as a result of unauthorised repair or inexpert installation that fails to meet the requirements contained in the user instruction book. • Repairs to products used on commercial or nonresidential...
.... • Cabinet or appearance parts, including knobs, flaps, handles or container lids. • Accessories or consumable items including but not limited to, ice trays, scrapers, cutlery baskets, filters and light bulbs. • Repairs required as a result of unauthorised repair or inexpert installation that fails to meet the requirements contained in the user instruction book. • Repairs to products used on commercial or nonresidential...


