
User Manual
Page 3
... 6.12 Child lock 24 6.13 Changing the Programme after it has started 24 6.14 Cancelling the Programme...........24 6.15 Programme end 25 7 Maintenance and cleaning 26 7.1 Cleaning lint filter / Loading door inner surface 26 7.2 Cleaning the sensor 26 7.3 Draining the water tank 27 7.4 Cleaning the condenser 27 8 Troubleshooting 29 4 Electrical Connection 16 4.1 Attention 16 4.2 Electrical requirements 16 4.3 Fitting a different plug 16 4.4 Washer/dryer combination 16 5 Preparations 17 5.1 Laundry suitable for drying in the dryer 17...
... 6.12 Child lock 24 6.13 Changing the Programme after it has started 24 6.14 Cancelling the Programme...........24 6.15 Programme end 25 7 Maintenance and cleaning 26 7.1 Cleaning lint filter / Loading door inner surface 26 7.2 Cleaning the sensor 26 7.3 Draining the water tank 27 7.4 Cleaning the condenser 27 8 Troubleshooting 29 4 Electrical Connection 16 4.1 Attention 16 4.2 Electrical requirements 16 4.3 Fitting a different plug 16 4.4 Washer/dryer combination 16 5 Preparations 17 5.1 Laundry suitable for drying in the dryer 17...
User Manual
Page 4
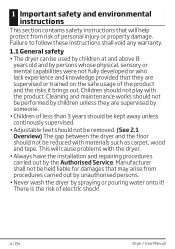
.... • Never wash the dryer by spraying or pouring water onto it brings out. Failure to follow these instructions shall void any warranty. 1.1 General safety • The dryer can be reduced with the product. 1 Important safety and environmental instructions This section contains safety instructions that will cause problems with the dryer. • Always have the installation and repairing procedures carried out by...
.... • Never wash the dryer by spraying or pouring water onto it brings out. Failure to follow these instructions shall void any warranty. 1.1 General safety • The dryer can be reduced with the product. 1 Important safety and environmental instructions This section contains safety instructions that will cause problems with the dryer. • Always have the installation and repairing procedures carried out by...
User Manual
Page 5
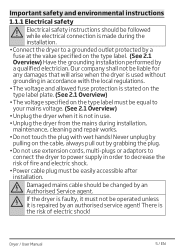
... out by grabbing the plug. • Do not use . • Unplug the dryer from the mains during installation, maintenance, cleaning and repair works. • Do not touch the plug with the local regulations. • The voltage and allowed fuse protection is the risk of fire and electric shock. • Power cable plug must not be operated unless it is repaired by an authorised service agent! Dryer / User Manual 5 / EN
... out by grabbing the plug. • Do not use . • Unplug the dryer from the mains during installation, maintenance, cleaning and repair works. • Do not touch the plug with the local regulations. • The voltage and allowed fuse protection is the risk of fire and electric shock. • Power cable plug must not be operated unless it is repaired by an authorised service agent! Dryer / User Manual 5 / EN
User Manual
Page 7
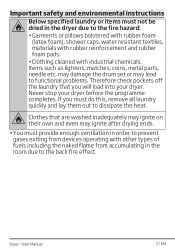
... room due to dissipate the heat. Dryer / User Manual 7 / EN Items such as lighters, matches, coins, metal parts, needle etc. If you will load into your dryer before the programme completes. Never stop your dryer. Important safety and environmental instructions Below specified laundry or items must not be dried in the dryer due to functional problems. Therefore check pockets off the laundry that...
... room due to dissipate the heat. Dryer / User Manual 7 / EN Items such as lighters, matches, coins, metal parts, needle etc. If you will load into your dryer before the programme completes. Never stop your dryer. Important safety and environmental instructions Below specified laundry or items must not be dried in the dryer due to functional problems. Therefore check pockets off the laundry that...
User Manual
Page 8
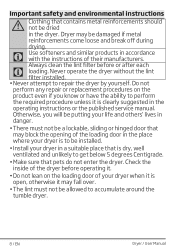
... life and others' lives in the operating instructions or the published service manual. Do not perform any repair or replacement procedures on the loading door of your dryer when it is to be allowed to get below 5 degrees Centigrade. • Make sure that pets do not enter the dryer. C Always clean the lint filter before operating it may block the opening of their manufacturers. Otherwise, you...
... life and others' lives in the operating instructions or the published service manual. Do not perform any repair or replacement procedures on the loading door of your dryer when it is to be allowed to get below 5 degrees Centigrade. • Make sure that pets do not enter the dryer. C Always clean the lint filter before operating it may block the opening of their manufacturers. Otherwise, you...
User Manual
Page 10
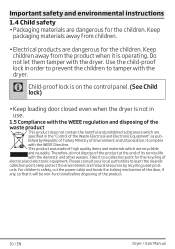
...instructions 1.4 Child safety • Packaging materials are dangerous for the children. Use the child-proof lock in order to prevent the children to tamper with the dryer. This product was made of Environment and Urbanization. C Child-proof lock is on the control panel. (See Child lock) • Keep loading door closed even when the dryer is operating... away from children. • Electrical products are dangerous for the recycling of the product. 10 / EN Dryer / User Manual Therefore, do not dispose of the product at the end of its service life with the WEEE Directive.
...instructions 1.4 Child safety • Packaging materials are dangerous for the children. Use the child-proof lock in order to prevent the children to tamper with the dryer. This product was made of Environment and Urbanization. C Child-proof lock is on the control panel. (See Child lock) • Keep loading door closed even when the dryer is operating... away from children. • Electrical products are dangerous for the recycling of the product. 10 / EN Dryer / User Manual Therefore, do not dispose of the product at the end of its service life with the WEEE Directive.
User Manual
Page 11
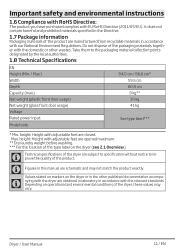
... authorities. 1.8 Technical Specifications EN Height (Min. / Max.) Width Depth Capacity (max.) Net weight (plastic front door usage) Net weight (glass front door usage) Voltage Rated power input Model code 84,6 cm / 86,6 cm* 59,5 cm 60,9 cm 9 kg** 39 kg 41 kg See type label*** * Min. C nying with the dryer are obtained in laboratory in accordance with EU RoHS Directive (2011/65...
... authorities. 1.8 Technical Specifications EN Height (Min. / Max.) Width Depth Capacity (max.) Net weight (plastic front door usage) Net weight (glass front door usage) Voltage Rated power input Model code 84,6 cm / 86,6 cm* 59,5 cm 60,9 cm 9 kg** 39 kg 41 kg See type label*** * Min. C nying with the dryer are obtained in laboratory in accordance with EU RoHS Directive (2011/65...
User Manual
Page 14
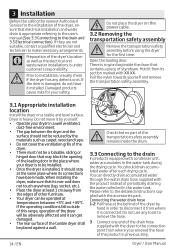
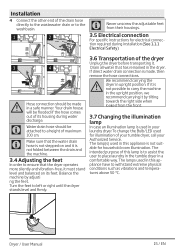
... it from where you removed the hose of styrofoam. Pull the nylon towards yourself and remove the transportation safety assembly. 3.1 Appropriate installation location Install the dryer on it installed. Dryer is damaged, do not have been made. A Check that no part of the transportation safety assembly remains inside the drum that may block the opening of the loading door in the water tank during the drying cycle. 3 Installation Before the calling the...
... it from where you removed the hose of styrofoam. Pull the nylon towards yourself and remove the transportation safety assembly. 3.1 Appropriate installation location Install the dryer on it installed. Dryer is damaged, do not have been made. A Check that no part of the transportation safety assembly remains inside the drum that may block the opening of the loading door in the water tank during the drying cycle. 3 Installation Before the calling the...
User Manual
Page 15
... your laundry dryer.To change the Bulb/LED used for illumination of your tumble dryer, call your Authorized Service. The intended purpose of this lamp is made in a comfortable way. C Water drain hose should be made , then remove the hose connections. Balance the machine by tilting towards the right side when looked from their housings. 3.5 Electrical connection For specific instructions for household room illumination. Dryer / User Manual 15 / EN...
... your laundry dryer.To change the Bulb/LED used for illumination of your tumble dryer, call your Authorized Service. The intended purpose of this lamp is made in a comfortable way. C Water drain hose should be made , then remove the hose connections. Balance the machine by tilting towards the right side when looked from their housings. 3.5 Electrical connection For specific instructions for household room illumination. Dryer / User Manual 15 / EN...

User Manual
Page 16
... a suitable switched and fused socket in a readily accessible position. Colour of another without the top cover fitted. With the alternative plugs a 13A fuse must be earthed If the fitted moulded plug is required as follows: 1 Connect the green - It is also unsafe to stack an appliance on top of the replacement fuse cover must be used . 4.2 Electrical requirements Before you have an earthed power outlet socket rated at 13...
... a suitable switched and fused socket in a readily accessible position. Colour of another without the top cover fitted. With the alternative plugs a 13A fuse must be earthed If the fitted moulded plug is required as follows: 1 Connect the green - It is also unsafe to stack an appliance on top of the replacement fuse cover must be used . 4.2 Electrical requirements Before you have an earthed power outlet socket rated at 13...

User Manual
Page 17
... drying time is shortened and energy consumption is in operation • Clean the lint filter before placing them . Dry only the laundry having metal accessories such as zippers, inside out. • Fasten the zippers, hooks and buckles and button sheets. 5.4 Things to be tangled with dryer Do not dry Do not dryclean At any temperature At high temperature At medium temperature At low temperature Without heating Hang to dry...
... drying time is shortened and energy consumption is in operation • Clean the lint filter before placing them . Dry only the laundry having metal accessories such as zippers, inside out. • Fasten the zippers, hooks and buckles and button sheets. 5.4 Things to be tangled with dryer Do not dry Do not dryclean At any temperature At high temperature At medium temperature At low temperature Without heating Hang to dry...
User Manual
Page 22
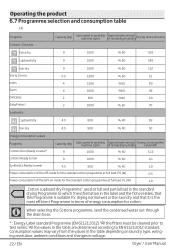
... BabyProtect Capacity (kg) Spin speed in washing machine (rpm) Approximate amount of remaining humidity value kWh 9 1000 % 60 5,12 9 1000 % 60 4,1 Synthetics Ready to EN 61121:2012 standard. When selecting the Cottons programme, send the condensed water out through the drain hose. * : Energy Label standard Programme (EN 61121:2012) "All the filters must be cleaned prior to test series...
... BabyProtect Capacity (kg) Spin speed in washing machine (rpm) Approximate amount of remaining humidity value kWh 9 1000 % 60 5,12 9 1000 % 60 4,1 Synthetics Ready to EN 61121:2012 standard. When selecting the Cottons programme, send the condensed water out through the drain hose. * : Energy Label standard Programme (EN 61121:2012) "All the filters must be cleaned prior to test series...
User Manual
Page 23
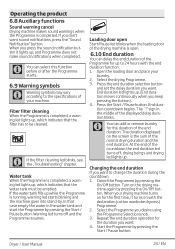
... completed. Open the loading door and place your drying machine turns on with the end duration function. 1. The duration displayed on the drying machine again by pressing the On/Off button. Repeat the end duration operation for the first time, it lights up , which indicates that the water tank must be cleaned. Start the Programme by pressing the Start / Pause button. Dryer / User Manual 23 / EN Fiber filter cleaning When...
... completed. Open the loading door and place your drying machine turns on with the end duration function. 1. The duration displayed on the drying machine again by pressing the On/Off button. Repeat the end duration operation for the first time, it lights up , which indicates that the water tank must be cleaned. Start the Programme by pressing the Start / Pause button. Dryer / User Manual 23 / EN Fiber filter cleaning When...
User Manual
Page 24
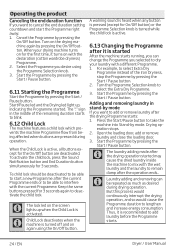
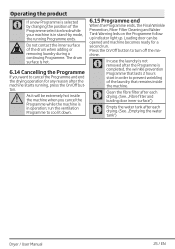
... Start/Pause button to select the Extra Dry Programme. 3. Open the loading door, add or remove laundry and close the loading door. 3. Keep the same buttons pressed for 3 seconds. Thus, it is activated. Start the Programme by pressing the On/Off button. Operating the product Canceling the end duration function If you selected to dry your drying machine turns on for the first time, it turns on the screen lights...
... Start/Pause button to select the Extra Dry Programme. 3. Open the loading door, add or remove laundry and close the loading door. 3. Keep the same buttons pressed for 3 seconds. Thus, it is activated. Start the Programme by pressing the On/Off button. Operating the product Canceling the end duration function If you selected to dry your drying machine turns on for the first time, it turns on the screen lights...
User Manual
Page 25
... to cool it will be opened and machine becomes ready for any reason after each drying. (See. „Fibre filter and loading door inner surface") C Empty the water tank after the machine starts running Programme ends. Press the On/Off button to prevent wrinkling of the laundry that lasts 2 hours start in stand-by changing the position of the drum when adding or removing laundry...
... to cool it will be opened and machine becomes ready for any reason after each drying. (See. „Fibre filter and loading door inner surface") C Empty the water tank after the machine starts running Programme ends. Press the On/Off button to prevent wrinkling of the laundry that lasts 2 hours start in stand-by changing the position of the drum when adding or removing laundry...
User Manual
Page 26
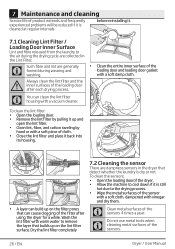
... sensor with a soft cloth, dampened with a soft damp cloth. To clean the lint filter: • Open the loading door. • Remove the lint filter by pulling it up on the filter pores that detect whether the laundry is cleaned at regular intervals. Dry the lint filter completely C C Clean metal surfaces of the sensors. 26 / EN Dryer / User Manual To clean the sensors: • Open the loading doorof the dryer. • Allow the machine to cool down if it . 7.1 Cleaning Lint Filter / Loading Door...
... sensor with a soft cloth, dampened with a soft damp cloth. To clean the lint filter: • Open the loading door. • Remove the lint filter by pulling it up on the filter pores that detect whether the laundry is cleaned at regular intervals. Dry the lint filter completely C C Clean metal surfaces of the sensors. 26 / EN Dryer / User Manual To clean the sensors: • Open the loading doorof the dryer. • Allow the machine to cool down if it . 7.1 Cleaning Lint Filter / Loading Door...
User Manual
Page 27
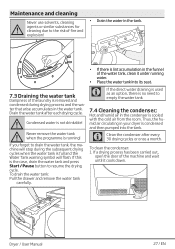
... case, drain the water tank and press Start / Pause button to resume the drying cycle. A Condensed water is running water. • Place the water tank into the tank. C Clean the condenser after each drying cycle. To drain the water tank: Pull the drawer and remove the water tank carefully. • If there is lint accumulation in your dryer is condensed and then pumped into its seat. Dryer / User Manual 27 / EN...
... case, drain the water tank and press Start / Pause button to resume the drying cycle. A Condensed water is running water. • Place the water tank into the tank. C Clean the condenser after each drying cycle. To drain the water tank: Pull the drawer and remove the water tank carefully. • If there is lint accumulation in your dryer is condensed and then pumped into its seat. Dryer / User Manual 27 / EN...
User Manual
Page 29
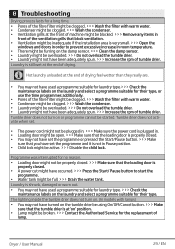
... drying feel wetter than they really are. • You may not have used a programme suitable for laundry type.>>> Check the maintenance labels on ' position. • Lamp might be broken. >>> Contact the Authorised Service for their type. Dryer / User Manual 29 / EN Tumble drier does not activate when set. • The power cord might not be plugged in. >>> Make sure the power cord is plugged in Pause position. • Child lock...
... drying feel wetter than they really are. • You may not have used a programme suitable for laundry type.>>> Check the maintenance labels on ' position. • Lamp might be broken. >>> Contact the Authorised Service for their type. Dryer / User Manual 29 / EN Tumble drier does not activate when set. • The power cord might not be plugged in. >>> Make sure the power cord is plugged in Pause position. • Child lock...
User Manual
Page 30
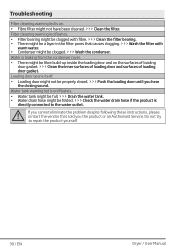
... eliminate the problem despite following these instructions, please contact the vendor that causes clogging. >>> Wash the filter with fibre. >>> Clean the filter bearing. • There might be folded. >>> Check the water drain hose if the product is directly connected to repair the product yourself 30 / EN Dryer / User Manual Troubleshooting Filter cleaning warning led is on. • Fibre filter might not be properly closed. >>> Push the loading door until you...
... eliminate the problem despite following these instructions, please contact the vendor that causes clogging. >>> Wash the filter with fibre. >>> Clean the filter bearing. • There might be folded. >>> Check the water drain hose if the product is directly connected to repair the product yourself 30 / EN Dryer / User Manual Troubleshooting Filter cleaning warning led is on. • Fibre filter might not be properly closed. >>> Push the loading door until you...

User Manual
Page 32
What is covered? • Repairs necessary as a result of faulty materials, defective components or manufacturing defect. • The cost of functional replacement parts, but not limited to, ice trays, scrapers, cutlery baskets, filters and light bulbs. • Repairs required as a result of unauthorised repair or inexpert installation that fails to meet the requirements contained in the user instruction book. • Repairs to products used in freezers or...
What is covered? • Repairs necessary as a result of faulty materials, defective components or manufacturing defect. • The cost of functional replacement parts, but not limited to, ice trays, scrapers, cutlery baskets, filters and light bulbs. • Repairs required as a result of unauthorised repair or inexpert installation that fails to meet the requirements contained in the user instruction book. • Repairs to products used in freezers or...


