Owners Manual
Page 3
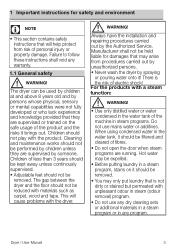
... odour in any warranty. 1.1 General safety A WARNING! 1 Important instructions for damages that may be reduced with a steam function: A WARNING! • Use only distilled water or water condensed in the water tank of fibres. • Do not open the door when steam programs are supervised by the Authorized Service. The gap between the dryer and the floor should be removed. When using condensed water in a steam program, stains...
... odour in any warranty. 1.1 General safety A WARNING! 1 Important instructions for damages that may be reduced with a steam function: A WARNING! • Use only distilled water or water condensed in the water tank of fibres. • Do not open the door when steam programs are supervised by the Authorized Service. The gap between the dryer and the floor should be removed. When using condensed water in a steam program, stains...
Owners Manual
Page 4
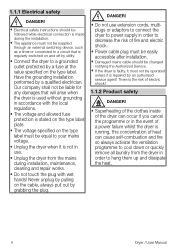
... of a power failure whilst the dryer is running, this concentration of fire and electric shock. • Power cable plug must be easily accessible after installation. • Damaged mains cable should be followed while electrical connection is made during installation, maintenance, cleaning and repair works. • Do not touch the plug with the local regulations. • The voltage and allowed fuse protection is stated on the type label plate...
... of a power failure whilst the dryer is running, this concentration of fire and electric shock. • Power cable plug must be easily accessible after installation. • Damaged mains cable should be followed while electrical connection is made during installation, maintenance, cleaning and repair works. • Do not touch the plug with the local regulations. • The voltage and allowed fuse protection is stated on the type label plate...

Owners Manual
Page 5
..., metal parts, needle etc. Dryer / User Manual 5 may damage the drum set or may be damaged if metal reinforcements come loose and break off during drying. C NOTE • Use softeners and similar products in hot water with plenty of detergent before or after drying ends. • You must be dried in the room due to dissipate the heat. Never operate the dryer without the lint filter installed. For this...
..., metal parts, needle etc. Dryer / User Manual 5 may damage the drum set or may be damaged if metal reinforcements come loose and break off during drying. C NOTE • Use softeners and similar products in hot water with plenty of detergent before or after drying ends. • You must be dried in the room due to dissipate the heat. Never operate the dryer without the lint filter installed. For this...
Owners Manual
Page 6
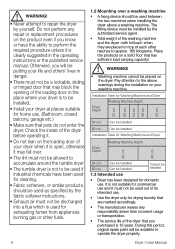
... be installed 1.3 Intended use • Dryer has been designed for domestic use. During this period, original spare parts will be putting your life and others' lives in the operating instructions or the published service manual. Check the inside of the dryer before operating it. • Do not lean on the loading door of your dryer when it is open, otherwise it may block the opening of the loading door in...
... be installed 1.3 Intended use • Dryer has been designed for domestic use. During this period, original spare parts will be putting your life and others' lives in the operating instructions or the published service manual. Check the inside of the dryer before operating it. • Do not lean on the loading door of your dryer when it is open, otherwise it may block the opening of the loading door in...
Owners Manual
Page 7
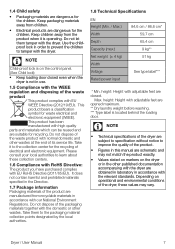
... and other published documentation accompanying with the dryer are schematic and may vary. Max. height: Height with the dryer. Depending on operational and environmental conditions of the waste product with the dryer. Take it is operating. 1.4 Child safety • Packaging materials are opened maximum. ** Dry laundry weight before washing. *** Type label is located behind the loading door. Do not let them to tamper...
... and other published documentation accompanying with the dryer are schematic and may vary. Max. height: Height with the dryer. Depending on operational and environmental conditions of the waste product with the dryer. Take it is operating. 1.4 Child safety • Packaging materials are opened maximum. ** Dry laundry weight before washing. *** Type label is located behind the loading door. Do not let them to tamper...

Owners Manual
Page 8
... of this range, operation of the dryer, ensure that may block the opening button 5. In models where the tank is placed below, the water tank is under customer's responsibility. Water tank drawer (in models where the tank is damaged, do not have been made. User Manual 7. Drying basket* 8. If the drier is placed above) 11. When installing the dryer, make necessary arrangements. Loading door 4. Water drain hose * 5. Damaged products...
... of this range, operation of the dryer, ensure that may block the opening button 5. In models where the tank is placed below, the water tank is under customer's responsibility. Water tank drawer (in models where the tank is damaged, do not have been made. User Manual 7. Drying basket* 8. If the drier is placed above) 11. When installing the dryer, make necessary arrangements. Loading door 4. Water drain hose * 5. Damaged products...
Owners Manual
Page 9
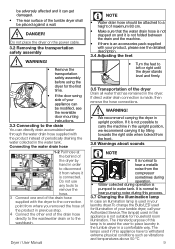
... the reversible door mounting instructions. 3.3 Connecting to the drain You can get damaged. • The rear surface of the tumble dryer shall be placed against a wall. A WARNING! • We recommend carrying the dryer in upright position. The intended purpose of this appliance have to withstand extreme physical conditions such as vibrations and temperatures above 50 °C 9 If direct water drain connection...
... the reversible door mounting instructions. 3.3 Connecting to the drain You can get damaged. • The rear surface of the tumble dryer shall be placed against a wall. A WARNING! • We recommend carrying the dryer in upright position. The intended purpose of this appliance have to withstand extreme physical conditions such as vibrations and temperatures above 50 °C 9 If direct water drain connection...
Owners Manual
Page 10
... a long time. • Do not add wet laundry while the dryer is in operation • For models with a condenser unit: clean the condenser once in a month or after every 30 operations regularly. . • Clean the filter periodically when there is visible air collection on it open the loading door of laundry together. Do not load more than thick bathroom towels. • Follow the instructions in...
... a long time. • Do not add wet laundry while the dryer is in operation • For models with a condenser unit: clean the condenser once in a month or after every 30 operations regularly. . • Clean the filter periodically when there is visible air collection on it open the loading door of laundry together. Do not load more than thick bathroom towels. • Follow the instructions in...
Owners Manual
Page 11
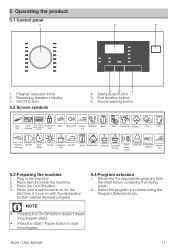
.... 2. Start/pause button 5. Sound warning button Tank full Filter Filter drawer / Child-proof cleaning Heat exchanger cleaning lock Mute Volume up Express Delicates 14' Shirts Sport Freshen Up Cottons Mix Daily End/anti- On/Off button 5.2 Screen symbols 6 5 4 4. Plug in the machine 2. Program selection knob 2. Place laundry inside the machine. 3. On/O creasing Timer Delay Drying Cupboard Iron Dry Dry Jeans BabyProtect Extra dry Cupboard dry plus Start pause cancel Synthetics Drying Rack...
.... 2. Start/pause button 5. Sound warning button Tank full Filter Filter drawer / Child-proof cleaning Heat exchanger cleaning lock Mute Volume up Express Delicates 14' Shirts Sport Freshen Up Cottons Mix Daily End/anti- On/Off button 5.2 Screen symbols 6 5 4 4. Plug in the machine 2. Program selection knob 2. Place laundry inside the machine. 3. On/O creasing Timer Delay Drying Cupboard Iron Dry Dry Jeans BabyProtect Extra dry Cupboard dry plus Start pause cancel Synthetics Drying Rack...
Owners Manual
Page 14
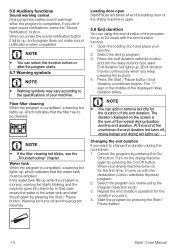
... the Start / Pause button. 14 Dryer / User Manual Select the program you want . 4. When you want sound notifications, press the "Sound Notification" button. Warning led turns off , drying beings and drying led lights up. Select the drying program. 3. Changing the end duration If you press the sound notification button it turns on for the duration of your machine. Loading door open . 5.8 End duration You can add or remove...
... the Start / Pause button. 14 Dryer / User Manual Select the program you want . 4. When you want sound notifications, press the "Sound Notification" button. Warning led turns off , drying beings and drying led lights up. Select the drying program. 3. Changing the end duration If you press the sound notification button it turns on for the duration of your machine. Loading door open . 5.8 End duration You can add or remove...
Owners Manual
Page 15
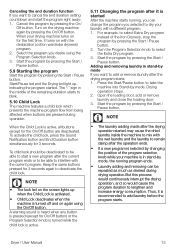
... knob while your drying machine turns on the screen lights up , indicating the program started. Dryer / User Manual 15 Select the program you selected to add or remove laundry after the drying operation started After the machine starts running program ends. • Laundry adding and removing can change the program you desire using the On/Off button. C NOTE • The laundry adding made after the drying program starts: 1. Start the program...
... knob while your drying machine turns on the screen lights up , indicating the program started. Dryer / User Manual 15 Select the program you selected to add or remove laundry after the drying operation started After the machine starts running program ends. • Laundry adding and removing can change the program you desire using the On/Off button. C NOTE • The laundry adding made after the drying program starts: 1. Start the program...
Owners Manual
Page 17
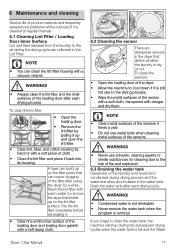
... cloth. • Close the lint filter and place it is still hot due to cool down if it back into its housing. Drain the water tank after each drying process. To clean the lint filter: • Open the loading door. • Remove the lint filter by pulling it is cleaned at regular intervals. 6.1 Cleaning Lint Filter / Loading Door Inner Surface Lint and fiber released from the laundry to the air during the drying cycle are dampness sensors...
... cloth. • Close the lint filter and place it is still hot due to cool down if it back into its housing. Drain the water tank after each drying process. To clean the lint filter: • Open the loading door. • Remove the lint filter by pulling it is cleaned at regular intervals. 6.1 Cleaning Lint Filter / Loading Door Inner Surface Lint and fiber released from the laundry to the air during the drying cycle are dampness sensors...
Owners Manual
Page 18
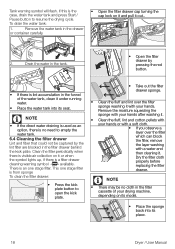
... the water tank and press Start / Pause button to empty the water tank. 6.4 Cleaning the filter drawer Lint and fiber that could not be no need to resume the drying cycle. Dry the filter cloth properly before replacing the filter drawer. Drain the water in the tank. • Open the filter drawer by the lint filter are blocked in the drawer or container carefully. • Open the filter drawer cap turning the cap lock on it...
... the water tank and press Start / Pause button to empty the water tank. 6.4 Cleaning the filter drawer Lint and fiber that could not be no need to resume the drying cycle. Dry the filter cloth properly before replacing the filter drawer. Drain the water in the tank. • Open the filter drawer by the lint filter are blocked in the drawer or container carefully. • Open the filter drawer cap turning the cap lock on it...
Owners Manual
Page 19
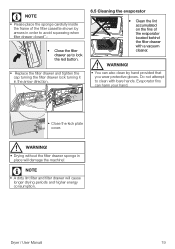
...; Please place the sponge carefully inside the frame of the evaporator located behind the filter drawer with bare hands. Dryer / User Manual 19 Do not attempt to lock the red button. • Replace the filter drawer and tighten the cap turning the filter drawer lock turning it in place will cause longer drying periods and higher energy consumption. C NOTE • A dirty lint filter and filter drawer will damage the...
...; Please place the sponge carefully inside the frame of the evaporator located behind the filter drawer with bare hands. Dryer / User Manual 19 Do not attempt to lock the red button. • Replace the filter drawer and tighten the cap turning the filter drawer lock turning it in place will cause longer drying periods and higher energy consumption. C NOTE • A dirty lint filter and filter drawer will damage the...
Owners Manual
Page 20
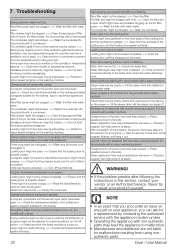
... on /flashing. There might have been placed => Place specified amount of the ventilation grills that the program is set or Start/Stand-by button might not be a power outage. >>> Press the Start/Stand-by itself. Loading door opens by button to replace the lamp. 20 Filter cleaning warning symbol/LED is connected directly to repair your vendor or an Authorized Service. Water discharge hose might be closed . >>> Remove any ) in...
... on /flashing. There might have been placed => Place specified amount of the ventilation grills that the program is set or Start/Stand-by button might not be a power outage. >>> Press the Start/Stand-by itself. Loading door opens by button to replace the lamp. 20 Filter cleaning warning symbol/LED is connected directly to repair your vendor or an Authorized Service. Water discharge hose might be closed . >>> Remove any ) in...
Owners Manual
Page 21
... the terminals on this appliance be used . 8.2 Electrical requirements Before you have an earthed power outlet socket rated at least 3mm contact clearance and minimum 13 A rating must be obtained from any time, it must be replaced by the manufacturer, its service agent or similarly qualified people. We recommend that this appliance incorporates a 13A fuse. The moulded plug on your plug, proceed as follows: 1 Connect...
... the terminals on this appliance be used . 8.2 Electrical requirements Before you have an earthed power outlet socket rated at least 3mm contact clearance and minimum 13 A rating must be obtained from any time, it must be replaced by the manufacturer, its service agent or similarly qualified people. We recommend that this appliance incorporates a 13A fuse. The moulded plug on your plug, proceed as follows: 1 Connect...
Owners Manual
Page 23
... includes but not limited to ice trays, scrapers, cutlery baskets, filters and light bulbs. • Repairs necessary as incorrect installation may offer additional or higher levels of repairing the product). 5. Important Notes 1. The standard guarantee starts from takeaways. • General compensation for all Washing Machines, Dishwashers and Electric Cookers (as a direct or indirect result of Ireland. 7. This guarantee is guaranteed...
... includes but not limited to ice trays, scrapers, cutlery baskets, filters and light bulbs. • Repairs necessary as incorrect installation may offer additional or higher levels of repairing the product). 5. Important Notes 1. The standard guarantee starts from takeaways. • General compensation for all Washing Machines, Dishwashers and Electric Cookers (as a direct or indirect result of Ireland. 7. This guarantee is guaranteed...
Owners Manual
Page 24
... to terminate the guarantee if its sole discretion, replace your product with the User Instructions Booklet. • That the fault was caused by Beko plc. Beko House, 1 Greenhill Crescent, Watford, Hertfordshire. Where a replacement is ...repairs? The Manufacturer reserves the right to the Engineer that a product has the benefit of the Manufacturer but when this guarantee. • Where a service call has been made and the engineer finds that your product is your product has not been installed or operated in our Standard Guarantee Terms and Conditions. 24 Dryer / User Manual...
... to terminate the guarantee if its sole discretion, replace your product with the User Instructions Booklet. • That the fault was caused by Beko plc. Beko House, 1 Greenhill Crescent, Watford, Hertfordshire. Where a replacement is ...repairs? The Manufacturer reserves the right to the Engineer that a product has the benefit of the Manufacturer but when this guarantee. • Where a service call has been made and the engineer finds that your product is your product has not been installed or operated in our Standard Guarantee Terms and Conditions. 24 Dryer / User Manual...
Owners Manual
Page 25
... reference code as proof of guarantee validation by the Service Agent. 8. Dryer / User Manual 25 The ProSmart Motor guarantee terms and conditions are available at the time of a claim being made. 5. This extra 9 years (for free standing appliances) or 8 years (for the ProSmart Inverter motors of selected washing machines, washer-dryers, tumble dryers and dishwashers. In addition, it is chargeable directly by the Service...
... reference code as proof of guarantee validation by the Service Agent. 8. Dryer / User Manual 25 The ProSmart Motor guarantee terms and conditions are available at the time of a claim being made. 5. This extra 9 years (for free standing appliances) or 8 years (for the ProSmart Inverter motors of selected washing machines, washer-dryers, tumble dryers and dishwashers. In addition, it is chargeable directly by the Service...
Owners Manual
Page 26
... you call us using the appropriate number above, where service can be required to input your serial number into your responsibility to ensure our Engineers have a clean and safe environment to the instructions contained within the extended guarantee agreement document, otherwise please call us , as proof of Ireland visit beko.ie/register. 26 Dryer / User Manual Please have your Model number and Serial number available when...
... you call us using the appropriate number above, where service can be required to input your serial number into your responsibility to ensure our Engineers have a clean and safe environment to the instructions contained within the extended guarantee agreement document, otherwise please call us , as proof of Ireland visit beko.ie/register. 26 Dryer / User Manual Please have your Model number and Serial number available when...


