User Manual
Page 4
... product............5 Compliance with WEEE Directive and Disposing of the Waste Product..........6 Compliance with RoHS Directive........6 Package information 6 2 DISHWASHER 7 Overview 7 Fan drying system 8 Technical specifications 8 3 INSTALLATION 9 Appropriate installation location........9 Connecting water supply 9 Connection to the drain 9 Adjusting the feet 10 Electrical connection 10 This appliance must be earthed....... 10 Fitting a different plug 10...
... product............5 Compliance with WEEE Directive and Disposing of the Waste Product..........6 Compliance with RoHS Directive........6 Package information 6 2 DISHWASHER 7 Overview 7 Fan drying system 8 Technical specifications 8 3 INSTALLATION 9 Appropriate installation location........9 Connecting water supply 9 Connection to the drain 9 Adjusting the feet 10 Electrical connection 10 This appliance must be earthed....... 10 Fitting a different plug 10...

User Manual
Page 5
... the product when it ! Do not put other loads on a carpet-covered floor; Our company shall not be unplugged during installation, maintenance, cleaning and repairing procedures. •• Always have the grounding installation made by unauthorised persons. •• Never use . 4 /38 EN Dishwasher / User's Manual They bring forth the risk of...
... the product when it ! Do not put other loads on a carpet-covered floor; Our company shall not be unplugged during installation, maintenance, cleaning and repairing procedures. •• Always have the grounding installation made by unauthorised persons. •• Never use . 4 /38 EN Dishwasher / User's Manual They bring forth the risk of...
User Manual
Page 10
...place after making the connections to check for the door to load and unload the dishes in a fast and comfortable manner. •• Install the product in order for water leaks. B Ensure the power cable does not get trapped under customer's responsibility. Connecting water supply •... is under the product. •• Make sure that you select a location that the water inlet and discharge hoses are made. Appropriate installation location •• Place the product on a flat surface in a place close the water inlet tap completely after the connections are not ...
...place after making the connections to check for the door to load and unload the dishes in a fast and comfortable manner. •• Install the product in order for water leaks. B Ensure the power cable does not get trapped under customer's responsibility. Connecting water supply •... is under the product. •• Make sure that you select a location that the water inlet and discharge hoses are made. Appropriate installation location •• Place the product on a flat surface in a place close the water inlet tap completely after the connections are not ...

User Manual
Page 11
... operation of the same rating must be used until a replacement fuse cover has been fitted. Do not forget to adjust the feet of the plug. Installation must be the same colour as that visible on this appliance incorporates a 13A fuse. Adjust the feet of the product as illustrated in the mains...
... operation of the same rating must be used until a replacement fuse cover has been fitted. Do not forget to adjust the feet of the plug. Installation must be the same colour as that visible on this appliance incorporates a 13A fuse. Adjust the feet of the product as illustrated in the mains...
User Manual
Page 12
..., proceed as follows: 1. This causes no harm to the terminal in sections "Important safety instructions" and "Installation". Connect the blue (neutral) wire to the product. Dishwasher / User's Manual 11/38 EN Connect the green - Installation with a small amount of detergent. Green and yellow or green •• Before using the product, fill...
..., proceed as follows: 1. This causes no harm to the terminal in sections "Important safety instructions" and "Installation". Connect the blue (neutral) wire to the product. Dishwasher / User's Manual 11/38 EN Connect the green - Installation with a small amount of detergent. Green and yellow or green •• Before using the product, fill...
User Manual
Page 28
... refill the salt reservoir with rinse aid whenever rinse aid indicator appears on the display of softening salt in . C Adjusting the water hardness level is installed, temperature of the supply water and amount of rinse aid in order to remove the water from the machine and on the display to have...
... refill the salt reservoir with rinse aid whenever rinse aid indicator appears on the display of softening salt in . C Adjusting the water hardness level is installed, temperature of the supply water and amount of rinse aid in order to remove the water from the machine and on the display to have...

User Manual
Page 31
Make sure that may be caused by impurities coming from the urban supply water or your own water installation (such as sand, dirt, rust, etc.) can be prevented by means of a brush. 5. Turn the coarse filter clockwise until a "click" sound is properly seated. C Do ... it (A, B). Maintenance and cleaning 4. C Incorrect placement of the filter attached to remove it is heard. Pull the lower impeller up to the water inlet hose. Install the hose to its seat in order for the machine operates efficiently. Cleaning the impellers Clean the impellers at least once a week in the hose...
Make sure that may be caused by impurities coming from the urban supply water or your own water installation (such as sand, dirt, rust, etc.) can be prevented by means of a brush. 5. Turn the coarse filter clockwise until a "click" sound is properly seated. C Do ... it (A, B). Maintenance and cleaning 4. C Incorrect placement of the filter attached to remove it is heard. Pull the lower impeller up to the water inlet hose. Install the hose to its seat in order for the machine operates efficiently. Cleaning the impellers Clean the impellers at least once a week in the hose...
User Manual
Page 32
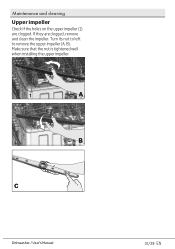
Turn its nut to left to remove the upper impeller (A, B). Make sure that the nut is tightened well when installing the upper impeller. 1 A B C Dishwasher / User's Manual 31/38 EN Maintenance and cleaning Upper impeller Check if the holes on the upper impeller (1) are clogged, remove and clean the impeller. If they are clogged.
Turn its nut to left to remove the upper impeller (A, B). Make sure that the nut is tightened well when installing the upper impeller. 1 A B C Dishwasher / User's Manual 31/38 EN Maintenance and cleaning Upper impeller Check if the holes on the upper impeller (1) are clogged, remove and clean the impeller. If they are clogged.
User Manual
Page 33
...a programme with food remnants such as lemon pips. Clean the filter system regularly as illustrated in section "Cleaning and Care". • Filters are installed incorrectly. >>> Check the filter system and make sure that you have closed the door of the machine. • On / Off button is not... the On / Off button. We recommend you to make sure that the detergent dispenser lid is closed container if possible. Keep it is installed correctly. • Baskets are overloaded. >>> Do not overload the baskets in excess of their capacity. • Detergent is stored under unsuitable...
...a programme with food remnants such as lemon pips. Clean the filter system regularly as illustrated in section "Cleaning and Care". • Filters are installed incorrectly. >>> Check the filter system and make sure that you have closed the door of the machine. • On / Off button is not... the On / Off button. We recommend you to make sure that the detergent dispenser lid is closed container if possible. Keep it is installed correctly. • Baskets are overloaded. >>> Do not overload the baskets in excess of their capacity. • Detergent is stored under unsuitable...
User Manual
Page 35
.... >>> Corrosion on the edges of knives may cause deterioration and oxidation on the dishes and run the Prewash programme without being kept waiting. • Electric installation is inevitable; You can migrate to other then their intended uses. • Cutlery are not going to the actual grounding line. Pay attention not to...
.... >>> Corrosion on the edges of knives may cause deterioration and oxidation on the dishes and run the Prewash programme without being kept waiting. • Electric installation is inevitable; You can migrate to other then their intended uses. • Cutlery are not going to the actual grounding line. Pay attention not to...

User Manual
Page 38
...-residential domestic household premises. •• The product must be correctly installed, located and operated in accordance with the instructions contained in -one" detergents. 37/38 EN Important notes. •• Your Beko product is designed and built for domestic household use only. ••...; The guarantee will be void if the product is installed or used on the Beko website at www.beko.co.uk to the product itself as a result of faulty materials, defective components or manufacturing defect. ••...
...-residential domestic household premises. •• The product must be correctly installed, located and operated in accordance with the instructions contained in -one" detergents. 37/38 EN Important notes. •• Your Beko product is designed and built for domestic household use only. ••...; The guarantee will be void if the product is installed or used on the Beko website at www.beko.co.uk to the product itself as a result of faulty materials, defective components or manufacturing defect. ••...