User Manual
Page 3
... and environmental instructions 4 1.1 General safety 4 1.1.1 Electrical safety 5 1.1.2 Product safety 6 1.2 Mounting over a washing machine.........8 1.3 Intended use 9 1.4 Child safety 9 1.5 Compliance with the WEEE regulation and disposing of the waste product........... 10 1.6 Compliance with RoHS Directive:.......... 10 1.7 Package information 10 1.8 Technical specifications 11 2 Your Dryer 12 2.1 Overview 12 2.2 Package Contents 13 3 Installation 14 3.1 Appropriate installation location............14 3.2 Removing the transportation safety assembly 14 3.3 Connecting to the...
... and environmental instructions 4 1.1 General safety 4 1.1.1 Electrical safety 5 1.1.2 Product safety 6 1.2 Mounting over a washing machine.........8 1.3 Intended use 9 1.4 Child safety 9 1.5 Compliance with the WEEE regulation and disposing of the waste product........... 10 1.6 Compliance with RoHS Directive:.......... 10 1.7 Package information 10 1.8 Technical specifications 11 2 Your Dryer 12 2.1 Overview 12 2.2 Package Contents 13 3 Installation 14 3.1 Appropriate installation location............14 3.2 Removing the transportation safety assembly 14 3.3 Connecting to the...
User Manual
Page 4
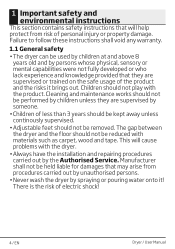
Cleaning and maintenance works should not play with the dryer. • Always have the installation and repairing procedures carried out by children unless they are supervised by spraying or pouring water onto it brings out. This will help protect from procedures carried out by unauthorised persons. • Never wash the dryer by someone. • Children of electric shock! 4 / EN Dryer / User Manual Manufacturer...
Cleaning and maintenance works should not play with the dryer. • Always have the installation and repairing procedures carried out by children unless they are supervised by spraying or pouring water onto it brings out. This will help protect from procedures carried out by unauthorised persons. • Never wash the dryer by someone. • Children of electric shock! 4 / EN Dryer / User Manual Manufacturer...
User Manual
Page 5
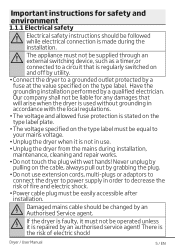
... environment 1.1.1 Electrical safety A Electrical safety instructions should be changed by a qualified electrician. B If the dryer is faulty, it must be operated unless it is repaired by an authorised service agent! Have the grounding installation performed by an Authorised Service agent. There is made during installation, maintenance, cleaning and repair works. • Do not touch the plug with the local regulations. • The voltage and allowed fuse protection...
... environment 1.1.1 Electrical safety A Electrical safety instructions should be changed by a qualified electrician. B If the dryer is faulty, it must be operated unless it is repaired by an authorised service agent! Have the grounding installation performed by an Authorised Service agent. There is made during installation, maintenance, cleaning and repair works. • Do not touch the plug with the local regulations. • The voltage and allowed fuse protection...

User Manual
Page 6
... the drum set or may lead to functional problems. Therefore check pockets off the laundry that you cancel the programme or in the event of a power failure whilst the dryer is running, this , remove all laundry from the dryer in order to the fire hazard: • Garments or pillows bolstered with rubber foam (latex foam), shower caps, water resistant textiles...
... the drum set or may lead to functional problems. Therefore check pockets off the laundry that you cancel the programme or in the event of a power failure whilst the dryer is running, this , remove all laundry from the dryer in order to the fire hazard: • Garments or pillows bolstered with rubber foam (latex foam), shower caps, water resistant textiles...

User Manual
Page 7
... their own and even may fall over. Important instructions for safety and environment Clothes that contains metal reinforcements should not be dried in the dryer. Never operate the dryer without the lint filter installed. • Never attempt to perform the required procedure unless it may ignite after each loading. Dryer may block the opening of your dryer in the room due to get below 5 degrees...
... their own and even may fall over. Important instructions for safety and environment Clothes that contains metal reinforcements should not be dried in the dryer. Never operate the dryer without the lint filter installed. • Never attempt to perform the required procedure unless it may ignite after each loading. Dryer may block the opening of your dryer in the room due to get below 5 degrees...
User Manual
Page 9
... use. • Use the dryer only for drying laundry that are marked accordingly. • The manufacturer waives any responsibility arisen from children. • Electrical products are dangerous for domestic use. Important instructions for safety and environment 1.3 Intended use • Dryer has been designed for the children. It is operating. C Child-proof lock is on the control panel. (See Child lock) • Keep loading door closed even when the dryer...
... use. • Use the dryer only for drying laundry that are marked accordingly. • The manufacturer waives any responsibility arisen from children. • Electrical products are dangerous for domestic use. Important instructions for safety and environment 1.3 Intended use • Dryer has been designed for the children. It is operating. C Child-proof lock is on the control panel. (See Child lock) • Keep loading door closed even when the dryer...

User Manual
Page 11
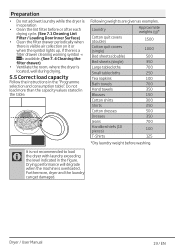
... 60,9 cm Capacity (max.) 8 kg** Net weight (plastic front door usage) 50 kg Net weight (glass front door usage) 52 kg Voltage Rated power input See type label*** Model code * Min. height: Height with adjustable feet are opened maximum. ** Dry laundry weight before washing. *** For the location of the type label on the dryer (see 2.1 Overview.) C Technical specifications of the dryer are subject to specification without notice...
... 60,9 cm Capacity (max.) 8 kg** Net weight (plastic front door usage) 50 kg Net weight (glass front door usage) 52 kg Voltage Rated power input See type label*** Model code * Min. height: Height with adjustable feet are opened maximum. ** Dry laundry weight before washing. *** For the location of the type label on the dryer (see 2.1 Overview.) C Technical specifications of the dryer are subject to specification without notice...
User Manual
Page 14
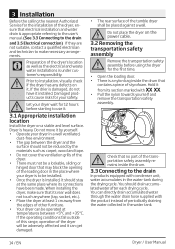
... nearest Authorized Service for the first time. • Open the loading door. • There is a nylon bag inside the drum. 3.3 Connecting to use it from the edges of the loading door in the water tank during the drying cycle. If the operating conditions fall outside of this range, operation of the dryer will be adversely affected and it can directly drain accumulated water through the water drain hose supplied with...
... nearest Authorized Service for the first time. • Open the loading door. • There is a nylon bag inside the drum. 3.3 Connecting to use it from the edges of the loading door in the water tank during the drying cycle. If the operating conditions fall outside of this range, operation of the dryer will be adversely affected and it can directly drain accumulated water through the water drain hose supplied with...
User Manual
Page 15
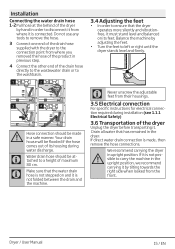
... right side when looked from their housings. 3.5 Electrical connection For specific instructions for electrical connection required during water discharge. Drain all water that the water drain hose is not stepped on and it is not possible to disconnect it from where you removed the hose of the product in a safe manner. Dryer / User Manual 15 / EN Do not use any tools to remove the hose. 3 Connect one end of the drain hose...
... right side when looked from their housings. 3.5 Electrical connection For specific instructions for electrical connection required during water discharge. Drain all water that the water drain hose is not stepped on and it is not possible to disconnect it from where you removed the hose of the product in a safe manner. Dryer / User Manual 15 / EN Do not use any tools to remove the hose. 3 Connect one end of the drain hose...
User Manual
Page 17
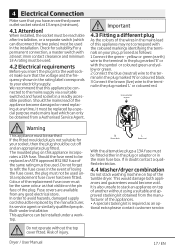
... service. A Do not operate without using a suitable and approved stacking kit obtained from any time, it must be used. 4.2 Electrical requirements Before you have an earthed power outlet socket rated at least 3mm contact clearance and minimum 13 A rating must be replaced by the manufacturer, its service agent or similarly qualified people. A Important 4.3 Fitting a different plug As the colours of the wires in doubt contact a qualified electrician. 4.4 Washer/dryer...
... service. A Do not operate without using a suitable and approved stacking kit obtained from any time, it must be used. 4.2 Electrical requirements Before you have an earthed power outlet socket rated at least 3mm contact clearance and minimum 13 A rating must be replaced by the manufacturer, its service agent or similarly qualified people. A Important 4.3 Fitting a different plug As the colours of the wires in doubt contact a qualified electrician. 4.4 Washer/dryer...
User Manual
Page 18
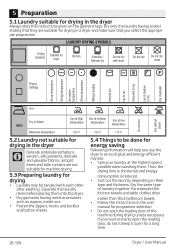
... temperature At high temperature At medium temperature At low temperature Without heating Hang to dry Lay to dry Hang wet to dry Lay in shadow to keep it open the loading door of laundry together. For example thin kitchen towels and table clothes dries earlier than thick bathroom towels. • Follow the instructions in the user manual for programme selection. • Do not open for a long time. 18 / EN Dryer / User Manual...
... temperature At high temperature At medium temperature At low temperature Without heating Hang to dry Lay to dry Hang wet to dry Lay in shadow to keep it open the loading door of laundry together. For example thin kitchen towels and table clothes dries earlier than thick bathroom towels. • Follow the instructions in the user manual for programme selection. • Do not open for a long time. 18 / EN Dryer / User Manual...
User Manual
Page 19
... before or after each drying cycle. (See 7.1 Cleaning Lint Filter / Loading Door Inner Surface) • Clean the filter drawer periodically when there is visible air collection on it or when the symbol lights up, if there is a filter drawer cleaning warning symbol « » available. (See 7. 4 Cleaning the filter drawer) • Ventilate the room, where the dryer is not recommended to load the dryer with laundry exceeding the...
... before or after each drying cycle. (See 7.1 Cleaning Lint Filter / Loading Door Inner Surface) • Clean the filter drawer periodically when there is visible air collection on it or when the symbol lights up, if there is a filter drawer cleaning warning symbol « » available. (See 7. 4 Cleaning the filter drawer) • Ventilate the room, where the dryer is not recommended to load the dryer with laundry exceeding the...

User Manual
Page 26
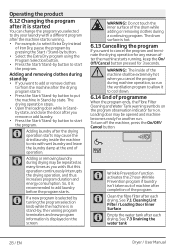
... End ng In Rap Dry Start/Pause • Open the loading door and place the laundry. • Select drying program, spin cycle and if needed, additional functions. • Press the End Time selection button and set the delay time you wish. Warning symbol turns off at the end of countdown, drying starts and duration of displayed delay time flashes. C For detailed information, See 6 Maintenance and cleaning. 26 / EN C You can...
... End ng In Rap Dry Start/Pause • Open the loading door and place the laundry. • Select drying program, spin cycle and if needed, additional functions. • Press the End Time selection button and set the delay time you wish. Warning symbol turns off at the end of countdown, drying starts and duration of displayed delay time flashes. C For detailed information, See 6 Maintenance and cleaning. 26 / EN C You can...
User Manual
Page 28
... and leave the laundry damp at the end of operation. The drum surface is hot. 6.13 Cancelling the program If you want to add or remove clothes to/from the machine after each drying. See 7.1 Cleaning Lint Filter / Loading Door Inner Surface C Empty the water tank after the drying program starts: • Press the Start/Stand-by button to put the machine in stand-by •...
... and leave the laundry damp at the end of operation. The drum surface is hot. 6.13 Cancelling the program If you want to add or remove clothes to/from the machine after each drying. See 7.1 Cleaning Lint Filter / Loading Door Inner Surface C Empty the water tank after the drying program starts: • Press the Start/Stand-by button to put the machine in stand-by •...
User Manual
Page 29
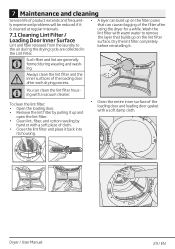
... the loading door and loading door gasket with a soft damp cloth. Dryer / User Manual 29 / EN Wash the lint filter with a vacuum cleaner. A Always clean the lint filter and the inner surfaces of the loading door after using the dryer for a while. C You can clean the lint filter housing with warm water to the air during the drying cycle are generally formed during wearing and washing. 7 Maintenance and cleaning Service life of product extends and frequently experienced problems will...
... the loading door and loading door gasket with a soft damp cloth. Dryer / User Manual 29 / EN Wash the lint filter with a vacuum cleaner. A Always clean the lint filter and the inner surfaces of the loading door after using the dryer for a while. C You can clean the lint filter housing with warm water to the air during the drying cycle are generally formed during wearing and washing. 7 Maintenance and cleaning Service life of product extends and frequently experienced problems will...
User Manual
Page 30
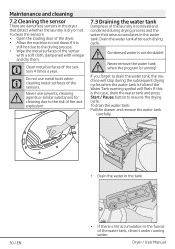
... water tank carefully. 30 / EN • Drain the water in the funnel of the water tank, clean it is lint accumulation in the tank. • If there is still hot due to the risk of fire and explosion! 7.3 Draining the water tank Dampness of the sensor with a soft cloth, dampened with vinegar and dry them. To clean the sensors: • Open the loading door of the sensors 4 times...
... water tank carefully. 30 / EN • Drain the water in the funnel of the water tank, clean it is lint accumulation in the tank. • If there is still hot due to the risk of fire and explosion! 7.3 Draining the water tank Dampness of the sensor with a soft cloth, dampened with vinegar and dry them. To clean the sensors: • Open the loading door of the sensors 4 times...
User Manual
Page 32
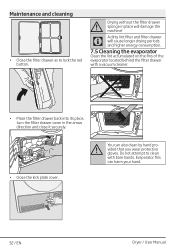
... to lock the red button. A You can harm your hand. 32 / EN Dryer / User Manual C A dirty lint filter and filter drawer will damage the machine! Evaporator fins can also clean by hand provided that you wear protective gloves. A Drying without the filter drawer sponge in the arrow direction and close it securely. • Close the kick plate cover. Maintenance and cleaning • Close the filter drawer...
... to lock the red button. A You can harm your hand. 32 / EN Dryer / User Manual C A dirty lint filter and filter drawer will damage the machine! Evaporator fins can also clean by hand provided that you wear protective gloves. A Drying without the filter drawer sponge in the arrow direction and close it securely. • Close the kick plate cover. Maintenance and cleaning • Close the filter drawer...
User Manual
Page 33
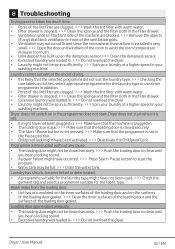
... is installed is clogged. >>> Clean the sponge and the filter cloth in the Pause position. • Childproof lock might have been activated. >>> Deactivate the Childproof Lock. Dryer / User Manual 33 / EN Dryer does not switch on the dampness sensor.>>> Clean the dampness sensor. • Excessive laundry was loaded in front of the ventilation grids. • Ventilation may be full. >>> Drain the water tank. Dryer does not start . Loading door opens spontaneously...
... is installed is clogged. >>> Clean the sponge and the filter cloth in the Pause position. • Childproof lock might have been activated. >>> Deactivate the Childproof Lock. Dryer / User Manual 33 / EN Dryer does not switch on the dampness sensor.>>> Clean the dampness sensor. • Excessive laundry was loaded in front of the ventilation grids. • Ventilation may be full. >>> Drain the water tank. Dryer does not start . Loading door opens spontaneously...
User Manual
Page 35
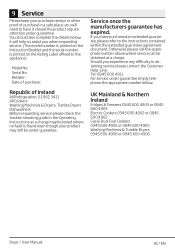
... Customer Help-Line. Should you have it will help us assist you will need to have purchased an extended guarantee please refer to the appliance) Model No: Serial No: Retailer: Date of purchase: Republic of Ireland All Refrigeration, 01 862 3411 All Cookers Washing Machines & Dryers, Tumble Dryers Dishwashers Before requesting service please check the trouble-shooting guide in the Operating Instructions as...
... Customer Help-Line. Should you have it will help us assist you will need to have purchased an extended guarantee please refer to the appliance) Model No: Serial No: Retailer: Date of purchase: Republic of Ireland All Refrigeration, 01 862 3411 All Cookers Washing Machines & Dryers, Tumble Dryers Dishwashers Before requesting service please check the trouble-shooting guide in the Operating Instructions as...

User Manual
Page 36
... Email: service@beko.co.uk Fax: 0845 6004922 www.beko.co.uk Guarantee Your new product is guaranteed against the cost of breakdown repairs for twelve months from your statutory or legal rights. What is covered? • Repairs necessary as a result of unauthorised repair or inexpert installation that fails to meet the requirements contained in the user instruction book. • Repairs to new...
... Email: service@beko.co.uk Fax: 0845 6004922 www.beko.co.uk Guarantee Your new product is guaranteed against the cost of breakdown repairs for twelve months from your statutory or legal rights. What is covered? • Repairs necessary as a result of unauthorised repair or inexpert installation that fails to meet the requirements contained in the user instruction book. • Repairs to new...


