
User Manual
Page 2
...choice of dishes in the home. The dishwasher must only be some water left in your right to give you lasting service. the washing of a Beko quality dishwasher which has been designed to free service during production, there may invalidate your machine. Beko Customer Service Notes Due to using it for...installing the dishwasher and using your future reference If you have any questions, or if you understand the controls prior to the quality control processes during the guarantee period. The information contained herein is operated on the back cover. Please keep these instructions...
...choice of dishes in the home. The dishwasher must only be some water left in your right to give you lasting service. the washing of a Beko quality dishwasher which has been designed to free service during production, there may invalidate your machine. Beko Customer Service Notes Due to using it for...installing the dishwasher and using your future reference If you have any questions, or if you understand the controls prior to the quality control processes during the guarantee period. The information contained herein is operated on the back cover. Please keep these instructions...
User Manual
Page 3
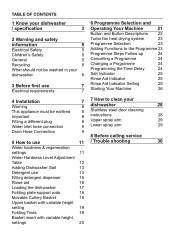
... Selection and Operating Your Machine 21 Button and Button Descriptions 22 Turbo fan heat drying system 23 Programme Selection 23 Adding Functions to the Programme 23 Programme Steps Follow-up 24 Cancelling a Programme 24 Changing a Programme 24 Programming the Time Delay 24 Salt Indicator 25 Rinse Aid Indicator 25 Rinse Aid Indicator Setting 25 Starting Your Machine 26 7 How to clean your dishwasher 28 Stainless steel door cleaning instructions 28 Upper spray arm 29 Lower spray arm 29 8 Before calling service / Trouble shooting 30
... Selection and Operating Your Machine 21 Button and Button Descriptions 22 Turbo fan heat drying system 23 Programme Selection 23 Adding Functions to the Programme 23 Programme Steps Follow-up 24 Cancelling a Programme 24 Changing a Programme 24 Programming the Time Delay 24 Salt Indicator 25 Rinse Aid Indicator 25 Rinse Aid Indicator Setting 25 Starting Your Machine 26 7 How to clean your dishwasher 28 Stainless steel door cleaning instructions 28 Upper spray arm 29 Lower spray arm 29 8 Before calling service / Trouble shooting 30

User Manual
Page 5
...) Net weight Supply voltage Fuse currrent Total power Heater power Pump powers Diameter of the door. 4 GB Specification Load Capacity Height Width Depth Depth/Height (without prior notice. Because we continually strive to write the model code ,stock code and serial number information of the appliance besides your contact information in the e-mail. Note for Testing Institutes The necessary information for : Upper basket Lower basket : 13 Place settings : 850 mm...
...) Net weight Supply voltage Fuse currrent Total power Heater power Pump powers Diameter of the door. 4 GB Specification Load Capacity Height Width Depth Depth/Height (without prior notice. Because we continually strive to write the model code ,stock code and serial number information of the appliance besides your contact information in the e-mail. Note for Testing Institutes The necessary information for : Upper basket Lower basket : 13 Place settings : 850 mm...
User Manual
Page 6
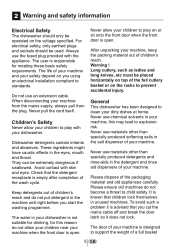
... the front door when the front door is open . For electrical safety, only earthed plugs and sockets should only be placed horizontally on the racks to play with skin and eyes. Always use an extension cable. Never use materials other than specially produced detergents and rinse-aids in the salt dispenser of the full cutlery basket or on top of your dirty dishes at...
... the front door when the front door is open . For electrical safety, only earthed plugs and sockets should only be placed horizontally on the racks to play with skin and eyes. Always use an extension cable. Never use materials other than specially produced detergents and rinse-aids in the salt dispenser of the full cutlery basket or on top of your dirty dishes at...

User Manual
Page 8
... appliance be changed by the door or handle Electrical requirements Before you to place the dishes in the relevant part of your dishwasher has an Internal Lighting; Do not move the appliance by pulling by an authorized service technican. The supply cord or the mains lead must be carried out by a Beko Authorised Service Agent or a similarly qualified person. 7 GB Any repairs and maintenance work on where...
... appliance be changed by the door or handle Electrical requirements Before you to place the dishes in the relevant part of your dishwasher has an Internal Lighting; Do not move the appliance by pulling by an authorized service technican. The supply cord or the mains lead must be carried out by a Beko Authorised Service Agent or a similarly qualified person. 7 GB Any repairs and maintenance work on where...

User Manual
Page 10
... your new dishwasher. Old hose sets must be extended otherwise the machine may not empty the waste water. The appliance must be connected to install your hose firmly to the waste pipe to avoid it coming from the water mains supply must not be connected into the foul drains and not surface water drainage system. We recommend the tap is turned off during the washing...
... your new dishwasher. Old hose sets must be extended otherwise the machine may not empty the waste water. The appliance must be connected to install your hose firmly to the waste pipe to avoid it coming from the water mains supply must not be connected into the foul drains and not surface water drainage system. We recommend the tap is turned off during the washing...

User Manual
Page 11
... of the machine to ensure that the water inlet and drain hoses are not linked or squashed. Position the machine next to install it under the counter. Installation of the door. 10 GB Good levelling is essential for servicing. Care must be taken to allow slight side ways movement for correct closure and sealing of dishwasher Remove all packaging before positioning the machine...
... of the machine to ensure that the water inlet and drain hoses are not linked or squashed. Position the machine next to install it under the counter. Installation of the door. 10 GB Good levelling is essential for servicing. Care must be taken to allow slight side ways movement for correct closure and sealing of dishwasher Remove all packaging before positioning the machine...
User Manual
Page 15
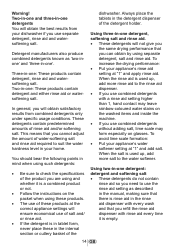
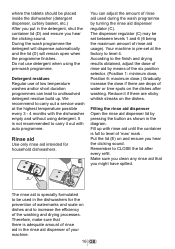
... rinse aid dispenser with a rinse aid setting higher than 1, hand contact may leave rainbow-coloured water stains on the washed items and inside the machine. • If you cannot adjust the amount of water-softening salt and rinse aid required to suit the water hardness level in the detergent dispenser of rinse aid and/or softening salt. Two-in-one detergent, softening salt and rinse aid. • These detergents will ensure economical use combined detergents...
... rinse aid dispenser with a rinse aid setting higher than 1, hand contact may leave rainbow-coloured water stains on the washed items and inside the machine. • If you cannot adjust the amount of water-softening salt and rinse aid required to suit the water hardness level in the detergent dispenser of rinse aid and/or softening salt. Two-in-one detergent, softening salt and rinse aid. • These detergents will ensure economical use combined detergents...
User Manual
Page 16
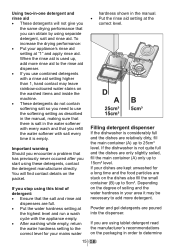
... rinse aid. Powder and gel detergents are full. • Put the water hardness setting at the highest level and run a wash cycle with salt every time it is empty. Using two-in-one detergent and rinse aid • These detergents will find contact details on the degree of detergent: • Ensure that you stop using these detergents, contact the detergent manufacturer directly. Filling detergent dispenser If the dishwasher is not quite full and the dishes...
... rinse aid. Powder and gel detergents are full. • Put the water hardness setting at the highest level and run a wash cycle with salt every time it is empty. Using two-in-one detergent and rinse aid • These detergents will find contact details on the degree of detergent: • Ensure that you stop using these detergents, contact the detergent manufacturer directly. Filling detergent dispenser If the dishwasher is not quite full and the dishes...
User Manual
Page 17
... out a service wash at the factory to level of 'max' mark . Put the lid (E) on the dishes. You can lead to the finish and drying results obtained, adjust the dose of rinse aid by turning the rinse aid dispenser regulator (C). During the wash programme the detergent will dispense automatically and the lid (D) will remain open when the programme finishes. where the tablets should be set at the...
... out a service wash at the factory to level of 'max' mark . Put the lid (E) on the dishes. You can lead to the finish and drying results obtained, adjust the dose of rinse aid by turning the rinse aid dispenser regulator (C). During the wash programme the detergent will dispense automatically and the lid (D) will remain open when the programme finishes. where the tablets should be set at the...

User Manual
Page 23
... to start, pause or cancel the selected programme or the delayed start running when the Start / Pause / Cancel button is activated. Number of the selected programme appears in the programme indicator on your machine. Turn on the display in the machine; Salt and Rinse Agent indicators When you to view the full display on and off . Half Load / Tablet Detergent Button Half Load/Tablet Detergent Button allows you press the On/Off button, turn on...
... to start, pause or cancel the selected programme or the delayed start running when the Start / Pause / Cancel button is activated. Number of the selected programme appears in the programme indicator on your machine. Turn on the display in the machine; Salt and Rinse Agent indicators When you to view the full display on and off . Half Load / Tablet Detergent Button Half Load/Tablet Detergent Button allows you press the On/Off button, turn on...

User Manual
Page 24
... can change while the programme is running when the Start / Pause / Cancel button is normal. Programme number will remain active in from the time indicated at the beginning since it can follow up the programme you may hear fan noise which is pressed symbol light up , then press Start/Pause/Cancel button and close the door of your machine is installed, temperature of the supply water, auto-cleaning of the water softening...
... can change while the programme is running when the Start / Pause / Cancel button is normal. Programme number will remain active in from the time indicated at the beginning since it can follow up the programme you may hear fan noise which is pressed symbol light up , then press Start/Pause/Cancel button and close the door of your machine is installed, temperature of the supply water, auto-cleaning of the water softening...

User Manual
Page 25
... can not be residues of detergent or rinse aid left in the machine and/or on the pieces being washed depending on the display during the delayed start countdown and the delay time indicator will start flashing when the Time Delay button is over . If you have to change running . Press the button of Programme indicator lights up indicator a Washing Step Indicator b Drying Step Indicator c End of minutes the machine will resume operation from the Programme Steps...
... can not be residues of detergent or rinse aid left in the machine and/or on the pieces being washed depending on the display during the delayed start countdown and the delay time indicator will start flashing when the Time Delay button is over . If you have to change running . Press the button of Programme indicator lights up indicator a Washing Step Indicator b Drying Step Indicator c End of minutes the machine will resume operation from the Programme Steps...

User Manual
Page 26
... a new delayed start time while the delayed start countdown while it on. • Hold Half Load button pressed and release On / Off button. • Keep Half Load button pressed for three seconds more. • Rinse Aid Indicator comes on the display in the format of "ON" or "OFF". • You can use the Time Delay function if You need to see that the countdown stops. WARNING: If the water hardness level is...
... a new delayed start time while the delayed start countdown while it on. • Hold Half Load button pressed and release On / Off button. • Keep Half Load button pressed for three seconds more. • Rinse Aid Indicator comes on the display in the format of "ON" or "OFF". • You can use the Time Delay function if You need to see that the countdown stops. WARNING: If the water hardness level is...

User Manual
Page 27
... plug into the wall socket. • Open the tap. • Open the door. • Place the dishes. • Check if the upper and lower impellers rotate freely. • Put sufficient amount of detergent in the detergent dispenser and close its lid. • Press On/Off button. • Check if the salt and rinse aid warning indicators light and add salt and/or rinse aid if needed. • Determine your washing...
... plug into the wall socket. • Open the tap. • Open the door. • Place the dishes. • Check if the upper and lower impellers rotate freely. • Put sufficient amount of detergent in the detergent dispenser and close its lid. • Press On/Off button. • Check if the salt and rinse aid warning indicators light and add salt and/or rinse aid if needed. • Determine your washing...

User Manual
Page 28
...-wash ▼ Wash ▼ Cold rinse ▼ Rinse ▼ Hot Rinse ▼ Dry ▼ End Medium to high A The programme sequence is adjusted to rinse Lightly soiled dishes, and loosen residue 30 minute - plastic items. until dishes are not effected by the selection of extra drying function. ** Reference programme for the mixed nature water dirtiness 58 minutes Hot pre-wash toddler of the daily load and level and washes dishes and...
...-wash ▼ Wash ▼ Cold rinse ▼ Rinse ▼ Hot Rinse ▼ Dry ▼ End Medium to high A The programme sequence is adjusted to rinse Lightly soiled dishes, and loosen residue 30 minute - plastic items. until dishes are not effected by the selection of extra drying function. ** Reference programme for the mixed nature water dirtiness 58 minutes Hot pre-wash toddler of the daily load and level and washes dishes and...
User Manual
Page 29
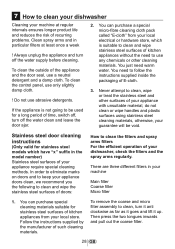
... micro filter assembly to clean, turn off the water clean and leave the door ajar. 2. You need warm water. To clean the outside of recurring problems. Clean spray arms and in your dishwasher, check the filters and the spray arms regularly. Follow the instructions supplied by the manufacturer of your appliance with unsuitable material, do not clean or wipe handles and plastic surfaces using stainless steel cleaning materials, otherwise, your appliance require special cleaning methods. To clean the control panel, use...
... micro filter assembly to clean, turn off the water clean and leave the door ajar. 2. You need warm water. To clean the outside of recurring problems. Clean spray arms and in your dishwasher, check the filters and the spray arms regularly. Follow the instructions supplied by the manufacturer of your appliance with unsuitable material, do not clean or wipe handles and plastic surfaces using stainless steel cleaning materials, otherwise, your appliance require special cleaning methods. To clean the control panel, use...
User Manual
Page 31
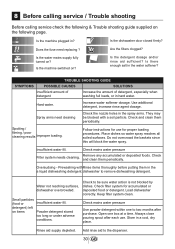
... filter system for use . Store in hard water. Add rinse aid to remove dishwashing detergent. Spray arms need cleaning Check the nozzle holes in the a liquid dishwashing detergent. Check mains water pressure Filter system needs cleaning. Remove any accumulated or deposited foods. Oversudsing - Small particles (food or Insufficient water fill. Load dishwasher correctly. Rinse aid supply depleted. Hard water. Insufficient water fill. Always close pouring spout after purchase. Water not reaching surfaces, dishwasher overcrowded. Do not overcrowd the baskets...
... filter system for use . Store in hard water. Add rinse aid to remove dishwashing detergent. Spray arms need cleaning Check the nozzle holes in the a liquid dishwashing detergent. Check mains water pressure Filter system needs cleaning. Remove any accumulated or deposited foods. Oversudsing - Small particles (food or Insufficient water fill. Load dishwasher correctly. Rinse aid supply depleted. Hard water. Insufficient water fill. Always close pouring spout after purchase. Water not reaching surfaces, dishwasher overcrowded. Do not overcrowd the baskets...

User Manual
Page 32
... loading dishwasher. Dishes not dry Rinse aid supply depleted. Add liquid rinse aid . Start dishwasher soon after use, or pre-wash items if they will not be left in dispenser. To assure freshness, buy detergent as needed and no more than one to dry out in dispenser too long before using powder detergent, there may not always be preventable. Clean filter system. 31 GB Do not overload cutlery basket. Old detergent. If using . powder Detergent cakes in dishwasher Dishes washed...
... loading dishwasher. Dishes not dry Rinse aid supply depleted. Add liquid rinse aid . Start dishwasher soon after use, or pre-wash items if they will not be left in dispenser. To assure freshness, buy detergent as needed and no more than one to dry out in dispenser too long before using powder detergent, there may not always be preventable. Clean filter system. 31 GB Do not overload cutlery basket. Old detergent. If using . powder Detergent cakes in dishwasher Dishes washed...

User Manual
Page 33
... the User Instructions Booklet provided. • Professional installation by a qualified Electrical Domestic Appliance Installer is recommended for Refrigeration, Cooking Appliances, Washing Machines & Dishwashers. Guarantee for all Washing Machines, Dishwashers and Electric Cookers • Gas Cookers must be correctly installed, located and operated in accordance with the instructions contained in anyway diminish your retailer). Important notes. • Your Beko product is designed and built for domestic household use only...
... the User Instructions Booklet provided. • Professional installation by a qualified Electrical Domestic Appliance Installer is recommended for Refrigeration, Cooking Appliances, Washing Machines & Dishwashers. Guarantee for all Washing Machines, Dishwashers and Electric Cookers • Gas Cookers must be correctly installed, located and operated in accordance with the instructions contained in anyway diminish your retailer). Important notes. • Your Beko product is designed and built for domestic household use only...


