Owners Manual
Page 2
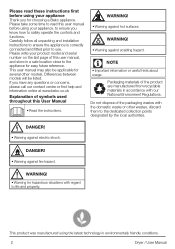
... user manual may also be listed. DANGER! • Warning against electric shock. This product was manufactured using your appliance, to ensure you know how to read these instructions first before using the latest technology in environmentally friendly conditions. 2 Dryer / User Manual Packaging materials of symbols used throughout this user manual, and store in a safe location close to use. Please read this user manual before using your product model and serial number...
... user manual may also be listed. DANGER! • Warning against electric shock. This product was manufactured using your appliance, to ensure you know how to read these instructions first before using the latest technology in environmentally friendly conditions. 2 Dryer / User Manual Packaging materials of symbols used throughout this user manual, and store in a safe location close to use. Please read this user manual before using your product model and serial number...
Owners Manual
Page 3
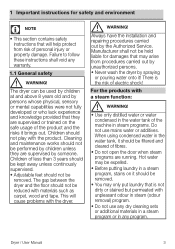
...; Never wash the dryer by the Authorized Service. When using condensed water in steam programs. Do not use any dry cleaning sets or additional materials in a steam program or in any warranty. 1.1 General safety A WARNING! The gap between the dryer and the floor should not be held liable for safety and environment C NOTE • This section contains safety instructions that they are running. There is...
...; Never wash the dryer by the Authorized Service. When using condensed water in steam programs. Do not use any dry cleaning sets or additional materials in a steam program or in any warranty. 1.1 General safety A WARNING! The gap between the dryer and the floor should not be held liable for safety and environment C NOTE • This section contains safety instructions that they are running. There is...
Owners Manual
Page 4
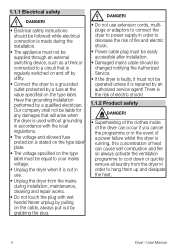
... the dryer is used without grounding in order to hang them up and dissipate the heat. 4 Dryer / User Manual There is the risk of electric shock! 1.1.2 Product safety DANGER! • Superheating of the clothes inside of fire and electric shock. • Power cable plug must be easily accessible after installation. • Damaged mains cable should be followed while electrical connection is made during installation, maintenance, cleaning and repair works. •...
... the dryer is used without grounding in order to hang them up and dissipate the heat. 4 Dryer / User Manual There is the risk of electric shock! 1.1.2 Product safety DANGER! • Superheating of the clothes inside of fire and electric shock. • Power cable plug must be easily accessible after installation. • Damaged mains cable should be followed while electrical connection is made during installation, maintenance, cleaning and repair works. •...
Owners Manual
Page 5
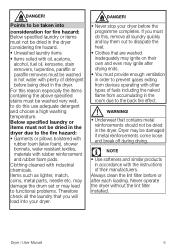
... the drum set or may lead to functional problems. Therefore check all laundry quickly and lay them out to do this use adequate detergent and choose a high washing temperature. Never operate the dryer without the lint filter installed. Clothing cleaned with rubber reinforcement and rubber foam pads. DANGER! • Never stop your dryer. Points to be washed very well, to dissipate the heat. • Clothes that...
... the drum set or may lead to functional problems. Therefore check all laundry quickly and lay them out to do this use adequate detergent and choose a high washing temperature. Never operate the dryer without the lint filter installed. Clothing cleaned with rubber reinforcement and rubber foam pads. DANGER! • Never stop your dryer. Points to be washed very well, to dissipate the heat. • Clothes that...
Owners Manual
Page 6
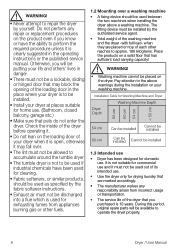
.... • The manufacturer waives any repair or replacement procedures on the loading door of your dryer when it is open, otherwise it may block the opening of the loading door in the place where your dryer is to be putting your life and others' lives in the operating instructions or the published service manual. It is not suitable for commercial use . Pay attention to the above...
.... • The manufacturer waives any repair or replacement procedures on the loading door of your dryer when it is open, otherwise it may block the opening of the loading door in the place where your dryer is to be putting your life and others' lives in the operating instructions or the published service manual. It is not suitable for commercial use . Pay attention to the above...
Owners Manual
Page 7
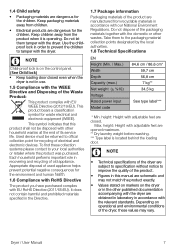
... RoHS Directive The product you have purchased complies with the dryer. Used device must be disposed with other household wastes at the end of its service life. To find these values may not match the product exactly. • Values stated on markers on the control panel. (See Child lock) • Keep loading door closed . Max. C NOTE • Technical specifications of the dryer are...
... RoHS Directive The product you have purchased complies with the dryer. Used device must be disposed with other household wastes at the end of its service life. To find these values may not match the product exactly. • Values stated on markers on the control panel. (See Child lock) • Keep loading door closed . Max. C NOTE • Technical specifications of the dryer are...
Owners Manual
Page 8
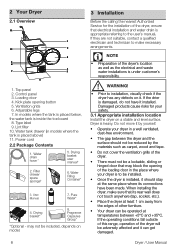
... placed below, the water tank is heavy. Type label 9. Dryer / User Manual User Manual 7. Power cord 2.2 Package Contents 1. Drying basket user manual* 2. Fragrance Capsules Group* *Optional - Damaged products cause risks for the installation of the dryer, ensure that its connections have it installed. Top panel 2. Ventilation grids 6. may block the opening button 5. C NOTE • Preparation of the dryer's location as well as carpet, wood and tape. • Do not cover the ventilation grills...
... placed below, the water tank is heavy. Type label 9. Dryer / User Manual User Manual 7. Power cord 2.2 Package Contents 1. Drying basket user manual* 2. Fragrance Capsules Group* *Optional - Damaged products cause risks for the installation of the dryer, ensure that its connections have it installed. Top panel 2. Ventilation grids 6. may block the opening button 5. C NOTE • Preparation of the dryer's location as well as carpet, wood and tape. • Do not cover the ventilation grills...
Owners Manual
Page 9
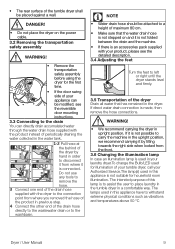
... is connected. If direct water drain connection is used for household room illumination. The intended purpose of the dryer Drain all water that the water drain hose is not stepped on the power cable. 3.2 Removing the transportation safety assembly A WARNING! • Remove the transportation safety assembly before using the dryer for the first time. • If the door swing side of your laundry dryer.To change the Bulb/LED used in order...
... is connected. If direct water drain connection is used for household room illumination. The intended purpose of the dryer Drain all water that the water drain hose is not stepped on the power cable. 3.2 Removing the transportation safety assembly A WARNING! • Remove the transportation safety assembly before using the dryer for the first time. • If the door swing side of your laundry dryer.To change the Bulb/LED used in order...
Owners Manual
Page 10
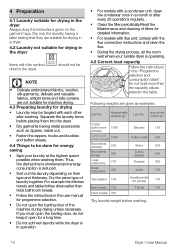
... energy saving • Spin your tumble dryer is in operation • For models with dryer should not be done for drying in the dryer Always obey the instructions given on their type and thickness. Dry the same type of the machine during drying unless necessary. If you must open the loading door, do not keep it open for a long time. • Do not add wet laundry while the dryer is operating...
... energy saving • Spin your tumble dryer is in operation • For models with dryer should not be done for drying in the dryer Always obey the instructions given on their type and thickness. Dry the same type of the machine during drying unless necessary. If you must open the loading door, do not keep it open for a long time. • Do not add wet laundry while the dryer is operating...
Owners Manual
Page 11
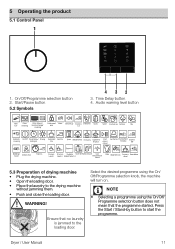
... mean that no laundry is jammed to the loading door. Dryer / User Manual 11 5 Operating the product 5.1 Control Panel 1 1. C NOTE • Selecting a programme using the On/ Off/Programme selection knob, the machine will turn on. A WARNING! Time Delay button 4. On/O Timer Delay/ Drying Cupboard Iron Dry creasing Ending in Dry Jeans BabyProtect Extra dry Cupboard dry plus Start pause cancel Synthetics Drying Rack/ Express TimeDry 30' Bedding/ Duvet Cottons Eco Express...
... mean that no laundry is jammed to the loading door. Dryer / User Manual 11 5 Operating the product 5.1 Control Panel 1 1. C NOTE • Selecting a programme using the On/ Off/Programme selection knob, the machine will turn on. A WARNING! Time Delay button 4. On/O Timer Delay/ Drying Cupboard Iron Dry creasing Ending in Dry Jeans BabyProtect Extra dry Cupboard dry plus Start pause cancel Synthetics Drying Rack/ Express TimeDry 30' Bedding/ Duvet Cottons Eco Express...
Owners Manual
Page 14
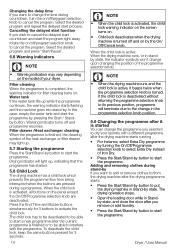
... delayed start countdown and start the program right away, rotate the on/off and programme resumes. Filter drawer /Heat exchanger cleaning When the programme is completed, the warning indicator for 3 buttons to activate the child lock. When the child lock is turned off /program selection knob to cancel the program. Changing the delay time If you want to add or remove clothes to start the programme. Water tank...
... delayed start countdown and start the program right away, rotate the on/off and programme resumes. Filter drawer /Heat exchanger cleaning When the programme is completed, the warning indicator for 3 buttons to activate the child lock. When the child lock is turned off /program selection knob to cancel the program. Changing the delay time If you want to add or remove clothes to start the programme. Water tank...
Owners Manual
Page 15
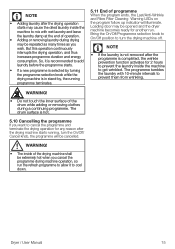
... the drum while adding or removing clothes during machine operation, so run . Dryer / User Manual 15 C NOTE • Adding laundry after the drying operation starts may cause the dried laundry inside the machine to mix with 10-minute intervals to add laundry before the programme starts. • If a new programme is selected by turning the programme selection knob while the drying machine is completed, the wrinkle...
... the drum while adding or removing clothes during machine operation, so run . Dryer / User Manual 15 C NOTE • Adding laundry after the drying operation starts may cause the dried laundry inside the machine to mix with 10-minute intervals to add laundry before the programme starts. • If a new programme is selected by turning the programme selection knob while the drying machine is completed, the wrinkle...
Owners Manual
Page 16
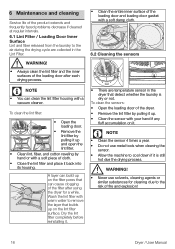
... sensors: • Open the loading door of the dryer. • Remove the lint filter by hand or with your hand if any fluff accumulation on the lint filter surface. Wash the lint filter with warm water to the air during the drying cycle are temperature sensor in the Lint Filter. A WARNING! • Always clean the lint filter and the inner surfaces of the product extends and frequently faced problems decrease if cleaned at regular intervals. 6.1 Lint Filter / Loading Door...
... sensors: • Open the loading door of the dryer. • Remove the lint filter by hand or with your hand if any fluff accumulation on the lint filter surface. Wash the lint filter with warm water to the air during the drying cycle are temperature sensor in the Lint Filter. A WARNING! • Always clean the lint filter and the inner surfaces of the product extends and frequently faced problems decrease if cleaned at regular intervals. 6.1 Lint Filter / Loading Door...
Owners Manual
Page 17
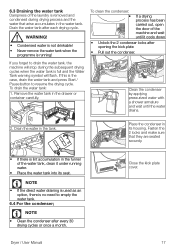
... water tank and press Start / Pause button to drain the water tank, the machine will flash. Clean the condenser by applying pressurized water with a shower armature and wait until it under running ! Drain the water tank after every 30 drying cycles or once a month. Fasten the 2 locks and make sure that arise accumulates in its seat. C NOTE • If the direct water draining is used...
... water tank and press Start / Pause button to drain the water tank, the machine will flash. Clean the condenser by applying pressurized water with a shower armature and wait until it under running ! Drain the water tank after every 30 drying cycles or once a month. Fasten the 2 locks and make sure that arise accumulates in its seat. C NOTE • If the direct water draining is used...

Owners Manual
Page 18
.... Loading door opens by contacting the authorized service with the appliance model number. • Operating the appliance with the On/Off button or program might not have been used . >>> Check the maintenance labels on the clothes and select a program suitable for a long time => Take the laundry out as soon as extra. Steam application time may be full. >>> Empty the water tank. Clothes come out damp after it is connected directly to replace...
.... Loading door opens by contacting the authorized service with the appliance model number. • Operating the appliance with the On/Off button or program might not have been used . >>> Check the maintenance labels on the clothes and select a program suitable for a long time => Take the laundry out as soon as extra. Steam application time may be full. >>> Empty the water tank. Clothes come out damp after it is connected directly to replace...
Owners Manual
Page 19
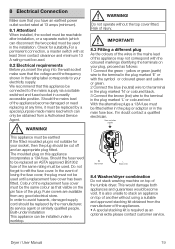
... losing the fuse cover, the plug must be used . 8.2 Electrical requirements Before you have an earthed power outlet socket rated at 13 amps (minimum). 8.1 Attention! If in the main fuse box. Dryer / User Manual 19 8 Electrical Connection Make sure that this appliance be connected to the mains supply via a suitable switched and fused socket in a readily accessible position. Check for your electricity supply. Do not forget to the terminal in the plug marked...
... losing the fuse cover, the plug must be used . 8.2 Electrical requirements Before you have an earthed power outlet socket rated at 13 amps (minimum). 8.1 Attention! If in the main fuse box. Dryer / User Manual 19 8 Electrical Connection Make sure that this appliance be connected to the mains supply via a suitable switched and fused socket in a readily accessible position. Check for your electricity supply. Do not forget to the terminal in the plug marked...
Owners Manual
Page 21
... this guarantee or the User Instructions Booklet. • Repairs to operate in addition to the installation environment). Such financial loss includes but not limited to ice trays, scrapers, cutlery baskets, filters and light bulbs. • Repairs necessary as incorrect installation may offer additional or higher levels of Ireland. 7. If you purchased the product. The standard guarantee starts from an authorised retailer...
... this guarantee or the User Instructions Booklet. • Repairs to operate in addition to the installation environment). Such financial loss includes but not limited to ice trays, scrapers, cutlery baskets, filters and light bulbs. • Repairs necessary as incorrect installation may offer additional or higher levels of Ireland. 7. If you purchased the product. The standard guarantee starts from an authorised retailer...
Owners Manual
Page 22
...installed or operated in our Standard Guarantee Terms and Conditions. 22 Dryer / User Manual 9. Where a replacement is offered, this would normally be an identical model but cannot be guaranteed. Any costs related to terminate the guarantee if its sole discretion, replace your product is no fault with the User Instructions...the number set out above. 10. Our Engineers work Monday to Friday 9.00am to charge for the repairs? The Manufacturer reserves the right to 5.00pm. The Manufacturer will not be liable for the return of purchase by this guarantee. We will cover ...
...installed or operated in our Standard Guarantee Terms and Conditions. 22 Dryer / User Manual 9. Where a replacement is offered, this would normally be an identical model but cannot be guaranteed. Any costs related to terminate the guarantee if its sole discretion, replace your product is no fault with the User Instructions...the number set out above. 10. Our Engineers work Monday to Friday 9.00am to charge for the repairs? The Manufacturer reserves the right to 5.00pm. The Manufacturer will not be liable for the return of purchase by this guarantee. We will cover ...
Owners Manual
Page 23
...guarantee and will receive a unique reference code as standard. Beko Free standing appliances come with a 12 month parts and labour guarantee as standard, Beko Built-in appliances come with Beko plc using the procedure outlined below. 1. You do not need to activate the 10 year guarantee you...following the online instructions. Dryer / User Manual 23 Any additional components fitted to our Standard guarantee terms and conditions detailed in this Guarantee. 10. The guarantee is only valid for one replacement of the ProSmart motor during the registration process. We may use the ...
...guarantee and will receive a unique reference code as standard. Beko Free standing appliances come with a 12 month parts and labour guarantee as standard, Beko Built-in appliances come with Beko plc using the procedure outlined below. 1. You do not need to activate the 10 year guarantee you...following the online instructions. Dryer / User Manual 23 Any additional components fitted to our Standard guarantee terms and conditions detailed in this Guarantee. 10. The guarantee is only valid for one replacement of the ProSmart motor during the registration process. We may use the ...
Owners Manual
Page 24
... requesting service please check the troubleshooting guide in a safe place; HOW TO OBTAIN SERVICE FOR YOUR APPLIANCE Please keep your purchase receipt or other proof of purchase paperwork Recording of these details alone will not count as proof of purchase. For help please visit beko.co.uk/support/model-finder • The product model number is printed on the Operating Instruction Booklet / User guide...
... requesting service please check the troubleshooting guide in a safe place; HOW TO OBTAIN SERVICE FOR YOUR APPLIANCE Please keep your purchase receipt or other proof of purchase paperwork Recording of these details alone will not count as proof of purchase. For help please visit beko.co.uk/support/model-finder • The product model number is printed on the Operating Instruction Booklet / User guide...


