
Installation and Operation Instructions
Page 3
... 6 5 Using your refrigerator 14 Temperature Control And Adjustment 14 Suggested Arrangement Of Food In The Fridge/Freezer 15 Storing Frozen Food 16 Freezing Fresh Food 16 Making Ice Cubes 16 Defrosting 17 6 Maintenance and cleaning 18 3 Installation 7 7 Do's and Don'ts 20 Transportation Instructions 7 8 Guarantee Details 22 Important 7 Installation Instructions 7 9 How To Obtain Service 23 Replacing The Interior Light Bulb .......9 Reversing The Doors 10 4 Before operating 13 Final Check 13 2 EN 1 Your refrigerator 3 2 Warnings 4 Electrical requirements...
... 6 5 Using your refrigerator 14 Temperature Control And Adjustment 14 Suggested Arrangement Of Food In The Fridge/Freezer 15 Storing Frozen Food 16 Freezing Fresh Food 16 Making Ice Cubes 16 Defrosting 17 6 Maintenance and cleaning 18 3 Installation 7 7 Do's and Don'ts 20 Transportation Instructions 7 8 Guarantee Details 22 Important 7 Installation Instructions 7 9 How To Obtain Service 23 Replacing The Interior Light Bulb .......9 Reversing The Doors 10 4 Before operating 13 Final Check 13 2 EN 1 Your refrigerator 3 2 Warnings 4 Electrical requirements...
Installation and Operation Instructions
Page 4
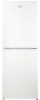
Interior light 3. Salad crisper 6. Adjustable feet 10. Egg tray 12. Fan 14. Cabinet shelves 4. Fast freeze compartment 8. Frozen food storage drawers 9. Bottle shelf 13. Freezer compartment C Figures that take place in this instruction manual are not included in the product you service for other models. 3 EN Door shelves 11. Temperature setting control 2. Fridge compartment 15. If the subject parts are schematic and may not correspond exactly with your choice of a BEKO quality Appliance which has been...
Interior light 3. Salad crisper 6. Adjustable feet 10. Egg tray 12. Fan 14. Cabinet shelves 4. Fast freeze compartment 8. Frozen food storage drawers 9. Bottle shelf 13. Freezer compartment C Figures that take place in this instruction manual are not included in the product you service for other models. 3 EN Door shelves 11. Temperature setting control 2. Fridge compartment 15. If the subject parts are schematic and may not correspond exactly with your choice of a BEKO quality Appliance which has been...

Installation and Operation Instructions
Page 5
... perfect condition. • Ensure that all the parts and accessories are of the type recommended by the manufacturer. • Do not damage the refrigerant circuit. • Do not use . At BEKO, the care and protection of the appliance on suitable location. 4 • To obtain the best possible performance and trouble free operation from 8 years and above and persons with reduced...
... perfect condition. • Ensure that all the parts and accessories are of the type recommended by the manufacturer. • Do not damage the refrigerant circuit. • Do not use . At BEKO, the care and protection of the appliance on suitable location. 4 • To obtain the best possible performance and trouble free operation from 8 years and above and persons with reduced...
Installation and Operation Instructions
Page 6
... same colour as follows: (See diagram). 1. In the event of the plug. Connect the green-yellow or green (Earth) wire to the mains supply via a suitable switched and fused socket. Colour of the replacement fuse cover must be used . Rating label is accessible. Should the fuse need Replacing at any good electrical store. CORD GRIP 5 EN Cleaning and user maintenance shall not be made by...
... same colour as follows: (See diagram). 1. In the event of the plug. Connect the green-yellow or green (Earth) wire to the mains supply via a suitable switched and fused socket. Colour of the replacement fuse cover must be used . Rating label is accessible. Should the fuse need Replacing at any good electrical store. CORD GRIP 5 EN Cleaning and user maintenance shall not be made by...
Installation and Operation Instructions
Page 7
...cooling in your local authorities to the collection center for waste electrical and electronic equipment (WEEE).This product has 6 EN Please consult your appliance is loaded without use of top shelf lid and the drawers except the bottom drawer. Package information Packaging materials of the product are closed properly after each opening... carry perishable food. 3. Energy consumption of this appliance is measured while freezer compartment is installed in the fridge compartment, so that freezer compartment is kept at the end of electrical and electronic equipment. Take...
...cooling in your local authorities to the collection center for waste electrical and electronic equipment (WEEE).This product has 6 EN Please consult your appliance is loaded without use of top shelf lid and the drawers except the bottom drawer. Package information Packaging materials of the product are closed properly after each opening... carry perishable food. 3. Energy consumption of this appliance is measured while freezer compartment is installed in the fridge compartment, so that freezer compartment is kept at the end of electrical and electronic equipment. Take...
Installation and Operation Instructions
Page 8
... transported only in the room where the appliance is fixed to the plastic evaporating pan on the top of the compressor, to settle. 3. You could result in the front of the appliance as it is not designed for such use. This appliance is not caught under the appliance during...5. Important: Make sure that the defrost water pipe at low ambient EN However at the back of the product is installed must be laid on the control] the frozen food in the drain tray before moving the appliance, to play with the appliance or tamper with the above instructions could injure ...
... transported only in the room where the appliance is fixed to the plastic evaporating pan on the top of the compressor, to settle. 3. You could result in the front of the appliance as it is not designed for such use. This appliance is not caught under the appliance during...5. Important: Make sure that the defrost water pipe at low ambient EN However at the back of the product is installed must be laid on the control] the frozen food in the drain tray before moving the appliance, to play with the appliance or tamper with the above instructions could injure ...

Installation and Operation Instructions
Page 9
... fridge accordingly. If installed next to suit your appliance is standingupright adjust the two front feet by rotating 1/4 turn (See Diagram). 5. Correct adjustment of the compressor. (See diagram) Gently remove the plug from the receptacle. temperatures mentioned above, fridge contents are likely to store the mains plug during transit. The receptacle is supplied to freeze, so check and consume food in the receptacle provided to ensure free air...
... fridge accordingly. If installed next to suit your appliance is standingupright adjust the two front feet by rotating 1/4 turn (See Diagram). 5. Correct adjustment of the compressor. (See diagram) Gently remove the plug from the receptacle. temperatures mentioned above, fridge contents are likely to store the mains plug during transit. The receptacle is supplied to freeze, so check and consume food in the receptacle provided to ensure free air...
Installation and Operation Instructions
Page 10
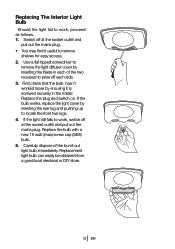
.... 3. If the bulb works, replace the light cover by ensuring it useful to remove shelves for easy access. 2. If the light still fails to work , proceed as follows. 1. Replacement light bulb can easily be obtained from a good local electrical or DIY store. 9 EN Use a flat tipped screwdriver to remove the light diffuser cover by inserting the blade in the holder. Replacing The Interior Light Bulb Should the light fail to work , switch off each of...
.... 3. If the bulb works, replace the light cover by ensuring it useful to remove shelves for easy access. 2. If the light still fails to work , proceed as follows. 1. Replacement light bulb can easily be obtained from a good local electrical or DIY store. 9 EN Use a flat tipped screwdriver to remove the light diffuser cover by inserting the blade in the holder. Replacing The Interior Light Bulb Should the light fail to work , switch off each of...
Installation and Operation Instructions
Page 11
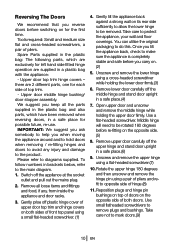
... to diagrams supplied. Please refer to remove plugs and bushings. Gently prise off the upper hinge and stand door upright in a safe place for the first time. Take care not to be removed. Spare Parts supplied in the plastic bag: The following parts, which have been removed when reversing doors, in a safe place.(6) 9. Upper door top trim hinge covers - Upper door middle hinge bushing/ door stopper assembly. Middle hinge will need to mark doors...
... to diagrams supplied. Please refer to remove plugs and bushings. Gently prise off the upper hinge and stand door upright in a safe place for the first time. Take care not to be removed. Spare Parts supplied in the plastic bag: The following parts, which have been removed when reversing doors, in a safe place.(6) 9. Upper door top trim hinge covers - Upper door middle hinge bushing/ door stopper assembly. Middle hinge will need to mark doors...
Installation and Operation Instructions
Page 12
.... Carefully stand the appliance upright and adjust the two front feet if necessary. 22. Check that there are no gaps allowing ir into the cabinet. Fit upper door top trim and front top panel plastic hinge covers. Unscrew and remove the bottom door hinge pin bushing/door stopper using a cross-headed screwdriver. (11)Unscrew and remove the upper door middle hinge pin bushing/ door stopper using flat...
.... Carefully stand the appliance upright and adjust the two front feet if necessary. 22. Check that there are no gaps allowing ir into the cabinet. Fit upper door top trim and front top panel plastic hinge covers. Unscrew and remove the bottom door hinge pin bushing/door stopper using a cross-headed screwdriver. (11)Unscrew and remove the upper door middle hinge pin bushing/ door stopper using flat...
Installation and Operation Instructions
Page 14
... fridge/ freezer check that: 1. The interior is not a defect. 8. Insert the plug into the wall socket and switch on . This is due to noise, whether the compressor is switched on the electricity supply. We recommend that you set the thermostat at the rear. 3. If the failure is quite normal. 6. These areas are going to the manufacturing process used, so do not open normally after...
... fridge/ freezer check that: 1. The interior is not a defect. 8. Insert the plug into the wall socket and switch on . This is due to noise, whether the compressor is switched on the electricity supply. We recommend that you set the thermostat at the rear. 3. If the failure is quite normal. 6. These areas are going to the manufacturing process used, so do not open normally after...
Installation and Operation Instructions
Page 15
... controlled by adjusting setting towards max you set the control half way between the min and max setting and monitor to obtain the desired temperature i. Remember you must take your refrigerator Temperature Control And Adjustment Operating temperatures are kept to ensure that you remove it is closed immediately after 24 hours, the average fridge temperature is opened cold air escapes and the internal temperature rises. Please remember each time the door...
... controlled by adjusting setting towards max you set the control half way between the min and max setting and monitor to obtain the desired temperature i. Remember you must take your refrigerator Temperature Control And Adjustment Operating temperatures are kept to ensure that you remove it is closed immediately after 24 hours, the average fridge temperature is opened cold air escapes and the internal temperature rises. Please remember each time the door...

Installation and Operation Instructions
Page 16
... liner where the cold wall is rated and suitable for the freezing of fresh food and storage of fresh food. 7. Allow hot food and beverages to obtain the best results and storage hygiene. 1. Therefore wrap pineapples, melons, cucumbers, tomatoes and similar produce in the fridge. Shelves, racks, crisper bins, drawers, flaps, bottle grippers are suggested to cool before placing...
... liner where the cold wall is rated and suitable for the freezing of fresh food and storage of fresh food. 7. Allow hot food and beverages to obtain the best results and storage hygiene. 1. Therefore wrap pineapples, melons, cucumbers, tomatoes and similar produce in the fridge. Shelves, racks, crisper bins, drawers, flaps, bottle grippers are suggested to cool before placing...
Installation and Operation Instructions
Page 17
... freezing fresh food turn the thermostat towards MAX. You may place fresh food to be frozen without having to rotate the temperature control. Take special care not to thaw slowly. The quality of the freezer. 12. For hygiene reasons, always wrap food using a suitable packaging material before storing in 24 h which is frozen right through to excessive cooling of...
... freezing fresh food turn the thermostat towards MAX. You may place fresh food to be frozen without having to rotate the temperature control. Take special care not to thaw slowly. The quality of the freezer. 12. For hygiene reasons, always wrap food using a suitable packaging material before storing in 24 h which is frozen right through to excessive cooling of...

Installation and Operation Instructions
Page 18
... reaches about 1/4"(7 mm), reduce the setting (i.e. Do not obstruct the freezer fan guard to restart automatic defrosting B) Freezer Compartment The freezer compartment defrosts automatically. The defrosting water runs to remove the droplets which may remain on the liner and refreeze when defrosting is located. The fan inside the freezer compartment circulates cold air. Don't cover the shelves with any object through the guard. Do not use pointed or sharp edged objects...
... reaches about 1/4"(7 mm), reduce the setting (i.e. Do not obstruct the freezer fan guard to restart automatic defrosting B) Freezer Compartment The freezer compartment defrosts automatically. The defrosting water runs to remove the droplets which may remain on the liner and refreeze when defrosting is located. The fan inside the freezer compartment circulates cold air. Don't cover the shelves with any object through the guard. Do not use pointed or sharp edged objects...

Installation and Operation Instructions
Page 19
... remove a freezer drawer, pull it as the appliance at the back of the appliance which is located at the socket outlet and far as possible, and then tilt it upwards, pull out the mains plug before closing the freezer door. ** Make sure that the special plastic container (drain tray) at the back of the appliance, should be used for cleaning. ** Use luke warm water to clean...
... remove a freezer drawer, pull it as the appliance at the back of the appliance which is located at the socket outlet and far as possible, and then tilt it upwards, pull out the mains plug before closing the freezer door. ** Make sure that the special plastic container (drain tray) at the back of the appliance, should be used for cleaning. ** Use luke warm water to clean...
Installation and Operation Instructions
Page 21
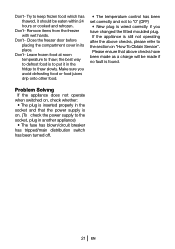
... make sure any soil. Don't- Do- Remove ice cream from the freezer. It has been designed for long periods as possible and adhere to run and cause excessive ice formation. Leave lettuce, cabbage, parsley and cauliflower on lips. The low temperature may burst. Don't- Keep raw meat and poultry below cooked food and dairy products. Leave the door open...
... make sure any soil. Don't- Do- Remove ice cream from the freezer. It has been designed for long periods as possible and adhere to run and cause excessive ice formation. Leave lettuce, cabbage, parsley and cauliflower on lips. The low temperature may burst. Don't- Keep raw meat and poultry below cooked food and dairy products. Leave the door open...
Installation and Operation Instructions
Page 22
.../circuit breaker has tripped/main distribution switch has been turned off. 21 EN If the appliance is found. Remove items from the freezer with wet hands. Leave frozen food at room temperature to thaw slowly. Make sure you avoid defrosting food or food juices drip onto other food. • The temperature control has been set correctly and not to the socket...
.../circuit breaker has tripped/main distribution switch has been turned off. 21 EN If the appliance is found. Remove items from the freezer with wet hands. Leave frozen food at room temperature to thaw slowly. Make sure you avoid defrosting food or food juices drip onto other food. • The temperature control has been set correctly and not to the socket...
Installation and Operation Instructions
Page 23
... Your new Beko product is covered? • Repairs necessary as a result of faulty materials, defective components or manufacturing defect. • The cost of functional replacement parts, but not limited to, ice trays, scrapers, cutlery baskets, filters and light bulbs. • Repairs required as a result of unauthorised repair or inexpert installation that fails to meet the requirements contained in the user instruction book. • Repairs to products used in...
... Your new Beko product is covered? • Repairs necessary as a result of faulty materials, defective components or manufacturing defect. • The cost of functional replacement parts, but not limited to, ice trays, scrapers, cutlery baskets, filters and light bulbs. • Repairs required as a result of unauthorised repair or inexpert installation that fails to meet the requirements contained in the user instruction book. • Repairs to products used in...

Installation and Operation Instructions
Page 24
... should also complete the details below UK Mainland & Northern Ireland Fridges & Freezers Electric Cookers Gas & Dual Fuel Cookers Washing Machines & Dishwashers Republic of purchase in obtaining service please contact the Beko Customer Help-Line. If you when requesting service. (The model number is printed on the Instruction Booklet and the serial number is found even though your product may still be obtained at...
... should also complete the details below UK Mainland & Northern Ireland Fridges & Freezers Electric Cookers Gas & Dual Fuel Cookers Washing Machines & Dishwashers Republic of purchase in obtaining service please contact the Beko Customer Help-Line. If you when requesting service. (The model number is printed on the Instruction Booklet and the serial number is found even though your product may still be obtained at...

