User Manual
Page 2
... state-of electric shock. Warning of -the-art technology. Dear Customer, Thank you handover the product to life and property. If you for several other accompanying documents carefully before using the product and keep it as well. Differences between models will be identified in the manual. Therefore, please read this user manual is also applicable for purchasing this user manual the...
... state-of electric shock. Warning of -the-art technology. Dear Customer, Thank you handover the product to life and property. If you for several other accompanying documents carefully before using the product and keep it as well. Differences between models will be identified in the manual. Therefore, please read this user manual is also applicable for purchasing this user manual the...
User Manual
Page 3
... operate the top oven 22 Cooking times table 23 How to operate the top grill 24 Top oven cooking times table for grilling 24 M Maintenance and care 25 General information 25 Cleaning the control panel 25 Cleaning the oven 25 Removing the oven door 25 Removing the door inner glass 26 Replacing the oven lamp 27 4 Preparation 15 0 Troubleshooting 28 Tips for saving energy Initial use Time setting First cleaning of the appliance Initial heating 15 15 M Guarantee and Service...
... operate the top oven 22 Cooking times table 23 How to operate the top grill 24 Top oven cooking times table for grilling 24 M Maintenance and care 25 General information 25 Cleaning the control panel 25 Cleaning the oven 25 Removing the oven door 25 Removing the door inner glass 26 Replacing the oven lamp 27 4 Preparation 15 0 Troubleshooting 28 Tips for saving energy Initial use Time setting First cleaning of the appliance Initial heating 15 15 M Guarantee and Service...

User Manual
Page 4
... supervision. • Installation and repair procedures must be disconnected during installation, maintenance, cleaning and repairing procedures. • If the power connection cable for the product is the risk of electric shock! • Only connect the product to a grounded outlet/line with the voltage and protection as specified in the "Technical specifications". There is damaged, it is defective or has any warranty. Failure to...
... supervision. • Installation and repair procedures must be disconnected during installation, maintenance, cleaning and repairing procedures. • If the power connection cable for the product is the risk of electric shock! • Only connect the product to a grounded outlet/line with the voltage and protection as specified in the "Technical specifications". There is damaged, it is defective or has any warranty. Failure to...
User Manual
Page 5
... that it is in use the connection cable specified in the "Technical specifications". • The appliance must be taken to avoid touching heating elements. Care should only be carried out by a switch built into the fixed electrical installation, according to the product as a result of short circuit. • Any work on electrical equipment and systems should be installed so that the electrical connection does not contact the...
... that it is in use the connection cable specified in the "Technical specifications". • The appliance must be taken to avoid touching heating elements. Care should only be carried out by a switch built into the fixed electrical installation, according to the product as a result of short circuit. • Any work on electrical equipment and systems should be installed so that the electrical connection does not contact the...

User Manual
Page 6
... heating purposes. 6/EN accumulation might damage the bottom of the oven. • Do not place aluminium foil on the base of the tray. • Do not use harsh abrasive cleaners or sharp metal scrapers to clean the oven door glass since they can scratch the surface, which may cause an electric shock. • Placing the wire shelf and tray onto the wire racks...
... heating purposes. 6/EN accumulation might damage the bottom of the oven. • Do not place aluminium foil on the base of the tray. • Do not use harsh abrasive cleaners or sharp metal scrapers to clean the oven door glass since they can scratch the surface, which may cause an electric shock. • Placing the wire shelf and tray onto the wire racks...
User Manual
Page 7
... during use or handling errors. • The oven can be reused and are manufactured from recyclable materials in the Directive. Take it to learn about these collection centers. Keep children away from children. This product has been manufactured with high quality parts and materials which can be used for defrosting, baking, roasting and grilling food. Compliance with RoHS Directive: The product you...
... during use or handling errors. • The oven can be reused and are manufactured from recyclable materials in the Directive. Take it to learn about these collection centers. Keep children away from children. This product has been manufactured with high quality parts and materials which can be used for defrosting, baking, roasting and grilling food. Compliance with RoHS Directive: The product you...
User Manual
Page 10
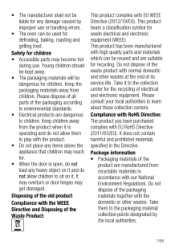
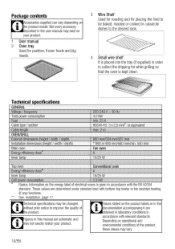
... your product. Oven tray Used for pastries, frozen foods and big roasts. 3, Wire Shelf Used for roasting and for placing the food to be changed without prior notice to improve the quality of the product, these values may be baked, roasted or cooked in order to the desired rack, 4. Technical specifications GENERAL Voltage / frequency Total power consumption Fuse Cable type / section Cable length OVEN/GRILL External dimensions (height / width / depth) Installation dimensions (height / width...
... your product. Oven tray Used for pastries, frozen foods and big roasts. 3, Wire Shelf Used for roasting and for placing the food to be changed without prior notice to improve the quality of the product, these values may be baked, roasted or cooked in order to the desired rack, 4. Technical specifications GENERAL Voltage / frequency Total power consumption Fuse Cable type / section Cable length OVEN/GRILL External dimensions (height / width / depth) Installation dimensions (height / width...
User Manual
Page 11
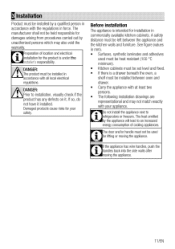
... used must be heat resistant (100 °C minimum). • Kitchen cabinets must be set level and fixed. • If there is a drawer beneath the oven, a shelf must be left between oven and drawer. • Carry the appliance with at least two persons. • The following installation drawings are representational and may also void the warranty. A.I DANGER: I DANGER: A• V The product must be installed...
... used must be heat resistant (100 °C minimum). • Kitchen cabinets must be set level and fixed. • If there is a drawer beneath the oven, a shelf must be left between oven and drawer. • Carry the appliance with at least two persons. • The following installation drawings are representational and may also void the warranty. A.I DANGER: I DANGER: A• V The product must be installed...
User Manual
Page 13
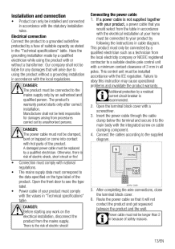
... circuit breaker is the risk of safety reasons. 13/EN The product's warranty period starts only after correct installation. Otherwise, there is not supplied together with your product by a qualified electrician while using the product without a transformer. A, DANGER: •v Before starting any damages that you would select from the mains supply. After completing the wire connections, close the terminal block cover. 6. Connecting the power cable 1. Open...
... circuit breaker is the risk of safety reasons. 13/EN The product's warranty period starts only after correct installation. Otherwise, there is not supplied together with your product by a qualified electrician while using the product without a transformer. A, DANGER: •v Before starting any damages that you would select from the mains supply. After completing the wire connections, close the terminal block cover. 6. Connecting the power cable 1. Open...
User Manual
Page 15
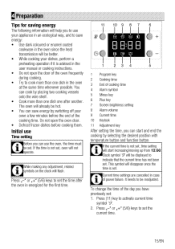
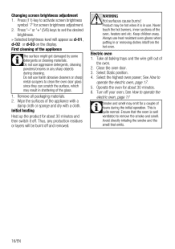
... displayed to indicate that the current time has not been set. Current time settings are cancelled in case of the day you have previously set the current time. 15/EN It needs to set : 1. Initial use Time setting Before you can start increasing/moving up from 12:00. This symbol will disappear once the time is advised in the user manual or cooking instructions. • Do not open the oven door...
... displayed to indicate that the current time has not been set. Current time settings are cancelled in case of the day you have previously set the current time. 15/EN It needs to set : 1. Initial use Time setting Before you can start increasing/moving up from 12:00. This symbol will disappear once the time is advised in the user manual or cooking instructions. • Do not open the oven door...
User Manual
Page 16
... the smoke and the smell that the room is quite normal. Remove all baking trays and the wire grill out of the oven, heaters and etc. Initial heating Heat up the product for screen brightness adjustment. 2. Electric oven 1. Select the highest oven power; Thus, any sharp objects during the initial operation. Turn off . First cleaning of the appliance with a damp cloth or sponge and dry with...
... the smoke and the smell that the room is quite normal. Remove all baking trays and the wire grill out of the oven, heaters and etc. Initial heating Heat up the product for screen brightness adjustment. 2. Electric oven 1. Select the highest oven power; Thus, any sharp objects during the initial operation. Turn off . First cleaning of the appliance with a damp cloth or sponge and dry with...
User Manual
Page 17
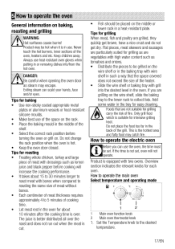
... the wire shelf or baking tray with two ovens. Do not place the food too far in the tray for easy cleaning. How to operate the electric oven Before you are vegetables with bones when compared to roasting the same size of meat without bones. • Each centimeter of meat thickness requires approximately 4 to operate the oven General information on baking, roasting and grilling . If the time is in use of...
... the wire shelf or baking tray with two ovens. Do not place the food too far in the tray for easy cleaning. How to operate the electric oven Before you are vegetables with bones when compared to roasting the same size of meat without bones. • Each centimeter of meat thickness requires approximately 4 to operate the oven General information on baking, roasting and grilling . If the time is in use of...
User Manual
Page 18
... grilling time. Operating with one tray only. Wire shelf must be different from the top and bottom. Food is not required in this section. Operating modes All functions in your meals in different rack levels and preheating is heated simultaneously from the arrangement on your wire shelf to obtain a good grill performance. Possibly, the external cooling fan will also operate to the adjusted temperature and...
... grilling time. Operating with one tray only. Wire shelf must be different from the top and bottom. Food is not required in this section. Operating modes All functions in your meals in different rack levels and preheating is heated simultaneously from the arrangement on your wire shelf to obtain a good grill performance. Possibly, the external cooling fan will also operate to the adjusted temperature and...
User Manual
Page 20
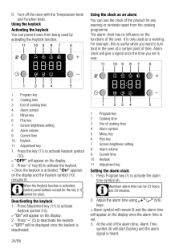
... keylock You can use the clock of the alarm time, Alarm Time symbol (4) will be 23 hours and 59 minutes. 2. When the Keylock function is useful when you set . 3. For example, this is activated, control panel buttons except for any warning or reminder apart from being used as an alarm You can prevent oven from the cooking programme. Adjust the alarm time using 5/6) keys. »...
... keylock You can use the clock of the alarm time, Alarm Time symbol (4) will be 23 hours and 59 minutes. 2. When the Keylock function is useful when you set . 3. For example, this is activated, control panel buttons except for any warning or reminder apart from being used as an alarm You can prevent oven from the cooking programme. Adjust the alarm time using 5/6) keys. »...
User Manual
Page 21
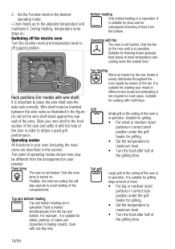
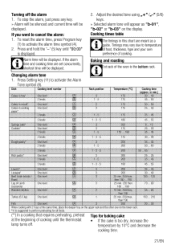
... the cooking time. 21/EN Changing alarm tone 1. I .);-,: leh e. lovel:-, 1 1 11 I .. place the deeper tray on the upper rack and the other one on the display. Tips for all foods. (**) In a cooking that requires preheating, preheat at the same time. Press and hold the '-' (5) key until the thermostat lamp turns off the alarm 1. Baking and roasting 1st rack of cooking until "00:00" is the bottom rack. Press Setting...
... the cooking time. 21/EN Changing alarm tone 1. I .);-,: leh e. lovel:-, 1 1 11 I .. place the deeper tray on the upper rack and the other one on the display. Tips for all foods. (**) In a cooking that requires preheating, preheat at the same time. Press and hold the '-' (5) key until the thermostat lamp turns off the alarm 1. Baking and roasting 1st rack of cooking until "00:00" is the bottom rack. Press Setting...

User Manual
Page 22
... the cooking table. Cook the pastry in accordance with the mode and temperature given in the oven. During heating and cooling, thermostat light turns on the outside use less liquid or lower the temperature by turning the relevant knob to the adjusted temperature and maintains it on top, place it in a pan with Function knob. If the bottom part is still not browned enough, place it . Switching...
... the cooking table. Cook the pastry in accordance with the mode and temperature given in the oven. During heating and cooling, thermostat light turns on the outside use less liquid or lower the temperature by turning the relevant knob to the adjusted temperature and maintains it on top, place it in a pan with Function knob. If the bottom part is still not browned enough, place it . Switching...

User Manual
Page 24
...bottom rack. Grilling with electric grill • Put big or medium-sized portions in use. Set the temperature to operate the top grill A# WARNING •T Close oven door during grilling. If required, perform a preheating of about 5 minutes. » Thermostat (temperature) light turns on the grill 8 • Food and plates ...rack of the oven is required to be roasted, grill the food either by placing onto the wire grill in the back of fire. Do not place the food too far in the tray or by placing the tray onto the floor of grill compartment will get heated when the main oven...
...bottom rack. Grilling with electric grill • Put big or medium-sized portions in use. Set the temperature to operate the top grill A# WARNING •T Close oven door during grilling. If required, perform a preheating of about 5 minutes. » Thermostat (temperature) light turns on the grill 8 • Food and plates ...rack of the oven is required to be roasted, grill the food either by placing onto the wire grill in the back of fire. Do not place the food too far in the tray or by placing the tray onto the floor of grill compartment will get heated when the main oven...
User Manual
Page 25
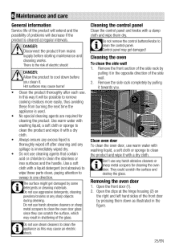
... off after each use aggressive detergents, cleaning powders/creams or any harsh abrasive cleaners or sharp metal scrapers for cleaning the product. Open the front door (1). 2. Control panel may cause burns! • Clean the product thoroughly after cleaning and any spillage is the risk of electric shock! 6 Maintenance and care General information Service life of the product will extend and the possibility of problems will be possible...
... off after each use aggressive detergents, cleaning powders/creams or any harsh abrasive cleaners or sharp metal scrapers for cleaning the product. Open the front door (1). 2. Control panel may cause burns! • Clean the product thoroughly after cleaning and any spillage is the risk of electric shock! 6 Maintenance and care General information Service life of the product will extend and the possibility of problems will be possible...
User Manual
Page 28
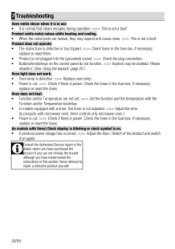
... the fuses in the fuse box. Please disable it (See. Ifnecessary, replace or reset the fuses. (In models with microwave oven, timer controls only microwave oven.) • Power is cut . >>> Check if there is power. Product does not operate. • The mains fuse is defective or has tripped. >>> Check fuses in the fuse box. Troubleshooting Oven emits steam when it is in use. • It is normal that steam escapes during operation. >>> This is not a fault Product emits metal noises while heating...
... the fuses in the fuse box. Please disable it (See. Ifnecessary, replace or reset the fuses. (In models with microwave oven, timer controls only microwave oven.) • Power is cut . >>> Check if there is power. Product does not operate. • The mains fuse is defective or has tripped. >>> Check fuses in the fuse box. Troubleshooting Oven emits steam when it is in use. • It is normal that steam escapes during operation. >>> This is not a fault Product emits metal noises while heating...

User Manual
Page 29
... if the product is resold. • Beko plc disclaims any difficulty in obtaining service please call tie above cumbers where service can be correctly installed, located and operated in accordance with the instructions contained in the User Instructions Booklet provided. • Professional Instal aticn by a qualified plumber/electrical appliarce installer is recommended for all functional replacement parts. • The labour costs of unauthorised repairs or inexpert installation that...
... if the product is resold. • Beko plc disclaims any difficulty in obtaining service please call tie above cumbers where service can be correctly installed, located and operated in accordance with the instructions contained in the User Instructions Booklet provided. • Professional Instal aticn by a qualified plumber/electrical appliarce installer is recommended for all functional replacement parts. • The labour costs of unauthorised repairs or inexpert installation that...


