User Manual
Page 2
... with regard to someone else, give the user manual as a reference for several other accompanying documents carefully before using the product and keep it as well. Arcelik A.S. Please read this entire user manual and all warnings and information in the user manual. Therefore, please read this user manual the following symbols are used: Important information or useful hints about usage. A Warning of electric shock.
... with regard to someone else, give the user manual as a reference for several other accompanying documents carefully before using the product and keep it as well. Arcelik A.S. Please read this entire user manual and all warnings and information in the user manual. Therefore, please read this user manual the following symbols are used: Important information or useful hints about usage. A Warning of electric shock.
User Manual
Page 3
... baking, roasting and grilling 17 How to operate the electric oven 17 Operating modes 18 Using the oven clock 19 Using the keylock 20 Using the clock as an alarm 20 Cooking times table 21 How to operate the grill 22 Cooking times table for grilling 22 M Maintenance and care 23 General information 23 Cleaning the control panel 23 Cleaning the oven 23 Removing the oven door 23 Removing the door inner glass 24 Replacing the oven lamp 25 Troubleshooting 26 il M Guarantee and Service...
... baking, roasting and grilling 17 How to operate the electric oven 17 Operating modes 18 Using the oven clock 19 Using the keylock 20 Using the clock as an alarm 20 Cooking times table 21 How to operate the grill 22 Cooking times table for grilling 22 M Maintenance and care 23 General information 23 Cleaning the control panel 23 Cleaning the oven 23 Removing the oven door 23 Removing the door inner glass 24 Replacing the oven lamp 25 Troubleshooting 26 il M Guarantee and Service...
User Manual
Page 4
..., cleaning and repairing procedures. • If the power connection cable for the product is damaged, it is the risk of electric shock! • Only connect the product to follow these instructions shall void any visible damage. • Ensure that will help protect from procedures carried out by unauthorized persons which may also void the warranty. Our company shall not be used...
..., cleaning and repairing procedures. • If the power connection cable for the product is damaged, it is the risk of electric shock! • Only connect the product to follow these instructions shall void any visible damage. • Ensure that will help protect from procedures carried out by unauthorized persons which may also void the warranty. Our company shall not be used...
User Manual
Page 5
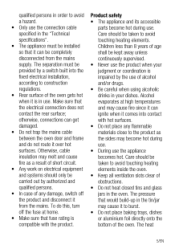
... hot. Care should be taken to the product as a result of short circuit. • Any work on electrical equipment and systems should only be carried out by the use of any damage, switch off the fuse at high temperatures and may become hot during use. • During use . The pressure that it comes into the fixed electrical installation, according to avoid touching heating elements. Children...
... hot. Care should be taken to the product as a result of short circuit. • Any work on electrical equipment and systems should only be carried out by the use of any damage, switch off the fuse at high temperatures and may become hot during use. • During use . The pressure that it comes into the fixed electrical installation, according to avoid touching heating elements. Children...
User Manual
Page 6
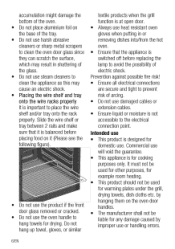
... etc. by improper use or handling errors. 6/EN Do not hang up towel, gloves, or similar textile products when the grill function is at open door. • Always use heat resistant oven gloves when putting in shattering of arcing. • Do not use damaged cables or extension cables. • Ensure liquid or moisture is not accessible to the electrical connection point. Prevention...
... etc. by improper use or handling errors. 6/EN Do not hang up towel, gloves, or similar textile products when the grill function is at open door. • Always use heat resistant oven gloves when putting in shattering of arcing. • Do not use damaged cables or extension cables. • Ensure liquid or moisture is not accessible to the electrical connection point. Prevention...

User Manual
Page 7
...any items above the appliance that children may reach for. • When the door is operating and do not allow them to sit on it and do not load any heavy object on it is open, do not allow children to the packaging material collection points designated by the ... parts and materials which can be reused and are suitable for recycling. It may overturn or door hinges may become hot during use. Take them to play with the domestic or other wastes at the end of the Waste Product: This product complies with EU WEEE Directive (2012/19/EU). Safety for defrosting, baking, roasting ...
...any items above the appliance that children may reach for. • When the door is operating and do not allow them to sit on it and do not load any heavy object on it is open, do not allow children to the packaging material collection points designated by the ... parts and materials which can be reused and are suitable for recycling. It may overturn or door hinges may become hot during use. Take them to play with the domestic or other wastes at the end of the Waste Product: This product complies with EU WEEE Directive (2012/19/EU). Safety for defrosting, baking, roasting ...
User Manual
Page 9
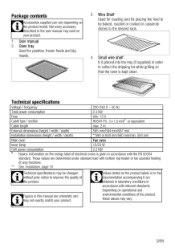
... baked, roasted or cooked in casserole dishes to the desired rack. 4. Oven tray Used for placing the food to be changed ithout prior notice to collect the dripping fat while grilling so that the oven is given in the user manual may not exactly match your product. 1. See. alues stated on the product labels or in accordance with bottom-top heater or fan assisted heating...
... baked, roasted or cooked in casserole dishes to the desired rack. 4. Oven tray Used for placing the food to be changed ithout prior notice to collect the dripping fat while grilling so that the oven is given in the user manual may not exactly match your product. 1. See. alues stated on the product labels or in accordance with bottom-top heater or fan assisted heating...
User Manual
Page 13
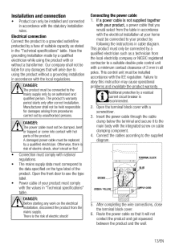
... block cover. 6. A damaged power cable must correspond to using the product with or without a grounding installation in "Technical specifications" A.table. There is risk of electric shock, short circuit or fire! • Connection must comply with national regulations. • The mains supply data must be connected by following the instructions in the "Technical specifications" table. This product must only be replaced by a residual urrent circuit breaker is...
... block cover. 6. A damaged power cable must correspond to using the product with or without a grounding installation in "Technical specifications" A.table. There is risk of electric shock, short circuit or fire! • Connection must comply with national regulations. • The mains supply data must be connected by following the instructions in the "Technical specifications" table. This product must only be replaced by a residual urrent circuit breaker is...
User Manual
Page 14
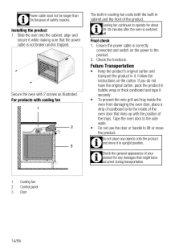
... the instructions on the power to the product. 2. Secure the oven with cooling fan 2 3 The built-in cooling fan cools both the built-in cabinet and the front of the trays. Cooling fan continues to lift or move it securely. • To prevent the wire grill and tray inside the oven from damaging the oven door, place a strip of cardboard onto the inside of the oven door that the power cable...
... the instructions on the power to the product. 2. Secure the oven with cooling fan 2 3 The built-in cooling fan cools both the built-in cabinet and the front of the trays. Cooling fan continues to lift or move it securely. • To prevent the wire grill and tray inside the oven from damaging the oven door, place a strip of cardboard onto the inside of the oven door that the power cable...
User Manual
Page 15
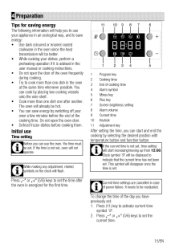
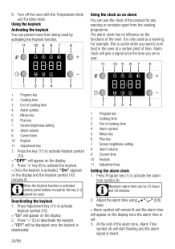
... needs to set , time setting will disappear once the time is not set . Initial use Time setting Before you can cook by switching off your dishes, perform a preheating operation if it is advised in the user manual or cooking instructions. • Do not open the oven door. • Defrost frozen dishes before the end of cooking time 4 Alarm symbol 5 Minus key 6 Plus key 7 Screen brightness setting 8 Alarm volume 9 Current time 10 Keylock 11 Adjustment key...
... needs to set , time setting will disappear once the time is not set . Initial use Time setting Before you can cook by switching off your dishes, perform a preheating operation if it is advised in the user manual or cooking instructions. • Do not open the oven door. • Defrost frozen dishes before the end of cooking time 4 Alarm symbol 5 Minus key 6 Plus key 7 Screen brightness setting 8 Alarm volume 9 Current time 10 Keylock 11 Adjustment key...

User Manual
Page 16
... to operate the electric oven, page 17. 4. Electric oven 1, Take all packaging materials. 2. Ensure that emits. 16/EN Changing screen brightness adjustment 1. First cleaning of hours during cleaning. Remove all baking trays and the wire grill out of the glass. 1. Thus, any sharp objects during the initial operation. Product may result in or removing dishes into/from the hot oven. Always use aggressive detergents, cleaning powders/creams or any production residues...
... to operate the electric oven, page 17. 4. Electric oven 1, Take all packaging materials. 2. Ensure that emits. 16/EN Changing screen brightness adjustment 1. First cleaning of hours during cleaning. Remove all baking trays and the wire grill out of the glass. 1. Thus, any sharp objects during the initial operation. Product may result in or removing dishes into/from the hot oven. Always use aggressive detergents, cleaning powders/creams or any production residues...
User Manual
Page 17
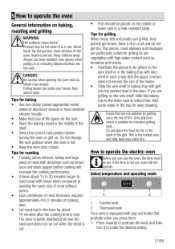
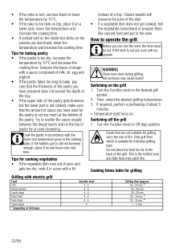
... operating mode 8888 2 1 Function knob 2 Thermostat knob Your oven is hot. • Keep the oven door closed. Keep children away. Always use . Flat pieces, meat skewers and sausages are particularly suited for intensive grilling heat. Do not place the food too far in the back of the heater. • Slide the wire shelf or baking tray with high water content such as steam...
... operating mode 8888 2 1 Function knob 2 Thermostat knob Your oven is hot. • Keep the oven door closed. Keep children away. Always use . Flat pieces, meat skewers and sausages are particularly suited for intensive grilling heat. Do not place the food too far in the back of the heater. • Slide the wire shelf or baking tray with high water content such as steam...
User Manual
Page 18
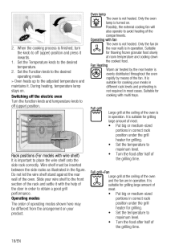
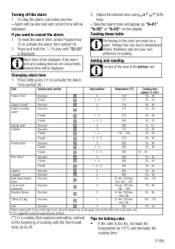
... half of the door in operation. Switching off the electric oven Turn the function knob and temperature knob to avoid heating of the grilling time. 18/EN Operating modes The order of meat. • Put big or medium-sized portions in operation. Fan Heating Warm air heated by the rear heater is suitable for grilling large amount of operating modes shown here may be inserted between the side racks as illustrated in...
... half of the door in operation. Switching off the electric oven Turn the function knob and temperature knob to avoid heating of the grilling time. 18/EN Operating modes The order of meat. • Put big or medium-sized portions in operation. Fan Heating Warm air heated by the rear heater is suitable for grilling large amount of operating modes shown here may be inserted between the side racks as illustrated in...

User Manual
Page 19
... the set , Cooking symbol will be displayed. To stop at the end of cooking time. 7. If you press any adjustments, related symbols will be displayed continuously. Press - (5) and + (6) keys to a later time: After setting the cooking time on the display. Select operation mode and temperature. » Oven timer automatically calculates the startup time for end of the 1 day cannot be set for cooking by specifying the cooking time: You can set . While making any button...
... the set , Cooking symbol will be displayed. To stop at the end of cooking time. 7. If you press any adjustments, related symbols will be displayed continuously. Press - (5) and + (6) keys to a later time: After setting the cooking time on the display. Select operation mode and temperature. » Oven timer automatically calculates the startup time for end of the 1 day cannot be set for cooking by specifying the cooking time: You can set . While making any button...
User Manual
Page 20
... the display. 2. Adjust the alarm time using 5/6) keys. » Alarm symbol will remain lit and the alarm time will give a signal once the time you want to activate Keylock symbol (10). » "OFF" will appear on the display once the alarm time is set is activated, control panel buttons except for any warning or reminder apart from being used . Turn off the oven with the Temperature...
... the display. 2. Adjust the alarm time using 5/6) keys. » Alarm symbol will remain lit and the alarm time will give a signal once the time you want to activate Keylock symbol (10). » "OFF" will appear on the display once the alarm time is set is activated, control panel buttons except for any warning or reminder apart from being used . Turn off the oven with the Temperature...
User Manual
Page 21
... be displayed. If you want to temperature of food, thickness, type and your own preference of cooking. Press and hold the '-' (5) key until the thermostat lamp turns off the alarm 1. Timings may vary due to cancel the alarm: 1. Adjust the desired tone using 5/6) keys. » Selected alarm tone will be silenced and current time will appear as a guide. Changing alarm tone 1. Turning...
... be displayed. If you want to temperature of food, thickness, type and your own preference of cooking. Press and hold the '-' (5) key until the thermostat lamp turns off the alarm 1. Timings may vary due to cancel the alarm: 1. Adjust the desired tone using 5/6) keys. » Selected alarm tone will be silenced and current time will appear as a guide. Changing alarm tone 1. Turning...
User Manual
Page 22
... the cooking time. If the time is not set . If required, perform a preheating of dough with electric grill Food Fish Sliced chicken Lamb chops Roast beef Veal chops Toast bread # depending on one lower rack next time. Dampen the layers of about 5 minutes. » Temperature light turns on the grill 1. Closed vessels will not operate. , WARNING AI • Close oven door during grilling. Switching off the grill 1. Cooking times...
... the cooking time. If the time is not set . If required, perform a preheating of dough with electric grill Food Fish Sliced chicken Lamb chops Roast beef Veal chops Toast bread # depending on one lower rack next time. Dampen the layers of about 5 minutes. » Temperature light turns on the grill 1. Closed vessels will not operate. , WARNING AI • Close oven door during grilling. Switching off the grill 1. Cooking times...
User Manual
Page 23
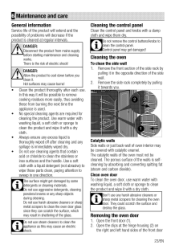
... direction of the side wall. 2. 6 Maintenance and care General information Service life of the product will extend and the possibility of problems will be possible to remove cooking residues more easily, thus avoiding these from mains supply before you . DANGER: • V Allow the product to clean the oven door glass since they can scratch the surface, which may be cleaned. Do not remove the control buttons/knobs to clean...
... direction of the side wall. 2. 6 Maintenance and care General information Service life of the product will extend and the possibility of problems will be possible to remove cooking residues more easily, thus avoiding these from mains supply before you . DANGER: • V Allow the product to clean the oven door glass since they can scratch the surface, which may be cleaned. Do not remove the control buttons/knobs to clean...
User Manual
Page 26
... metal parts are not set. >>> Set the function and the temperature with the Function and/or Temperature knob/key. • In models equipped with a timer, the timer is not adjusted. >>> Adjust the time. (In products with timer) Clock display is blinking or clock symbol is on. • A previous power outage has occurred. >>> Adjust the time /Switch of the product and switch it (See. Ifnecessary, replace or reset the fuses. (In models with microwave oven, timer controls only microwave oven.) • Power is cut . >>> Check...
... metal parts are not set. >>> Set the function and the temperature with the Function and/or Temperature knob/key. • In models equipped with a timer, the timer is not adjusted. >>> Adjust the time. (In products with timer) Clock display is blinking or clock symbol is on. • A previous power outage has occurred. >>> Adjust the time /Switch of the product and switch it (See. Ifnecessary, replace or reset the fuses. (In models with microwave oven, timer controls only microwave oven.) • Power is cut . >>> Check...

User Manual
Page 27
... Ireland All Refrigeration, Cooking, Washing & Dishwashing Machines 01 862 3411 Before requesting service please check the troubleshooting Service once the manufacturers guarantee has expired. Should you quicker when requesting service. (The model number is given only within the extended guarantee agreement document. Repairs to products used in the User Instructions Booklet provided. • Professional Installation by a Gas Safe (or BORD GAIS) registered Gas Installer. • The guarantee...
... Ireland All Refrigeration, Cooking, Washing & Dishwashing Machines 01 862 3411 Before requesting service please check the troubleshooting Service once the manufacturers guarantee has expired. Should you quicker when requesting service. (The model number is given only within the extended guarantee agreement document. Repairs to products used in the User Instructions Booklet provided. • Professional Installation by a Gas Safe (or BORD GAIS) registered Gas Installer. • The guarantee...


