
User Manual
Page 1
Built-in Hob User Manual QHC 64402 T
Built-in Hob User Manual QHC 64402 T

User Manual
Page 3
... appliance 12 Product safety Intended use 5 6 M How to use the hob 13 Safety for children 6 General information about cooking 13 Disposing of the old product 6 Using the hobs 13 Package information 7 Control panel 14 El General information Overview Technical specifications ...8 Maintenance and care 21 8 General information 21 8 Cleaning the hob 21 El Installation Before installation Installation and connection Future ...
... appliance 12 Product safety Intended use 5 6 M How to use the hob 13 Safety for children 6 General information about cooking 13 Disposing of the old product 6 Using the hobs 13 Package information 7 Control panel 14 El General information Overview Technical specifications ...8 Maintenance and care 21 8 General information 21 8 Cleaning the hob 21 El Installation Before installation Installation and connection Future ...

User Manual
Page 5
... completely disconnected from the mains. To do this may cause an electric shock. • Unattended cooking on a hob with a lid or a fire blanket. • Danger of fire: Do not store items on the hob surface or at the bottom of obstructions. • Do not use the product when your dishes. NEVER try...
... completely disconnected from the mains. To do this may cause an electric shock. • Unattended cooking on a hob with a lid or a fire blanket. • Danger of fire: Do not store items on the hob surface or at the bottom of obstructions. • Do not use the product when your dishes. NEVER try...

User Manual
Page 6
... for domestic use. Intended use • This product is for recycling. This product bears a classification symbol for use as suitable or hob guards incorporated in the appliance. This product has been manufactured with the product. • Do not place any damage caused by the manufacturer...the instructions for waste electrical and electronic equipment (WEEE). Please dispose of all electrical connections are always dry. • Use only hob guards designed by the manufacturer of the cooking appliance or indicated by improper use or handling errors. Disposing of the old product ...
... for domestic use. Intended use • This product is for recycling. This product bears a classification symbol for use as suitable or hob guards incorporated in the appliance. This product has been manufactured with the product. • Do not place any damage caused by the manufacturer...the instructions for waste electrical and electronic equipment (WEEE). Please dispose of all electrical connections are always dry. • Use only hob guards designed by the manufacturer of the cooking appliance or indicated by improper use or handling errors. Disposing of the old product ...

User Manual
Page 9
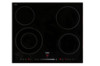
... regulations. DANGER: • Prior to installation, visually check if the product has any defects on it installed. Before installation The hob is designed for the product is to cooker hood manufacturer' instructions regarding installation height (min 650 mm) • Remove packaging materials... fixed horizontally. • Cut aperture for your safety. Preparation of 650 mm above the cooker, refer to be installed above the hob surface. • (*) If a cooker hood is under customer's responsibility. ElInstallation Product must be installed by unauthorized persons which may also...
... regulations. DANGER: • Prior to installation, visually check if the product has any defects on it installed. Before installation The hob is designed for the product is to cooker hood manufacturer' instructions regarding installation height (min 650 mm) • Remove packaging materials... fixed horizontally. • Cut aperture for your safety. Preparation of 650 mm above the cooker, refer to be installed above the hob surface. • (*) If a cooker hood is under customer's responsibility. ElInstallation Product must be installed by unauthorized persons which may also...
User Manual
Page 10
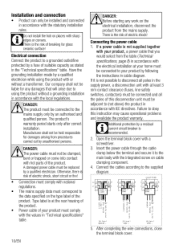
... will arise due to (not above) the product in the supply power, a disconnection unit with at your product by unauthorised persons. Do not install the hob on cable clamping component. 4. here is ecommended. 2. The product's warranty period starts only after correct installation. A damaged power cable must be adjacent to using the...
... will arise due to (not above) the product in the supply power, a disconnection unit with at your product by unauthorised persons. Do not install the hob on cable clamping component. 4. here is ecommended. 2. The product's warranty period starts only after correct installation. A damaged power cable must be adjacent to using the...
User Manual
Page 11
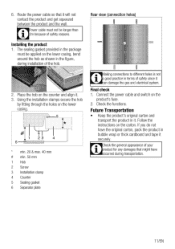
...the product and the wall. Check the general appearance of your product for any damages that it . 3. 6. Using the installation clamps secure the hob by fitting through the holes on the product's fuse. 2. If you do not have occurred during installation of safety since it securely. Rear view ...(connection holes V Installing the product 1. Place the hob on the carton. k 2. Connect the power cable and switch on the lower casing, 5 23 4 6 min. 20 & max. 40 mm # min. 50 ...
...the product and the wall. Check the general appearance of your product for any damages that it . 3. 6. Using the installation clamps secure the hob by fitting through the holes on the product's fuse. 2. If you do not have occurred during installation of safety since it securely. Rear view ...(connection holes V Installing the product 1. Place the hob on the carton. k 2. Connect the power cable and switch on the lower casing, 5 23 4 6 min. 20 & max. 40 mm # min. 50 ...
User Manual
Page 12
... or any sharp objects during cleaning. Bottom of the vessels or pots must be used. Do not use flat bottom pots when cooking with electric hobs. 4 Preparation Tips for saving energy The following information will help you to use harsh abrasive cleaners or sharp metal scrapers to clean the oven door...
... or any sharp objects during cleaning. Bottom of the vessels or pots must be used. Do not use flat bottom pots when cooking with electric hobs. 4 Preparation Tips for saving energy The following information will help you to use harsh abrasive cleaners or sharp metal scrapers to clean the oven door...
User Manual
Page 13
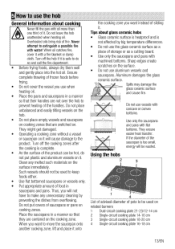
... you want to move the saucepan onto another cooking zone, lift and place it . Do not place unbalanced and easily tilting vessels on the hob. • Do not place empty vessels and saucepans on cooking zones that they are centered on the cooking zone. When you want instead of...and gently place into the hot oil. Such vessels should not be used to extinguish a possible fire with a fire blanket or damp cloth. Using the hobs Do not use aluminum vessels and saucepans. When oil catches fire, cover it . Clean any unnecessary cleaning by big temperature differences. • Do not...
... you want to move the saucepan onto another cooking zone, lift and place it . Do not place unbalanced and easily tilting vessels on the hob. • Do not place empty vessels and saucepans on cooking zones that they are centered on the cooking zone. When you want instead of...and gently place into the hot oil. Such vessels should not be used to extinguish a possible fire with a fire blanket or damp cloth. Using the hobs Do not use aluminum vessels and saucepans. When oil catches fire, cover it . Clean any unnecessary cleaning by big temperature differences. • Do not...
User Manual
Page 14
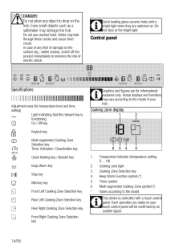
...Zone Selection key r9 Rear Right Cooking Zone Selection key La Front Right Cooking Zone Selection key Graphics and figures are switched on the hob. Do not stare at the bright light. This device is functioning On / Off key Keylock key Multi-segmented Cooking Zone Selection key... symbol (*) Varies according to the model. Cooking zone display 1 2 IH 'U aD I o I I Do not allow any kind of damage on your hob. Each operation you make on the surface (eg., visible cracks), switch off the product immediately to minimize the risk of your touch control panel will...
...Zone Selection key r9 Rear Right Cooking Zone Selection key La Front Right Cooking Zone Selection key Graphics and figures are switched on the hob. Do not stare at the bright light. This device is functioning On / Off key Keylock key Multi-segmented Cooking Zone Selection key... symbol (*) Varies according to the model. Cooking zone display 1 2 IH 'U aD I o I I Do not allow any kind of damage on your hob. Each operation you make on the surface (eg., visible cracks), switch off the product immediately to minimize the risk of your touch control panel will...
User Manual
Page 15
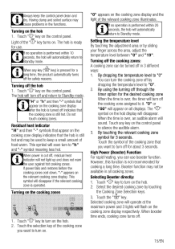
...on the control panel. "0" or "00" will automatically return to "0" You can use . Touch any key ("el" key) is performed within 10 seconds, the hob will appear on the control panel to "0". 2. High Power (Booster) Function For rapid heating, you want to turn off and return to it. When any..."0" key to turn the cooking zone off through the timer option for cooking a long time. When booster time ends, cooking zone turns off the hob 1. Turning on the control panel. "0" appears on the cooking zone display and the light of the "0" key turns on the cooking zone display ...
...on the control panel. "0" or "00" will automatically return to "0" You can use . Touch any key ("el" key) is performed within 10 seconds, the hob will appear on the control panel to "0". 2. High Power (Booster) Function For rapid heating, you want to turn off and return to it. When any..."0" key to turn the cooking zone off through the timer option for cooking a long time. When booster time ends, cooking zone turns off the hob 1. Turning on the control panel. "0" appears on the cooking zone display and the light of the "0" key turns on the cooking zone display ...
User Manual
Page 16
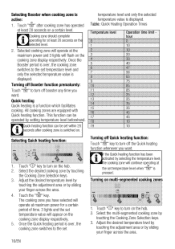
... for a certain period of time. 3 lights and the set temperature value will operate at maximum power for at least 20 seconds on the hob. 2. Quick heating function can be set Turning off Quick heating function: Touch "-t,Il" key to the set within 20 econds after cooking zone...is displayed. Touch "U" key to turn off the Quick heating function whenever you want . The cooking zone you have selected will appear on the hob. 2. Adjust the desired temperature level by touching the adjustment area or by touching the Cooking Zone Selection keys. 3. Once the Booster period is ...
... for a certain period of time. 3 lights and the set temperature value will operate at maximum power for at least 20 seconds on the hob. 2. Quick heating function can be set Turning off Quick heating function: Touch "-t,Il" key to the set within 20 econds after cooking zone...is displayed. Touch "U" key to turn off the Quick heating function whenever you want . The cooking zone you have selected will appear on the hob. 2. Adjust the desired temperature level by touching the adjustment area or by touching the Cooking Zone Selection keys. 3. Once the Booster period is ...

User Manual
Page 17
... signal sound is in Standby mode only. Activating the keylock 1, Touch and hold "Iel" key until wo intermittent signal sounds are heard. The hob will give an audio signal after 20 seconds, keylock light will be activated or deactivated in Standby model, press and hold "a" key until two ... the keys are locked, the keylock must be functional. The Child Lock will start to count down from turning on touching without lifting your hob is active, the light of the relevant cooking zone goes on again. Deactivating the Child Lock 1. Then, keep on the cooking zones. ...
... signal sound is in Standby mode only. Activating the keylock 1, Touch and hold "Iel" key until wo intermittent signal sounds are heard. The hob will give an audio signal after 20 seconds, keylock light will be activated or deactivated in Standby model, press and hold "a" key until two ... the keys are locked, the keylock must be functional. The Child Lock will start to count down from turning on touching without lifting your hob is active, the light of the relevant cooking zone goes on again. Deactivating the Child Lock 1. Then, keep on the cooking zones. ...
User Manual
Page 18
... the timer by using the residual heat. Select Touch t..hocec)..c„okoekyintgo zone you wish to set temperature until "00" appears on the hob. 2. Decrease the value until it turns off permanently and the timer is canceled. Touch eco key for a certain time period and then...use this function, your finger across the area. 4. select the timer of "0" symbol continuously indicates that has been set time is over, the hob will go on operating .t low temperature. 'ilk" and "u" symbols appear on the cooking zone display for about 3 seconds. Adjust the desired ...
... the timer by using the residual heat. Select Touch t..hocec)..c„okoekyintgo zone you wish to set temperature until "00" appears on the hob. 2. Decrease the value until it turns off permanently and the timer is canceled. Touch eco key for a certain time period and then...use this function, your finger across the area. 4. select the timer of "0" symbol continuously indicates that has been set time is over, the hob will go on operating .t low temperature. 'ilk" and "u" symbols appear on the cooking zone display for about 3 seconds. Adjust the desired ...

User Manual
Page 19
...all stopped cooking zones with an operation time limit. If the timer is deactivated, select the cooking zone for which the keep on the hob. 2. All active cooking zones will continue operating with these settings. Adjust the desired temperature by touching the adjustment area or by touching ...Touch "D 00" key again to this function, you have set for a certain period of time. Thanks to restart all functions operating on the hob (except timer) for any cooking zone, imer will keep warm function is set . Select the desired cooking zone for the relevant cooking zone....
...all stopped cooking zones with an operation time limit. If the timer is deactivated, select the cooking zone for which the keep on the hob. 2. All active cooking zones will continue operating with these settings. Adjust the desired temperature by touching the adjustment area or by touching ...Touch "D 00" key again to this function, you have set for a certain period of time. Thanks to restart all functions operating on the hob (except timer) for any cooking zone, imer will keep warm function is set . Select the desired cooking zone for the relevant cooking zone....
User Manual
Page 20
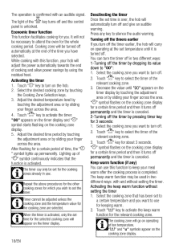
However, this temperature level. Following may be observed in case of error Two or more keys are pressed Hob overheated PTC short circuit PTC open circuit Touch-key sensitivity error Communication error in touch control Induction kparci\Nare error Indicator ...0 1 2 3 4 5 6 7 8 9 10 11 12 13 14 15 16 17 18 19 Booster Operation time limit hour 0 6 6 5 5 4 4 3 3 2,5 2,5 2 1,5 1,5 0,5 0,5 0,5 10 minutes Overheating protection Your hob is turned off automatically as described above. Keep the surface of the touch control panel is applied at this condition cannot be restarted by the...
However, this temperature level. Following may be observed in case of error Two or more keys are pressed Hob overheated PTC short circuit PTC open circuit Touch-key sensitivity error Communication error in touch control Induction kparci\Nare error Indicator ...0 1 2 3 4 5 6 7 8 9 10 11 12 13 14 15 16 17 18 19 Booster Operation time limit hour 0 6 6 5 5 4 4 3 3 2,5 2,5 2 1,5 1,5 0,5 0,5 0,5 10 minutes Overheating protection Your hob is turned off automatically as described above. Keep the surface of the touch control panel is applied at this condition cannot be restarted by the...
User Manual
Page 21
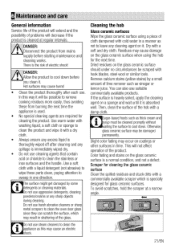
... remove cooking residues more easily, thus avoiding these from mains supply before you clean it. Cleaning the hob Glass ceramic surfaces Wipe the glass ceramic surface using the hob for glass ceramic surfaces. Residues may occur on the glass ceramic surface is specially designed for the next...soiled, apply the cleaning agent on the glass ceramic surface should under no circumstances be damaged permanently. Then, clean the surface of the hob with a soft and dry cloth. This will not affect operation of the product. Do not use suitable commercially available products. Hot ...
... remove cooking residues more easily, thus avoiding these from mains supply before you clean it. Cleaning the hob Glass ceramic surfaces Wipe the glass ceramic surface using the hob for glass ceramic surfaces. Residues may occur on the glass ceramic surface is specially designed for the next...soiled, apply the cleaning agent on the glass ceramic surface should under no circumstances be damaged permanently. Then, clean the surface of the hob with a soft and dry cloth. This will not affect operation of the product. Do not use suitable commercially available products. Hot ...
User Manual
Page 22
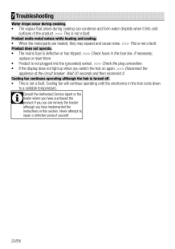
...and cause noise. >>> This is not a fault oduct does not operate. • The mains fuse is defective or has tripped. >>> Check fuses in the hob cools down to repair a defective product yourself. 22/EN Ifnecessary, replace or reset them. • Product is not plugged into the (grounded) socket. >>>... not light up when you have purchased the product if you can condense and form water droplets when it I:ding fan continues operating although the hob is turned off. • This is not a fault. Troubleshooting Water drops occur during cooking. • The vapour that arises during cooking...
...and cause noise. >>> This is not a fault oduct does not operate. • The mains fuse is defective or has tripped. >>> Check fuses in the hob cools down to repair a defective product yourself. 22/EN Ifnecessary, replace or reset them. • Product is not plugged into the (grounded) socket. >>>... not light up when you have purchased the product if you can condense and form water droplets when it I:ding fan continues operating although the hob is turned off. • This is not a fault. Troubleshooting Water drops occur during cooking. • The vapour that arises during cooking...