User Manual
Page 2
... 5 Pre-Configuration 7 Specifications 8 Step-by-Step Installation Guide Installing the Switch Base 9 Installing the HID USB Driver 10 Connecting the Console 11 Connecting the PCs 13 Powering Up the Systems 14 Using Your KVM Switch Selecting a Computer Using Direct-Access Port Selectors 15 Selecting a Computer Using Keyboard Hot Key Commands 15 AutoScan Mode 16 Connecting USB Devices to the Built-In 2-Port Hub 16 Belkin KVM Switches and Accessories OmniView KVM Switches 17 OmniView KVM Cables 19 OmniView KVM Accessories and Adapters 22 FAQs 23 Troubleshooting 25...
... 5 Pre-Configuration 7 Specifications 8 Step-by-Step Installation Guide Installing the Switch Base 9 Installing the HID USB Driver 10 Connecting the Console 11 Connecting the PCs 13 Powering Up the Systems 14 Using Your KVM Switch Selecting a Computer Using Direct-Access Port Selectors 15 Selecting a Computer Using Keyboard Hot Key Commands 15 AutoScan Mode 16 Connecting USB Devices to the Built-In 2-Port Hub 16 Belkin KVM Switches and Accessories OmniView KVM Switches 17 OmniView KVM Cables 19 OmniView KVM Accessories and Adapters 22 FAQs 23 Troubleshooting 25...
User Manual
Page 3
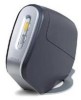
... over multiple computers/servers from installation and operation, to RJ45 Flash Cable • User Manual • Quick Installation Guide • Registration Card • 9V DC, 1A Power Supply 1 This compact, affordable Belkin OmniView KVM Switch is backed by a Belkin Five-Year Warranty and free technical support. Thank you control over 1 million Belkin OmniView KVM Switches are being used worldwide. INTRODUCTION Congratulations on your purchase of the Belkin OmniView SOHO Series KVM Switch with your KVM Switch. For easy installation, please refer...
... over multiple computers/servers from installation and operation, to RJ45 Flash Cable • User Manual • Quick Installation Guide • Registration Card • 9V DC, 1A Power Supply 1 This compact, affordable Belkin OmniView KVM Switch is backed by a Belkin Five-Year Warranty and free technical support. Thank you control over 1 million Belkin OmniView KVM Switches are being used worldwide. INTRODUCTION Congratulations on your purchase of the Belkin OmniView SOHO Series KVM Switch with your KVM Switch. For easy installation, please refer...
User Manual
Page 4
..., Belkin KVM Cables for upgrade information and support, or see the enclosed instruction document. Visit belkin.com for SOHO Series with the latest devices and computers. Firmware upgrades are recommended. This feature eliminates the need to disconnect and reconnect these devices when switching between computers, and reduces the clutter on your keyboard. USB Hot Keys Hot keys allow you to select ports using a simple hot key sequence on your KVM Switch...
..., Belkin KVM Cables for upgrade information and support, or see the enclosed instruction document. Visit belkin.com for SOHO Series with the latest devices and computers. Firmware upgrades are recommended. This feature eliminates the need to disconnect and reconnect these devices when switching between computers, and reduces the clutter on your keyboard. USB Hot Keys Hot keys allow you to select ports using a simple hot key sequence on your KVM Switch...
User Manual
Page 5
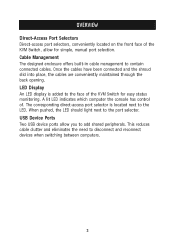
USB Device Ports Two USB device ports allow for easy status monitoring. OVERVIEW Direct-Access Port Selectors Direct-access port selectors, conveniently located on the front face of the KVM Switch, allow you to add shared peripherals. A lit LED indicates which computer the console has control of the KVM Switch for simple, manual port selection. When pushed, the LED should light next to disconnect and reconnect devices when switching between computers. 3 LED Display An LED display...
USB Device Ports Two USB device ports allow for easy status monitoring. OVERVIEW Direct-Access Port Selectors Direct-access port selectors, conveniently located on the front face of the KVM Switch, allow you to add shared peripherals. A lit LED indicates which computer the console has control of the KVM Switch for simple, manual port selection. When pushed, the LED should light next to disconnect and reconnect devices when switching between computers. 3 LED Display An LED display...

User Manual
Page 7
OVERVIEW Operating Systems Your KVM Switch is for use on CPUs using: Platforms • Windows® 98/2000/Me/XP, Mac® OS*, Linux®* *with USB support Keyboards • Supports 101-/102-/104-/107-key USB keyboards Mice • USB-compatible USB mice with 2, 3, 4, or 5 buttons Monitors • DVI-D • VGA (with DVI to DB15 adapter) • SVGA (with DVI to DB15 adapter) • MultiSync® (with...
OVERVIEW Operating Systems Your KVM Switch is for use on CPUs using: Platforms • Windows® 98/2000/Me/XP, Mac® OS*, Linux®* *with USB support Keyboards • Supports 101-/102-/104-/107-key USB keyboards Mice • USB-compatible USB mice with 2, 3, 4, or 5 buttons Monitors • DVI-D • VGA (with DVI to DB15 adapter) • SVGA (with DVI to DB15 adapter) • MultiSync® (with...
User Manual
Page 9
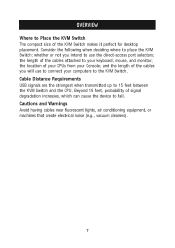
... to Place the KVM Switch The compact size of the cables you intend to use to connect your computers to place the KVM Switch: whether or not you will use the direct-access port selectors; and the length of the KVM Switch makes it perfect for desktop placement. OVERVIEW Where to fail. the location of the cables attached to 15 feet between the KVM Switch and the...
... to Place the KVM Switch The compact size of the cables you intend to use to connect your computers to place the KVM Switch: whether or not you will use the direct-access port selectors; and the length of the KVM Switch makes it perfect for desktop placement. OVERVIEW Where to fail. the location of the cables attached to 15 feet between the KVM Switch and the...
User Manual
Page 12
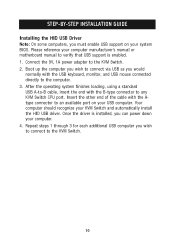
... finishes loading, using a standard USB A-to-B cable, insert the end with the USB keyboard, monitor, and USB mouse connected directly to verify that USB support is installed, you can power down your computer. 4. Please reference your computer manufacturer's manual or motherboard manual to the computer. 3. Once the driver is enabled. 1. Boot up the computer you wish to connect via USB as you wish to connect to any KVM Switch CPU port. Repeat steps...
... finishes loading, using a standard USB A-to-B cable, insert the end with the USB keyboard, monitor, and USB mouse connected directly to verify that USB support is installed, you can power down your computer. 4. Please reference your computer manufacturer's manual or motherboard manual to the computer. 3. Once the driver is enabled. 1. Boot up the computer you wish to connect via USB as you wish to connect to any KVM Switch CPU port. Repeat steps...
User Manual
Page 13
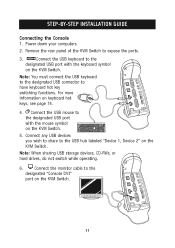
... hard drives, do not switch while operating. 6. Connect the USB mouse to the designated "Console DVI" port on the KVM Switch. 11 Connect the monitor cable to the designated USB port with the keyboard symbol on the KVM Switch. 5. Power down your computers. 2. Remove the rear panel of the KVM Switch to the designated USB port with the mouse symbol on the KVM Switch. Connect the USB keyboard to expose the ports. 3. Note: You must connect the USB...
... hard drives, do not switch while operating. 6. Connect the USB mouse to the designated "Console DVI" port on the KVM Switch. 11 Connect the monitor cable to the designated USB port with the keyboard symbol on the KVM Switch. 5. Power down your computers. 2. Remove the rear panel of the KVM Switch to the designated USB port with the mouse symbol on the KVM Switch. Connect the USB keyboard to expose the ports. 3. Note: You must connect the USB...
User Manual
Page 14
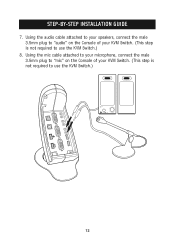
Using the audio cable attached to your speakers, connect the male 3.5mm plug to "audio" on the Console of your KVM Switch. (This step is not required to use the KVM Switch.) 8. STEP-BY-STEP INSTALLATION GUIDE 7. Using the mic cable attached to your microphone, connect the male 3.5mm plug to "mic" on the Console of your KVM Switch. (This step is not required to use the KVM Switch.) 12
Using the audio cable attached to your speakers, connect the male 3.5mm plug to "audio" on the Console of your KVM Switch. (This step is not required to use the KVM Switch.) 8. STEP-BY-STEP INSTALLATION GUIDE 7. Using the mic cable attached to your microphone, connect the male 3.5mm plug to "mic" on the Console of your KVM Switch. (This step is not required to use the KVM Switch.) 12

User Manual
Page 15
STEP-BY-STEP INSTALLATION GUIDE Connecting the PCs 1. Connect the other male end of the DVI cable to the back of the computer. Repeat Steps 1 and 2 for SOHO Series with Audio (Belkin part number F1D9201-XX), connect the USB cable from your Belkin KVM Cables for all computers. 13 Take the DVI cable and connect the male end of the cable to the USB port on the back of the KVM Switch for CPU1. Using your computer's USB port to the DVI port on the KVM Switch. 2.
STEP-BY-STEP INSTALLATION GUIDE Connecting the PCs 1. Connect the other male end of the DVI cable to the back of the computer. Repeat Steps 1 and 2 for SOHO Series with Audio (Belkin part number F1D9201-XX), connect the USB cable from your Belkin KVM Cables for all computers. 13 Take the DVI cable and connect the male end of the cable to the USB port on the back of the KVM Switch for CPU1. Using your computer's USB port to the DVI port on the KVM Switch. 2.

User Manual
Page 16
... the "Speaker Out" jack of your KVM Switch. 4. All computers can be ready for use. 14 Powering Up the Systems Once all CPUs that are attached to your sound card or computer, and connect the other end of the "audio" jack to the KVM Switch. Your KVM Switch should be powered on all cables have been connected, turn on simultaneously. STEP-BY-STEP INSTALLATION GUIDE 3.
... the "Speaker Out" jack of your KVM Switch. 4. All computers can be ready for use. 14 Powering Up the Systems Once all CPUs that are attached to your sound card or computer, and connect the other end of the "audio" jack to the KVM Switch. Your KVM Switch should be powered on all cables have been connected, turn on simultaneously. STEP-BY-STEP INSTALLATION GUIDE 3.
User Manual
Page 17
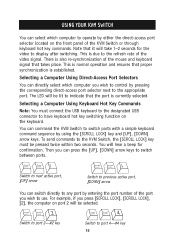
... Using Keyboard Hot Key Commands Note: You must be lit to indicate that it will be selected. You can command the KVM Switch to the KVM Switch, the [SCROLL LOCK] key must connect the USB keyboard to the designated USB connector to have keyboard hot key switching function on port 2 will take 1-2 seconds for confirmation. You will be pressed twice within two seconds. For example, if...
... Using Keyboard Hot Key Commands Note: You must be lit to indicate that it will be selected. You can command the KVM Switch to the KVM Switch, the [SCROLL LOCK] key must connect the USB keyboard to the designated USB connector to have keyboard hot key switching function on port 2 will take 1-2 seconds for confirmation. You will be pressed twice within two seconds. For example, if...

User Manual
Page 18
... example, you are working on a Zip drive connected to connect two additional shared peripherals. You can be changed. This time interval cannot be accessed through whichever computer you are using . This is still open that allows you will get a "file lost or corrupted" error message on one or two seconds. Enable AutoScan mode-#0 key Connecting USB Devices to the next. If you cannot dynamically switch ports and disconnect a mounted...
... example, you are working on a Zip drive connected to connect two additional shared peripherals. You can be changed. This time interval cannot be accessed through whichever computer you are using . This is still open that allows you will get a "file lost or corrupted" error message on one or two seconds. Enable AutoScan mode-#0 key Connecting USB Devices to the next. If you cannot dynamically switch ports and disconnect a mounted...

User Manual
Page 19
...-access port selectors on the face of the display. Power for error-free boot up ; keyboard and mouse emulations for the KVM Switch draws off of up to four PS/2 computers from one console. The PS/2 KVM switch allows you to control up to 2048x1536@85Hz is supported through the E Series KVM Switch when used with your desktop. and a Belkin Five-Year Warranty. BELKIN KVM SWITCHES AND ACCESSORIES OmniView KVM Switches OmniView E Series These KVM...
...-access port selectors on the face of the display. Power for error-free boot up ; keyboard and mouse emulations for the KVM Switch draws off of up to four PS/2 computers from one console. The PS/2 KVM switch allows you to control up to 2048x1536@85Hz is supported through the E Series KVM Switch when used with your desktop. and a Belkin Five-Year Warranty. BELKIN KVM SWITCHES AND ACCESSORIES OmniView KVM Switches OmniView E Series These KVM...
User Manual
Page 20
... cables for easy installation; and is natively rack-mountable for today's enterprise environment. and 16-Port KVM Switches enable two administrators to control up to name and select attached servers using hot key commands or direct-access port selectors. The MATRIX2 Series uses standard cables for easy installation; and 16-port models, the OmniView PRO2 Series KVM Switch expands easily for complete independence from a single console. Switch between ports by using an on -screen interface. The OmniView MATRIX2 Series KVM Switch...
... cables for easy installation; and is natively rack-mountable for today's enterprise environment. and 16-Port KVM Switches enable two administrators to control up to name and select attached servers using hot key commands or direct-access port selectors. The MATRIX2 Series uses standard cables for easy installation; and 16-port models, the OmniView PRO2 Series KVM Switch expands easily for complete independence from a single console. Switch between ports by using an on -screen interface. The OmniView MATRIX2 Series KVM Switch...

User Manual
Page 22
.../2 Style F1D9301-XX, USB Style 20 The MATRIX Series Cables use advanced micro-cable construction to your MATRIX2 Series KVM Switches. BELKIN KVM SWITCHES AND ACCESSORIES OmniView PRO Series Plus All-In-One KVM Cables Belkin PRO Series Plus Cables allow you to easily connect all your computers and servers to deliver fast and reliable data transfers. • Advanced, micro-cable construction • All-In-One molded design for cable management • Industry-standard...
.../2 Style F1D9301-XX, USB Style 20 The MATRIX Series Cables use advanced micro-cable construction to your MATRIX2 Series KVM Switches. BELKIN KVM SWITCHES AND ACCESSORIES OmniView PRO Series Plus All-In-One KVM Cables Belkin PRO Series Plus Cables allow you to easily connect all your computers and servers to deliver fast and reliable data transfers. • Advanced, micro-cable construction • All-In-One molded design for cable management • Industry-standard...
User Manual
Page 23
..., MATRIX, E, SOHO, PRO2 Series, and many other KVM switches. F3X1835-XX-GLD, PS/2 Style F3X1895-XX-GLD, USB Style OmniView Daisy-Chain Cables These cables let you to easily connect all your computers and servers to your PRO2 or MATRIX2 Series KVM configuration. BELKIN KVM SWITCHES AND ACCESSORIES OmniView Gold Series All-In-One KVM Cables Belkin Gold Series Cables offer the highest-possible cable performance, providing maximum conductivity and error-free data transmission.
..., MATRIX, E, SOHO, PRO2 Series, and many other KVM switches. F3X1835-XX-GLD, PS/2 Style F3X1895-XX-GLD, USB Style OmniView Daisy-Chain Cables These cables let you to easily connect all your computers and servers to your PRO2 or MATRIX2 Series KVM configuration. BELKIN KVM SWITCHES AND ACCESSORIES OmniView Gold Series All-In-One KVM Cables Belkin Gold Series Cables offer the highest-possible cable performance, providing maximum conductivity and error-free data transmission.

User Manual
Page 24
... KVM Switch gives two users central control of one PC from two sets of distance between your KVM solution. The Belkin PS/2-to-USB Adapter converts PS/2 keyboard and mouse signals to 250 feet (76.2m) of keyboards, monitors, and mice. The OmniView SOHO Series 2-Port Replacement Kit includes shroud, base, flash cable, two PS/2 extension cables, and SOHO Series User Manual. The OmniView SOHO Series 4-Port Replacement Kit includes shroud, base, flash cable...
... KVM Switch gives two users central control of one PC from two sets of distance between your KVM solution. The Belkin PS/2-to-USB Adapter converts PS/2 keyboard and mouse signals to 250 feet (76.2m) of keyboards, monitors, and mice. The OmniView SOHO Series 2-Port Replacement Kit includes shroud, base, flash cable, two PS/2 extension cables, and SOHO Series User Manual. The OmniView SOHO Series 4-Port Replacement Kit includes shroud, base, flash cable...

User Manual
Page 26
... USB hub is the warranty for the KVM Switch? A: The KVM Switch will the KVM Switch support? Q: How does the KVM Switch user switch between ports? A: The KVM Switch supports two methods of DVI cards will support DVI-D monitors. A: Yes, the KVM Switch requires a 9V DC, 1A power adapter to the designated keyboard port. Q: What type of DVI monitor can select computers using specially designated keyboard hot keys, or independently access the desired port by its own power adapter. Q: Does the KVM Switch require a power supply...
... USB hub is the warranty for the KVM Switch? A: The KVM Switch will the KVM Switch support? Q: How does the KVM Switch user switch between ports? A: The KVM Switch supports two methods of DVI cards will support DVI-D monitors. A: Yes, the KVM Switch requires a 9V DC, 1A power adapter to the designated keyboard port. Q: What type of DVI monitor can select computers using specially designated keyboard hot keys, or independently access the desired port by its own power adapter. Q: Does the KVM Switch require a power supply...
User Manual
Page 29
... mouse cable attached to the channel with which you are experiencing problems to re-synchronize the mouse connection. • Connect the mouse to regain mouse function. • Deactivate power-management schemes on the Console. • Try a different mouse. 27 TROUBLESHOOTING MOUSE The mouse is lost when I switch to a different port. • Check that the USB mouse you are using is connected properly to the Console of standby mode...
... mouse cable attached to the channel with which you are experiencing problems to re-synchronize the mouse connection. • Connect the mouse to regain mouse function. • Deactivate power-management schemes on the Console. • Try a different mouse. 27 TROUBLESHOOTING MOUSE The mouse is lost when I switch to a different port. • Check that the USB mouse you are using is connected properly to the Console of standby mode...


