User Manual
Page 1
OmniView™ KVM Switch with Audio Control multiple DVI/USB computers with one USB keyboard and mouse, and DVI monitor User Manual SOHO Series F1DD102U F1DD104U
OmniView™ KVM Switch with Audio Control multiple DVI/USB computers with one USB keyboard and mouse, and DVI monitor User Manual SOHO Series F1DD102U F1DD104U
User Manual
Page 2
... Base 9 Installing the HID USB Driver 10 Connecting the Console 11 Connecting the PCs 13 Powering Up the Systems 14 Using Your KVM Switch Selecting a Computer Using Direct-Access Port Selectors 15 Selecting a Computer Using Keyboard Hot Key Commands 15 AutoScan Mode 16 Connecting... USB Devices to the Built-In 2-Port Hub 16 Belkin KVM Switches and Accessories OmniView KVM Switches 17 OmniView KVM Cables 19 OmniView KVM Accessories and Adapters 22 FAQs 23 Troubleshooting 25 Warranty, FCC, ICES, and CE Statements 28
... Base 9 Installing the HID USB Driver 10 Connecting the Console 11 Connecting the PCs 13 Powering Up the Systems 14 Using Your KVM Switch Selecting a Computer Using Direct-Access Port Selectors 15 Selecting a Computer Using Keyboard Hot Key Commands 15 AutoScan Mode 16 Connecting... USB Devices to the Built-In 2-Port Hub 16 Belkin KVM Switches and Accessories OmniView KVM Switches 17 OmniView KVM Cables 19 OmniView KVM Accessories and Adapters 22 FAQs 23 Troubleshooting 25 Warranty, FCC, ICES, and CE Statements 28
User Manual
Page 3
... and free technical support. We appreciate your business and have confidence that you will provide details about your new KVM Switch, from one console, Belkin KVM Switches come in the unlikely event of a problem. This manual will soon see for all configurations, large or... high-quality, durable products at a competitive price. INTRODUCTION Congratulations on your purchase of the Belkin OmniView SOHO Series KVM Switch with Audio. Our diverse line of quality KVM solutions exemplifies the Belkin commitment to RJ45 Flash Cable • User Manual • Quick Installation Guide • ...
... and free technical support. We appreciate your business and have confidence that you will provide details about your new KVM Switch, from one console, Belkin KVM Switches come in the unlikely event of a problem. This manual will soon see for all configurations, large or... high-quality, durable products at a competitive price. INTRODUCTION Congratulations on your purchase of the Belkin OmniView SOHO Series KVM Switch with Audio. Our diverse line of quality KVM solutions exemplifies the Belkin commitment to RJ45 Flash Cable • User Manual • Quick Installation Guide • ...
User Manual
Page 4
... computers, and reduces the clutter on your keyboard. To preserve signal integrity at high resolutions, Belkin KVM Cables for SOHO Series with fewer speakers. 2 Microphone/Audio Support The KVM Switch supports USB-type speakers and microphones and has built-in small-office and home-office environments...allow you to automatically scan and monitor the activities of multimedia use in microphone and speaker jacks to 1600x1200@60Hz. Visit belkin.com for your KVM Switch continue to be compatible with one . AutoScan The AutoScan feature allows you to select ports using a simple hot ...
... computers, and reduces the clutter on your keyboard. To preserve signal integrity at high resolutions, Belkin KVM Cables for SOHO Series with fewer speakers. 2 Microphone/Audio Support The KVM Switch supports USB-type speakers and microphones and has built-in small-office and home-office environments...allow you to automatically scan and monitor the activities of multimedia use in microphone and speaker jacks to 1600x1200@60Hz. Visit belkin.com for your KVM Switch continue to be compatible with one . AutoScan The AutoScan feature allows you to select ports using a simple hot ...
User Manual
Page 5
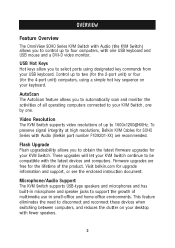
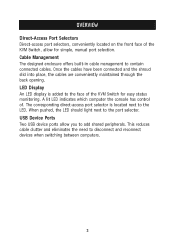
...reduces cable clutter and eliminates the need to contain connected cables. A lit LED indicates which computer the console has control of the KVM Switch for simple, manual port selection. Once the cables have been connected and the shroud slid into place, the cables are conveniently...maintained through the back opening. OVERVIEW Direct-Access Port Selectors Direct-access port selectors, conveniently located on the front face of the KVM Switch, allow you to add shared peripherals. Cable Management The designed enclosure offers built-in cable management to disconnect and reconnect ...
...reduces cable clutter and eliminates the need to contain connected cables. A lit LED indicates which computer the console has control of the KVM Switch for simple, manual port selection. Once the cables have been connected and the shroud slid into place, the cables are conveniently...maintained through the back opening. OVERVIEW Direct-Access Port Selectors Direct-access port selectors, conveniently located on the front face of the KVM Switch, allow you to add shared peripherals. Cable Management The designed enclosure offers built-in cable management to disconnect and reconnect ...
User Manual
Page 6
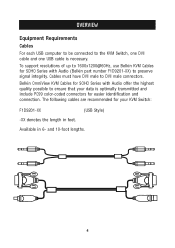
... optimally transmitted and include PC99 color-coded connectors for easier identification and connection. To support resolutions of up to ensure that your KVM Switch: F1D9201-XX (USB Style) -XX denotes the length in 6- Cables must have DVI male to preserve signal integrity. and...following cables are recommended for SOHO Series with Audio offer the highest quality possible to 1600x1200@60Hz, use Belkin KVM Cables for your data is necessary. Available in feet. Belkin OmniView KVM Cables for SOHO Series with Audio (Belkin part number F1D9201-XX) to DVI male connectors.
... optimally transmitted and include PC99 color-coded connectors for easier identification and connection. To support resolutions of up to ensure that your KVM Switch: F1D9201-XX (USB Style) -XX denotes the length in 6- Cables must have DVI male to preserve signal integrity. and...following cables are recommended for SOHO Series with Audio offer the highest quality possible to 1600x1200@60Hz, use Belkin KVM Cables for your data is necessary. Available in feet. Belkin OmniView KVM Cables for SOHO Series with Audio (Belkin part number F1D9201-XX) to DVI male connectors.

User Manual
Page 7
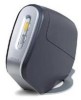
OVERVIEW Operating Systems Your KVM Switch is for use on CPUs using: Platforms • Windows® 98/2000/Me/XP, Mac® OS*, Linux®* *with USB support Keyboards • ... • Multimedia speaker/stereo with 3.5mm connectors Power Supply • 9V 1A power supply required (center pin positive) Unit Display Diagrams The front of the KVM Switch • Direct-access port selector • LED for identification of selected port • Removable shroud 5
OVERVIEW Operating Systems Your KVM Switch is for use on CPUs using: Platforms • Windows® 98/2000/Me/XP, Mac® OS*, Linux®* *with USB support Keyboards • ... • Multimedia speaker/stereo with 3.5mm connectors Power Supply • 9V 1A power supply required (center pin positive) Unit Display Diagrams The front of the KVM Switch • Direct-access port selector • LED for identification of selected port • Removable shroud 5
User Manual
Page 8
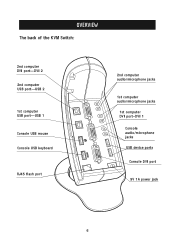
OVERVIEW The back of the KVM Switch: 2nd computer DVI port-DVI 2 2nd computer USB port-USB 2 1st computer USB port-USB 1 Console USB mouse Console USB keyboard RJ45 flash port 2nd computer audio/microphone jacks 1st computer audio/microphone jacks 1st computer DVI port-DVI 1 Console audio/microphone jacks USB device ports Console DVI port 9V 1A power jack 6
OVERVIEW The back of the KVM Switch: 2nd computer DVI port-DVI 2 2nd computer USB port-USB 2 1st computer USB port-USB 1 Console USB mouse Console USB keyboard RJ45 flash port 2nd computer audio/microphone jacks 1st computer audio/microphone jacks 1st computer DVI port-DVI 1 Console audio/microphone jacks USB device ports Console DVI port 9V 1A power jack 6
User Manual
Page 9
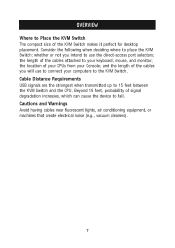
...that create electrical noise (e.g., vacuum cleaners). 7 the length of the cables attached to your Console; Beyond 15 feet, probability of the KVM Switch makes it perfect for desktop placement. the location of the cables you intend to use to connect your computers to 15 feet between ...from your keyboard, mouse, and monitor; Cable Distance Requirements USB signals are the strongest when transmitted up to the KVM Switch. OVERVIEW Where to Place the KVM Switch The compact size of signal degradation increases, which can cause the device to fail. Consider the following when ...
...that create electrical noise (e.g., vacuum cleaners). 7 the length of the cables attached to your Console; Beyond 15 feet, probability of the KVM Switch makes it perfect for desktop placement. the location of the cables you intend to use to connect your computers to 15 feet between ...from your keyboard, mouse, and monitor; Cable Distance Requirements USB signals are the strongest when transmitted up to the KVM Switch. OVERVIEW Where to Place the KVM Switch The compact size of signal degradation increases, which can cause the device to fail. Consider the following when ...
User Manual
Page 11
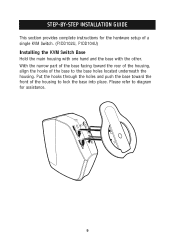
Please refer to lock the base into place. STEP-BY-STEP INSTALLATION GUIDE This section provides complete instructions for the hardware setup of the housing to diagram for assistance. 9 Put the hooks through the holes and push the base toward the rear of the housing, align the hooks of the base to the base holes located underneath the housing. With the narrow part of the base facing toward the front of a single KVM Switch. (F1DD102U, F1DD104U) Installing the KVM Switch Base Hold the main housing with one hand and the base with the other.
Please refer to lock the base into place. STEP-BY-STEP INSTALLATION GUIDE This section provides complete instructions for the hardware setup of the housing to diagram for assistance. 9 Put the hooks through the holes and push the base toward the rear of the housing, align the hooks of the base to the base holes located underneath the housing. With the narrow part of the base facing toward the front of a single KVM Switch. (F1DD102U, F1DD104U) Installing the KVM Switch Base Hold the main housing with one hand and the base with the other.
User Manual
Page 12
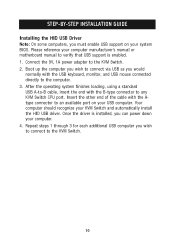
After the operating system finishes loading, using a standard USB A-to-B cable, insert the end with the Atype connector to any KVM Switch CPU port. Insert the other end of the cable with the B-type connector to an available port on your system BIOS. Once the driver ... can power down your computer. 4. Boot up the computer you wish to connect via USB as you wish to connect to the KVM Switch. 2. Your computer should recognize your KVM Switch and automatically install the HID USB driver. STEP-BY-STEP INSTALLATION GUIDE Installing the HID USB Driver Note: On some computers...
After the operating system finishes loading, using a standard USB A-to-B cable, insert the end with the Atype connector to any KVM Switch CPU port. Insert the other end of the cable with the B-type connector to an available port on your system BIOS. Once the driver ... can power down your computer. 4. Boot up the computer you wish to connect via USB as you wish to connect to the KVM Switch. 2. Your computer should recognize your KVM Switch and automatically install the HID USB driver. STEP-BY-STEP INSTALLATION GUIDE Installing the HID USB Driver Note: On some computers...
User Manual
Page 13
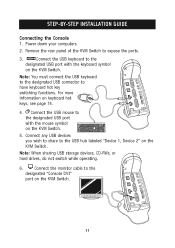
Connect the USB mouse to the designated USB port with the mouse symbol on the KVM Switch. 11 Connect the USB keyboard to the designated USB port with the keyboard symbol on the KVM Switch. Connect the monitor cable to expose the ports. 3. Power down your computers. 2. Remove... the rear panel of the KVM Switch to the designated "Console DVI" port on the KVM Switch. 5. Connect any USB devices you wish to share to have keyboard hot key switching functions. Note: When sharing ...
Connect the USB mouse to the designated USB port with the mouse symbol on the KVM Switch. 11 Connect the USB keyboard to the designated USB port with the keyboard symbol on the KVM Switch. Connect the monitor cable to expose the ports. 3. Power down your computers. 2. Remove... the rear panel of the KVM Switch to the designated "Console DVI" port on the KVM Switch. 5. Connect any USB devices you wish to share to have keyboard hot key switching functions. Note: When sharing ...
User Manual
Page 14
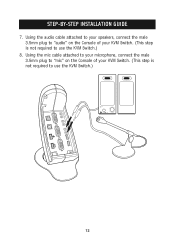
Using the mic cable attached to your microphone, connect the male 3.5mm plug to "mic" on the Console of your KVM Switch. (This step is not required to use the KVM Switch.) 12 Using the audio cable attached to your speakers, connect the male 3.5mm plug to "audio" on the Console of your KVM Switch. (This step is not required to use the KVM Switch.) 8. STEP-BY-STEP INSTALLATION GUIDE 7.
Using the mic cable attached to your microphone, connect the male 3.5mm plug to "mic" on the Console of your KVM Switch. (This step is not required to use the KVM Switch.) 12 Using the audio cable attached to your speakers, connect the male 3.5mm plug to "audio" on the Console of your KVM Switch. (This step is not required to use the KVM Switch.) 8. STEP-BY-STEP INSTALLATION GUIDE 7.

User Manual
Page 15
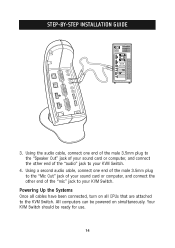
Connect the other male end of the DVI cable to the DVI port on the KVM Switch. 2. Take the DVI cable and connect the male end of the cable to the back of the computer. Repeat Steps 1 and 2 for SOHO Series with Audio (Belkin part number F1D9201-XX), connect the USB cable from your computer's USB port to the USB port on the back of the KVM Switch for CPU1. Using your Belkin KVM Cables for all computers. 13 STEP-BY-STEP INSTALLATION GUIDE Connecting the PCs 1.
Connect the other male end of the DVI cable to the DVI port on the KVM Switch. 2. Take the DVI cable and connect the male end of the cable to the back of the computer. Repeat Steps 1 and 2 for SOHO Series with Audio (Belkin part number F1D9201-XX), connect the USB cable from your computer's USB port to the USB port on the back of the KVM Switch for CPU1. Using your Belkin KVM Cables for all computers. 13 STEP-BY-STEP INSTALLATION GUIDE Connecting the PCs 1.
User Manual
Page 16
... Out" jack of your sound card or computer, and connect the other end of the "mic" jack to your KVM Switch. 4. Powering Up the Systems Once all CPUs that are attached to your KVM Switch. Using a second audio cable, connect one end of the male 3.5mm plug to the "Speaker Out" jack... of your sound card or computer, and connect the other end of the "audio" jack to the KVM Switch. All computers can be ready for use. 14 STEP-BY-STEP INSTALLATION GUIDE 3. Your KVM Switch should be powered on all cables have been connected, turn on simultaneously.
... Out" jack of your sound card or computer, and connect the other end of the "mic" jack to your KVM Switch. 4. Powering Up the Systems Once all CPUs that are attached to your KVM Switch. Using a second audio cable, connect one end of the male 3.5mm plug to the "Speaker Out" jack... of your sound card or computer, and connect the other end of the "audio" jack to the KVM Switch. All computers can be ready for use. 14 STEP-BY-STEP INSTALLATION GUIDE 3. Your KVM Switch should be powered on all cables have been connected, turn on simultaneously.
User Manual
Page 17
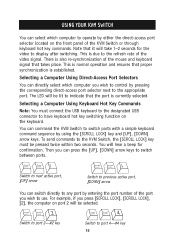
... You can directly select which computer to operate by using the [SCROLL LOCK] key and [UP], [DOWN] arrow keys. To send commands to the KVM Switch, the [SCROLL LOCK] key must connect the USB keyboard to the designated USB connector to have keyboard hot key switching function on port 2 will...ports with a simple keyboard command sequence by either the direct-access port selector located on the front panel of the KVM Switch or through keyboard hot key commands. USING YOUR KVM SWITCH You can select which computer you wish to control by entering the port number of the port you wish ...
... You can directly select which computer to operate by using the [SCROLL LOCK] key and [UP], [DOWN] arrow keys. To send commands to the KVM Switch, the [SCROLL LOCK] key must connect the USB keyboard to the designated USB connector to have keyboard hot key switching function on port 2 will...ports with a simple keyboard command sequence by either the direct-access port selector located on the front panel of the KVM Switch or through keyboard hot key commands. USING YOUR KVM SWITCH You can select which computer you wish to control by entering the port number of the port you wish ...

User Manual
Page 18
...To enable AutoScan mode press [SCROLL LOCK], [SCROLL LOCK], [0], [0] Note: There is moving the mouse or using the keyboard when the KVM switches to the KVM Switch, that proper USB synchronization is necessary to connect two additional shared peripherals. Otherwise, if the user is no longer in this mode.... This is established. 16 If you to prevent errors. USING YOUR KVM SWITCH AutoScan Mode In AutoScan mode the KVM Switch remains on one port for storage devices such as the Belkin VideoBus USB video capture device.
...To enable AutoScan mode press [SCROLL LOCK], [SCROLL LOCK], [0], [0] Note: There is moving the mouse or using the keyboard when the KVM switches to the KVM Switch, that proper USB synchronization is necessary to connect two additional shared peripherals. Otherwise, if the user is no longer in this mode.... This is established. 16 If you to prevent errors. USING YOUR KVM SWITCH AutoScan Mode In AutoScan mode the KVM Switch remains on one port for storage devices such as the Belkin VideoBus USB video capture device.

User Manual
Page 19
...compatibility with the additional convenience of direct-access port selectors on this unit include: hot key functionality; BELKIN KVM SWITCHES AND ACCESSORIES OmniView KVM Switches OmniView E Series These KVM devices allow you to control up to four PS/2 computers from one console. High-quality resolution of...boot up to 2048x1536@85Hz is necessary and less cables to unplug and re-plug them when switching computers. and a Belkin Two-Year Warranty. and a Belkin Five-Year Warranty. It includes a built-in, 2-port USB device hub that allows you expanded compatibility with either ...
...compatibility with the additional convenience of direct-access port selectors on this unit include: hot key functionality; BELKIN KVM SWITCHES AND ACCESSORIES OmniView KVM Switches OmniView E Series These KVM devices allow you to control up to four PS/2 computers from one console. High-quality resolution of...boot up to 2048x1536@85Hz is necessary and less cables to unplug and re-plug them when switching computers. and a Belkin Two-Year Warranty. and a Belkin Five-Year Warranty. It includes a built-in, 2-port USB device hub that allows you expanded compatibility with either ...
User Manual
Page 20
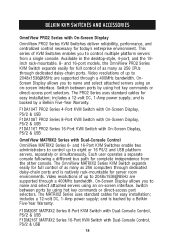
.../2 & USB 18 and 16-port models, the OmniView PRO2 Series KVM Switch expands easily for full control of as many as 256 computers through dedicated daisy-chain ports. Switch between ports by a Belkin Five-Year Warranty. includes a 12-volt DC, 1-Amp power supply... the desktop-style, 4-port, and the 19inch rack-mountable. 8- includes a 12-volt DC, 1-Amp power supply; BELKIN KVM SWITCHES AND ACCESSORIES OmniView PRO2 Series with On-Screen Display OmniView PRO2 Series KVM Switches deliver reliability, performance, and centralized control necessary for server room environments.
.../2 & USB 18 and 16-port models, the OmniView PRO2 Series KVM Switch expands easily for full control of as many as 256 computers through dedicated daisy-chain ports. Switch between ports by a Belkin Five-Year Warranty. includes a 12-volt DC, 1-Amp power supply... the desktop-style, 4-port, and the 19inch rack-mountable. 8- includes a 12-volt DC, 1-Amp power supply; BELKIN KVM SWITCHES AND ACCESSORIES OmniView PRO2 Series with On-Screen Display OmniView PRO2 Series KVM Switches deliver reliability, performance, and centralized control necessary for server room environments.
User Manual
Page 21
...sturdy, strain-relief construction and PVC overmolding to your PS/2 computers to prevent data loss. OmniView E Series KVM Cables Belkin E Series Cables allow you to connect all your KVM switch while offering high performance. • Industry-standard, 14-pin coaxial VGA cabling • Nickel-plated... PRO, MATRIX, E, SOHO, PRO2 Series, and many other KVM switches. F1D9100-XX, PS/2 Style F1D9101-XX, USB Style F1D9201-XX, USB/DVI Style 19 BELKIN KVM SWITCHES AND ACCESSORIES OmniView KVM Cables OmniView KVM Cables provide you with the quality connections necessary to complete the installation...
...sturdy, strain-relief construction and PVC overmolding to your PS/2 computers to prevent data loss. OmniView E Series KVM Cables Belkin E Series Cables allow you to connect all your KVM switch while offering high performance. • Industry-standard, 14-pin coaxial VGA cabling • Nickel-plated... PRO, MATRIX, E, SOHO, PRO2 Series, and many other KVM switches. F1D9100-XX, PS/2 Style F1D9101-XX, USB Style F1D9201-XX, USB/DVI Style 19 BELKIN KVM SWITCHES AND ACCESSORIES OmniView KVM Cables OmniView KVM Cables provide you with the quality connections necessary to complete the installation...
