User Manual
Page 2
TABLE OF CONTENTS Overview Introduction 1 Package Contents 1 Feature Overview 2 Equipment Requirements 3 Specifications 4 RIPC Diagrams 5 Installation Hardware Installation 6 Initial Network Configuration 12 Using your RIPC Prerequisites 15 Log Into the RIPC 16 Main Screen 17 Log Out from the RIPC 18 Control Host ...
TABLE OF CONTENTS Overview Introduction 1 Package Contents 1 Feature Overview 2 Equipment Requirements 3 Specifications 4 RIPC Diagrams 5 Installation Hardware Installation 6 Initial Network Configuration 12 Using your RIPC Prerequisites 15 Log Into the RIPC 16 Main Screen 17 Log Out from the RIPC 18 Control Host ...

User Manual
Page 3
...developed the RIPC with screws • One DB9 cable 1 The result is a powerful, yet easy-to-install and -use worldwide. Our diverse line of this Belkin OmniView ENTERPRISE Quad-Bus Series Remote IP Console (the RIPC). Package Contents • One OmniView ENTERPRISE Quad-Bus...surpasses all the details you control of your computer or KVM switch from installation to operation and troubleshooting, in mind. OVERVIEW Introduction Congratulations on your purchase of KVM solutions exemplifies the Belkin commitment to delivering high-quality, durable products at a reasonable price. ...
...developed the RIPC with screws • One DB9 cable 1 The result is a powerful, yet easy-to-install and -use worldwide. Our diverse line of this Belkin OmniView ENTERPRISE Quad-Bus Series Remote IP Console (the RIPC). Package Contents • One OmniView ENTERPRISE Quad-Bus...surpasses all the details you control of your computer or KVM switch from installation to operation and troubleshooting, in mind. OVERVIEW Introduction Congratulations on your purchase of KVM solutions exemplifies the Belkin commitment to delivering high-quality, durable products at a reasonable price. ...
User Manual
Page 4
...devices and computers. To preserve signal integrity and obtain the best results, use Belkin video cables. There are free for the life of the RIPC. Web-browser compatibility The RIPC can set up to install additional software onto the computer. Flash upgrades Flash upgrades allow you to monitor... the status of your web browser, without having to 1280x1024@60Hz. Visit belkin.com for your RIPC continues to position on the remote system...
...devices and computers. To preserve signal integrity and obtain the best results, use Belkin video cables. There are free for the life of the RIPC. Web-browser compatibility The RIPC can set up to install additional software onto the computer. Flash upgrades Flash upgrades allow you to monitor... the status of your web browser, without having to 1280x1024@60Hz. Visit belkin.com for your RIPC continues to position on the remote system...
User Manual
Page 5
OVERVIEW Equipment Requirements Hardware Requirements • OmniView ENTERPRISE Quad-Bus Series Remote IP Console (included) • PS/2 cable kit (included) • 5V DC, 2000mA power supply (included) • Keyboard, monitor, and mouse • Connection to network using 10/100Base-T Ethernet port (RJ45) • CAT5e crossover cable • CAT5e straight-through cable • Rack-mount bracket with screws (included, for rack-mount install option) Software Requirements • Microsoft Internet Explorer 5.5 and above • Servers running Windows® NT®, 2000, and XP 3
OVERVIEW Equipment Requirements Hardware Requirements • OmniView ENTERPRISE Quad-Bus Series Remote IP Console (included) • PS/2 cable kit (included) • 5V DC, 2000mA power supply (included) • Keyboard, monitor, and mouse • Connection to network using 10/100Base-T Ethernet port (RJ45) • CAT5e crossover cable • CAT5e straight-through cable • Rack-mount bracket with screws (included, for rack-mount install option) Software Requirements • Microsoft Internet Explorer 5.5 and above • Servers running Windows® NT®, 2000, and XP 3

User Manual
Page 8
...Belkin Corporation is not responsible for damage caused by your failure to the RIPC or your computer(s), please ensure that all your rack's manufacturer. *** Cautions and Warnings *** Before attempting to connect anything to do so. 6 Attach the included bracket to the rack. INSTALLATION Hardware Installation Installing... the RIPC into a Server Rack The RIPC includes mounting brackets for the rack are powered off. Note: Mounting screws for installation in 19-inch racks. 1. Mount the RIPC to ...
...Belkin Corporation is not responsible for damage caused by your failure to the RIPC or your computer(s), please ensure that all your rack's manufacturer. *** Cautions and Warnings *** Before attempting to connect anything to do so. 6 Attach the included bracket to the rack. INSTALLATION Hardware Installation Installing... the RIPC into a Server Rack The RIPC includes mounting brackets for the rack are powered off. Note: Mounting screws for installation in 19-inch racks. 1. Mount the RIPC to ...
User Manual
Page 9
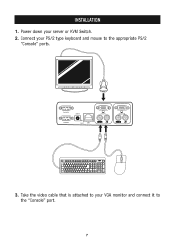
Connect your PS/2 type keyboard and mouse to the "Console" port. 7 Serial 02 power Serial 01 reset LAN console CPU/KVM 1 2 34 56 78 9 0 - = delete P [ ] K L ;: '" return shift clt alt F9 F10 F11 num cap lock lock pg up HOME PG UP PG DN HELP CAPS ` ESC OPT PC ^ < + > =/ 7 89 + 45 6 1 23 0 3. Power down your VGA monitor and connect it to the appropriate PS/2 "Console" ports. Take the video cable that is attached to your server or KVM Switch. 2. INSTALLATION 1.
Connect your PS/2 type keyboard and mouse to the "Console" port. 7 Serial 02 power Serial 01 reset LAN console CPU/KVM 1 2 34 56 78 9 0 - = delete P [ ] K L ;: '" return shift clt alt F9 F10 F11 num cap lock lock pg up HOME PG UP PG DN HELP CAPS ` ESC OPT PC ^ < + > =/ 7 89 + 45 6 1 23 0 3. Power down your VGA monitor and connect it to the appropriate PS/2 "Console" ports. Take the video cable that is attached to your server or KVM Switch. 2. INSTALLATION 1.

User Manual
Page 10
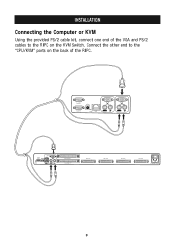
INSTALLATION Connecting the Computer or KVM Using the provided PS/2 cable kit, connect one end of the RIPC. Serial 02 power Serial 01 reset LAN console CPU/KVM 8 Connect the other end to the "CPU/KVM" ports on the back of the VGA and PS/2 cables to your server.
INSTALLATION Connecting the Computer or KVM Using the provided PS/2 cable kit, connect one end of the RIPC. Serial 02 power Serial 01 reset LAN console CPU/KVM 8 Connect the other end to the "CPU/KVM" ports on the back of the VGA and PS/2 cables to your server.
User Manual
Page 11
Serial 02 power Serial 01 reset LAN console CPU/KVM bank select flash 1 23 4 reset console USB PS/2 daisy chain IN daisy chain OUT CPU 01/02 CPU 03/04 CPU 05/06 CPU 07/08 90-264 VAC. 47-63 Hz 9 Connect the other end to the RIPC on the back of the RIPC. INSTALLATION Connecting the Computer or KVM Using the provided PS/2 cable kit, connect one end of the VGA and PS/2 cables to the "CPU/KVM" ports on the KVM Switch.
Serial 02 power Serial 01 reset LAN console CPU/KVM bank select flash 1 23 4 reset console USB PS/2 daisy chain IN daisy chain OUT CPU 01/02 CPU 03/04 CPU 05/06 CPU 07/08 90-264 VAC. 47-63 Hz 9 Connect the other end to the RIPC on the back of the RIPC. INSTALLATION Connecting the Computer or KVM Using the provided PS/2 cable kit, connect one end of the VGA and PS/2 cables to the "CPU/KVM" ports on the KVM Switch.

User Manual
Page 12
Attach the barrel plug into an available power outlet. 2. Turn on the rear of the RIPC to the power unit. If you do not have a KVM Switch, please proceed with powering up your KVM Switch. Serial 02 power Serial 01 reset LAN console CPU/KVM 3. INSTALLATION Powering Up the RIPC 1. Connect the included power supply unit into the power jack located on your computers. 10
Attach the barrel plug into an available power outlet. 2. Turn on the rear of the RIPC to the power unit. If you do not have a KVM Switch, please proceed with powering up your KVM Switch. Serial 02 power Serial 01 reset LAN console CPU/KVM 3. INSTALLATION Powering Up the RIPC 1. Connect the included power supply unit into the power jack located on your computers. 10
User Manual
Page 13
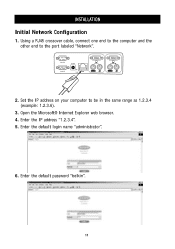
Set the IP address on your computer to the port labeled "Network". Enter the IP address "1.2.3.4". 5. INSTALLATION Initial Network Configuration 1. Open the Microsoft® Internet Explorer web browser. 4. Enter the default password "belkin". 11 Using a RJ45 crossover cable, connect one end to the computer and the other end to be in the same range as 1.2.3.4 (example: 1.2.3.6). 3. Serial 02 power Serial 01 reset LAN console CPU/KVM 2. Enter the default login name "administrator". 6.
Set the IP address on your computer to the port labeled "Network". Enter the IP address "1.2.3.4". 5. INSTALLATION Initial Network Configuration 1. Open the Microsoft® Internet Explorer web browser. 4. Enter the default password "belkin". 11 Using a RJ45 crossover cable, connect one end to the computer and the other end to be in the same range as 1.2.3.4 (example: 1.2.3.6). 3. Serial 02 power Serial 01 reset LAN console CPU/KVM 2. Enter the default login name "administrator". 6.

User Manual
Page 14
Connecting the RIPC to the Network Connect the RIPC to save new network settings. 9. Under Setting & Configurations, click on "Apply Changes" to the network using a straight-through RJ45 Category 5 network cable. 12 Enter the desired network settings and click on "Network". (Note: Uncheck "DHCP" check box.) 8. INSTALLATION Initial Network Configuration 7. Reset the local IP address settings on the computer used for configuration of the RIPC.
Connecting the RIPC to the Network Connect the RIPC to save new network settings. 9. Under Setting & Configurations, click on "Apply Changes" to the network using a straight-through RJ45 Category 5 network cable. 12 Enter the desired network settings and click on "Network". (Note: Uncheck "DHCP" check box.) 8. INSTALLATION Initial Network Configuration 7. Reset the local IP address settings on the computer used for configuration of the RIPC.
User Manual
Page 15
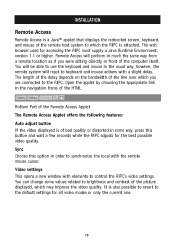
... to keyboard and mouse actions with elements to control the RIPC's video settings. It is attached. Video settings This opens a new window with a slight delay. INSTALLATION Remote Access Remote Access is a Java™ applet that displays the redirected screen, keyboard, and mouse of the remote host system to which the RIPC...
... to keyboard and mouse actions with elements to control the RIPC's video settings. It is attached. Video settings This opens a new window with a slight delay. INSTALLATION Remote Access Remote Access is a Java™ applet that displays the redirected screen, keyboard, and mouse of the remote host system to which the RIPC...
User Manual
Page 16
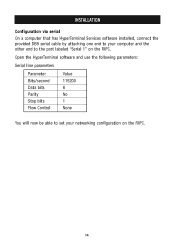
Open the HyperTerminal software and use the following parameters: Serial line parameters Parameter Bits/second Data bits Parity Stop bits Flow Control Value 115200 8 No 1 None You will now be able to the port labeled "Serial 1" on the RIPC. 14 INSTALLATION Configuration via serial On a computer that has HyperTerminal Services software installed, connect the provided DB9 serial cable by attaching one end to your computer and the other end to set your networking configuration on the RIPC.
Open the HyperTerminal software and use the following parameters: Serial line parameters Parameter Bits/second Data bits Parity Stop bits Flow Control Value 115200 8 No 1 None You will now be able to the port labeled "Serial 1" on the RIPC. 14 INSTALLATION Configuration via serial On a computer that has HyperTerminal Services software installed, connect the provided DB9 serial cable by attaching one end to your computer and the other end to set your networking configuration on the RIPC.

User Manual
Page 18
... a secure connection, you must enter: https://192.168.1.22/ The RIPC has a built-in administrator-user that has permission to administrate your RIPC configured during installation. USING YOUR RIPC We recommend the following into the address line of your system: Login name Password administrator...
... a secure connection, you must enter: https://192.168.1.22/ The RIPC has a built-in administrator-user that has permission to administrate your RIPC configured during installation. USING YOUR RIPC We recommend the following into the address line of your system: Login name Password administrator...

User Manual
Page 19
Note: The RIPC will require you have installed and accessed your user name and password to log in again later. The logout button logs you for a password automatically if there is no administration ...
Note: The RIPC will require you have installed and accessed your user name and password to log in again later. The logout button logs you for a password automatically if there is no administration ...
User Manual
Page 27
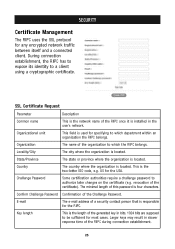
... province where the organization is the two-letter ISO code, e.g. This is located. The minimal length of this password is located. Key length This is installed in bits. 1024 bits are supposed to which department within an organization the RIPC belongs. SECURITY Certificate Management The RIPC uses the SSL protocol for...
... province where the organization is the two-letter ISO code, e.g. This is located. The minimal length of this password is located. Key length This is installed in bits. 1024 bits are supposed to which department within an organization the RIPC belongs. SECURITY Certificate Management The RIPC uses the SSL protocol for...

User Manual
Page 28
The CSR can be certified by a certification authority (CA). Send the saved CSR to create and install the RIPC's SSL certificate: 1. The following steps are explained in the table above. Upload the certificate to the RIPC using the ...is unique for certification. You will initiate the Certificate Signing Request generation. SECURITY Certificate Request Required Information However, it is possible to generate and install a new certificate that needs to be downloaded to your own SSL certificate). Create a SSL Certificate Signing Request using the Upload panel as shown...
The CSR can be certified by a certification authority (CA). Send the saved CSR to create and install the RIPC's SSL certificate: 1. The following steps are explained in the table above. Upload the certificate to the RIPC using the ...is unique for certification. You will initiate the Certificate Signing Request generation. SECURITY Certificate Request Required Information However, it is possible to generate and install a new certificate that needs to be downloaded to your own SSL certificate). Create a SSL Certificate Signing Request using the Upload panel as shown...

User Manual
Page 31
...the connection line (Modem, ISDN, DSL, LAN, etc.). The software is available on the RIPC itself, this encoding shouldn't be downloaded and installed automatically. User-Defined Hot Keys User-defined hot keys simulate keystrokes on the remote system that cannot be additionally compressed to optimize the speed of...Machine across different platforms. The Remote Access software is optimized for this box for the changes to the Internet, you can also pre-install the JVM on the number of parallel users and the bandwidth of functionality when run the code for many parallel users want to ...
...the connection line (Modem, ISDN, DSL, LAN, etc.). The software is available on the RIPC itself, this encoding shouldn't be downloaded and installed automatically. User-Defined Hot Keys User-defined hot keys simulate keystrokes on the remote system that cannot be additionally compressed to optimize the speed of...Machine across different platforms. The Remote Access software is optimized for this box for the changes to the Internet, you can also pre-install the JVM on the number of parallel users and the bandwidth of functionality when run the code for many parallel users want to ...

User Manual
Page 32
Its use will be described in the table below and in the following text. 30 IMPORTANT: Be sure to change the administrator-user password immediately after you have installed and initially accessed your RIPC. User & Passwords Panel The Figure above shows the User & Passwords panel of the RIPC's front end. NETWORK SETTINGS MENU Users & Passwords Upon delivery, each RIPC is pre-configured with a supervisor user called "administrator" having the password "belkin".
Its use will be described in the table below and in the following text. 30 IMPORTANT: Be sure to change the administrator-user password immediately after you have installed and initially accessed your RIPC. User & Passwords Panel The Figure above shows the User & Passwords panel of the RIPC's front end. NETWORK SETTINGS MENU Users & Passwords Upon delivery, each RIPC is pre-configured with a supervisor user called "administrator" having the password "belkin".
User Manual
Page 42
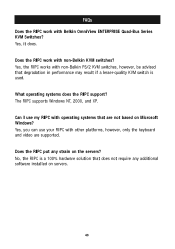
...that does not require any strain on servers. 40 Does the RIPC put any additional software installed on the servers? The RIPC supports Windows NT, 2000, and XP. Yes, you can use my RIPC with Belkin OmniView ENTERPRISE Quad-Bus Series KVM Switches? No, the RIPC is used. Yes, it ... however, only the keyboard and video are not based on Microsoft Windows? What operating systems does the RIPC support? Yes, the RIPC works with non-Belkin PS/2 KVM switches, however, be advised that degradation in performance may result if a lesser-quality KVM switch is a 100% hardware solution that are ...
...that does not require any strain on servers. 40 Does the RIPC put any additional software installed on the servers? The RIPC supports Windows NT, 2000, and XP. Yes, you can use my RIPC with Belkin OmniView ENTERPRISE Quad-Bus Series KVM Switches? No, the RIPC is used. Yes, it ... however, only the keyboard and video are not based on Microsoft Windows? What operating systems does the RIPC support? Yes, the RIPC works with non-Belkin PS/2 KVM switches, however, be advised that degradation in performance may result if a lesser-quality KVM switch is a 100% hardware solution that are ...
