
User Manual
Page 7
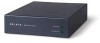
RIPC Diagrams Connection LED OVERVIEW Connection Link / Activity Remote IP Console Link/Activity LED Power Jack Serial 02 Port LAN Port Console VGA Port CPU/KVM VGA Port Serial 02 power console CPU/KVM Serial 01 reset LAN Serial 01 port Reset Button Console CPU/KVM Keyboard Port Keyboard Port Console Mouse Port CPU/KVM Mouse Port 5
RIPC Diagrams Connection LED OVERVIEW Connection Link / Activity Remote IP Console Link/Activity LED Power Jack Serial 02 Port LAN Port Console VGA Port CPU/KVM VGA Port Serial 02 power console CPU/KVM Serial 01 reset LAN Serial 01 port Reset Button Console CPU/KVM Keyboard Port Keyboard Port Console Mouse Port CPU/KVM Mouse Port 5
User Manual
Page 9
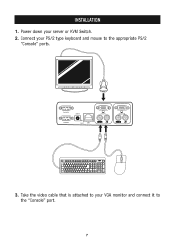
Connect your PS/2 type keyboard and mouse to the "Console" port. 7 Power down your VGA monitor and connect it to the appropriate PS/2 "Console" ports. Take the video cable that is attached to your server or KVM Switch. 2. Serial 02 power Serial 01 reset LAN console CPU/KVM 1 2 34 56 78 9 0 - = delete P [ ] K L ;: '" return shift clt alt F9 F10 F11 num cap lock lock pg up HOME PG UP PG DN HELP CAPS ` ESC OPT PC ^ < + > =/ 7 89 + 45 6 1 23 0 3. INSTALLATION 1.
Connect your PS/2 type keyboard and mouse to the "Console" port. 7 Power down your VGA monitor and connect it to the appropriate PS/2 "Console" ports. Take the video cable that is attached to your server or KVM Switch. 2. Serial 02 power Serial 01 reset LAN console CPU/KVM 1 2 34 56 78 9 0 - = delete P [ ] K L ;: '" return shift clt alt F9 F10 F11 num cap lock lock pg up HOME PG UP PG DN HELP CAPS ` ESC OPT PC ^ < + > =/ 7 89 + 45 6 1 23 0 3. INSTALLATION 1.

User Manual
Page 10
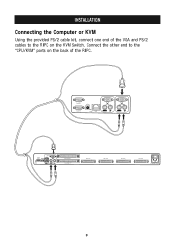
Connect the other end to the "CPU/KVM" ports on the back of the VGA and PS/2 cables to your server. Serial 02 power Serial 01 reset LAN console CPU/KVM 8 INSTALLATION Connecting the Computer or KVM Using the provided PS/2 cable kit, connect one end of the RIPC.
Connect the other end to the "CPU/KVM" ports on the back of the VGA and PS/2 cables to your server. Serial 02 power Serial 01 reset LAN console CPU/KVM 8 INSTALLATION Connecting the Computer or KVM Using the provided PS/2 cable kit, connect one end of the RIPC.
User Manual
Page 11
INSTALLATION Connecting the Computer or KVM Using the provided PS/2 cable kit, connect one end of the RIPC. Connect the other end to the "CPU/KVM" ports on the back of the VGA and PS/2 cables to the RIPC on the KVM Switch. Serial 02 power Serial 01 reset LAN console CPU/KVM bank select flash 1 23 4 reset console USB PS/2 daisy chain IN daisy chain OUT CPU 01/02 CPU 03/04 CPU 05/06 CPU 07/08 90-264 VAC. 47-63 Hz 9
INSTALLATION Connecting the Computer or KVM Using the provided PS/2 cable kit, connect one end of the RIPC. Connect the other end to the "CPU/KVM" ports on the back of the VGA and PS/2 cables to the RIPC on the KVM Switch. Serial 02 power Serial 01 reset LAN console CPU/KVM bank select flash 1 23 4 reset console USB PS/2 daisy chain IN daisy chain OUT CPU 01/02 CPU 03/04 CPU 05/06 CPU 07/08 90-264 VAC. 47-63 Hz 9

User Manual
Page 12
Connect the included power supply unit into the power jack located on your computers. 10 Attach the barrel plug into an available power outlet. 2. If you do not have a KVM Switch, please proceed with powering up your KVM Switch. Serial 02 power Serial 01 reset LAN console CPU/KVM 3. INSTALLATION Powering Up the RIPC 1. Turn on the rear of the RIPC to the power unit.
Connect the included power supply unit into the power jack located on your computers. 10 Attach the barrel plug into an available power outlet. 2. If you do not have a KVM Switch, please proceed with powering up your KVM Switch. Serial 02 power Serial 01 reset LAN console CPU/KVM 3. INSTALLATION Powering Up the RIPC 1. Turn on the rear of the RIPC to the power unit.
User Manual
Page 13
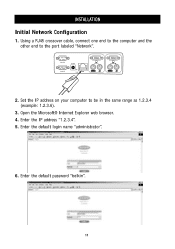
Enter the default password "belkin". 11 Serial 02 power Serial 01 reset LAN console CPU/KVM 2. Open the Microsoft® Internet Explorer web browser. 4. Using a RJ45 crossover cable, connect one end to the computer and the other end to be in the same range as 1.2.3.4 (example: 1.2.3.6). 3. Set the IP address on your computer to the port labeled "Network". Enter the IP address "1.2.3.4". 5. INSTALLATION Initial Network Configuration 1. Enter the default login name "administrator". 6.
Enter the default password "belkin". 11 Serial 02 power Serial 01 reset LAN console CPU/KVM 2. Open the Microsoft® Internet Explorer web browser. 4. Using a RJ45 crossover cable, connect one end to the computer and the other end to be in the same range as 1.2.3.4 (example: 1.2.3.6). 3. Set the IP address on your computer to the port labeled "Network". Enter the IP address "1.2.3.4". 5. INSTALLATION Initial Network Configuration 1. Enter the default login name "administrator". 6.

User Manual
Page 14
INSTALLATION Initial Network Configuration 7. Enter the desired network settings and click on "Apply Changes" to the network using a straight-through RJ45 Category 5 network cable. 12 Connecting the RIPC to the Network Connect the RIPC to save new network settings. 9. Reset the local IP address settings on "Network". (Note: Uncheck "DHCP" check box.) 8. Under Setting & Configurations, click on the computer used for configuration of the RIPC.
INSTALLATION Initial Network Configuration 7. Enter the desired network settings and click on "Apply Changes" to the network using a straight-through RJ45 Category 5 network cable. 12 Connecting the RIPC to the Network Connect the RIPC to save new network settings. 9. Reset the local IP address settings on "Network". (Note: Uncheck "DHCP" check box.) 8. Under Setting & Configurations, click on the computer used for configuration of the RIPC.
User Manual
Page 24
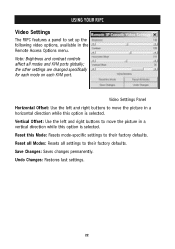
...: Restores last settings. 22 Video Settings Panel Horizontal Offset: Use the left and right buttons to move the picture in a horizontal direction while this Mode: Resets mode-specific settings to move the picture in the Remote Access Options menu. Vertical Offset: Use the left and right buttons to their factory defaults...
...: Restores last settings. 22 Video Settings Panel Horizontal Offset: Use the left and right buttons to move the picture in a horizontal direction while this Mode: Resets mode-specific settings to move the picture in the Remote Access Options menu. Vertical Offset: Use the left and right buttons to their factory defaults...
User Manual
Page 36
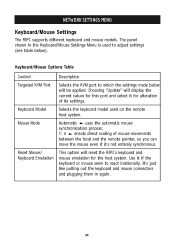
... The RIPC supports different keyboard and mouse models. Use it if the keyboard or mouse seem to adjust settings (see table below will reset the RIPC's keyboard and mouse emulation for alteration of mouse movements between the local and the remote pointer, so you can move the... them in the Keyboard/Mouse Settings Menu is used on the remote host system. Keyboard Model Selects the keyboard model used to react irrationally. Reset Mouse/ Keyboard Emulation This option will be applied. Choosing "Update" will display the current values for this port and select it 's not entirely...
... The RIPC supports different keyboard and mouse models. Use it if the keyboard or mouse seem to adjust settings (see table below will reset the RIPC's keyboard and mouse emulation for alteration of mouse movements between the local and the remote pointer, so you can move the... them in the Keyboard/Mouse Settings Menu is used on the remote host system. Keyboard Model Selects the keyboard model used to react irrationally. Reset Mouse/ Keyboard Emulation This option will be applied. Choosing "Update" will display the current values for this port and select it 's not entirely...
User Manual
Page 38
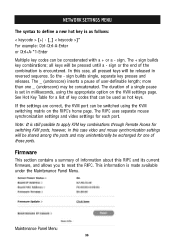
... for one _ (underscore) may unintentionally be released in milliseconds, using the KVM switching matrix on the KVM settings page. NETWORK SETTINGS MENU The syntax to reset the RIPC. sign.
... for one _ (underscore) may unintentionally be released in milliseconds, using the KVM switching matrix on the KVM settings page. NETWORK SETTINGS MENU The syntax to reset the RIPC. sign.