
User Manual
Page 3
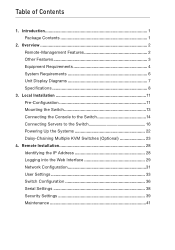
... Mounting the Switch 13 Connecting the Console to the Switch 14 Connecting Servers to the Switch 16 Powering Up the Systems 22 Daisy-Chaining Multiple KVM Switches (Optional 23 4. Remote Installation 28 Identifying the IP Address 28 Logging into the Web Interface 29 Network Configuration 31 User Settings 33 Switch Configuration...
... Mounting the Switch 13 Connecting the Console to the Switch 14 Connecting Servers to the Switch 16 Powering Up the Systems 22 Daisy-Chaining Multiple KVM Switches (Optional 23 4. Remote Installation 28 Identifying the IP Address 28 Logging into the Web Interface 29 Network Configuration 31 User Settings 33 Switch Configuration...
User Manual
Page 5
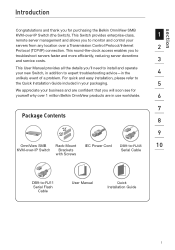
section Introduction Congratulations and thank you for yourself why over 1 million Belkin OmniView products are confident that you will soon see for purchasing the Belkin OmniView SMB KVM-over a Transmission Control Protocol/Internet 2 Protocol (TCP/IP) connection. This Switch provides enterprise-class, 1 remote server...business and are in use worldwide. 6 7 Package Contents 8 9 OmniView SMB Rack-Mount IEC Power Cord DB9-to-RJ45 10 KVM-over-IP Switch Brackets Serial Cable with Screws DB9-to the Quick Installation Guide included in the 4 unlikely event of a problem....
section Introduction Congratulations and thank you for yourself why over 1 million Belkin OmniView products are confident that you will soon see for purchasing the Belkin OmniView SMB KVM-over a Transmission Control Protocol/Internet 2 Protocol (TCP/IP) connection. This Switch provides enterprise-class, 1 remote server...business and are in use worldwide. 6 7 Package Contents 8 9 OmniView SMB Rack-Mount IEC Power Cord DB9-to-RJ45 10 KVM-over-IP Switch Brackets Serial Cable with Screws DB9-to the Quick Installation Guide included in the 4 unlikely event of a problem....
User Manual
Page 7
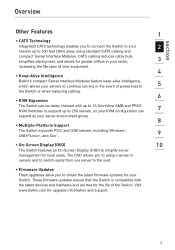
... deployment, and allows for greater airflow in your racks, 3 increasing the life span of your equipment. 4 • Keep-Alive Intelligence Belkin's compact Server Interface Modules feature keep-alive intelligence, which allows your servers to continue running in the event of power loss to 5 the ...to the next. • Firmware Updates Flash upgrades allow you to connect the Switch to your 2 servers up to 256 servers, so your KVM configuration can 7 expand as your server environment grows. 8 • Multiple-Platform Support The Switch supports PS/2 and USB servers, including Windows...
... deployment, and allows for greater airflow in your racks, 3 increasing the life span of your equipment. 4 • Keep-Alive Intelligence Belkin's compact Server Interface Modules feature keep-alive intelligence, which allows your servers to continue running in the event of power loss to 5 the ...to the next. • Firmware Updates Flash upgrades allow you to connect the Switch to your 2 servers up to 256 servers, so your KVM configuration can 7 expand as your server environment grows. 8 • Multiple-Platform Support The Switch supports PS/2 and USB servers, including Windows...
User Manual
Page 9
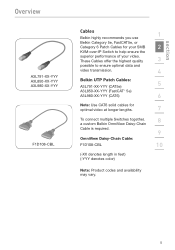
These Cables offer the highest quality 3 possible to help ensure the superior performance of your SMB 2 KVM-over-IP Switch to ensure optimal data and video transmission. 4 Belkin UTP Patch Cables: A3L791-XX-YYY (CAT5e) 5 A3L850-XX-YYY (FastCAT™ 5e) A3L980-XX-YYY (CAT6) 6 ...Note: Use CAT6 solid cables for optimal video at longer lengths. 7 To connect multiple Switches together, 8 a custom Belkin OmniView Daisy-Chain Cable is required. 9 OmniView Daisy-Chain Cable: F1D108-CBL 10 (-XX denotes length in feet) (-YYY denotes color) Note: Product...
These Cables offer the highest quality 3 possible to help ensure the superior performance of your SMB 2 KVM-over-IP Switch to ensure optimal data and video transmission. 4 Belkin UTP Patch Cables: A3L791-XX-YYY (CAT5e) 5 A3L850-XX-YYY (FastCAT™ 5e) A3L980-XX-YYY (CAT6) 6 ...Note: Use CAT6 solid cables for optimal video at longer lengths. 7 To connect multiple Switches together, 8 a custom Belkin OmniView Daisy-Chain Cable is required. 9 OmniView Daisy-Chain Cable: F1D108-CBL 10 (-XX denotes length in feet) (-YYY denotes color) Note: Product...

User Manual
Page 10
Overview System Requirements Operating-System (OS) Platforms The SMB KVM-over-IP Switch is compatible with CPUs running on, but not limited to, the following OS platforms: • Windows® NT®, 95, 98, 2000, ...; PS/2-compatible with 2, 3, 4, or 5 buttons • PS/2-compatible wireless and optical mice Monitors • CRT and LCD (with VGA support) Remote-Console Software The SMB KVM-over-IP Switch may be accessed remotely over a TCP/IP connection from computers using the following web browsers and OS platforms: • Microsoft Internet Explorer...
Overview System Requirements Operating-System (OS) Platforms The SMB KVM-over-IP Switch is compatible with CPUs running on, but not limited to, the following OS platforms: • Windows® NT®, 95, 98, 2000, ...; PS/2-compatible with 2, 3, 4, or 5 buttons • PS/2-compatible wireless and optical mice Monitors • CRT and LCD (with VGA support) Remote-Console Software The SMB KVM-over-IP Switch may be accessed remotely over a TCP/IP connection from computers using the following web browsers and OS platforms: • Microsoft Internet Explorer...
User Manual
Page 13
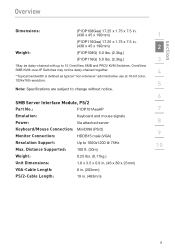
... x 7.5 in. (438 x 45 x 190mm) 1 Weight: (F1DP116Gea) 17.25 x 1.75 x 7.5 in . (483mm) 9 OmniView SMB KVM-over-IP Switches may not be daisy-chained with up to 1600x1200 @ 75Hz 10 Max. Distance Supported: 100 ft. (30m) Weight: 0.25 lbs....0.9 in. (46 x 89 x 23mm) VGA-Cable Length: 8 in. (203mm) PS/2-Cable Length: 19 in . (438 x 45 x 190mm) 2 (F1DP108G) 5.0 lbs. (2.3kg.) (F1DP116G) 5.0 lbs. (2.3kg.) 3 *May be daisy-chained together. 4 **Typical bandwidth is defined as typical "non-intensive" administrative use at 16-bit color, 1024x768 resolution. 5 Note: Specifications...
... x 7.5 in. (438 x 45 x 190mm) 1 Weight: (F1DP116Gea) 17.25 x 1.75 x 7.5 in . (483mm) 9 OmniView SMB KVM-over-IP Switches may not be daisy-chained with up to 1600x1200 @ 75Hz 10 Max. Distance Supported: 100 ft. (30m) Weight: 0.25 lbs....0.9 in. (46 x 89 x 23mm) VGA-Cable Length: 8 in. (203mm) PS/2-Cable Length: 19 in . (438 x 45 x 190mm) 2 (F1DP108G) 5.0 lbs. (2.3kg.) (F1DP116G) 5.0 lbs. (2.3kg.) 3 *May be daisy-chained together. 4 **Typical bandwidth is defined as typical "non-intensive" administrative use at 16-bit color, 1024x768 resolution. 5 Note: Specifications...
User Manual
Page 15
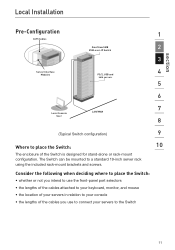
... console • the lengths of the Switch is designed for stand-alone or rack-mount configuration. section Local Installation Pre-Configuration 1 CAT5 Cables OmniView SMB 2 KVM-over-IP Switch 3 Server Interface 4 Modules PS/2, USB and SUN servers 5 6 7 Local Console L A N/ WA N User 8 (Typical Switch configuration) 9 Where to place the Switch: 10 The...
... console • the lengths of the Switch is designed for stand-alone or rack-mount configuration. section Local Installation Pre-Configuration 1 CAT5 Cables OmniView SMB 2 KVM-over-IP Switch 3 Server Interface 4 Modules PS/2, USB and SUN servers 5 6 7 Local Console L A N/ WA N User 8 (Typical Switch configuration) 9 Where to place the Switch: 10 The...
User Manual
Page 27
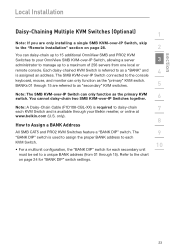
...-IP Switch, allowing a server 3 administrator to manage up to a maximum of 256 servers from 01 through your Belkin reseller, or online at www.belkin.com (U.S. The SMB KVM-over-IP Switch connected to the console keyboard, mouse, and monitor can only function as a "BANK" and 4 is available through 15). The 9 "BANK DIP" switch...
...-IP Switch, allowing a server 3 administrator to manage up to a maximum of 256 servers from 01 through your Belkin reseller, or online at www.belkin.com (U.S. The SMB KVM-over-IP Switch connected to the console keyboard, mouse, and monitor can only function as a "BANK" and 4 is available through 15). The 9 "BANK DIP" switch...
User Manual
Page 28
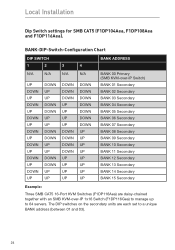
The DIP switches on the secondary units are daisy-chained together with an SMB KVM-over-IP 1x16 Switch (F1DP116Gea) to manage up to a unique BANK address (between 01 and 03)....DOWN DOWN DOWN DOWN DOWN DOWN DOWN UP UP UP UP UP UP UP UP BANK 00 Primary (SMB KVM-over-IP Switch) BANK 01 Secondary BANK 02 Secondary BANK 03 Secondary BANK 04 Secondary BANK 05 Secondary ... BANK 13 Secondary BANK 14 Secondary BANK 15 Secondary Example: Three SMB CAT5 16-Port KVM Switches (F1DP116Aea) are each set to 64 servers. Local Installation Dip Switch settings for SMB CAT5 (F1DP104Aea, F1DP108Aea...
The DIP switches on the secondary units are daisy-chained together with an SMB KVM-over-IP 1x16 Switch (F1DP116Gea) to manage up to a unique BANK address (between 01 and 03)....DOWN DOWN DOWN DOWN DOWN DOWN DOWN UP UP UP UP UP UP UP UP BANK 00 Primary (SMB KVM-over-IP Switch) BANK 01 Secondary BANK 02 Secondary BANK 03 Secondary BANK 04 Secondary BANK 05 Secondary ... BANK 13 Secondary BANK 14 Secondary BANK 15 Secondary Example: Three SMB CAT5 16-Port KVM Switches (F1DP116Aea) are each set to 64 servers. Local Installation Dip Switch settings for SMB CAT5 (F1DP104Aea, F1DP108Aea...
User Manual
Page 29
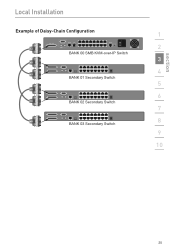
section Local Installation Example of Daisy-Chain Configuration ��� BANK 00 SMB KVM-over-IP Switch BANK 01 Secondary Switch BANK 02 Secondary Switch BANK 03 Secondary Switch 1 2 3 4 5 6 7 8 9 10 25
section Local Installation Example of Daisy-Chain Configuration ��� BANK 00 SMB KVM-over-IP Switch BANK 01 Secondary Switch BANK 02 Secondary Switch BANK 03 Secondary Switch 1 2 3 4 5 6 7 8 9 10 25
User Manual
Page 30
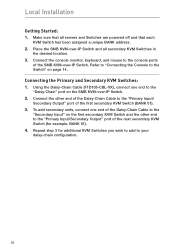
... 3. Connect the console monitor, keyboard, and mouse to the "Daisy-Chain" port on the SMB KVM-over -IP Switch. To add secondary units, connect one end to the console ports of the first secondary KVM Switch (BANK 01). 3. Repeat step 3 for example, BANK 01). 4. Local Installation Getting Started:... 1. Using the Daisy-Chain Cable (F1D108-CBL-XX), connect one end of the next secondary KVM Switch (for additional KVM Switches you wish to add to the "Secondary Input" on page 14. Connect the other end to the "Primary Input/Secondary Output" ...
... 3. Connect the console monitor, keyboard, and mouse to the "Daisy-Chain" port on the SMB KVM-over -IP Switch. To add secondary units, connect one end to the console ports of the first secondary KVM Switch (BANK 01). 3. Repeat step 3 for example, BANK 01). 4. Local Installation Getting Started:... 1. Using the Daisy-Chain Cable (F1D108-CBL-XX), connect one end of the next secondary KVM Switch (for additional KVM Switches you wish to add to the "Secondary Input" on page 14. Connect the other end to the "Primary Input/Secondary Output" ...
User Manual
Page 31
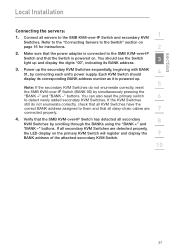
...reset the primary switch 6 to them and that the power adapter is powered on page 16 for instructions. 2 2. Power up . 5 Note: If the secondary KVM Switches do not enumerate correctly, check that all daisy-chain cables are detected properly, the LED display on the primary... have the 7 correct BANK address assigned to detect newly added secondary KVM Switches. Connect all servers to the SMB KVM-over-IP Switch and that the SMB KVM-over -IP Switch (BANK 00) by connecting each unit's power supply. Each KVM Switch should see the Switch 3 light up and display the digits "...
...reset the primary switch 6 to them and that the power adapter is powered on page 16 for instructions. 2 2. Power up . 5 Note: If the secondary KVM Switches do not enumerate correctly, check that all daisy-chain cables are detected properly, the LED display on the primary... have the 7 correct BANK address assigned to detect newly added secondary KVM Switches. Connect all servers to the SMB KVM-over-IP Switch and that the SMB KVM-over -IP Switch (BANK 00) by connecting each unit's power supply. Each KVM Switch should see the Switch 3 light up and display the digits "...
User Manual
Page 35
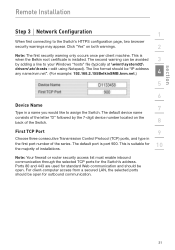
...in a name you would like to the Switch's HTTPS configuration page, two browser security warnings may appear. This is when the Belkin root certificate is port 900. Note: Your firewall or router security access list must enable inbound communication through the selected TCP ports for...line format should be open . This is suitable for the Switch's address. The second warning can be "IP address any name.kvm.net". (For example: 192.168.2.155BelkinSMB.kvm.net.) 4 5 6 Device Name 7 Type in 10 the first port number of installations. section Remote Installation Step 3 Network...
...in a name you would like to the Switch's HTTPS configuration page, two browser security warnings may appear. This is when the Belkin root certificate is port 900. Note: Your firewall or router security access list must enable inbound communication through the selected TCP ports for...line format should be open . This is suitable for the Switch's address. The second warning can be "IP address any name.kvm.net". (For example: 192.168.2.155BelkinSMB.kvm.net.) 4 5 6 Device Name 7 Type in 10 the first port number of installations. section Remote Installation Step 3 Network...
User Manual
Page 40
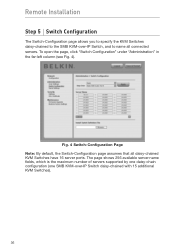
... server-name fields, which is the maximum number of servers supported by one daisy-chain configuration (one SMB KVM-over -IP Switch, and to the SMB KVM-over -IP Switch daisy-chained with 15 additional KVM Switches). 36 Fig. 4 Switch-Configuration Page Note: By default, the Switch-Configuration page assumes that all connected...
... server-name fields, which is the maximum number of servers supported by one daisy-chain configuration (one SMB KVM-over -IP Switch, and to the SMB KVM-over -IP Switch daisy-chained with 15 additional KVM Switches). 36 Fig. 4 Switch-Configuration Page Note: By default, the Switch-Configuration page assumes that all connected...
User Manual
Page 41
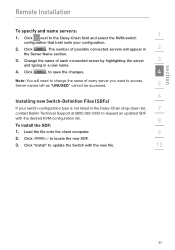
... new file. 10 37 Click . to save the changes. 4 Note: You will appear in the Daisy-Chain drop-down list, 7 contact Belkin Technical Support at (800) 282-2355 to access. section Remote Installation To specify and name servers: 1. Click next to update the Switch with ...the desired KVM-configuration list. 8 To install the SDF: 1. Click "Install" to the Daisy-Chain field and select the KVM-switch 1 configuration that best suits your switch-configuration type is not listed in 2 the...
... new file. 10 37 Click . to save the changes. 4 Note: You will appear in the Daisy-Chain drop-down list, 7 contact Belkin Technical Support at (800) 282-2355 to access. section Remote Installation To specify and name servers: 1. Click next to update the Switch with ...the desired KVM-configuration list. 8 To install the SDF: 1. Click "Install" to the Daisy-Chain field and select the KVM-switch 1 configuration that best suits your switch-configuration type is not listed in 2 the...

User Manual
Page 47
...to take over any server. A user only has this 8 option when the current session is your first time connecting, you the option to install the Belkin certificate and the Microsoft ActiveX control. If the target server is "SMBremote" (both are case-sensitive). 4 3. By default, the user name is "...Server-Access Dialog Box Note: Use the Go local button located in your client computer to end a current Remote session and take control over the KVM locally. 43 Select one of the screen. 5. The screen of the switch to install the ActiveX 5 control. 4. The dialog box will also...
...to take over any server. A user only has this 8 option when the current session is your first time connecting, you the option to install the Belkin certificate and the Microsoft ActiveX control. If the target server is "SMBremote" (both are case-sensitive). 4 3. By default, the user name is "...Server-Access Dialog Box Note: Use the Go local button located in your client computer to end a current Remote session and take control over the KVM locally. 43 Select one of the screen. 5. The screen of the switch to install the ActiveX 5 control. 4. The dialog box will also...
User Manual
Page 62
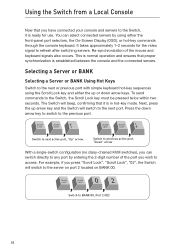
... on port 2 located on BANK 00. Press the down arrow keys. Switch to previous active port, "Down" arrow With a single-switch configuration (no daisy-chained KVM switches), you can select connected servers by entering the 2-digit number of the mouse and keyboard signals also occurs. Selecting a Server or BANK Selecting a Server...
... on port 2 located on BANK 00. Press the down arrow keys. Switch to previous active port, "Down" arrow With a single-switch configuration (no daisy-chained KVM switches), you can select connected servers by entering the 2-digit number of the mouse and keyboard signals also occurs. Selecting a Server or BANK Selecting a Server...

User Manual
Page 63
...-initiator key. Press "Scroll Lock", "Scroll Lock", "Page Down", to switch to the next BANK. 2 3 4 With a daisy-chain switch configuration, you can switch between BANKs (KVM switches) by pressing "Scroll Lock", "Scroll Lock", BANK address, and the port number.
...-initiator key. Press "Scroll Lock", "Scroll Lock", "Page Down", to switch to the next BANK. 2 3 4 With a daisy-chain switch configuration, you can switch between BANKs (KVM switches) by pressing "Scroll Lock", "Scroll Lock", BANK address, and the port number.

User Manual
Page 64
...-" scroll buttons on BANK 02, pressing the "BANK +" button will be displayed on the front panel of the primary KVM Switch to access other servers that are connected to the secondary KVM Switches. The "BANK -" button will allow you wish to control by pressing the port selector next to the corresponding port...indicate the port is currently selected. Pressing the "BANK -" button will take you are at BANK 02 and want to check servers on the primary KVM Switch will take you to BANK 01. For example, when you are at the primary switch (BANK 00) and want to the desired server on...
...-" scroll buttons on BANK 02, pressing the "BANK +" button will be displayed on the front panel of the primary KVM Switch to access other servers that are connected to the secondary KVM Switches. The "BANK -" button will allow you wish to control by pressing the port selector next to the corresponding port...indicate the port is currently selected. Pressing the "BANK -" button will take you are at BANK 02 and want to check servers on the primary KVM Switch will take you to BANK 01. For example, when you are at the primary switch (BANK 00) and want to the desired server on...

User Manual
Page 69
...to press "F10" again to program the new DDC information to user inactivity. See page 37. 5 Timeout This specifies the amount of the KVM Switch (and connected servers) due to the Server Interface Modules. 65 To regain access to all hot-key commands is enabled. To change ... key. The Timeout feature is only available if the Security feature is "Scroll Lock" (see 2 "Hot-Key-Command Shortcuts" on the primary KVM Switch, the settings will then adjust the monitor's settings accordingly. To designate a different key to initiate hot-key commands, use its properties, such...
...to press "F10" again to program the new DDC information to user inactivity. See page 37. 5 Timeout This specifies the amount of the KVM Switch (and connected servers) due to the Server Interface Modules. 65 To regain access to all hot-key commands is enabled. To change ... key. The Timeout feature is only available if the Security feature is "Scroll Lock" (see 2 "Hot-Key-Command Shortcuts" on the primary KVM Switch, the settings will then adjust the monitor's settings accordingly. To designate a different key to initiate hot-key commands, use its properties, such...
