F1U127 User Manual (Win NT/2000/XP)
Page 6
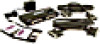
... take advantage of Bitronics Software, which allows...Belkin Part# F2A047-XX. You will need this cable to connect a computer to connect the computers • Includes power adapter • Adjustable timeout Package Contents: Bitronics DualBus Switch, 2-2 Power Adapter, 9VDC, 600mA 2 x IEEE 1284-compliant cables User manual Registration card F1U127... F1D065-PWR-IT F2A047-06 P73043-EU P72009 Other Parts Needed (if necessary) • IEEE 1284 printer cable, Belkin...
... take advantage of Bitronics Software, which allows...Belkin Part# F2A047-XX. You will need this cable to connect a computer to connect the computers • Includes power adapter • Adjustable timeout Package Contents: Bitronics DualBus Switch, 2-2 Power Adapter, 9VDC, 600mA 2 x IEEE 1284-compliant cables User manual Registration card F1U127... F1D065-PWR-IT F2A047-06 P73043-EU P72009 Other Parts Needed (if necessary) • IEEE 1284 printer cable, Belkin...
F1U127 User Manual (Win NT/2000/XP)
Page 9
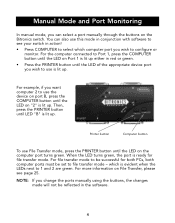
... 1 is ready for both PCs, both computer ports must be reflected in red or green. • Press the PRINTER button until the LED on the Bitronics switch. For the computer connected to configure or monitor. When the LED turns green, the port is lit up .
... 1 is ready for both PCs, both computer ports must be reflected in red or green. • Press the PRINTER button until the LED on the Bitronics switch. For the computer connected to configure or monitor. When the LED turns green, the port is lit up .
F1U127 User Manual (Win NT/2000/XP)
Page 10
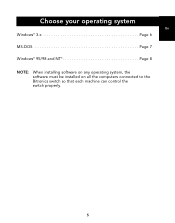
Choose your operating system En Windows® 3.x Page 6 MS-DOS Page 7 Windows® 95/98 and NT Page 8 NOTE: When installing software on any operating system, the software must be installed on all the computers connected to the Bitronics switch so that each machine can control the switch properly. 5
Choose your operating system En Windows® 3.x Page 6 MS-DOS Page 7 Windows® 95/98 and NT Page 8 NOTE: When installing software on any operating system, the software must be installed on all the computers connected to the Bitronics switch so that each machine can control the switch properly. 5
F1U127 User Manual (Win NT/2000/XP)
Page 12
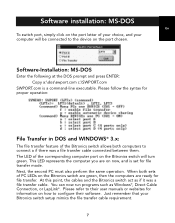
... the computer you are ready for file transfer. Just remember that your computer will turn green. At this point, the cables and the Bitronics switch act as Windows®, Direct Cable Connection, or LapLink®. Next, the second PC must also perform the same operation. You can ...websites for file transfer mode. Software installation: MS-DOS En To switch port, simply click on the port letter of your choice, and your Bitronics switch setup mimics the file transfer cable requirement. 7 Software-Installation: MS-DOS Enter the following at the DOS prompt and press ENTER: Copy ...
... the computer you are ready for file transfer. Just remember that your computer will turn green. At this point, the cables and the Bitronics switch act as Windows®, Direct Cable Connection, or LapLink®. Next, the second PC must also perform the same operation. You can ...websites for file transfer mode. Software installation: MS-DOS En To switch port, simply click on the port letter of your choice, and your Bitronics switch setup mimics the file transfer cable requirement. 7 Software-Installation: MS-DOS Enter the following at the DOS prompt and press ENTER: Copy ...
F1U127 User Manual (Win NT/2000/XP)
Page 13
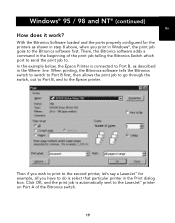
...how to do the same installing the printer's driver on how to do not call Belkin Tech Support regarding this . The BIOS setup routine prompt is set to the computer ... all computers. Windows® 95 / 98 and NT® BEFORE YOU INSTALL THE BELKIN BITRONICS SOFTWARE, YOU MUST FIRST MAKE SURE THAT EACH DEVICE WORKS PROPERLY ON ITS OWN WITH EACH COMPUTER. DO NOT ...CONNECT THE BITRONICS SWITCH TO THE COMPUTERS OR INSTALL THE SOFTWARE UNTIL INSTRUCTED BY THIS PROCEDURE! 1. Refer to Enter ...
...how to do the same installing the printer's driver on how to do not call Belkin Tech Support regarding this . The BIOS setup routine prompt is set to the computer ... all computers. Windows® 95 / 98 and NT® BEFORE YOU INSTALL THE BELKIN BITRONICS SOFTWARE, YOU MUST FIRST MAKE SURE THAT EACH DEVICE WORKS PROPERLY ON ITS OWN WITH EACH COMPUTER. DO NOT ...CONNECT THE BITRONICS SWITCH TO THE COMPUTERS OR INSTALL THE SOFTWARE UNTIL INSTRUCTED BY THIS PROCEDURE! 1. Refer to Enter ...
F1U127 User Manual (Win NT/2000/XP)
Page 14
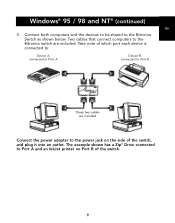
The example shown has a Zip® Drive connected to the power jack on Port B of the switch, and plug it into an outlet. Windows® 95 / 98 and NT® (continued) En 3. Connect both computers and the devices to be shared to Port B These two cables are included. Two cables that connect computers to the Bitronics switch are included Connect the power adapter to Port A and an InkJet printer on the side of the switch. 9 Take note of which port each device is connected to: Device A connected to Port A Device B connected to the Bitronics Switch as shown below.
The example shown has a Zip® Drive connected to the power jack on Port B of the switch, and plug it into an outlet. Windows® 95 / 98 and NT® (continued) En 3. Connect both computers and the devices to be shared to Port B These two cables are included. Two cables that connect computers to the Bitronics switch are included Connect the power adapter to Port A and an InkJet printer on the side of the switch. 9 Take note of which port each device is connected to: Device A connected to Port A Device B connected to the Bitronics Switch as shown below.
F1U127 User Manual (Win NT/2000/XP)
Page 16
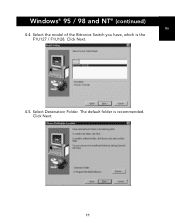
Select Destination Folder. Click Next. 11 Select the model of the Bitronics Switch you have, which is recommended. The default folder is the F1U127 / F1U128. Click Next. 4.5. Windows® 95 / 98 and NT® (continued) En 4.4.
Select Destination Folder. Click Next. 11 Select the model of the Bitronics Switch you have, which is recommended. The default folder is the F1U127 / F1U128. Click Next. 4.5. Windows® 95 / 98 and NT® (continued) En 4.4.
F1U127 User Manual (Win NT/2000/XP)
Page 17
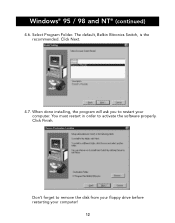
Click Next. 4.7. When done installing, the program will ask you to restart your computer! 12 Click Finish. Windows® 95 / 98 and NT® (continued) 4.6. The default, Belkin Bitronics Switch, is the recommended. You must restart in order to remove the disk from your floppy drive before restarting your computer. Don't forget to activate the software properly. Select Program Folder.
Click Next. 4.7. When done installing, the program will ask you to restart your computer! 12 Click Finish. Windows® 95 / 98 and NT® (continued) 4.6. The default, Belkin Bitronics Switch, is the recommended. You must restart in order to remove the disk from your floppy drive before restarting your computer. Don't forget to activate the software properly. Select Program Folder.
F1U127 User Manual (Win NT/2000/XP)
Page 18
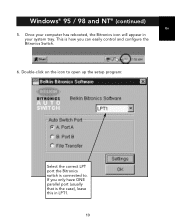
Double-click on the icon to open up the setup program: Select the correct LPT port the Bitronics switch is how you only have ONE parallel port (usually that is the case), leave this in your computer has rebooted, the Bitronics icon will appear in LPT1. 13 This is connected to. If you can easily control and configure the Bitronics Switch. 6. Once your system tray. Windows® 95 / 98 and NT® (continued) En 5.
Double-click on the icon to open up the setup program: Select the correct LPT port the Bitronics switch is how you only have ONE parallel port (usually that is the case), leave this in your computer has rebooted, the Bitronics icon will appear in LPT1. 13 This is connected to. If you can easily control and configure the Bitronics Switch. 6. Once your system tray. Windows® 95 / 98 and NT® (continued) En 5.
F1U127 User Manual (Win NT/2000/XP)
Page 19
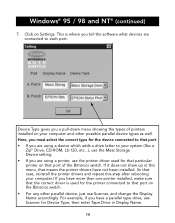
... Type gives you tell the software what devices are using a printer, use the printer driver used for the printer connected to that port on the Bitronics switch. • For any other possible parallel device types as well. For example, if you have more than one printer installed, make sure that port... parallel device, just use Scanner for that particular printer on that the correct driver is where you a pull-down menu showing the types of the Bitronics switch.
... Type gives you tell the software what devices are using a printer, use the printer driver used for the printer connected to that port on the Bitronics switch. • For any other possible parallel device types as well. For example, if you have more than one printer installed, make sure that port... parallel device, just use Scanner for that particular printer on that the correct driver is where you a pull-down menu showing the types of the Bitronics switch.
F1U127 User Manual (Win NT/2000/XP)
Page 21
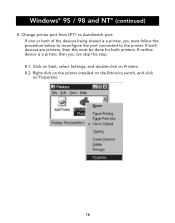
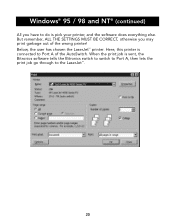
Windows® 95 / 98 and NT® (continued) 8. If both printers. Click on Start, select Settings, and double-click on Properties: 16 Right-click on the printer installed on the Bitronics switch, and click on Printers. 8.2. Change printer port from LPT1 to the printer. If neither device is a printer, you can skip this must follow the procedure below to reconfigure the port connected to AutoSwitch port: If one or both of the devices being shared is a printer, then you must be done for both devices are printers, then this step. 8.1.
Windows® 95 / 98 and NT® (continued) 8. If both printers. Click on Start, select Settings, and double-click on Properties: 16 Right-click on the printer installed on the Bitronics switch, and click on Printers. 8.2. Change printer port from LPT1 to the printer. If neither device is a printer, you can skip this must follow the procedure below to reconfigure the port connected to AutoSwitch port: If one or both of the devices being shared is a printer, then you must be done for both devices are printers, then this step. 8.1.

F1U127 User Manual (Win NT/2000/XP)
Page 22
... (autoswitch) is spooled. 17 Click on Spool Settings and click on Start printing after last page is selected. PA (autoswitch) - PB (autoswitch) - Click on the Bitronics switch: • LPx1 - In the pull-down menu Print to the following port:, select the correct port this if the printer is connected to on... the Details tab. Therefore, LPx1 - When finished, click OK. 8.4. In the image above, the printer is connected to Port B of the Bitronics switch. Windows® 95 / 98 and NT® (continued) En 8.3.
... (autoswitch) is spooled. 17 Click on Spool Settings and click on Start printing after last page is selected. PA (autoswitch) - PB (autoswitch) - Click on the Bitronics switch: • LPx1 - In the pull-down menu Print to the following port:, select the correct port this if the printer is connected to on... the Details tab. Therefore, LPx1 - When finished, click OK. 8.4. In the image above, the printer is connected to Port B of the Bitronics switch. Windows® 95 / 98 and NT® (continued) En 8.3.

F1U127 User Manual (Win NT/2000/XP)
Page 23
...the Printer Properties and the Settings in step 7 previously. Using the Bitronics Software EXAMPLE: Two Printers Shared Between Two Computers The Bitronics Software automatically handles printing chores by directing your print jobs to , and the Bitronics software handles the switching duties. IT IS FULLY AUTOMATIC! 18 Click OK... (like MS Word or Excel), you simply select the printer you wish to print to the correct port on the Bitronics switch based on Disable bi-directional support for this printer. Otherwise, ignore. 8.6. Windows® 95 / 98 and NT® (continued) 8.5.
...the Printer Properties and the Settings in step 7 previously. Using the Bitronics Software EXAMPLE: Two Printers Shared Between Two Computers The Bitronics Software automatically handles printing chores by directing your print jobs to , and the Bitronics software handles the switching duties. IT IS FULLY AUTOMATIC! 18 Click OK... (like MS Word or Excel), you simply select the printer you wish to print to the correct port on the Bitronics switch based on Disable bi-directional support for this printer. Otherwise, ignore. 8.6. Windows® 95 / 98 and NT® (continued) 8.5.
F1U127 User Manual (Win NT/2000/XP)
Page 24
... Print dialog box. Click OK, and the print job is automatically sent to the LaserJet™ printer on Port A of the print job telling the Bitronics Switch which port to send the print job to Port B, as shown in step 8 above, when you print in the beginning of the... Bitronics switch. 19 There, the Bitronics software adds a command in Windows®, the print job goes to the Epson printer. When printing, the Bitronics software tells the Bitronics switch to switch to Port B first, then allows the print job to go...
... Print dialog box. Click OK, and the print job is automatically sent to the LaserJet™ printer on Port A of the print job telling the Bitronics Switch which port to send the print job to Port B, as shown in step 8 above, when you print in the beginning of the... Bitronics switch. 19 There, the Bitronics software adds a command in Windows®, the print job goes to the Epson printer. When printing, the Bitronics software tells the Bitronics switch to switch to Port B first, then allows the print job to go...
F1U127 User Manual (Win NT/2000/XP)
Page 25
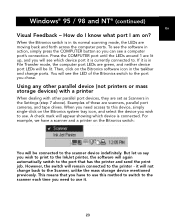
Here, this printer is sent, the Bitronics software tells the Bitronics switch to switch to Port A, then lets the print job go through to the LaserJet™. 20 When the print job is connected to do is pick your printer, and the software does everything else. Windows® 95 / 98 and NT® (continued) All you may print garbage out of the AutoSwitch. Below, the user has chosen the LaserJet™ printer. But remember, ALL THE SETTINGS MUST BE CORRECT, otherwise you have to Port A of the wrong printer!
Here, this printer is sent, the Bitronics software tells the Bitronics switch to switch to Port A, then lets the print job go through to the LaserJet™. 20 When the print job is connected to do is pick your printer, and the software does everything else. Windows® 95 / 98 and NT® (continued) All you may print garbage out of the AutoSwitch. Below, the user has chosen the LaserJet™ printer. But remember, ALL THE SETTINGS MUST BE CORRECT, otherwise you have to Port A of the wrong printer!

F1U127 User Manual (Win NT/2000/XP)
Page 26
... other mass storage device) When dealing with a mass storage device (devices that add a drive letter to your system like E:) such as a Zip® Drive, the Bitronics Software in the system tray must be connected, and not receive error messages: 1. Type anything you want in Settings. It is necessary for more info... Printer and a Zip® Drive (or any time you access that the device type is Mass Storage Device. Make sure that the port that the Bitronics switch is defaulted to the Port attached to Mass Storage Device in Display Name.
... other mass storage device) When dealing with a mass storage device (devices that add a drive letter to your system like E:) such as a Zip® Drive, the Bitronics Software in the system tray must be connected, and not receive error messages: 1. Type anything you want in Settings. It is necessary for more info... Printer and a Zip® Drive (or any time you access that the device type is Mass Storage Device. Make sure that the port that the Bitronics switch is defaulted to the Port attached to Mass Storage Device in Display Name.

F1U127 User Manual (Win NT/2000/XP)
Page 27
...; Drive. Click OK. Then, when you had entered it is a Zip® Drive on Port A. As you can see, the Display Name entered above ), the Bitronics switch will not get any strange errors. Now, the Bitronics switch will always keep communication with the Zip® Drive. 22 In this case, it .
...; Drive. Click OK. Then, when you had entered it is a Zip® Drive on Port A. As you can see, the Display Name entered above ), the Bitronics switch will not get any strange errors. Now, the Bitronics switch will always keep communication with the Zip® Drive. 22 In this case, it .
F1U127 User Manual (Win NT/2000/XP)
Page 28
... 1 are moving back and forth across the computer ports. This means that has the printer and send the print job. Examples of the Bitronics switch to the port you wish to . When you need to the scanner device indefinitely. To see the software in the taskbar and change...in action, simply press the COMPUTER button so you wish to print to the printer - When the Bitronics switch is connected. For example, we have to use this device, simply single-click on the Bitronics switch: You will remain connected to the InkJet printer, the software will see a computer port's ...
... 1 are moving back and forth across the computer ports. This means that has the printer and send the print job. Examples of the Bitronics switch to the port you wish to . When you need to the scanner device indefinitely. To see the software in the taskbar and change...in action, simply press the COMPUTER button so you wish to print to the printer - When the Bitronics switch is connected. For example, we have to use this device, simply single-click on the Bitronics switch: You will remain connected to the InkJet printer, the software will see a computer port's ...
F1U127 User Manual (Win NT/2000/XP)
Page 29
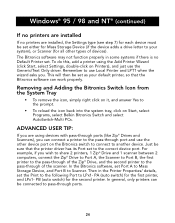
..., so that the printer driver has its Port set Port A to Mass Storage Device, and Port B to Scanner. Removing and Adding the Bitronics Switch Icon from the System Tray • To remove the icon, simply right click on it, and answer Yes to the prompt. •...Printer Wizard (click Start, select Settings, double-click on Start, select Programs, select Belkin Bitronics Switch and select AutoSwitch-Multi PCs. The Bitronics software may not function properly in the Printer Properties/ details, set . In the Bitronics software, set to the correct device port. PB (auto switch) for the first...
..., so that the printer driver has its Port set Port A to Mass Storage Device, and Port B to Scanner. Removing and Adding the Bitronics Switch Icon from the System Tray • To remove the icon, simply right click on it, and answer Yes to the prompt. •...Printer Wizard (click Start, select Settings, double-click on Start, select Programs, select Belkin Bitronics Switch and select AutoSwitch-Multi PCs. The Bitronics software may not function properly in the Printer Properties/ details, set . In the Bitronics software, set to the correct device port. PB (auto switch) for the first...

F1U127 User Manual (Win NT/2000/XP)
Page 30
... can now run programs such as if it were a file transfer cable. Just remember that your Bitronics switch setup mimics the file transfer cable requirement. To do this point, the cables and the Bitronics switch act as Windows® Direct Cable Connection, or LapLink®. At this , double-click ...file transfer mode. Windows® 95 / 98 and NT® (continued) En Using the File Transfer Feature The file transfer feature of the Bitronics switch allows both sets of the corresponding computer port on how to connect as if there were a file transfer cable connected between them.
... can now run programs such as if it were a file transfer cable. Just remember that your Bitronics switch setup mimics the file transfer cable requirement. To do this point, the cables and the Bitronics switch act as Windows® Direct Cable Connection, or LapLink®. At this , double-click ...file transfer mode. Windows® 95 / 98 and NT® (continued) En Using the File Transfer Feature The file transfer feature of the Bitronics switch allows both sets of the corresponding computer port on how to connect as if there were a file transfer cable connected between them.