F1UP0301 Manual
Page 7
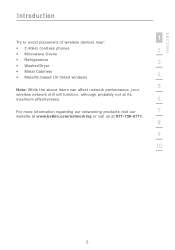
section Introduction 1 Try to avoid placement of wireless devices near: • 2.4GHz cordless phones 2 • Microwave Ovens • Refrigerators 3 • Washer/Dryer • Metal Cabinets 4 • Metallic-based UV tinted windows 5 Note: While the above items can affect network performance, your wireless network still will function, although probably not at its maximum effectiveness. 6 For more information regarding our networking products visit our 7 website at www.belkin.com/networking or call us at 877-736-5771. 8 9 10 5
section Introduction 1 Try to avoid placement of wireless devices near: • 2.4GHz cordless phones 2 • Microwave Ovens • Refrigerators 3 • Washer/Dryer • Metal Cabinets 4 • Metallic-based UV tinted windows 5 Note: While the above items can affect network performance, your wireless network still will function, although probably not at its maximum effectiveness. 6 For more information regarding our networking products visit our 7 website at www.belkin.com/networking or call us at 877-736-5771. 8 9 10 5

F1UP0301 Manual
Page 8
... use • LEDs: Power, Ethernet link, Status, and Error Applications and Advantages • Temporary LANs for each printer • PC with Windows® 98SE, Me, 2000, XP Package Contents • Belkin USB Print Server • Installation Software CD • User Manual • Quick Installation Guide • Ethernet Cable 6 also companies that need...
... use • LEDs: Power, Ethernet link, Status, and Error Applications and Advantages • Temporary LANs for each printer • PC with Windows® 98SE, Me, 2000, XP Package Contents • Belkin USB Print Server • Installation Software CD • User Manual • Quick Installation Guide • Ethernet Cable 6 also companies that need...

F1UP0301 Manual
Page 15
... CD. 2 2. section Setup for the printer connected to the Print Server and select the "Port" tab, 4 select the Belkin port, and click "Configure Port...". 5 6 7 8 9 10 b) On the "Belkin Port: Properties" window, click "Locate Servers". Configure the Belkin Port Monitor on each computer printer driver to point to the correct Print Server as follows: 3 a) In...
... CD. 2 2. section Setup for the printer connected to the Print Server and select the "Port" tab, 4 select the Belkin port, and click "Configure Port...". 5 6 7 8 9 10 b) On the "Belkin Port: Properties" window, click "Locate Servers". Configure the Belkin Port Monitor on each computer printer driver to point to the correct Print Server as follows: 3 a) In...

F1UP0301 Manual
Page 16
...connected to close . Click "Apply". f) Click "OK" to the Print Server, select the properties for Advanced Users d) Click "OK" to close . select the Belkin port that printer and click the "Ports" tab; e) On the Ports tab, disable bidirectional support if currently enabled. g) If there is available on your network..., refer to the section "Printing to close. On the "Belkin Port: Properties" window, the name of the Print Server you selected will appear. Setup for that was just configured.
...connected to close . Click "Apply". f) Click "OK" to the Print Server, select the properties for Advanced Users d) Click "OK" to close . select the Belkin port that printer and click the "Ports" tab; e) On the Ports tab, disable bidirectional support if currently enabled. g) If there is available on your network..., refer to the section "Printing to close. On the "Belkin Port: Properties" window, the name of the Print Server you selected will appear. Setup for that was just configured.

F1UP0301 Manual
Page 20
...to the Print Server using the standard TCP/IP printer port built into Windows XP and 2000 instead of the downloaded file on the 18 Disabling this application, download the new firmware from the Belkin website at www.belkin.com. Web Interface - Unique names are critical in a network with ...TCP/ IP printing. • FTP Printing: This feature enables the printer to take note of the location of the Belkin Port Monitor. Print Server Configuration This menu allows the user to configure all port parameters manually and is not recommended for detailed instructions). If...
...to the Print Server using the standard TCP/IP printer port built into Windows XP and 2000 instead of the downloaded file on the 18 Disabling this application, download the new firmware from the Belkin website at www.belkin.com. Web Interface - Unique names are critical in a network with ...TCP/ IP printing. • FTP Printing: This feature enables the printer to take note of the location of the Belkin Port Monitor. Print Server Configuration This menu allows the user to configure all port parameters manually and is not recommended for detailed instructions). If...

F1UP0301 Manual
Page 22
... Monitor and Configuring It for a Specific Print Server 1. Select "Belkin Port" and, in the "Printer Ports" window, click "New Port". 20 In Windows, select the printer's properties and select the "Ports" tab. 2. Click "Add Port". The Belkin Port Monitor can then be able to print to more than one ...on your network, and some computers need to install the included Belkin Port Monitor (a virtual printer port) software on your PC. Printing to Multiple Print Servers If more than one Print Server, you will open. A window showing the printer ports installed on the PC will need to be...
... Monitor and Configuring It for a Specific Print Server 1. Select "Belkin Port" and, in the "Printer Ports" window, click "New Port". 20 In Windows, select the printer's properties and select the "Ports" tab. 2. Click "Add Port". The Belkin Port Monitor can then be able to print to more than one ...on your network, and some computers need to install the included Belkin Port Monitor (a virtual printer port) software on your PC. Printing to Multiple Print Servers If more than one Print Server, you will open. A window showing the printer ports installed on the PC will need to be...

F1UP0301 Manual
Page 23
On the next window (Belkin Port 2: Properties), click the "Locate Servers" button. 21 In the "Enter New Port" window, enter a unique name for the port and click "OK". 2 3 4 4. section Printing to Multiple Print Servers 1 3. On the "Ports" tab, select the newly created port; click "Configure Port". 5 6 7 8 9 10 6. Click "Close" on the "Printer Ports" window. 5.
On the next window (Belkin Port 2: Properties), click the "Locate Servers" button. 21 In the "Enter New Port" window, enter a unique name for the port and click "OK". 2 3 4 4. section Printing to Multiple Print Servers 1 3. On the "Ports" tab, select the newly created port; click "Configure Port". 5 6 7 8 9 10 6. Click "Close" on the "Printer Ports" window. 5.
F1UP0301 Manual
Page 24
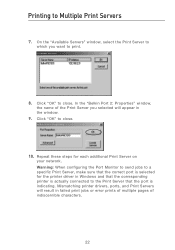
In the "Belkin Port 2: Properties" window, the name of the Print Server you want to print. 8. Mismatching printer drivers, ports, and Print Servers will appear in Windows and that the corresponding printer is actually connected to a specific Print Server, make sure that the correct port is indicating. Warning... jobs or error prints of multiple pages of indiscernible characters. 22 Repeat these steps for the printer driver in the window. 9. On the "Available Servers" window, select the Print Server to close . Printing to close . 10. Click "OK" to Multiple Print Servers 7.
In the "Belkin Port 2: Properties" window, the name of the Print Server you want to print. 8. Mismatching printer drivers, ports, and Print Servers will appear in Windows and that the corresponding printer is actually connected to a specific Print Server, make sure that the correct port is indicating. Warning... jobs or error prints of multiple pages of indiscernible characters. 22 Repeat these steps for the printer driver in the window. 9. On the "Available Servers" window, select the Print Server to close . Printing to close . 10. Click "OK" to Multiple Print Servers 7.

F1UP0301 Manual
Page 25
This can be automatically installed and configured by using the Belkin Port Monitor's Advanced Menu, which you want to manually 2 configure the Belkin Port Monitor software. In the "Belkin Port: Properties" window, click the "Advanced" tab. 23 The Advanced Menu features help when there is more than... and when print jobs fail because the Port Monitor cannot determine the name of the printer. 5 Opening the Belkin Port Monitor Advanced Menu 1. On the "Available Servers" window, select the Print Server to 6 which allows the user to enter a specific Print Server's IP address and...
This can be automatically installed and configured by using the Belkin Port Monitor's Advanced Menu, which you want to manually 2 configure the Belkin Port Monitor software. In the "Belkin Port: Properties" window, click the "Advanced" tab. 23 The Advanced Menu features help when there is more than... and when print jobs fail because the Port Monitor cannot determine the name of the printer. 5 Opening the Belkin Port Monitor Advanced Menu 1. On the "Available Servers" window, select the Print Server to 6 which allows the user to enter a specific Print Server's IP address and...
F1UP0301 Manual
Page 26
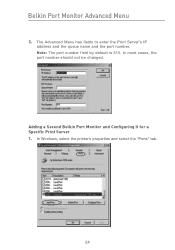
The Advanced Menu has fields to enter the Print Server's IP address and the queue name and the port number. In Windows, select the printer's properties and select the "Ports" tab. 24 Note: The port number field by default is 515. In most cases, the port number should not be changed. Adding a Second Belkin Port Monitor and Configuring It for a Specific Print Server 1. Belkin Port Monitor Advanced Menu 3.
The Advanced Menu has fields to enter the Print Server's IP address and the queue name and the port number. In Windows, select the printer's properties and select the "Ports" tab. 24 Note: The port number field by default is 515. In most cases, the port number should not be changed. Adding a Second Belkin Port Monitor and Configuring It for a Specific Print Server 1. Belkin Port Monitor Advanced Menu 3.
F1UP0301 Manual
Page 27
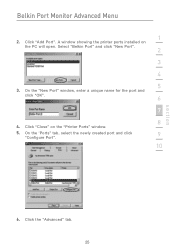
On the "New Port" window, enter a unique name for the port and click "OK". 6 7 8 4. Click the "Advanced" tab. 25 Select "Belkin Port" and click "New Port". 2 3 4 5 3. On the 'Ports" tab, select the newly created port and click 9 "Configure Port". 10 section 6. Belkin Port Monitor Advanced Menu 1 2. Click "Add Port". A window showing the printer ports installed on the "Printer Ports" window. 5. Click "Close" on the PC will open.
On the "New Port" window, enter a unique name for the port and click "OK". 6 7 8 4. Click the "Advanced" tab. 25 Select "Belkin Port" and click "New Port". 2 3 4 5 3. On the 'Ports" tab, select the newly created port and click 9 "Configure Port". 10 section 6. Belkin Port Monitor Advanced Menu 1 2. Click "Add Port". A window showing the printer ports installed on the "Printer Ports" window. 5. Click "Close" on the PC will open.
F1UP0301 Manual
Page 29
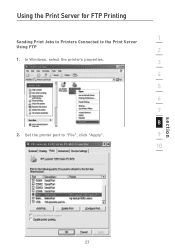
Using the Print Server for FTP Printing 1 Sending Print Jobs to Printers Connected to "File", click "Apply". 9 10 section 27 In Windows, select the printer's properties. 3 4 5 6 7 8 2. Set the printer port to the Print Server Using FTP 2 1.
Using the Print Server for FTP Printing 1 Sending Print Jobs to Printers Connected to "File", click "Apply". 9 10 section 27 In Windows, select the printer's properties. 3 4 5 6 7 8 2. Set the printer port to the Print Server Using FTP 2 1.

F1UP0301 Manual
Page 30
A dialogue box will be saved to name the print file. A file will open prompting you configured. Using the Print Server for FTP Printing 3. Print the document using the printer that you to the user's default Windows directory (typically "C:\" or "C:\Documents and Settings\ After naming the file, click "OK".
A dialogue box will be saved to name the print file. A file will open prompting you configured. Using the Print Server for FTP Printing 3. Print the document using the printer that you to the user's default Windows directory (typically "C:\" or "C:\Documents and Settings\ After naming the file, click "OK".
F1UP0301 Manual
Page 31
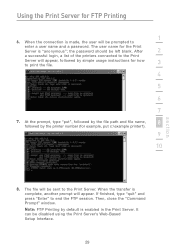
Then, close the "Command Prompt" window. The user name for how to print the file. 3 4 5 6 7 7. At the prompt, type "put c:\example printer1). 9 10 section 12 8. It can be sent to the ...
Then, close the "Command Prompt" window. The user name for how to print the file. 3 4 5 6 7 7. At the prompt, type "put c:\example printer1). 9 10 section 12 8. It can be sent to the ...

F1UP0301 Manual
Page 32
... whether any of the computers can access the Print Server. Check the Belkin website for compatibility issues at : http://web.belkin.com/support/F1UP0301. 30 Check the Belkin website for printer compatibility issues at http://web.belkin.com/support/F1UP0301. • If none of the computers on the Print Server by ... dynamic to establish a new IP address to be that the computer is most likely not the Print Server or the printer, but not Windows 98. Reinstall it using the manufacturer's CD that came with the new network or router. • It could be used with your printer...
... whether any of the computers can access the Print Server. Check the Belkin website for compatibility issues at : http://web.belkin.com/support/F1UP0301. 30 Check the Belkin website for printer compatibility issues at http://web.belkin.com/support/F1UP0301. • If none of the computers on the Print Server by ... dynamic to establish a new IP address to be that the computer is most likely not the Print Server or the printer, but not Windows 98. Reinstall it using the manufacturer's CD that came with the new network or router. • It could be used with your printer...
F1UP0301 Manual
Page 34
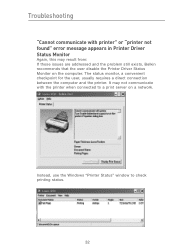
... issues are addressed and the problem still exists, Belkin recommends that the user disable the Printer Driver Status Monitor on a network. The status monitor, a convenient checkpoint for the user, usually requires a direct connection between the computer and the printer. Instead, use the Windows "Printer Status" window to a print server on the computer. Troubleshooting...
... issues are addressed and the problem still exists, Belkin recommends that the user disable the Printer Driver Status Monitor on a network. The status monitor, a convenient checkpoint for the user, usually requires a direct connection between the computer and the printer. Instead, use the Windows "Printer Status" window to a print server on the computer. Troubleshooting...