
User Guide
Page 1
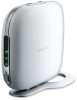
... (0) 20 654 7300 +31 (0) 20 654 7349 fax Belkin Ltd. 4 Pioneer Avenue Tuggerah Business Park Tuggerah, NSW 2259, Australia +61 (0) 2 4350 4600 +61 (0) 2 4350 4700 fax © 2007 Belkin International, Inc. Windows, Windows Vista, and Microsoft are registered trademarks of Microsoft Corporation in... the United States and/or other countries. High-Speed Docking Station Belkin Tech Support US: 310-898-1100, ext. 2263 800-223-5546...
... (0) 20 654 7300 +31 (0) 20 654 7349 fax Belkin Ltd. 4 Pioneer Avenue Tuggerah Business Park Tuggerah, NSW 2259, Australia +61 (0) 2 4350 4600 +61 (0) 2 4350 4700 fax © 2007 Belkin International, Inc. Windows, Windows Vista, and Microsoft are registered trademarks of Microsoft Corporation in... the United States and/or other countries. High-Speed Docking Station Belkin Tech Support US: 310-898-1100, ext. 2263 800-223-5546...

User Guide
Page 5
...may appear more than once), click "Install this 2 Follow the on-screen instructions to install the Docking Station drivers. Installation Installation for Windows Vista™ 1 IMPORTANT: INSTALL SOFTWARE FIRST. 2 DO NOT connect the Docking Station before installing the software, or the system may fail... to work correctly. 3 Go to http://www.belkin.com/highspeeddock/support/ to check for updates and download the latest driver for Windows Vista before beginning the installation. The flickering occurs while the system detects and installs the ...
...may appear more than once), click "Install this 2 Follow the on-screen instructions to install the Docking Station drivers. Installation Installation for Windows Vista™ 1 IMPORTANT: INSTALL SOFTWARE FIRST. 2 DO NOT connect the Docking Station before installing the software, or the system may fail... to work correctly. 3 Go to http://www.belkin.com/highspeeddock/support/ to check for updates and download the latest driver for Windows Vista before beginning the installation. The flickering occurs while the system detects and installs the ...

User Guide
Page 6
..., you will direct you to connect the Docking Station to the notebook and click "OK". This product has been thoroughly tested to work with all Windows operating systems. 1 After the software installation is complete, a prompt will be plugged into the computer to the "B" position. 4 When the message, "Please insert the High...
..., you will direct you to connect the Docking Station to the notebook and click "OK". This product has been thoroughly tested to work with all Windows operating systems. 1 After the software installation is complete, a prompt will be plugged into the computer to the "B" position. 4 When the message, "Please insert the High...

User Guide
Page 7
... now successfully uninstalled from your computer. 5 How do I switch the default audio device? 6 Your Docking Station features a built-in Windows Vista. 1. Installation How do I uninstall the Docking Station's drivers? 1 1. Click on "Manage audio devices". 3. Select "Belkin Notebook Expansion..." When you may switch the default audio device from your notebook to the dock.
... now successfully uninstalled from your computer. 5 How do I switch the default audio device? 6 Your Docking Station features a built-in Windows Vista. 1. Installation How do I uninstall the Docking Station's drivers? 1 1. Click on "Manage audio devices". 3. Select "Belkin Notebook Expansion..." When you may switch the default audio device from your notebook to the dock.

User Guide
Page 9
.... 3 Go to http://www.belkin.com/highspeeddock/support/ to your notebook computer. If you do not have administrator privileges to the "B" position. 6 This is being installed, if the message, "The software you to connect the Docking Station to check for updates and download the latest driver for Windows XP 1 IMPORTANT: INSTALL SOFTWARE...
.... 3 Go to http://www.belkin.com/highspeeddock/support/ to your notebook computer. If you do not have administrator privileges to the "B" position. 6 This is being installed, if the message, "The software you to connect the Docking Station to check for updates and download the latest driver for Windows XP 1 IMPORTANT: INSTALL SOFTWARE...

User Guide
Page 10
Click on "Add or Remove Programs". 3. Your drivers are now successfully uninstalled from your notebook to the dock. Your Docking Station features a built-in Windows XP. 1. Open the Control Panel and select "Sounds and Audio Devices". 2. Please do so at that , you will be prompted to restart your computer. How ..., connect your Docking Station to the notebook and click "OK". 2 After that time. Select "C-Media USB Sound Driver" and then click on 6 "Uninstall/Change". 5. Select "Belkin Notebook Expansion..." How do I switch the default audio device?
Click on "Add or Remove Programs". 3. Your drivers are now successfully uninstalled from your notebook to the dock. Your Docking Station features a built-in Windows XP. 1. Open the Control Panel and select "Sounds and Audio Devices". 2. Please do so at that , you will be prompted to restart your computer. How ..., connect your Docking Station to the notebook and click "OK". 2 After that time. Select "C-Media USB Sound Driver" and then click on 6 "Uninstall/Change". 5. Select "Belkin Notebook Expansion..." How do I switch the default audio device?

User Guide
Page 13
... 3 monitor. To set up the Docking Station to the Docking Station. This mode allows you to the primary notebook screen. However, windows that you disconnect the Docking Station, any open windows on the 2 external monitor move to use Primary Mode, follow these steps: 1. Installation NOTE: lf the video output of the Docking...
... 3 monitor. To set up the Docking Station to the Docking Station. This mode allows you to the primary notebook screen. However, windows that you disconnect the Docking Station, any open windows on the 2 external monitor move to use Primary Mode, follow these steps: 1. Installation NOTE: lf the video output of the Docking...

User Guide
Page 16
...quality, select those options on it. 2. Click "OK" to change your display resolution: (1), through the 2 Windows Control Panel. To change the resolution using the Belkin system-tray application: 3 1. To change the resolution using the Windows Control Panel: 1. Position the mouse on the resolution setting you can select any resolution or color quality... 6. Installation number of columns and rows, the more clear and crisp your computer screen will appear showing several resolution-setting alternatives. 6 3. or (2), through the Belkin system-tray application;
...quality, select those options on it. 2. Click "OK" to change your display resolution: (1), through the 2 Windows Control Panel. To change the resolution using the Belkin system-tray application: 3 1. To change the resolution using the Windows Control Panel: 1. Position the mouse on the resolution setting you can select any resolution or color quality... 6. Installation number of columns and rows, the more clear and crisp your computer screen will appear showing several resolution-setting alternatives. 6 3. or (2), through the Belkin system-tray application;

User Guide
Page 17
... the appropriate point. Installation What happens when my notebook goes into hibernate mode when the notebook returns to the Docking Station. To avoid this problem, Belkin 4 has created an application that secondary monitor. If the notebook goes into standby or hibernate mode, and the 2 Docking Station is attached to an active... the same settings it had before the notebook went into standby or 1 hibernate mode? In addition, if the external monitor is set for Extended Mode, windows that were previously visible on the primary notebook monitor, not the external monitor. 14
... the appropriate point. Installation What happens when my notebook goes into hibernate mode when the notebook returns to the Docking Station. To avoid this problem, Belkin 4 has created an application that secondary monitor. If the notebook goes into standby or hibernate mode, and the 2 Docking Station is attached to an active... the same settings it had before the notebook went into standby or 1 hibernate mode? In addition, if the external monitor is set for Extended Mode, windows that were previously visible on the primary notebook monitor, not the external monitor. 14

User Guide
Page 19
...from your notebook and restart your notebook's CD-ROM or DVD drive. 3. If the problem persists, please call Belkin Technical Support so that came with your notebook or adapters other than the one 5 supplied with the Docking Station. ... front of the Docking Station is not 6 green, the power adapter is plugged into your computer. 2. Please call Belkin Technical Support at 2 800-223-5546 ext. 2263. Troubleshooting Guide If your Docking Station does not operate as expected,... outlet. Follow the instructions on the CD-ROM drive icon in Windows Explorer. 4.
...from your notebook and restart your notebook's CD-ROM or DVD drive. 3. If the problem persists, please call Belkin Technical Support so that came with your notebook or adapters other than the one 5 supplied with the Docking Station. ... front of the Docking Station is not 6 green, the power adapter is plugged into your computer. 2. Please call Belkin Technical Support at 2 800-223-5546 ext. 2263. Troubleshooting Guide If your Docking Station does not operate as expected,... outlet. Follow the instructions on the CD-ROM drive icon in Windows Explorer. 4.

User Guide
Page 20
..., such as a USB mouse, into the Docking Station should 4 work properly. If installation is securely connected to a working power outlet. If Windows does not find new hardware, there may be a problem with the fixing screws on my monitor is always blank. 17 c. When the notebook is... in your notebook's ExpressCard slot, that the cable is connected to your notebook. If Windows now finds new hardware, refer to "Installing 3 the Software Drivers" above and follow the steps to reinstall the software drivers. Troubleshooting Guide ...
..., such as a USB mouse, into the Docking Station should 4 work properly. If installation is securely connected to a working power outlet. If Windows does not find new hardware, there may be a problem with the fixing screws on my monitor is always blank. 17 c. When the notebook is... in your notebook's ExpressCard slot, that the cable is connected to your notebook. If Windows now finds new hardware, refer to "Installing 3 the Software Drivers" above and follow the steps to reinstall the software drivers. Troubleshooting Guide ...
User Guide
Page 21
... by" or "Hibernate" to make sure that the driver 2 is closed. By default, most notebooks go into your computer. 3 2. For Windows XP 1. Insert the installation CD into standby or hibernate mode when the lid is properly installed: 1. Click on the installer to reinstall the drivers.... Troubleshooting Guide If you check both of the above and your monitor still does 1 not display correctly, you need to change the option in Windows. 5 4. To change the option from your notebook and restart your notebook's CD-ROM or DVD drive. 4 3. Follow the instructions on ...
... by" or "Hibernate" to make sure that the driver 2 is closed. By default, most notebooks go into your computer. 3 2. For Windows XP 1. Insert the installation CD into standby or hibernate mode when the lid is properly installed: 1. Click on the installer to reinstall the drivers.... Troubleshooting Guide If you check both of the above and your monitor still does 1 not display correctly, you need to change the option in Windows. 5 4. To change the option from your notebook and restart your notebook's CD-ROM or DVD drive. 4 3. Follow the instructions on ...

User Guide
Page 22
...". 4. Open the DVD-player software and play the movie AFTER closing the lid on the "Start" menu, then open the Control Panel. 1 2. Troubleshooting Guide For Windows Vista 1. Refer to the video quality on "Hardware and Sound". 2 3.
...". 4. Open the DVD-player software and play the movie AFTER closing the lid on the "Start" menu, then open the Control Panel. 1 2. Troubleshooting Guide For Windows Vista 1. Refer to the video quality on "Hardware and Sound". 2 3.

User Guide
Page 23
... rates can be adjusted as described in the "Installing the Software Drivers" section, above. 4 3. Select a lower screen resolution until the Windows display appears on your monitor. Always try and use the maximum refresh rate available for the "Default Monitor on and connected to a number ... the software drivers as follows: 1. On the "Display Properties" screen, click the "Settings" tab. 3. Make sure that is powered on Belkin High-Speed Docking Station...." 2 1. Position the mouse anywhere on the monitor. To change the refresh rate, click "Advanced" and then click ...
... rates can be adjusted as described in the "Installing the Software Drivers" section, above. 4 3. Select a lower screen resolution until the Windows display appears on your monitor. Always try and use the maximum refresh rate available for the "Default Monitor on and connected to a number ... the software drivers as follows: 1. On the "Display Properties" screen, click the "Settings" tab. 3. Make sure that is powered on Belkin High-Speed Docking Station...." 2 1. Position the mouse anywhere on the monitor. To change the refresh rate, click "Advanced" and then click ...
User Guide
Page 25
Troubleshooting Guide In Mirror Mode, if the external monitor screen goes blank 1 when you move the video window completely onto 4 that monitor."-or, if an error message containing the word "overlay" appears, we recommend that you try to play back on the external ...
Troubleshooting Guide In Mirror Mode, if the external monitor screen goes blank 1 when you move the video window completely onto 4 that monitor."-or, if an error message containing the word "overlay" appears, we recommend that you try to play back on the external ...

User Guide
Page 28
... hear anything through my notebook's speakers. 4 Some computers automatically turn off their notebook speakers when the Docking Station is plugged in Windows XP, select "Sounds, Speech and Audio Devices"). 3. I cannot adjust the volume from the notebook's system tray. Close all ...programs on your notebook. 2. To enable your browser to update.windows.com to update to adjust volume 2 using Microsoft® Internet Explorer and pointing your notebook speakers again: 6 1. Open the Control...
... hear anything through my notebook's speakers. 4 Some computers automatically turn off their notebook speakers when the Docking Station is plugged in Windows XP, select "Sounds, Speech and Audio Devices"). 3. I cannot adjust the volume from the notebook's system tray. Close all ...programs on your notebook. 2. To enable your browser to update.windows.com to update to adjust volume 2 using Microsoft® Internet Explorer and pointing your notebook speakers again: 6 1. Open the Control...