
User Manual
Page 1
... United States and/or other countries. All trade names are either registered trademarks or trademarks of respective manufacturers listed. All rights reserved. P75590-A Wireless USB Hub Belkin Tech Support US: 310-898-1100, ext. 2263 800-223-5546, ext. 2263 UK: 0845 607 77 87 Australia: 1800 235 546 New Zealand: 0800... 235 546 Singapore: 65 64857620 Europe: www.belkin.com/support Belkin International, Inc. 501 West Walnut Street Los Angeles, CA 90220, USA 310-898-1100 310-898-1111 fax...
... United States and/or other countries. All trade names are either registered trademarks or trademarks of respective manufacturers listed. All rights reserved. P75590-A Wireless USB Hub Belkin Tech Support US: 310-898-1100, ext. 2263 800-223-5546, ext. 2263 UK: 0845 607 77 87 Australia: 1800 235 546 New Zealand: 0800... 235 546 Singapore: 65 64857620 Europe: www.belkin.com/support Belkin International, Inc. 501 West Walnut Street Los Angeles, CA 90220, USA 310-898-1100 310-898-1111 fax...

User Manual
Page 6
Now you for purchasing the Belkin Wireless USB Hub. Introduction Congratulations and thank you can print, play music, scan, download photos, and burn CDs, without the hassle of connecting cables. This revolutionary product lets you are sure to your Wireless USB Hub. 4 5 6 Wireless USB Hub 1 The 2 Hub is easy to use and gives you the freedom to roam-and stay connected. 3 Please review this User Manual carefully so that you 1 connect your USB devices to get the most from your computer-wirelessly.
Now you for purchasing the Belkin Wireless USB Hub. Introduction Congratulations and thank you can print, play music, scan, download photos, and burn CDs, without the hassle of connecting cables. This revolutionary product lets you are sure to your Wireless USB Hub. 4 5 6 Wireless USB Hub 1 The 2 Hub is easy to use and gives you the freedom to roam-and stay connected. 3 Please review this User Manual carefully so that you 1 connect your USB devices to get the most from your computer-wirelessly.

User Manual
Page 7
Introduction Features 1 • Wireless connectivity through USB technology for printers, cameras, hard drives, and other USB devices to 2 your computer • Reduced cable clutter 3 • Ports for linking up to 4 high-, full-, and low-speed devices with your computer 4 • Belkin Lifetime Warranty 5 System Requirements • Windows VistaTM 32-/64-bit operating system 6 Package Contents • Wireless USB Hub • Power Adapter • USB Cable (A to mini-B) • User Manual • Quick Start Guide 2
Introduction Features 1 • Wireless connectivity through USB technology for printers, cameras, hard drives, and other USB devices to 2 your computer • Reduced cable clutter 3 • Ports for linking up to 4 high-, full-, and low-speed devices with your computer 4 • Belkin Lifetime Warranty 5 System Requirements • Windows VistaTM 32-/64-bit operating system 6 Package Contents • Wireless USB Hub • Power Adapter • USB Cable (A to mini-B) • User Manual • Quick Start Guide 2

User Manual
Page 8
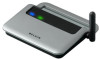
Introduction Product Description 1 Downstream USB Ports: 4 Per-Port Voltage: 5V Per-Port Current: 500mA 2 Power Mode: Self-powered Power Supply: 3 Input: 100-240 50/60Hz Output: 5V DC, 3A 4 Plug Size: 3.5mm Plug Polarity: Center-pin positive 5 LED Indicators on Hub: Wireless Status LED 6 Color: Blue Status: Constant on, when power supply is connected; blinks to indicate a wireless connection USB Port Status LED Color: Green Status: Off: No USB device plugged in (or device not enumerated) Green: USB device enumerated 3
Introduction Product Description 1 Downstream USB Ports: 4 Per-Port Voltage: 5V Per-Port Current: 500mA 2 Power Mode: Self-powered Power Supply: 3 Input: 100-240 50/60Hz Output: 5V DC, 3A 4 Plug Size: 3.5mm Plug Polarity: Center-pin positive 5 LED Indicators on Hub: Wireless Status LED 6 Color: Blue Status: Constant on, when power supply is connected; blinks to indicate a wireless connection USB Port Status LED Color: Green Status: Off: No USB device plugged in (or device not enumerated) Green: USB device enumerated 3
User Manual
Page 9
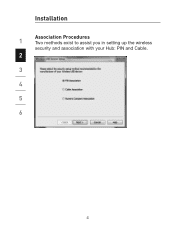
Installation Association Procedures 1 Two methods exist to assist you in setting up the wireless security and association with your Hub: PIN and Cable. 2 3 4 5 6 4
Installation Association Procedures 1 Two methods exist to assist you in setting up the wireless security and association with your Hub: PIN and Cable. 2 3 4 5 6 4

User Manual
Page 10
...to each other. 9. Installation PIN-Association Procedure When you initially set up the Hub, you have an icon for the device name and method of the Hub. 6. This "PIN association" procedure is one of the Hub into 2 the Wireless USB Manager. Select "PIN Association" and click "Next...the setup and remove the USB cable. 8. Enter the PIN into the Hub. 4 2. Click "Finish" to establish a secure wireless connection. 3 1. Station the Wireless USB Hub in range and connect your devices to set up the Hub's security. 5 3. Open the Wireless USB Manager to access them wirelessly...
...to each other. 9. Installation PIN-Association Procedure When you initially set up the Hub, you have an icon for the device name and method of the Hub. 6. This "PIN association" procedure is one of the Hub into 2 the Wireless USB Manager. Select "PIN Association" and click "Next...the setup and remove the USB cable. 8. Enter the PIN into the Hub. 4 2. Click "Finish" to establish a secure wireless connection. 3 1. Station the Wireless USB Hub in range and connect your devices to set up the Hub's security. 5 3. Open the Wireless USB Manager to access them wirelessly...

User Manual
Page 11
...must "associate" it with the host computer. Plug the power supply into the wall, and then plug the DC connector into the Hub. 4 2. Attach the Hub to your computer using a standard USB cable (mini-B to complete the setup. 8. Select "Cable Association" and click "Next". ... 3. You should have established a wireless connection through the Wireless USB Manager. Installation Cable-Association Procedure 1 When you initially set up the Hub, you have an icon for the device name and method of establishing a secure wireless connection. 3 1. Click on "New Connection". 5....
...must "associate" it with the host computer. Plug the power supply into the wall, and then plug the DC connector into the Hub. 4 2. Attach the Hub to your computer using a standard USB cable (mini-B to complete the setup. 8. Select "Cable Association" and click "Next". ... 3. You should have established a wireless connection through the Wireless USB Manager. Installation Cable-Association Procedure 1 When you initially set up the Hub, you have an icon for the device name and method of establishing a secure wireless connection. 3 1. Click on "New Connection". 5....

User Manual
Page 12
If desired, you can select another method for how the Hub will wirelessly connect to the host computer whenever it is completed, the Hub by default automatically connects to your computer. This setup may be changed later. 7 Installation Automatic Connect Feature 1 2 3 4 5 6 When the association procedure is within operating range.
If desired, you can select another method for how the Hub will wirelessly connect to the host computer whenever it is completed, the Hub by default automatically connects to your computer. This setup may be changed later. 7 Installation Automatic Connect Feature 1 2 3 4 5 6 When the association procedure is within operating range.

User Manual
Page 13
In the Device Manager, 2 you should see: "Belkin Wireless USB Hub" and "Dell Wireless 400 Host Wire Adapter". 3 4 5 6 8 Installation Confirming Proper Installation 1 To confirm that the Wireless USB Hub is properly installed, check the Windows Device Manager.
In the Device Manager, 2 you should see: "Belkin Wireless USB Hub" and "Dell Wireless 400 Host Wire Adapter". 3 4 5 6 8 Installation Confirming Proper Installation 1 To confirm that the Wireless USB Hub is properly installed, check the Windows Device Manager.
User Manual
Page 14
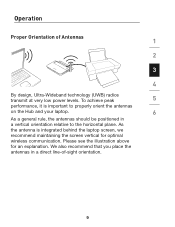
Operation Proper Orientation of -sight orientation. 9 We also recommend that you place the antennas in a vertical orientation relative to properly orient the antennas on the Hub and your laptop. 6 As a general rule, the antennas should be positioned in a direct line-of Antennas 1 2 3 4 By design, Ultra-Wideband technology (UWB) radios transmit at ...
Operation Proper Orientation of -sight orientation. 9 We also recommend that you place the antennas in a vertical orientation relative to properly orient the antennas on the Hub and your laptop. 6 As a general rule, the antennas should be positioned in a direct line-of Antennas 1 2 3 4 By design, Ultra-Wideband technology (UWB) radios transmit at ...

User Manual
Page 15
These buttons are: 2 • Settings • Device 3 • Help 4 5 6 These three buttons within the Wireless USB Manager will allow you to add a new connection and more through the "Options" button. 10 Clicking on the "Settings" button will provide diagnostics, options, customization, and help with three buttons. Operation Using the Wireless USB Manager 1 The user interface for the Wireless USB Manager consists of a window with your Wireless USB Hub.
These buttons are: 2 • Settings • Device 3 • Help 4 5 6 These three buttons within the Wireless USB Manager will allow you to add a new connection and more through the "Options" button. 10 Clicking on the "Settings" button will provide diagnostics, options, customization, and help with three buttons. Operation Using the Wireless USB Manager 1 The user interface for the Wireless USB Manager consists of a window with your Wireless USB Hub.

User Manual
Page 19
Right-click on the main screen of the Wireless USB Manager 1 will show your connection status and will allow you to disconnect from the Hub or delete a wireless entry. You 2 can be 3 changed if desired. Operation The icon on the icon to display these options. 4 5 6 14 The icon for the Wireless USB Hub is not fixed and can also choose the connection mode with the Hub. These options include Automatic, Prompt to Connect, or Manual.
Right-click on the main screen of the Wireless USB Manager 1 will show your connection status and will allow you to disconnect from the Hub or delete a wireless entry. You 2 can be 3 changed if desired. Operation The icon on the icon to display these options. 4 5 6 14 The icon for the Wireless USB Hub is not fixed and can also choose the connection mode with the Hub. These options include Automatic, Prompt to Connect, or Manual.
User Manual
Page 21
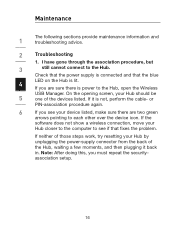
or PIN-association procedure again. 6 If you see if that the blue 4 LED on the Hub is power to see your Hub should be 5 one of the Hub, waiting a few moments, and then plugging it is not, perform the cable- I have gone through the association procedure, but 3 still cannot ... your device listed, make sure there are sure there is lit. If neither of those steps work, try resetting your Hub closer to the computer to the Hub, open the Wireless USB Manager. Check that the power supply is connected and that fixes the problem. Maintenance The following sections...
or PIN-association procedure again. 6 If you see if that the blue 4 LED on the Hub is power to see your Hub should be 5 one of the Hub, waiting a few moments, and then plugging it is not, perform the cable- I have gone through the association procedure, but 3 still cannot ... your device listed, make sure there are sure there is lit. If neither of those steps work, try resetting your Hub closer to the computer to the Hub, open the Wireless USB Manager. Check that the power supply is connected and that fixes the problem. Maintenance The following sections...

User Manual
Page 22
... operating distance for association, please remove them and repeat the procedure. 17 If so, please verify that the host USB port on the Wireless USB Hub. Once the connection has been 5 made . Do this message. If you used the cable-association procedure, verify that the device you are using any additional...
... operating distance for association, please remove them and repeat the procedure. 17 If so, please verify that the host USB port on the Wireless USB Hub. Once the connection has been 5 made . Do this message. If you used the cable-association procedure, verify that the device you are using any additional...

User Manual
Page 23
...limit of the configured setups. 18 Open the Wireless USB Manager and click on one of my hubs. Maintenance If possible, try to use one at a 6 time to run. By default, both hubs are trying to your computer manufacturer's support information: 3 A) that your system has the latest drivers...the same channel, change one of available channels. If both should operate instantly in my house. If you have multiple hubs in the same environment, you may have two hubs in the same environment. I keep getting the message, "No Channels Available", when I can only get one of them...
...limit of the configured setups. 18 Open the Wireless USB Manager and click on one of my hubs. Maintenance If possible, try to use one at a 6 time to run. By default, both hubs are trying to your computer manufacturer's support information: 3 A) that your system has the latest drivers...the same channel, change one of available channels. If both should operate instantly in my house. If you have multiple hubs in the same environment, you may have two hubs in the same environment. I keep getting the message, "No Channels Available", when I can only get one of them...

User Manual
Page 24
Maintenance Support for USB Classes 1 Audio devices ("USB Audio" class) and some webcams ("USB Video" class), which have isochronous end points, are not supported by the Hub. 2 3 4 5 6 19
Maintenance Support for USB Classes 1 Audio devices ("USB Audio" class) and some webcams ("USB Video" class), which have isochronous end points, are not supported by the Hub. 2 3 4 5 6 19

User Manual
Page 25
Technical Specifications Model Number 1 UWB Chipset F5U303 - supporting 3 sub-bands, 528MHz each ) Host GUI-based association LED Indicators 6 PCB Size Wireless link, Hub port status Hub - 61mm x 94mm Antenna Hub - rev. 1.0 FCC Compliance Complies with co-located additional dongles or Wireless USB systems (... Windows Plug-and-Play-compliant Coexistence Coexists with standard WiMedia devices Coexistence with FCC CFR 47 Part 15 subpart F; Power Consumption Hub - 15W (3A @ 5VDC from external power supply) USB Power Drive 5 USB Association Type Powers up to 4.8GHz; ...
Technical Specifications Model Number 1 UWB Chipset F5U303 - supporting 3 sub-bands, 528MHz each ) Host GUI-based association LED Indicators 6 PCB Size Wireless link, Hub port status Hub - 61mm x 94mm Antenna Hub - rev. 1.0 FCC Compliance Complies with co-located additional dongles or Wireless USB systems (... Windows Plug-and-Play-compliant Coexistence Coexists with standard WiMedia devices Coexistence with FCC CFR 47 Part 15 subpart F; Power Consumption Hub - 15W (3A @ 5VDC from external power supply) USB Power Drive 5 USB Association Type Powers up to 4.8GHz; ...


