User Manual
Page 4
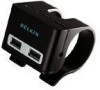
... for purchasing the Belkin USB Clip-On Hub. Please take a moment to review this manual completely to ensure that you get the most from your new USB Clip-On Hub. Introduction Congratulations and thank you for "hot swapping" of USB devices • Individual port-status-indicator LEDs • Four 480Mbps downstream ports • Fully compatible with USB 1.1 and USB 2.0 devices Introduction | 01...
... for purchasing the Belkin USB Clip-On Hub. Please take a moment to review this manual completely to ensure that you get the most from your new USB Clip-On Hub. Introduction Congratulations and thank you for "hot swapping" of USB devices • Individual port-status-indicator LEDs • Four 480Mbps downstream ports • Fully compatible with USB 1.1 and USB 2.0 devices Introduction | 01...
User Manual
Page 5
Introduction Package Contents • USB Clip-On Hub • AC Power Adapter • User Manual • USB 2.0 Mini-B Device Cable Technical Specifications Upstream Ports: Downstream Ports: Per-Port Voltage: Per-Port Current: Power Mode: Operating Temperature: Storage Temperature: Power Supply: Output: Plug Size: Plug Polarity: 1 4 DC +5V 500mA (max) (self-powered mode) Self-powered/bus-powered 5&#...
Introduction Package Contents • USB Clip-On Hub • AC Power Adapter • User Manual • USB 2.0 Mini-B Device Cable Technical Specifications Upstream Ports: Downstream Ports: Per-Port Voltage: Per-Port Current: Power Mode: Operating Temperature: Storage Temperature: Power Supply: Output: Plug Size: Plug Polarity: 1 4 DC +5V 500mA (max) (self-powered mode) Self-powered/bus-powered 5&#...

User Manual
Page 6
... to do not connect any USB devices to the Hub until instructed to function in high-speed mode (480Mbps data rate). Opening the clip mechanism beyond this installation procedure. 1. Plug the AC adapter into the upstream port on the rear of the Hub. Note: The Hub may damage the unit. WARNING: The Hub's clip has a one-inch tolerance...
... to do not connect any USB devices to the Hub until instructed to function in high-speed mode (480Mbps data rate). Opening the clip mechanism beyond this installation procedure. 1. Plug the AC adapter into the upstream port on the rear of the Hub. Note: The Hub may damage the unit. WARNING: The Hub's clip has a one-inch tolerance...
User Manual
Page 7
Installation 4. Plug the USB A connector of your Windows Installation CD to reinstall the USB drivers for that device. Important Note: When moving a device from one port on , Windows will now detect your Hub and install the required driver support. (The Windows "Install New Hardware Wizard" may be necessary to complete the driver installation process.) 5. Installation | 04 If your computer is on the Hub to another, it may prompt you to provide your USB device, or an additional hub, into any of the downstream ports of the Hub.
Installation 4. Plug the USB A connector of your Windows Installation CD to reinstall the USB drivers for that device. Important Note: When moving a device from one port on , Windows will now detect your Hub and install the required driver support. (The Windows "Install New Hardware Wizard" may be necessary to complete the driver installation process.) 5. Installation | 04 If your computer is on the Hub to another, it may prompt you to provide your USB device, or an additional hub, into any of the downstream ports of the Hub.


