User Manual
Page 3
.../ Side view 7 Controls and functions 8 Projector ...8 Remote control 9 Remote control effective range 10 Replacing the remote control battery 10 Positioning your projector 11 Choosing a location 11 Safety instructions for ceiling mounting of the projector 11 Obtaining a preferred projected image size 12 How to determine the position of the projector for a given screen size ... 13 How to determine the recommended screen size for a given distance ..... 13 Connection 15 Connecting a computer or monitor 15 Connecting a computer 15 Connecting a monitor 16 Connecting Video source devices...
.../ Side view 7 Controls and functions 8 Projector ...8 Remote control 9 Remote control effective range 10 Replacing the remote control battery 10 Positioning your projector 11 Choosing a location 11 Safety instructions for ceiling mounting of the projector 11 Obtaining a preferred projected image size 12 How to determine the position of the projector for a given screen size ... 13 How to determine the recommended screen size for a given distance ..... 13 Connection 15 Connecting a computer or monitor 15 Connecting a computer 15 Connecting a monitor 16 Connecting Video source devices...
User Manual
Page 4
... projector 38 Lamp information 39 Calculation of lamp hour 39 Warning message 39 Replacing the lamp 40 Temperature information 42 Indicators 42 Troubleshooting 44 Specifications 45 Projector specifications 45 iv Table of contents Picture menu 33 2. Closing the password function 23 Switching input signal 23 Adjusting the projected image 24 Adjusting the projection angle 24 Auto-adjusting the image 24 Fine-tuning the image size and clarity 24 Optimizing the image 25 Correcting keystone 25 Selecting an application mode 26 Other adjustments 27 Operating in a high...
... projector 38 Lamp information 39 Calculation of lamp hour 39 Warning message 39 Replacing the lamp 40 Temperature information 42 Indicators 42 Troubleshooting 44 Specifications 45 Projector specifications 45 iv Table of contents Picture menu 33 2. Closing the password function 23 Switching input signal 23 Adjusting the projected image 24 Adjusting the projection angle 24 Auto-adjusting the image 24 Fine-tuning the image size and clarity 24 Optimizing the image 25 Correcting keystone 25 Selecting an application mode 26 Other adjustments 27 Operating in a high...
User Manual
Page 7
... servicing to qualified service personnel. 6. NOT stable. Safety Instructions 1. Save this user's manual before 4. In some countries, the line voltage is under operation as this manual and marked on the projector or remote control. Do not block the projection lens with any objects when the projector is 2. Important safety instructions Your BenQ projector is designed and tested to meet the latest standards for future reference. Always open...
... servicing to qualified service personnel. 6. NOT stable. Safety Instructions 1. Save this user's manual before 4. In some countries, the line voltage is under operation as this manual and marked on the projector or remote control. Do not block the projection lens with any objects when the projector is 2. Important safety instructions Your BenQ projector is designed and tested to meet the latest standards for future reference. Always open...
User Manual
Page 11
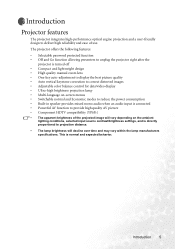
... manual zoom lens • One-key auto-adjustment to display the best picture quality • Auto vertical keystone correction to correct distorted images • Adjustable color balance control for data/video display • Ultra-high brightness projection lamp • Multi-language on-screen menus • Switchable normal and Economic modes to reduce the power consumption • Built-in speaker provides mixed mono audio when an audio input is connected • Powerful AV function to provide high quality AV picture...
... manual zoom lens • One-key auto-adjustment to display the best picture quality • Auto vertical keystone correction to correct distorted images • Adjustable color balance control for data/video display • Ultra-high brightness projection lamp • Multi-language on-screen menus • Switchable normal and Economic modes to reduce the power consumption • Built-in speaker provides mixed mono audio when an audio input is connected • Powerful AV function to provide high quality AV picture...

User Manual
Page 14
... Indicates the status of the projected image. BLANK (See "Hiding the image" on the control 2 panel to move the selection focus up or flashes if the projector's picture timings for details.) Exits and saves the menu settings. Adjusts the size of the projected image. 2. RGB/YPbPr, Video or S-Video. 5. Power (See "Start up or flashes when the lamp has developed a problem. 1. MENU (See "Using the menus" down . MODE (See "Application Mode" on page 33 for details.) 3 Depending upon which input signal...
... Indicates the status of the projected image. BLANK (See "Hiding the image" on the control 2 panel to move the selection focus up or flashes if the projector's picture timings for details.) Exits and saves the menu settings. Adjusts the size of the projected image. 2. RGB/YPbPr, Video or S-Video. 5. Power (See "Start up or flashes when the lamp has developed a problem. 1. MENU (See "Using the menus" down . MODE (See "Application Mode" on page 33 for details.) 3 Depending upon which input signal...

User Manual
Page 15
... details.) Turns the projector on page 29 RGB/YPbPr, Video or S-Video. Remote control 6. KEYSTONE (See page "Correcting keystone" on -screen menu is selected, there are several picture setup options available. SOURCE (See "Switching input details.) signal" on page 23 for details.) 7 Manually corrects distorted images 2 resulting from an angled projection. 7. Freeze (See "Freezing the image" on or off the on the remote control to press FREEZE again. image. Introduction 9 MENU (See "Using the menus...
... details.) Turns the projector on page 29 RGB/YPbPr, Video or S-Video. Remote control 6. KEYSTONE (See page "Correcting keystone" on -screen menu is selected, there are several picture setup options available. SOURCE (See "Switching input details.) signal" on page 23 for details.) 7 Manually corrects distorted images 2 resulting from an angled projection. 7. Freeze (See "Freezing the image" on or off the on the remote control to press FREEZE again. image. Introduction 9 MENU (See "Using the menus...

User Manual
Page 16
... the holder into a fire. The distance between the remote control and the IR sensors on the front and the back of the projector's IR remote control sensors to the remote control from the rear Approx. 15° Approx. 15° Replacing the remote control battery 1. Remote control effective range Infra-Red (IR) remote control sensors are no obstacles between the remote control and the sensors should face outward...
... the holder into a fire. The distance between the remote control and the IR sensors on the front and the back of the projector's IR remote control sensors to the remote control from the rear Approx. 15° Approx. 15° Replacing the remote control battery 1. Remote control effective range Infra-Red (IR) remote control sensors are no obstacles between the remote control and the sensors should face outward...
User Manual
Page 17
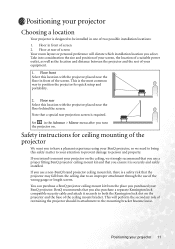
... use a non-BenQ brand projector ceiling mount kit, there is required. Floor front Select this location with the projector placed near the floor behind the screen. This will dictate which installation location you also purchase a separate Kensington lock compatible security cable and attach it is securely and safely installed. Positioning your projector Choosing a location Your projector is designed to be installed in front of screen 2. Safety instructions for quick setup...
... use a non-BenQ brand projector ceiling mount kit, there is required. Floor front Select this location with the projector placed near the floor behind the screen. This will dictate which installation location you also purchase a separate Kensington lock compatible security cable and attach it is securely and safely installed. Positioning your projector Choosing a location Your projector is designed to be installed in front of screen 2. Safety instructions for quick setup...

User Manual
Page 18
... projected image size The distance from the projector lens to the screen, the zoom setting, and the video format each factors in determining the ideal location for both the projected image size and the vertical offset dimension, which is positioned further away from the screen, the projected image size increases, and the vertical offset also increases proportionately. All inputs (other than composite Video being fed a 16:9 aspect signal) will display in a 4:3 aspect display...
... projected image size The distance from the projector lens to the screen, the zoom setting, and the video format each factors in determining the ideal location for both the projected image size and the vertical offset dimension, which is positioned further away from the screen, the projected image size increases, and the vertical offset also increases proportionately. All inputs (other than composite Video being fed a 16:9 aspect signal) will display in a 4:3 aspect display...

User Manual
Page 21
... : 1. Locate a function key labeled CRT/LCD or a function key with the projector (see "Remote paging operations" on page 6). Once connected, the audio can be like FN + F3 or CRT/LCD key turns the external display on the projector. 4. Connection When connecting a signal source to the projector, be sure to the Audio socket of the projector. If you wish to use of the projector (mixed mono) speaker, take the supplied USB cable and connect the...
... : 1. Locate a function key labeled CRT/LCD or a function key with the projector (see "Remote paging operations" on page 6). Once connected, the audio can be like FN + F3 or CRT/LCD key turns the external display on the projector. 4. Connection When connecting a signal source to the projector, be sure to the Audio socket of the projector. If you wish to use of the projector (mixed mono) speaker, take the supplied USB cable and connect the...

User Manual
Page 24
... the selected video image is not displayed after the projector is turned on and the correct video source has been selected, check that the Video source device is connected. green to green, blue to blue, and red to a High Definition TV (HDTV) tuner, the following diagram: A/V device Component Video to a Component Video source device: 1. See "Mute" and "Volume" on page 17 for details. If you connect the projector to red. 2. Also check that delivers...
... the selected video image is not displayed after the projector is turned on and the correct video source has been selected, check that the Video source device is connected. green to green, blue to blue, and red to a High Definition TV (HDTV) tuner, the following diagram: A/V device Component Video to a Component Video source device: 1. See "Mute" and "Volume" on page 17 for details. If you connect the projector to red. 2. Also check that delivers...

User Manual
Page 25
... picture quality. See "Mute (Off)" and "Volume (5)" on page 17 for details. If you wish to make use to connect to the device. See "Connecting Video source devices" on page 35 for details. • If the selected video image is not displayed after the projector is turned on and the correct video source has been selected, check that shown in the following diagram: A/V device S-Video cable Audio cable...
... picture quality. See "Mute (Off)" and "Volume (5)" on page 17 for details. If you wish to make use to connect to the device. See "Connecting Video source devices" on page 35 for details. • If the selected video image is not displayed after the projector is turned on and the correct video source has been selected, check that shown in the following diagram: A/V device S-Video cable Audio cable...
User Manual
Page 26
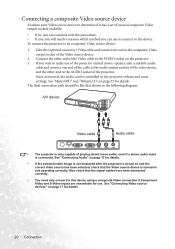
... selected video image is not displayed after the projector is connected. If you can be like that the Video source device is turned on and the correct video source has been selected, check that shown in the following diagram: A/V device Video cable Audio cable • The projector is only capable of playing mixed mono audio, even if a stereo audio input is turned on and operating correctly. The final connection path should be controlled...
... selected video image is not displayed after the projector is connected. If you can be like that the Video source device is turned on and the correct video source has been selected, check that shown in the following diagram: A/V device Video cable Audio cable • The projector is only capable of playing mixed mono audio, even if a stereo audio input is turned on and operating correctly. The final connection path should be controlled...

User Manual
Page 27
... remote control or projector to start to search for details. If the frequency/ resolution of the connected equipment on the wall socket switch (where fitted). See "Timing chart" on the projector or remote control to an input signal which is compatible with the projector's resolution. Slide open the lens cover. If you will start the unit. Operation 21 Check that the Power indicator on a blank screen. The projector will see the message "Out of the screen. The Power indicator light flashes green...
... remote control or projector to start to search for details. If the frequency/ resolution of the connected equipment on the wall socket switch (where fitted). See "Timing chart" on the projector or remote control to an input signal which is compatible with the projector's resolution. Slide open the lens cover. If you will start the unit. Operation 21 Check that the Power indicator on a blank screen. The projector will see the message "Out of the screen. The Power indicator light flashes green...
User Manual
Page 28
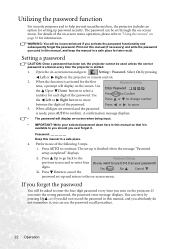
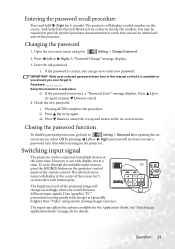
... the Password Setup Do you activate the password functionality and subsequently forget the password. The password can use the password recall procedure. 22 Operation i. Open the on -screen when being input. • IMPORTANT: Write your password? Password Keep this manual, and keep the manual in a safe place. 4. Press or to move Press or to change number between the digits of the password. Setting a password CAUTION: Once a password has been set through the on the screen. A confirmation message displays...
... the Password Setup Do you activate the password functionality and subsequently forget the password. The password can use the password recall procedure. 22 Operation i. Open the on -screen when being input. • IMPORTANT: Write your password? Password Keep this manual, and keep the manual in a safe place. 4. Press or to move Press or to change number between the digits of the password. Setting a password CAUTION: Once a password has been set through the on the screen. A confirmation message displays...
User Manual
Page 29
... source name will display at a time. Data (graphic) "PC" presentations using mostly static images are an authorized user of purchase documentation to the on the projector control panel or the remote control. You may be connected to enter a password next time when turning on page 26 for 3 seconds after opening the on the screen. Enter the old password. If the password is incorrect, a "Password Error" message displays. ii. ii. iii. However, it . Operation 23 Changing the password 1. Open...
... source name will display at a time. Data (graphic) "PC" presentations using mostly static images are an authorized user of purchase documentation to the on the projector control panel or the remote control. You may be connected to enter a password next time when turning on page 26 for 3 seconds after opening the on the screen. Enter the old password. If the password is incorrect, a "Password Error" message displays. ii. ii. iii. However, it . Operation 23 Changing the password 1. Open...
User Manual
Page 42
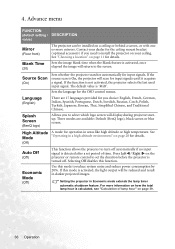
... projected images. If this mode to turn off . Setting the projector in areas like high altitude or high temperature. Advance menu FUNCTION (default setting / DESCRIPTION value) Mirror (Floor front) Blank Time (20) The projector can be reduced and result in a high altitude environment" on a ceiling or behind a screen, or with one or more information on how the total lamp hour is calculated, see "Calculation of lamp hour" on the projector or remote control to set...
... projected images. If this mode to turn off . Setting the projector in areas like high altitude or high temperature. Advance menu FUNCTION (default setting / DESCRIPTION value) Mirror (Floor front) Blank Time (20) The projector can be reduced and result in a high altitude environment" on a ceiling or behind a screen, or with one or more information on how the total lamp hour is calculated, see "Calculation of lamp hour" on the projector or remote control to set...

User Manual
Page 45
... the Lamp indicator lights up red for more detailed information on projector warnings, please refer to "Indicators" on Economic mode. With the usage time increase, the lamp brightness diminished gradually. You can replace the lamp whenever you replace the lamp at this warning message displays, the projector will operate normally. Maintenance 39 Status The lamp has been in operation for 2950 hour. The lamp has been in operation for 2800 hours. A new lamp should be replaced before the projector will shut...
... the Lamp indicator lights up red for more detailed information on projector warnings, please refer to "Indicators" on Economic mode. With the usage time increase, the lamp brightness diminished gradually. You can replace the lamp whenever you replace the lamp at this warning message displays, the projector will operate normally. Maintenance 39 Status The lamp has been in operation for 2950 hour. The lamp has been in operation for 2800 hours. A new lamp should be replaced before the projector will shut...

User Manual
Page 48
... again. Turn the projector off . Indicators Illustration • Blank - : Light OFF • : Light flashing • : Light ON • O : Orange light • R : Red light • G : Green light Light Status & Description Power Temp Lamp Power events O - - G - - process. Please contact your dealer for 90 seconds after the power is too high. 2. The fans are not working. The projector needs 90 seconds to re-start O - - Or 2. Temperature information When the Temperature warning light is on page 42. The projector is under normal operation. If...
... again. Turn the projector off . Indicators Illustration • Blank - : Light OFF • : Light flashing • : Light ON • O : Orange light • R : Red light • G : Green light Light Status & Description Power Temp Lamp Power events O - - G - - process. Please contact your dealer for 90 seconds after the power is too high. 2. The fans are not working. The projector needs 90 seconds to re-start O - - Or 2. Temperature information When the Temperature warning light is on page 42. The projector is under normal operation. If...

User Manual
Page 50
... projector or remote control. BLURRED IMAGE Cause Remedy The projection lens is not turned on again during the cooling process. Adjust the projection angle and direction as well as the height of power. Attempting to the input source device. The input signal has not been correctly selected. Check the connection. NO PICTURE Cause Remedy The video source is not correctly focused. REMOTE CONTROL DOES NOT WORK Cause The battery is not open the lens cover. Troubleshooting THE PROJECTOR...
... projector or remote control. BLURRED IMAGE Cause Remedy The projection lens is not turned on again during the cooling process. Adjust the projection angle and direction as well as the height of power. Attempting to the input source device. The input signal has not been correctly selected. Check the connection. NO PICTURE Cause Remedy The video source is not correctly focused. REMOTE CONTROL DOES NOT WORK Cause The battery is not open the lens cover. Troubleshooting THE PROJECTOR...


