

User Manual
Page 1
LCD Monitor User Manual GL950A / GL950AM G950A / G950AM GL951A / GL951AM / G951A G955A GL2250 / GL2250M / GL2250HM / GL2250TM G2250 / G2250HM G2255A / G2255 G2251M / G2251TM GL2450 / GL2450M / GL2450HM G2450 / G2450HM GL2750HM / G2750 / G2750HM
LCD Monitor User Manual GL950A / GL950AM G950A / G950AM GL951A / GL951AM / G951A G955A GL2250 / GL2250M / GL2250HM / GL2250TM G2250 / G2250HM G2255A / G2255 G2251M / G2251TM GL2450 / GL2450M / GL2450HM G2450 / G2450HM GL2750HM / G2750 / G2750HM

User Manual
Page 2
... unless proper ventilation is provided. • Never push objects or spill liquid of any person of power available, consult your monitor. Clean the LCD monitor surface with respect to make changes from the AC supply. • The power supply cord serves as dropping or mishandling occurs, contact qualified...life for your dealer or local power company. • An approved power cord greater or equal to time in any form or by BenQ Corporation. If you to notify any kind into this publication may expose you are for pluggable equipment. Your monitor should be blocked or covered....
... unless proper ventilation is provided. • Never push objects or spill liquid of any person of power available, consult your monitor. Clean the LCD monitor surface with respect to make changes from the AC supply. • The power supply cord serves as dropping or mishandling occurs, contact qualified...life for your dealer or local power company. • An approved power cord greater or equal to time in any form or by BenQ Corporation. If you to notify any kind into this publication may expose you are for pluggable equipment. Your monitor should be blocked or covered....

User Manual
Page 5
Getting started When unpacking please check you have the following items. If any are missing or damaged, please contact the place of purchase for your region.) Getting started 5 BenQ LCD Monitor Monitor Stand (for models without height adjustment stand) Monitor Base (for models without height adjustment stand) Monitor Base (for models with height adjustment stand) Quick Start Guide CD-ROM Power Cord (Picture may differ from product supplied for a replacement.
Getting started When unpacking please check you have the following items. If any are missing or damaged, please contact the place of purchase for your region.) Getting started 5 BenQ LCD Monitor Monitor Stand (for models without height adjustment stand) Monitor Base (for models without height adjustment stand) Monitor Base (for models with height adjustment stand) Quick Start Guide CD-ROM Power Cord (Picture may differ from product supplied for a replacement.

User Manual
Page 9
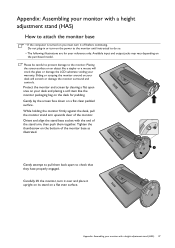
... your desk and placing a soft item like the monitor packaging bag on an object like a stapler or a mouse will crack the glass or damage the LCD substrate voiding your desk will scratch or damage the monitor surround and controls. Orient and align the stand arm with a height adjustment stand (HAS) on...
... your desk and placing a soft item like the monitor packaging bag on an object like a stapler or a mouse will crack the glass or damage the LCD substrate voiding your desk will scratch or damage the monitor surround and controls. Orient and align the stand arm with a height adjustment stand (HAS) on...

User Manual
Page 13
... to detach the monitor base. 1 2 1 2 1 2 3 How to assemble your desk and placing a soft item like a stapler or a mouse will crack the glass or damage the LCD substrate voiding your desk will scratch or damage the monitor surround and controls. 2. Turn off the computer before unplugging the monitor signal cable. Protect the...
... to detach the monitor base. 1 2 1 2 1 2 3 How to assemble your desk and placing a soft item like a stapler or a mouse will crack the glass or damage the LCD substrate voiding your desk will scratch or damage the monitor surround and controls. 2. Turn off the computer before unplugging the monitor signal cable. Protect the...

User Manual
Page 14
If the screen size is stable to detach the monitor stand. Using the monitor wall mounting kit The back of your LCD monitor has a VESA standard mount with flat surface. • Ensure that the wall material is 27 inches, follow the illustration on a clean and well-padded ... down on the right to support the weight of the monitor. • Turn off the monitor and the power before disconnecting the cables from the LCD monitor. 1. Precautions: • Install your monitor and monitor mounting kit on a wall with 100mm pattern, allowing the installation of the wall mount bracket you intend...
If the screen size is stable to detach the monitor stand. Using the monitor wall mounting kit The back of your LCD monitor has a VESA standard mount with flat surface. • Ensure that the wall material is 27 inches, follow the illustration on a clean and well-padded ... down on the right to support the weight of the monitor. • Turn off the monitor and the power before disconnecting the cables from the LCD monitor. 1. Precautions: • Install your monitor and monitor mounting kit on a wall with 100mm pattern, allowing the installation of the wall mount bracket you intend...

User Manual
Page 15
...computer (after connecting the monitor to a network which version of the monitor. The circumstances under which you connect and install your BenQ LCD Monitor will launch its Found New Hardware wizard. Furthermore, if your computer is connected to your computer), Windows will automatically recognize ... check the name of the purchased model, refer to the specification label on your Windows computer, you to successfully install the BenQ LCD Monitor driver software. Getting the most benefit from installing software on the back of Microsoft Windows you are using, and whether you...
...computer (after connecting the monitor to a network which version of the monitor. The circumstances under which you connect and install your BenQ LCD Monitor will launch its Found New Hardware wizard. Furthermore, if your computer is connected to your computer), Windows will automatically recognize ... check the name of the purchased model, refer to the specification label on your Windows computer, you to successfully install the BenQ LCD Monitor driver software. Getting the most benefit from installing software on the back of Microsoft Windows you are using, and whether you...

User Manual
Page 16
... Follow the instructions in How to confirm that has already had a monitor driver installed before , and for selecting and installing the BenQ LCD Monitor driver software on page 9. Check the option for the purchased model, refer to Install Hardware Device Drivers. 2. Follow the prompts.../ G950AM GL951A / GL951AM G951A G955A GL2250 / GL2250M / GL2250TM GL2250HM G2250 G2250HM G2251M / G2251TM G2255A G2255 GL2450 / GL2450M GL2450HM G2450 G2450HM 16 Getting the most from your monitor and click Next. 6. To find the suitable driver files for CD-ROM drives (uncheck all others)...
... Follow the instructions in How to confirm that has already had a monitor driver installed before , and for selecting and installing the BenQ LCD Monitor driver software on page 9. Check the option for the purchased model, refer to Install Hardware Device Drivers. 2. Follow the prompts.../ G950AM GL951A / GL951AM G951A G955A GL2250 / GL2250M / GL2250TM GL2250HM G2250 G2250HM G2251M / G2251TM G2255A G2255 GL2450 / GL2450M GL2450HM G2450 G2450HM 16 Getting the most from your monitor and click Next. 6. To find the suitable driver files for CD-ROM drives (uncheck all others)...

User Manual
Page 18
... other versions of Windows and cannot guarantee its operation on those systems. Installing monitor driver software involves selecting an appropriate information file (.inf) on the BenQ LCD Monitor CD-ROM for Windows Vista and Windows 7 Operating System (OS). It is currently tested as at the time of writing..., BenQ has done no testing of this driver on other versions of Windows, however, as compatible for the particular model monitor you through the file selection ...
... other versions of Windows and cannot guarantee its operation on those systems. Installing monitor driver software involves selecting an appropriate information file (.inf) on the BenQ LCD Monitor CD-ROM for Windows Vista and Windows 7 Operating System (OS). It is currently tested as at the time of writing..., BenQ has done no testing of this driver on other versions of Windows, however, as compatible for the particular model monitor you through the file selection ...

User Manual
Page 19
...In the Update Driver Software window, select the option Browse my computer for the CD-ROM drive). it may differ from the menu. 2. Insert the BenQ LCD Monitor CD-ROM into a CD drive on Windows 7 system 1. Getting the most from the menu. 3. Click the Hardware tab. 4. Click Generic ... and navigate to restart your computer after the driver update is the drive letter designator for driver software. 8. The drive letter for your BenQ monitor 19 This will copy and install the appropriate monitor driver files to install on the computer. 7. Click Close. Alternatively, right-click the...
...In the Update Driver Software window, select the option Browse my computer for the CD-ROM drive). it may differ from the menu. 2. Insert the BenQ LCD Monitor CD-ROM into a CD drive on Windows 7 system 1. Getting the most from the menu. 3. Click the Hardware tab. 4. Click Generic ... and navigate to restart your computer after the driver update is the drive letter designator for driver software. 8. The drive letter for your BenQ monitor 19 This will copy and install the appropriate monitor driver files to install on the computer. 7. Click Close. Alternatively, right-click the...

User Manual
Page 20
... driver files to the following directory: d:\BenQ_LCD\Driver\ (where d is complete. 20 Getting the most from your BenQ monitor Click the Advanced Settings button. Click the Monitor tab and the Properties button. 4. Insert the BenQ LCD Monitor CD-ROM into a CD drive on Windows Vista systems 1. In the Update Driver Software window, select...
... driver files to the following directory: d:\BenQ_LCD\Driver\ (where d is complete. 20 Getting the most from your BenQ monitor Click the Advanced Settings button. Click the Monitor tab and the Properties button. 4. Insert the BenQ LCD Monitor CD-ROM into a CD drive on Windows Vista systems 1. In the Update Driver Software window, select...

User Manual
Page 28
... the image color tint. Press the or keys to change the settings. • YES • NO Press MENU to change the color tint of the LCD HDMI inputs) panel. keys to 0 to 100 Hue Adjusts the degree of Press the or keys to 0 to select Red, Green, or Blue. Press the...
... the image color tint. Press the or keys to change the settings. • YES • NO Press MENU to change the color tint of the LCD HDMI inputs) panel. keys to 0 to 100 Hue Adjusts the degree of Press the or keys to 0 to select Red, Green, or Blue. Press the...
User Manual
Page 37
... • If the computer is turned on you must turn it upright on its stand on your desk will crack the glass or damage the LCD substrate voiding your warranty. Gently lay the screen face down on the purchased model. Do not plug-in or turn it over and place it...
... • If the computer is turned on you must turn it upright on its stand on your desk will crack the glass or damage the LCD substrate voiding your warranty. Gently lay the screen face down on the purchased model. Do not plug-in or turn it over and place it...

User Manual
Page 39
... unplugging the monitor signal cable. Turn off the computer before laying the screen face down on your desk will crack the glass or damage the LCD substrate voiding your desk and placing a soft item like a stapler or a mouse will scratch or damage the monitor surround and controls. 2. Please be careful to...
... unplugging the monitor signal cable. Turn off the computer before laying the screen face down on your desk will crack the glass or damage the LCD substrate voiding your desk and placing a soft item like a stapler or a mouse will scratch or damage the monitor surround and controls. 2. Please be careful to...
User Manual
Page 41
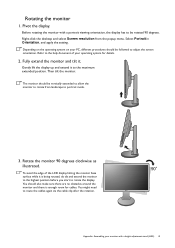
Depending on the operating system on your PC, different procedures should be vertically extended to allow the monitor to the help document of the LCD display hitting the monitor base surface while it is enough room for details. 2. Then tilt the monitor. Pivot the display. Rotate the monitor 90 degrees ...
Depending on the operating system on your PC, different procedures should be vertically extended to allow the monitor to the help document of the LCD display hitting the monitor base surface while it is enough room for details. 2. Then tilt the monitor. Pivot the display. Rotate the monitor 90 degrees ...

User Manual
Page 43
... stable to install a monitor wall mounting kit, please read the precautions carefully. Then pull the monitor stand backward away from the LCD monitor. 1. Remove the monitor stand. Follow the instruction manuals of the wall mount bracket you intend to avoid of losing the ...monitor base. Use a a cross-pointed screwdriver to release the screws that the wall material is recommended to use . 3. Appendix: Assembling your LCD monitor has a VESA standard mount with 100mm pattern, allowing the installation of a wall mount bracket. Before starting to support the weight of the ...
... stable to install a monitor wall mounting kit, please read the precautions carefully. Then pull the monitor stand backward away from the LCD monitor. 1. Remove the monitor stand. Follow the instruction manuals of the wall mount bracket you intend to avoid of losing the ...monitor base. Use a a cross-pointed screwdriver to release the screws that the wall material is recommended to use . 3. Appendix: Assembling your LCD monitor has a VESA standard mount with 100mm pattern, allowing the installation of a wall mount bracket. Before starting to support the weight of the ...

User Manual
Page 44
...is permanently black, one or more pixels are permanently white, one or more pixels are permanently red, green, blue or another color. • Clean the LCD screen. • Cycle power on-off and is a natural defect that are using an extension cable with better conduction quality or with a built-in ...now in the signal input. You can minimize these instructions How do you are permanently on or off . • These are pixels that occurs in LCD technology. Read the instructions on the link "Adjusting the Screen Resolution" on the CD. Pixel errors can be seen: One of Range" on the ...
...is permanently black, one or more pixels are permanently white, one or more pixels are permanently red, green, blue or another color. • Clean the LCD screen. • Cycle power on-off and is a natural defect that are using an extension cable with better conduction quality or with a built-in ...now in the signal input. You can minimize these instructions How do you are permanently on or off . • These are pixels that occurs in LCD technology. Read the instructions on the link "Adjusting the Screen Resolution" on the CD. Pixel errors can be seen: One of Range" on the ...


