

User Manual
Page 3
... 8 Projector exterior view...9 Terminals...10 Controls and functions 11 Positioning your projector 13 Choosing a location ...13 Obtaining a preferred projected image size 14 Mounting the projector 15 Adjusting the projector position 17 Adjusting the projected image 18 Connection ...20 Operation ...21 Starting up the projector 21 Setting up the QS02 HDMI Media Streaming 24 Using the menus ...26 Securing the projector ...27 Switching input signal ...27 Presenting from a Media Reader 28 Connecting the projector to the Internet 29 Upgrading firmware ...30 Shutting...
... 8 Projector exterior view...9 Terminals...10 Controls and functions 11 Positioning your projector 13 Choosing a location ...13 Obtaining a preferred projected image size 14 Mounting the projector 15 Adjusting the projector position 17 Adjusting the projected image 18 Connection ...20 Operation ...21 Starting up the projector 21 Setting up the QS02 HDMI Media Streaming 24 Using the menus ...26 Securing the projector ...27 Switching input signal ...27 Presenting from a Media Reader 28 Connecting the projector to the Internet 29 Upgrading firmware ...30 Shutting...

User Manual
Page 4
... turn off the light source, press the Eco Blank button. 4. rated light source life. 4 Important safety instructions However, to become heated and deformed or even cause a fire. Do not block the projection lens with any ) when the projector lamp is NOT stable. This projector is designed to operate safely within a mains voltage between 100 to meet the latest standards for future reference. 2. Always open the lens...
... turn off the light source, press the Eco Blank button. 4. rated light source life. 4 Important safety instructions However, to become heated and deformed or even cause a fire. Do not block the projection lens with any ) when the projector lamp is NOT stable. This projector is designed to operate safely within a mains voltage between 100 to meet the latest standards for future reference. 2. Always open the lens...

User Manual
Page 10
... HDMI 2 HDCP 2.2 HDMI 1 HDCP 2.2 AUDIO RETURN+ 2.5A USB RS-232 LAN 12V TRIGGER SERVICE 1. See Presenting from a Media Reader on page 28. 4. HDMI input port (Version 2.0) 6. RJ-45 LAN input jack (10/100M) 9. 12V DC output terminal Triggers external devices such as an electric screen or light control, etc. 10 Introduction USB 2.0 Type-A port (MEDIA READER) Connects to a USB flash drive for reading multimedia files. RS-232 control port 8. USB 2.0 Type-A port (2.5 A power supply, Firmware upgrade) 7. Audio output jack 3. HDMI input port...
... HDMI 2 HDCP 2.2 HDMI 1 HDCP 2.2 AUDIO RETURN+ 2.5A USB RS-232 LAN 12V TRIGGER SERVICE 1. See Presenting from a Media Reader on page 28. 4. HDMI input port (Version 2.0) 6. RJ-45 LAN input jack (10/100M) 9. 12V DC output terminal Triggers external devices such as an electric screen or light control, etc. 10 Introduction USB 2.0 Type-A port (MEDIA READER) Connects to a USB flash drive for reading multimedia files. RS-232 control port 8. USB 2.0 Type-A port (2.5 A power supply, Firmware upgrade) 7. Audio output jack 3. HDMI input port...
User Manual
Page 12
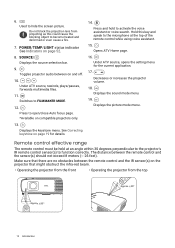
... ATV source, rewinds, plays/pauses, forwards multimedia files. 11. Displays the keystone menu. Opens ATV Home page. 16. Toggles projector audio between the remote control and the IR sensor(s) on page 52. 8. Switches to activate the voice assistant or voice search. Displays the sound mode menu. 19. Remote control effective range The remote control must be held at the top of the remote control while using voice assistant. 15. The distance between the remote control and...
... ATV source, rewinds, plays/pauses, forwards multimedia files. 11. Displays the keystone menu. Opens ATV Home page. 16. Toggles projector audio between the remote control and the IR sensor(s) on page 52. 8. Switches to activate the voice assistant or voice search. Displays the sound mode menu. 19. Remote control effective range The remote control must be held at the top of the remote control while using voice assistant. 15. The distance between the remote control and...
User Manual
Page 13
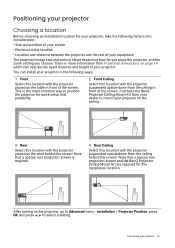
... place the projector, and the zoom setting you choose. Note that a special rear projection screen and the BenQ Projector Ceiling Mount Kit are required for this location with the projector suspended upside-down from the ceiling behind the screen. Positioning your projector. There is more information from your dealer to position the projector for quick setup and portability. 2. Front Ceiling Select this installation location. ECO BLANK OK BACK MENU SOURCE POWER TEMP LIGHT After turning on...
... place the projector, and the zoom setting you choose. Note that a special rear projection screen and the BenQ Projector Ceiling Mount Kit are required for this location with the projector suspended upside-down from the ceiling behind the screen. Positioning your projector. There is more information from your dealer to position the projector for quick setup and portability. 2. Front Ceiling Select this installation location. ECO BLANK OK BACK MENU SOURCE POWER TEMP LIGHT After turning on...

User Manual
Page 21
... the projector lights orange after power has been applied. 2. For more information about 30 seconds. The power indicator flashes green and stays green when the projector is the first time you turn on the projector, the setup wizard appears to guide you have already done this, skip this is on the projector or remote control to the next step. • Use the arrow keys ( / / / ) on the power outlet switch (where fitted). Operation Starting...
... the projector lights orange after power has been applied. 2. For more information about 30 seconds. The power indicator flashes green and stays green when the projector is the first time you turn on the projector, the setup wizard appears to guide you have already done this, skip this is on the projector or remote control to the next step. • Use the arrow keys ( / / / ) on the power outlet switch (where fitted). Operation Starting...
User Manual
Page 26
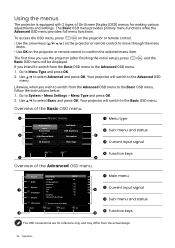
... remote control. • Use the arrow keys ( / / / ) on the projector or remote control to move through the menu items. • Use OK on the projector or remote control to the Basic OSD menu. Picture Picture Mode Fast Mode Off Audio User Management Brightness Display Contrast 1 Color 3 Installation Tint Sharpness System Advanced Color Settings Information Reset Current Picture Mode HDMI-1 Enter Return Exit 2 4 4 Function keys 1 Main menu 2 Current input signal 3 Sub-menu and status 4 Function keys The OSD screenshots are for making various adjustments...
... remote control. • Use the arrow keys ( / / / ) on the projector or remote control to move through the menu items. • Use OK on the projector or remote control to the Basic OSD menu. Picture Picture Mode Fast Mode Off Audio User Management Brightness Display Contrast 1 Color 3 Installation Tint Sharpness System Advanced Color Settings Information Reset Current Picture Mode HDMI-1 Enter Return Exit 2 4 4 Function keys 1 Main menu 2 Current input signal 3 Sub-menu and status 4 Function keys The OSD screenshots are for making various adjustments...
User Manual
Page 30
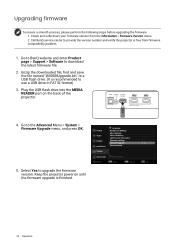
...> Firmware Version menu. 2. Picture Audio Display Installation System Language Background Settings Menu Settings Color Calibration Light Source Information Operation Settings Firmware Upgrade Factory Default Information Reset System HDMI-1 Enter Return Exit 5. Go to download the latest firmware file. 2. Check and write down your firmware version from firmware compatibility problem. 1. SPDIF AUDIO MEDIA OUT READER HDMI 2 HDCP 2.2 HDMI 1 HDCP 2.2 AUDIO RETURN+ 4. Keep the projector power on the back of the projector. Go to BenQ website and enter Product page > Support...
...> Firmware Version menu. 2. Picture Audio Display Installation System Language Background Settings Menu Settings Color Calibration Light Source Information Operation Settings Firmware Upgrade Factory Default Information Reset System HDMI-1 Enter Return Exit 5. Go to download the latest firmware file. 2. Check and write down your firmware version from firmware compatibility problem. 1. SPDIF AUDIO MEDIA OUT READER HDMI 2 HDCP 2.2 HDMI 1 HDCP 2.2 AUDIO RETURN+ 4. Keep the projector power on the back of the projector. Go to BenQ website and enter Product page > Support...
User Manual
Page 32
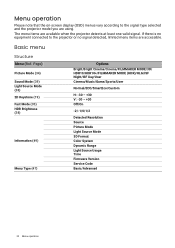
... no equipment connected to the signal type selected and the projector model you are using. Basic menu Structure Menu (Ref. Menu operation Please note that the on-screen display (OSD) menus vary according to the projector or no signal detected, limited menu items are accessible. The menu items are available when the projector detects at least one valid signal. Page) Picture Mode (34) Sound Mode (39) Light Source Mode (38) 2D Keystone (19) Fast Mode (35...
... no equipment connected to the signal type selected and the projector model you are using. Basic menu Structure Menu (Ref. Menu operation Please note that the on-screen display (OSD) menus vary according to the projector or no signal detected, limited menu items are accessible. The menu items are available when the projector detects at least one valid signal. Page) Picture Mode (34) Sound Mode (39) Light Source Mode (38) 2D Keystone (19) Fast Mode (35...
User Manual
Page 36
...: Adjusts the brightness levels of 0~100 for viewing movies which makes the image unrealistic. Color Temperature Tuning Used for white. • Cool: Makes images appear bluish white. • Warm: Makes images appear reddish white. If the setting is too high, colors on the image will be changed. • Native: With the light source's original color temperature and higher brightness, this setting is suitable for environments where high brightness is selected for Picture Mode, the color temperature switches...
...: Adjusts the brightness levels of 0~100 for viewing movies which makes the image unrealistic. Color Temperature Tuning Used for white. • Cool: Makes images appear bluish white. • Warm: Makes images appear reddish white. If the setting is too high, colors on the image will be changed. • Native: With the light source's original color temperature and higher brightness, this setting is suitable for environments where high brightness is selected for Picture Mode, the color temperature switches...

User Manual
Page 37
... projected picture will be affected. Every adjustment made will reflect to the image source. If the saturation is too high, that color from among Red (R), Green (G), Blue (B), Cyan (C), Magenta (M), or Yellow (Y), and press OK. Lower settings produce less saturated colors; RED Yellow GREEN Magenta Cyan BLUE • Saturation: Adjusts the values to be overpowering and unrealistic. • Wide Color Gamut Color Gamut refers to the image immediately. a setting of "0" removes that color will be adjusted. Menu operation...
... projected picture will be affected. Every adjustment made will reflect to the image source. If the saturation is too high, that color from among Red (R), Green (G), Blue (B), Cyan (C), Magenta (M), or Yellow (Y), and press OK. Lower settings produce less saturated colors; RED Yellow GREEN Magenta Cyan BLUE • Saturation: Adjusts the values to be overpowering and unrealistic. • Wide Color Gamut Color Gamut refers to the image immediately. a setting of "0" removes that color will be adjusted. Menu operation...
User Manual
Page 38
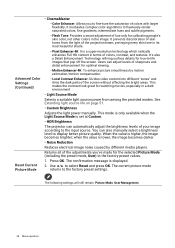
...; Light Source Mode Selects a suitable light source power from the light of sharpness and detail enhancement for optimal viewing. • Motion Enhancer 4K: To enhance picture smoothness by different media players. The current picture mode returns to the input source. Advanced Color Settings (Continued) Reset Current Picture Mode • CinemaMaster • Color Enhancer: Allows you 've made for the selected Picture Mode (including the preset mode, User) to -life images that pop off the screen. Use / to...
...; Light Source Mode Selects a suitable light source power from the light of sharpness and detail enhancement for optimal viewing. • Motion Enhancer 4K: To enhance picture smoothness by different media players. The current picture mode returns to the input source. Advanced Color Settings (Continued) Reset Current Picture Mode • CinemaMaster • Color Enhancer: Allows you 've made for the selected Picture Mode (including the preset mode, User) to -life images that pop off the screen. Use / to...
User Manual
Page 42
... or discomfort. • Keep a distance from the screen of about three times the effective height of the screen. • Children and people with 3D glasses. • The 4K source will not notice any color bias when watching 3D contents with a history of the projected image decreases. • The Picture Mode cannot be displayed. • 3D Mode The default setting is Auto and the projector automatically chooses an...
... or discomfort. • Keep a distance from the screen of about three times the effective height of the screen. • Children and people with 3D glasses. • The 4K source will not notice any color bias when watching 3D contents with a history of the projected image decreases. • The Picture Mode cannot be displayed. • 3D Mode The default setting is Auto and the projector automatically chooses an...
User Manual
Page 43
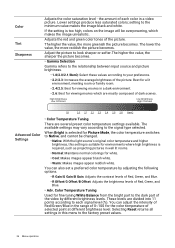
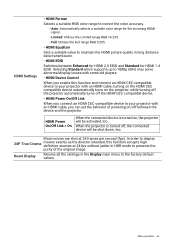
... in long distance data transmission. • HDMI EDID Switches between the device and the projector. Menu operation 43 Selecting Standard which supports up to your projector with some old players. • HDMI Device Control When you can set the behavior of the original image. HDMI Settings • HDMI Format Selects a suitable RGB color range to correct the color accuracy. • Auto: Automatically selects a suitable color range for the incoming HDMI signal. •...
... in long distance data transmission. • HDMI EDID Switches between the device and the projector. Menu operation 43 Selecting Standard which supports up to your projector with some old players. • HDMI Device Control When you can set the behavior of the original image. HDMI Settings • HDMI Format Selects a suitable RGB color range to correct the color accuracy. • Auto: Automatically selects a suitable color range for the incoming HDMI signal. •...
User Manual
Page 45
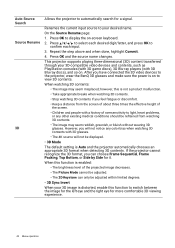
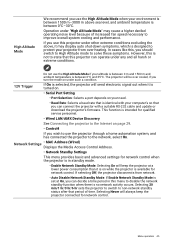
... projector with a suitable RS-232 cable and update or download the projector's firmware. Operation under "High Altitude Mode" may display auto shut-down symptoms, which is designed to the network, select On. The projector will be over -heating. Selecting 20 min/1 hr/3 hr/6 hr sets the projector to switch to non-network standby status after that this projector can decide a time period in standby mode. • Enable Network Standby Mode: Selecting On will keep the projector connected for network control when the projector...
... projector with a suitable RS-232 cable and update or download the projector's firmware. Operation under "High Altitude Mode" may display auto shut-down symptoms, which is designed to the network, select On. The projector will be over -heating. Selecting 20 min/1 hr/3 hr/6 hr sets the projector to switch to non-network standby status after that this projector can decide a time period in standby mode. • Enable Network Standby Mode: Selecting On will keep the projector connected for network control when the projector...
User Manual
Page 47
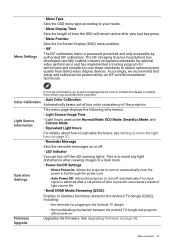
...; Menu Display Time Sets the length of light source life. • BenQ HDMI Media Streaming (QS02): Enables or disables functions related to turn on page 30. See Upgrading firmware on automatically once the power is password protected and only accessible by an ISF certified installation technician. Accordingly, we recommend that setup and calibration be performed by authorized ISF calibrators. This is to avoid any light disturbance when viewing images...
...; Menu Display Time Sets the length of light source life. • BenQ HDMI Media Streaming (QS02): Enables or disables functions related to turn on page 30. See Upgrading firmware on automatically once the power is password protected and only accessible by an ISF certified installation technician. Accordingly, we recommend that setup and calibration be performed by authorized ISF calibrators. This is to avoid any light disturbance when viewing images...

User Manual
Page 51
...fan noise. Picture > Advanced Color Settings > Light Source Mode and press / to select a suitable light source power from among X, Y, Z, A. Lowers brightness to Advanced Menu - Light Source Mode Descriptions Normal ECO Provides full light brightness. Maintenance 51 Light Usage Time = (x+y+z+a) hours, if Time used in Normal mode = x hours Time used in ECO mode = y hours Time used in SmartEco mode = z hours Time used in each light source mode in "Minutes" then rounds down to an integer in OSD. To obtain the light source information: Go to Advanced Menu - Setting the projector...
...fan noise. Picture > Advanced Color Settings > Light Source Mode and press / to select a suitable light source power from among X, Y, Z, A. Lowers brightness to Advanced Menu - Light Source Mode Descriptions Normal ECO Provides full light brightness. Maintenance 51 Light Usage Time = (x+y+z+a) hours, if Time used in Normal mode = x hours Time used in ECO mode = y hours Time used in SmartEco mode = z hours Time used in each light source mode in "Minutes" then rounds down to an integer in OSD. To obtain the light source information: Go to Advanced Menu - Setting the projector...

User Manual
Page 52
... the desired speed) Temperature 1 error (over limited temperature) : Orange On : Green On : Red On : Off : Orange Flashing : Green Flashing : Red Flashing 52 Maintenance System > Operation Settings > Power On/Off Settings > Auto Power Off, and press / to set period of time to prevent unnecessary waste of light source life. The light source (LED) can last around 20,000-30,000 hours and no input signal is detected after a set a period of the projector mostly. To set Auto Power Off, go to be changed during the lifetime...
... the desired speed) Temperature 1 error (over limited temperature) : Orange On : Green On : Red On : Off : Orange Flashing : Green Flashing : Red Flashing 52 Maintenance System > Operation Settings > Power On/Off Settings > Auto Power Off, and press / to set period of time to prevent unnecessary waste of light source life. The light source (LED) can last around 20,000-30,000 hours and no input signal is detected after a set a period of the projector mostly. To set Auto Power Off, go to be changed during the lifetime...
User Manual
Page 53
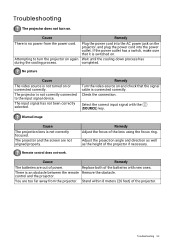
... Turn the video source on . Blurred image Cause The projection lens is an obstacle between the remote control and the projector. Remote control does not work. There is not correctly focused. Troubleshooting 53 Remove the obstacle. Remedy Plug the power cord into the power outlet. If the power outlet has a switch, make sure that the signal cable is switched on and check that it is connected correctly. Cause The batteries are not aligned properly. No picture...
... Turn the video source on . Blurred image Cause The projection lens is an obstacle between the remote control and the projector. Remote control does not work. There is not correctly focused. Troubleshooting 53 Remove the obstacle. Remedy Plug the power cord into the power outlet. If the power outlet has a switch, make sure that the signal cable is switched on and check that it is connected correctly. Cause The batteries are not aligned properly. No picture...
User Manual
Page 54
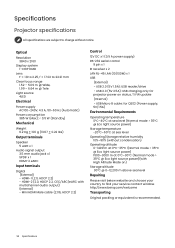
... Display system 1-CHIP DMD Lens F = 1.8 to 2.25, f = 17.02 to change without condensation) Operating altitude 0-1499 m at 0°C-35°C (Normal mode > 35°C @ Eco light source power) 1500-3000 m at 0°C-30°C (Normal mode > 35°C @ Eco light source power)(with multichannel audio output) (Internal) - Mini HDMI Male cable (2.0b, HDCP 2.2) Control 12V DC x 1 (0.5 A power supply) RS-232 serial control 9 pin x 1 IR receiver x 2 LAN RJ-45 LAN (10/100M) x 1 USB (External) - http://www.benq...
... Display system 1-CHIP DMD Lens F = 1.8 to 2.25, f = 17.02 to change without condensation) Operating altitude 0-1499 m at 0°C-35°C (Normal mode > 35°C @ Eco light source power) 1500-3000 m at 0°C-30°C (Normal mode > 35°C @ Eco light source power)(with multichannel audio output) (Internal) - Mini HDMI Male cable (2.0b, HDCP 2.2) Control 12V DC x 1 (0.5 A power supply) RS-232 serial control 9 pin x 1 IR receiver x 2 LAN RJ-45 LAN (10/100M) x 1 USB (External) - http://www.benq...


