

- PRJ Networking Operation Guide
Page 18
.... The Mail page allows you to this function: 18 Controlling the projector remotely through the Projector Network Display System. You can first try the Mail Test function to prevent unauthorized people from maliciously changing the projector settings through a web browser You can also use the OSD menu to your computer is...
.... The Mail page allows you to this function: 18 Controlling the projector remotely through the Projector Network Display System. You can first try the Mail Test function to prevent unauthorized people from maliciously changing the projector settings through a web browser You can also use the OSD menu to your computer is...

LX60ST and LW61ST User Manual
Page 3
... remove the lens cap (if any objects when the projector is under operation as this manual before 5. Important safety instructions Your projector is designed and tested to 240 volts AC, but could cause the objects to qualified service personnel. 6. Save it for safety of this product, it is NOT stable. you...
... remove the lens cap (if any objects when the projector is under operation as this manual before 5. Important safety instructions Your projector is designed and tested to 240 volts AC, but could cause the objects to qualified service personnel. 6. Save it for safety of this product, it is NOT stable. you...

LX60ST and LW61ST User Manual
Page 11
... Used to previous OSD menu, exits and saves menu settings. 4. MODE/ENTER Selects an available picture setup mode. FREEZE Freezes the projected image. 10. TEST Displays the test pattern. 12. NETWORK Searches the network signal and project it within a few seconds once available. 14. Right Increases the projected image brightness. Goes back...
... Used to previous OSD menu, exits and saves menu settings. 4. MODE/ENTER Selects an available picture setup mode. FREEZE Freezes the projected image. 10. TEST Displays the test pattern. 12. NETWORK Searches the network signal and project it within a few seconds once available. 14. Right Increases the projected image brightness. Goes back...

LX60ST and LW61ST User Manual
Page 16
Looking across this projector's optical characteristics. BenQ recommends that it , so as to make allowance for this row shows that a 150'' (about 3.8 m) screen is 81 mm. LW61ST Screen size Screen Center of .... If your projector This will help you determine the exact mounting position so that if you intend to permanently install the projector, you should physically test the projection size and distance using a 120-inch screen, the recommended projection distance is 1263 mm and the vertical offset is required.
Looking across this projector's optical characteristics. BenQ recommends that it , so as to make allowance for this row shows that a 150'' (about 3.8 m) screen is 81 mm. LW61ST Screen size Screen Center of .... If your projector This will help you determine the exact mounting position so that if you intend to permanently install the projector, you should physically test the projection size and distance using a 120-inch screen, the recommended projection distance is 1263 mm and the vertical offset is required.
LX60ST and LW61ST User Manual
Page 32
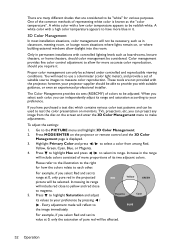
... settings: 1. Press to highlight Saturation and adjust its range. A white color with a high color temperature appears to have purchased a test disc which contains various color test patterns and can be used to test the color presentation on , or where building external windows allow for various purposes. Press MODE/ENTER on the screen and...
... settings: 1. Press to highlight Saturation and adjust its range. A white color with a high color temperature appears to have purchased a test disc which contains various color test patterns and can be used to test the color presentation on , or where building external windows allow for various purposes. Press MODE/ENTER on the screen and...
LX60ST and LW61ST User Manual
Page 41
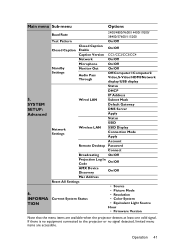
... the projector detects at least one valid signal. Main menu Sub-menu Options 5. INFORMA TION Baud Rate 2400/4800/9600/14400/19200/ 38400/57600/115200 Test Pattern On/Off Closed Caption Closed Caption Enable On/Off Caption Version CC1/CC2/CC3/CC4 Network On/Off Microphone On/Off Standby Settings Monitor...
... the projector detects at least one valid signal. Main menu Sub-menu Options 5. INFORMA TION Baud Rate 2400/4800/9600/14400/19200/ 38400/57600/115200 Test Pattern On/Off Closed Caption Closed Caption Enable On/Off Caption Version CC1/CC2/CC3/CC4 Network On/Off Microphone On/Off Standby Settings Monitor...

LX60ST and LW61ST User Manual
Page 46
...image is in standby mode and the COMPUTER 1 jack is correctly connected. Selecting On enables the function and the projector displays the grid test pattern. To view captions, select CC1, CC2, CC3, or CC4 (CC1 displays captions in the primary language in TV listings). See ...'s firmware. 5. Network Selecting On enables the function. Monitor Out Selecting On enables the function. SYSTEM SETUP: Advanced menu Function Description Baud Rate Test Pattern Selects a baud rate that is identical with your area). Press / to choose the source that you wish to devices. See "Connection"...
...image is in standby mode and the COMPUTER 1 jack is correctly connected. Selecting On enables the function and the projector displays the grid test pattern. To view captions, select CC1, CC2, CC3, or CC4 (CC1 displays captions in the primary language in TV listings). See ...'s firmware. 5. Network Selecting On enables the function. Monitor Out Selecting On enables the function. SYSTEM SETUP: Advanced menu Function Description Baud Rate Test Pattern Selects a baud rate that is identical with your area). Press / to choose the source that you wish to devices. See "Connection"...
LX60ST and LW61ST User Manual
Page 56
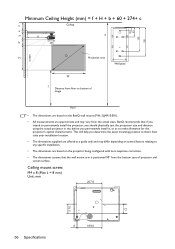
BenQ recommends that if you intend to permanently install the projector, you should physically test the projection size and distance using the actual projector in situ before you determine the exact mounting position so that the wall mount .... • The dimensions supplied are approximate and may differ depending on several factors relating to any specific installation. • The dimensions are based on the BenQ wall mount (P/N: 5J.J4R10.001). • All measurements are offered as to make allowance for this projector's optical characteristics. Ceiling mount screw: M4 x 8 (Max L =...
BenQ recommends that if you intend to permanently install the projector, you should physically test the projection size and distance using the actual projector in situ before you determine the exact mounting position so that the wall mount .... • The dimensions supplied are approximate and may differ depending on several factors relating to any specific installation. • The dimensions are based on the BenQ wall mount (P/N: 5J.J4R10.001). • All measurements are offered as to make allowance for this projector's optical characteristics. Ceiling mount screw: M4 x 8 (Max L =...