

User Manual
Page 2
... contents Using the teaching templates 34 Shutting down the projector 35 Direct power off 35 Menu operation 36 Maintenance 46 Care of the projector 46 Lamp information 47 Troubleshooting 53 Specifications 54 Projector specifications 54 Dimensions 55 Ceiling mount installation 55 Timing chart 56 Warranty and Copyright information 60
... contents Using the teaching templates 34 Shutting down the projector 35 Direct power off 35 Menu operation 36 Maintenance 46 Care of the projector 46 Lamp information 47 Troubleshooting 53 Specifications 54 Projector specifications 54 Dimensions 55 Ceiling mount installation 55 Timing chart 56 Warranty and Copyright information 60
User Manual
Page 3
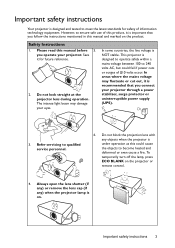
...where the mains voltage may damage your projector through a power stabilizer, surge protector or uninterruptible power supply (UPS). 3. To temporarily turn off the lamp, press ECO BLANK on the product. Please read this could fail if power cuts or surges of ±10 volts occur. However, to ensure ... some countries, the line voltage is under operation as this manual before 5. Do not block the projection lens with any ) when the projector lamp is designed to operate safely within a mains voltage between 100 to 240 volts AC, but could cause the objects to become heated and deformed ...
...where the mains voltage may damage your projector through a power stabilizer, surge protector or uninterruptible power supply (UPS). 3. To temporarily turn off the lamp, press ECO BLANK on the product. Please read this could fail if power cuts or surges of ±10 volts occur. However, to ensure ... some countries, the line voltage is under operation as this manual before 5. Do not block the projection lens with any ) when the projector lamp is designed to operate safely within a mains voltage between 100 to 240 volts AC, but could cause the objects to become heated and deformed ...
User Manual
Page 4
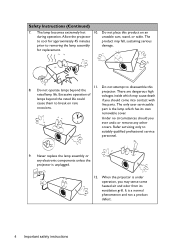
...any electronic components unless the projector is unplugged. 12. The only user serviceable occasions. The to removing the lamp assembly damage. Do not operate lamps beyond the rated life could if you should you may fall, sustaining serious prior to cool for replacement.... 11. There are dangerous high rated lamp life. Do not attempt to suitably qualified professional service personnel. 9. part is the lamp which may cause death lamps beyond the projector. Never replace the lamp assembly or any other covers. When the projector is ...
...any electronic components unless the projector is unplugged. 12. The only user serviceable occasions. The to removing the lamp assembly damage. Do not operate lamps beyond the rated life could if you should you may fall, sustaining serious prior to cool for replacement.... 11. There are dangerous high rated lamp life. Do not attempt to suitably qualified professional service personnel. 9. part is the lamp which may cause death lamps beyond the projector. Never replace the lamp assembly or any other covers. When the projector is ...
User Manual
Page 5
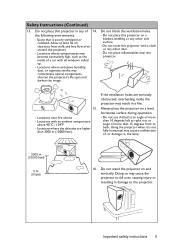
... confined. Space that is not fully horizontal may result in a fire. Locations where excessive humidity, dust, or cigarette smoke may cause the projector to , the lamp. 3000 m (10000 feet) 0 m (0 feet) 16. Locations near the projector. 15. - Doing so may contaminate optical components, shorten the projector's life span and darken the image...
... confined. Space that is not fully horizontal may result in a fire. Locations where excessive humidity, dust, or cigarette smoke may cause the projector to , the lamp. 3000 m (10000 feet) 0 m (0 feet) 16. Locations near the projector. 15. - Doing so may contaminate optical components, shorten the projector's life span and darken the image...
User Manual
Page 6
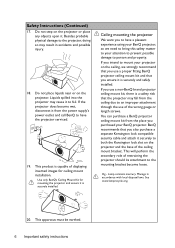
... We want you intend to the mounting bracket become wet, disconnect it from the ceiling due to fail. You can purchase a BenQ projector ceiling mount kit from the place you ensure it is capable of restraining the projector should its attachment to mount your projector on...lock compatible security cable and attach it to an improper attachment through the use a proper fitting BenQ projector ceiling mount kit and that you use of the ceiling mount bracket. Lamp contains mercury. This will perform the secondary role of displaying inverted images for mounting the projector and...
... We want you intend to the mounting bracket become wet, disconnect it from the ceiling due to fail. You can purchase a BenQ projector ceiling mount kit from the place you ensure it is capable of restraining the projector should its attachment to mount your projector on...lock compatible security cable and attach it to an improper attachment through the use a proper fitting BenQ projector ceiling mount kit and that you use of the ceiling mount bracket. Lamp contains mercury. This will perform the secondary role of displaying inverted images for mounting the projector and...
User Manual
Page 7
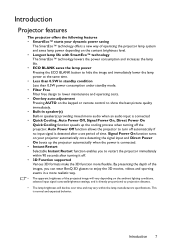
By presenting the depth of the images, you can wear BenQ 3D glasses to enjoy the 3D movies, videos and sporting events ... • Instant Restart Selectable Instant Restart function enables you to restart the projector immediately within the lamp manufacturers specifications. Auto Power Off function allows the projector to turn off the projector. This is directly proportional ...to projection distance. • The lamp brightness will decline over time and may vary within 90 seconds after a set period of time. Introduction...
By presenting the depth of the images, you can wear BenQ 3D glasses to enjoy the 3D movies, videos and sporting events ... • Instant Restart Selectable Instant Restart function enables you to restart the projector immediately within the lamp manufacturers specifications. Auto Power Off function allows the projector to turn off the projector. This is directly proportional ...to projection distance. • The lamp brightness will decline over time and may vary within 90 seconds after a set period of time. Introduction...
User Manual
Page 8
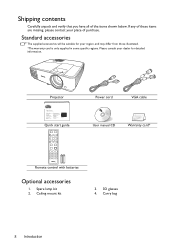
...Hızlı başlangıç kılavuzu Průvodce rychlým používáním BenQ.com Quick start guide Power cord VGA cable User manual CD Warranty card* Remote control with batteries Optional accessories 1. Please consult your... region, and may differ from those illustrated. *The warranty card is only supplied in some specific regions. Spare lamp kit 2. Carry bag 8 Introduction Standard accessories The supplied accessories will be suitable for your dealer for detailed information. Ceiling mount kit 3....
...Hızlı başlangıç kılavuzu Průvodce rychlým používáním BenQ.com Quick start guide Power cord VGA cable User manual CD Warranty card* Remote control with batteries Optional accessories 1. Please consult your... region, and may differ from those illustrated. *The warranty card is only supplied in some specific regions. Spare lamp kit 2. Carry bag 8 Introduction Standard accessories The supplied accessories will be suitable for your dealer for detailed information. Ceiling mount kit 3....
User Manual
Page 10
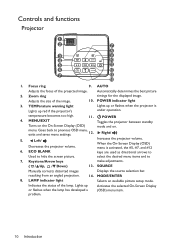
... distorted images Displays the source selection bar. TEMPerature warning light Lights up or flashes when the lamp has developed a problem. POWER 4. menu is under operation. LAMP indicator light Selects an available picture setup mode. Zoom ring timings for the displayed image. temperature...1 2 7 8 3 9 4 10 5 11 6 12 7 13 14 1. Automatically determines the best picture 2. Adjusts the size of the lamp. Indicates the status of the image. 3. AUTO Adjusts the focus of the projected image. POWER indicator light Lights up or flashes when the projector ...
... distorted images Displays the source selection bar. TEMPerature warning light Lights up or flashes when the lamp has developed a problem. POWER 4. menu is under operation. LAMP indicator light Selects an available picture setup mode. Zoom ring timings for the displayed image. temperature...1 2 7 8 3 9 4 10 5 11 6 12 7 13 14 1. Automatically determines the best picture 2. Adjusts the size of the lamp. Indicates the status of the image. 3. AUTO Adjusts the focus of the projected image. POWER indicator light Lights up or flashes when the projector ...
User Manual
Page 11
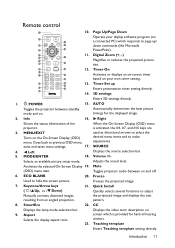
... is activated, the #4, #7, and #16 keys are 3. Remote control 1 10. Keystone/Arrow keys 21. the projected image and displays the test pattern. 8. CC Displays the lamp mode selection bar. 9. Introduction 11 Timer Set up / down commands (like Microsoft 4 16 PowerPoint). 5 11. Info 16. is provided for the displayed image. 2. SOURCE 4. Left...
... is activated, the #4, #7, and #16 keys are 3. Remote control 1 10. Keystone/Arrow keys 21. the projected image and displays the test pattern. 8. CC Displays the lamp mode selection bar. 9. Introduction 11 Timer Set up / down commands (like Microsoft 4 16 PowerPoint). 5 11. Info 16. is provided for the displayed image. 2. SOURCE 4. Left...
User Manual
Page 18
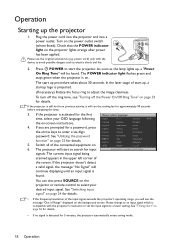
... on page 56 for details. • If no signal is detected for details. 5. Press POWER to avoid possible dangers such as the lamp lights up procedure takes about 30 seconds. The POWER indicator light flashes green and stays green when the projector is still hot from previous activity...ring to enter a six-digit password. To turn off the Power On/Off Ring Tone" on page 24 for approximately 90 seconds before energizing the lamp. 3. Please use the original accessories (e.g. The projector will see "Turning off the ring tone, see the message "Out of start to select ...
... on page 56 for details. • If no signal is detected for details. 5. Press POWER to avoid possible dangers such as the lamp lights up procedure takes about 30 seconds. The POWER indicator light flashes green and stays green when the projector is still hot from previous activity...ring to enter a six-digit password. To turn off the Power On/Off Ring Tone" on page 24 for approximately 90 seconds before energizing the lamp. 3. Please use the original accessories (e.g. The projector will see "Turning off the ring tone, see the message "Out of start to select ...
User Manual
Page 19
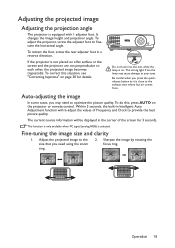
... projector are not perpendicular to optimize the picture quality. Sharpen the image by rotating the focus ring. Do not look into the lens while the lamp is equipped with 1 adjuster foot. Auto-adjusting the image In some cases, you need to each other, the projected image becomes trapezoidal. The ... keystone" on page 20 for 3 seconds. To adjust the projector, screw the adjuster foot to the exhaust vent where hot air comes from the lamp may need using the zoom ring. 2. To retract the foot, screw the rear adjuster foot in the corner of Frequency and Clock to your eyes...
... projector are not perpendicular to optimize the picture quality. Sharpen the image by rotating the focus ring. Do not look into the lens while the lamp is equipped with 1 adjuster foot. Auto-adjusting the image In some cases, you need to each other, the projected image becomes trapezoidal. The ... keystone" on page 20 for 3 seconds. To adjust the projector, screw the adjuster foot to the exhaust vent where hot air comes from the lamp may need using the zoom ring. 2. To retract the foot, screw the rear adjuster foot in the corner of Frequency and Clock to your eyes...
User Manual
Page 35
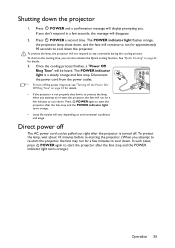
... re-start the projector after the fans stop and the POWER indicator light turns orange.) Operation 35 The POWER indicator light flashes orange, the projection lamp shuts down . Press POWER again to start the projector, the fans may run for approximately 90 seconds to cool down , to protect the... lamp, when you attempt to any commands during the cooling process. In such cases, press POWER again to cool down the projector 1. Shutting down . To shorten ...
... re-start the projector after the fans stop and the POWER indicator light turns orange.) Operation 35 The POWER indicator light flashes orange, the projection lamp shuts down . Press POWER again to start the projector, the fans may run for approximately 90 seconds to cool down , to protect the... lamp, when you attempt to any commands during the cooling process. In such cases, press POWER again to cool down the projector 1. Shutting down . To shorten ...
User Manual
Page 38
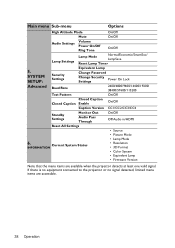
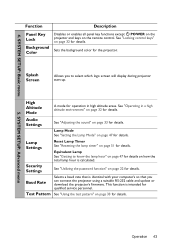
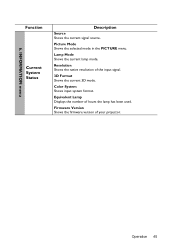
... available when the projector detects at least one valid signal. Current System Status INFORMATION • Lamp Mode • Resolution • 3D Format • Color System • Equivalent Lamp • Firmware Version Note that the menu items are accessible. 38 Operation Main menu Sub-menu... Options High Altitude Mode On/Off Mute On/Off Audio Settings Volume Power On/Off Ring Tone On/Off Lamp Settings Lamp Mode Normal/Economic/SmartEco/...
... available when the projector detects at least one valid signal. Current System Status INFORMATION • Lamp Mode • Resolution • 3D Format • Color System • Equivalent Lamp • Firmware Version Note that the menu items are accessible. 38 Operation Main menu Sub-menu... Options High Altitude Mode On/Off Mute On/Off Audio Settings Volume Power On/Off Ring Tone On/Off Lamp Settings Lamp Mode Normal/Economic/SmartEco/...
User Manual
Page 43
... Altitude Mode A mode for operation in a high altitude environment" on page 32 for details on how the total lamp hour is calculated. Lamp Mode See "Setting the Lamp Mode" on page 47 for details. This function is identical with your computer's so that is intended for details.... the projector's firmware. See "Utilizing the password function" on page 33 for details. 4. Sets the background color for details. Equivalent Lamp See "Getting to select which logo screen will display during projector start-up. Baud Rate Test Pattern Selects a baud rate that you ...
... Altitude Mode A mode for operation in a high altitude environment" on page 32 for details on how the total lamp hour is calculated. Lamp Mode See "Setting the Lamp Mode" on page 47 for details. This function is identical with your computer's so that is intended for details.... the projector's firmware. See "Utilizing the password function" on page 33 for details. 4. Sets the background color for details. Equivalent Lamp See "Getting to select which logo screen will display during projector start-up. Baud Rate Test Pattern Selects a baud rate that you ...
User Manual
Page 45
Picture Mode Shows the selected mode in the PICTURE menu. Equivalent Lamp Displays the number of the input signal. 3D Format Shows the current 3D mode. Lamp Mode Shows the current lamp mode. Resolution Shows the native resolution of hours the lamp has been used. Color System Shows input system format. Firmware Version Shows the firmware version of your projector. INFORMATION menu Function Current System Status Description Source Shows the current signal source. 6. Operation 45
Picture Mode Shows the selected mode in the PICTURE menu. Equivalent Lamp Displays the number of the input signal. 3D Format Shows the current 3D mode. Lamp Mode Shows the current lamp mode. Resolution Shows the native resolution of hours the lamp has been used. Color System Shows input system format. Firmware Version Shows the firmware version of your projector. INFORMATION menu Function Current System Status Description Source Shows the current signal source. 6. Operation 45
User Manual
Page 47
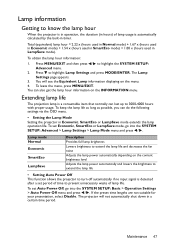
... mode) + 1.54 x (hours used in SmartEco mode) + 1.00 x (hours used in a certain time period. Press MENU/EXIT and then press / to highlight Lamp Settings and press MODE/ENTER. You will not automatically shut down in LampSave mode). To set Auto Power Off, go into the SYSTEM SETUP: Basic... > Operation Settings > Auto Power Off menu and press / . The Lamp Settings page appears. 3. If the preset time lengths are not suitable for your presentation, select Disable. The projector will see the Equivalent...
... mode) + 1.54 x (hours used in SmartEco mode) + 1.00 x (hours used in a certain time period. Press MENU/EXIT and then press / to highlight Lamp Settings and press MODE/ENTER. You will not automatically shut down in LampSave mode). To set Auto Power Off, go into the SYSTEM SETUP: Basic... > Operation Settings > Auto Power Off menu and press / . The Lamp Settings page appears. 3. If the preset time lengths are not suitable for your presentation, select Disable. The projector will see the Equivalent...
User Manual
Page 48
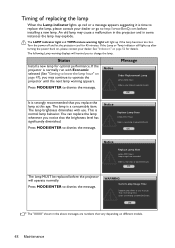
... you notice that vary depending on page 47), you may explode. Notice Replace Lamp Soon Lamp>XXXX Hours Order a new lamp at www.BenQ.com OK Notice Replace Lamp Now Lamp>XXXX Hours Lamp usage time exceeded Order a new lamp at this age. Turn the power off and let the projector cool for optimal performance. Status Install a new...
... you notice that vary depending on page 47), you may explode. Notice Replace Lamp Soon Lamp>XXXX Hours Order a new lamp at www.BenQ.com OK Notice Replace Lamp Now Lamp>XXXX Hours Lamp usage time exceeded Order a new lamp at this age. Turn the power off and let the projector cool for optimal performance. Status Install a new...
User Manual
Page 49
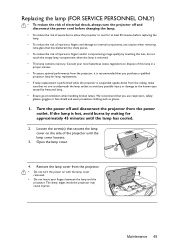
...sharp edges inside the projector may cause injuries. Loosen the screw(s) that secures the lamp cover on with the lamp cover removed. • Do not insert your local hazardous waste regulations to dispose of this lamp in a proper manner. • To assure optimal performance from the projector, it...face shield and wear protective clothing such as gloves. 1. If the lamp is hot, avoid burns by touching the lens, do not touch the empty lamp compartment when the lamp is removed. • This lamp contains mercury. Replacing the lamp (FOR SERVICE PERSONNEL ONLY) • To reduce the risk of ...
...sharp edges inside the projector may cause injuries. Loosen the screw(s) that secures the lamp cover on with the lamp cover removed. • Do not insert your local hazardous waste regulations to dispose of this lamp in a proper manner. • To assure optimal performance from the projector, it...face shield and wear protective clothing such as gloves. 1. If the lamp is hot, avoid burns by touching the lens, do not touch the empty lamp compartment when the lamp is removed. • This lamp contains mercury. Replacing the lamp (FOR SERVICE PERSONNEL ONLY) • To reduce the risk of ...
User Manual
Page 50
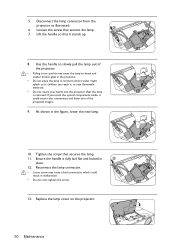
... on it, children can reach it, or near flammable materials. • Do not insert your hands into the projector after the lamp is fully laid flat and locked in 3 place. 1 12. Tighten the screw that it too quickly may cause a bad connection, which could result in the... figure, lower the new lamp. 10. Lift the handle so that secures the lamp. 11. Loosen the screw that secures the lamp. 2 7. If you touch the optical components inside, it could cause color unevenness and distortion of the projector...
... on it, children can reach it, or near flammable materials. • Do not insert your hands into the projector after the lamp is fully laid flat and locked in 3 place. 1 12. Tighten the screw that it too quickly may cause a bad connection, which could result in the... figure, lower the new lamp. 10. Lift the handle so that secures the lamp. 11. Loosen the screw that secures the lamp. 2 7. If you touch the optical components inside, it could cause color unevenness and distortion of the projector...
User Manual
Page 51
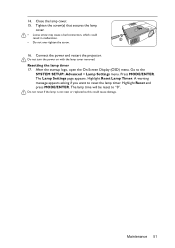
...-Screen Display (OSD) menu. Go to the SYSTEM SETUP: Advanced > Lamp Settings menu. Connect the power and restart the projector. Highlight Reset and press MODE/ENTER. Highlight Reset Lamp Timer. Tighten the screw(s) that secures the lamp cover. • Loose screw may cause a bad connection, which could... cause damage. 14. Do not reset if the lamp is not new or replaced as this could result in...
...-Screen Display (OSD) menu. Go to the SYSTEM SETUP: Advanced > Lamp Settings menu. Connect the power and restart the projector. Highlight Reset and press MODE/ENTER. Highlight Reset Lamp Timer. Tighten the screw(s) that secures the lamp cover. • Loose screw may cause a bad connection, which could... cause damage. 14. Do not reset if the lamp is not new or replaced as this could result in...

