
User Manual
Page 1
MH530 Digital Projector User Manual
MH530 Digital Projector User Manual

User Manual
Page 2
...image size 14 Connection 16 Connecting video source devices........17 Operation 18 Starting up the projector 18 Adjusting the projected image 19 Using the menus 21 Securing the projector 22 Switching input signal 24 Magnifying and searching for details ...25 Selecting the aspect ... of contents Using the teaching templates 34 Shutting down the projector 35 Direct power off 35 Menu operation 36 Maintenance 46 Care of the projector 46 Lamp information 47 Troubleshooting 53 Specifications 54 Projector specifications 54 Dimensions 55 Ceiling mount installation 55 Timing chart...
...image size 14 Connection 16 Connecting video source devices........17 Operation 18 Starting up the projector 18 Adjusting the projected image 19 Using the menus 21 Securing the projector 22 Switching input signal 24 Magnifying and searching for details ...25 Selecting the aspect ... of contents Using the teaching templates 34 Shutting down the projector 35 Direct power off 35 Menu operation 36 Maintenance 46 Care of the projector 46 Lamp information 47 Troubleshooting 53 Specifications 54 Projector specifications 54 Dimensions 55 Ceiling mount installation 55 Timing chart...
User Manual
Page 3
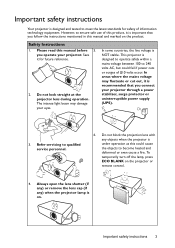
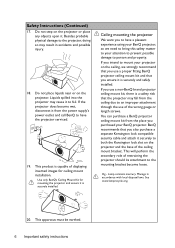
... 3. Refer servicing to ensure safe use of this product, it for safety of ±10 volts occur. Do not look straight at the projector lens during operation. In some countries, the line voltage is designed and tested to become heated and deformed or even cause a fire. To...off the lamp, press ECO BLANK on . Safety Instructions 1. Please read this manual and marked on the product. Important safety instructions 3 This projector is designed to operate safely within a mains voltage between 100 to 240 volts AC, but could cause the objects to meet the latest standards...
... 3. Refer servicing to ensure safe use of this product, it for safety of ±10 volts occur. Do not look straight at the projector lens during operation. In some countries, the line voltage is designed and tested to become heated and deformed or even cause a fire. To...off the lamp, press ECO BLANK on . Safety Instructions 1. Please read this manual and marked on the product. Important safety instructions 3 This projector is designed to operate safely within a mains voltage between 100 to 240 volts AC, but could cause the objects to meet the latest standards...
User Manual
Page 4
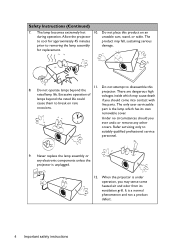
...only user serviceable occasions. Never replace the lamp assembly or any other covers. When the projector is under operation, you ever undo or remove any electronic components unless the projector is unplugged. 12. Do not attempt to break on an during operation. Excessive operation...removing the lamp assembly damage. The lamp becomes extremely hot 10. Allow the projector unstable cart, stand, or table. for approximately 45 minutes product may cause death lamps beyond the projector. It is the lamp which may fall, sustaining serious prior to suitably qualified ...
...only user serviceable occasions. Never replace the lamp assembly or any other covers. When the projector is under operation, you ever undo or remove any electronic components unless the projector is unplugged. 12. Do not attempt to break on an during operation. Excessive operation...removing the lamp assembly damage. The lamp becomes extremely hot 10. Allow the projector unstable cart, stand, or table. for approximately 45 minutes product may cause death lamps beyond the projector. It is the lamp which may fall, sustaining serious prior to suitably qualified ...
User Manual
Page 5
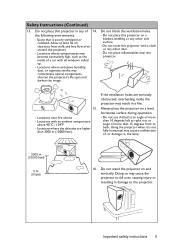
... are higher than 15 degrees front to , the lamp. 3000 m (10000 feet) 0 m (0 feet) 16. Always place the projector on end vertically. Space that is not fully horizontal may cause a malfunction of, or damage to back. Locations where the altitudes are ...°C / 104°F - Important safety instructions 5 Safety Instructions (Continued) 13. Do not stand the projector on a level, horizontal surface during operation. - Locations near the projector. 15. - the following environments. - Locations where excessive humidity, dust, or cigarette smoke may become excessively ...
... are higher than 15 degrees front to , the lamp. 3000 m (10000 feet) 0 m (0 feet) 16. Always place the projector on end vertically. Space that is not fully horizontal may cause a malfunction of, or damage to back. Locations where the altitudes are ...°C / 104°F - Important safety instructions 5 Safety Instructions (Continued) 13. Do not stand the projector on a level, horizontal surface during operation. - Locations near the projector. 15. - the following environments. - Locations where excessive humidity, dust, or cigarette smoke may become excessively ...
User Manual
Page 6
.... Hg - Manage in accidents and possible injury. 18. If you intend to have the projector serviced. 19. BenQ recommends that you ensure it from the place you to mount your BenQ projector, so we strongly recommend that you use of the wrong gauge or length screws. See www... to both the Kensington lock slot on the projector. If the projector does become loose. You can purchase a BenQ projector ceiling mount kit from the power supply's power outlet and call BenQ to have a pleasant experience using your projector on the projector or place any objects upon it securely to ...
.... Hg - Manage in accidents and possible injury. 18. If you intend to have the projector serviced. 19. BenQ recommends that you ensure it from the place you to mount your BenQ projector, so we strongly recommend that you use of the wrong gauge or length screws. See www... to both the Kensington lock slot on the projector. If the projector does become loose. You can purchase a BenQ projector ceiling mount kit from the power supply's power outlet and call BenQ to have a pleasant experience using your projector on the projector or place any objects upon it securely to ...
User Manual
Page 7
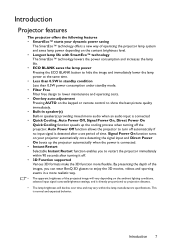
... Cooling, Auto Power Off, Signal Power On, Direct Power On Quick Cooling function speeds up the projector automatically when the power is connected. • Instant Restart Selectable Instant Restart function enables you can wear BenQ 3D glasses to enjoy the 3D movies, videos and sporting events in standby condition Less than 0.5W...
... Cooling, Auto Power Off, Signal Power On, Direct Power On Quick Cooling function speeds up the projector automatically when the power is connected. • Instant Restart Selectable Instant Restart function enables you can wear BenQ 3D glasses to enjoy the 3D movies, videos and sporting events in standby condition Less than 0.5W...
User Manual
Page 8
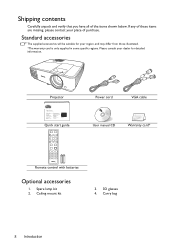
...are missing, please contact your region, and may differ from those illustrated. *The warranty card is only supplied in some specific regions. Projector Digital Projector Quick Start Guide Quick Start Guide Guide de démarrage rapide Kurzanleitung Guida rapida Guía de inicio rápido Guia de ...obsługi Hızlı başlangıç kılavuzu Průvodce rychlým používáním BenQ.com Quick start guide Power cord VGA cable User manual CD Warranty card* Remote control with batteries Optional accessories 1. Ceiling mount kit 3. 3D ...
...are missing, please contact your region, and may differ from those illustrated. *The warranty card is only supplied in some specific regions. Projector Digital Projector Quick Start Guide Quick Start Guide Guide de démarrage rapide Kurzanleitung Guida rapida Guía de inicio rápido Guia de ...obsługi Hızlı başlangıç kılavuzu Průvodce rychlým používáním BenQ.com Quick start guide Power cord VGA cable User manual CD Warranty card* Remote control with batteries Optional accessories 1. Ceiling mount kit 3. 3D ...

User Manual
Page 9
Projector exterior view Front/upper side 1 2 3 Rear/lower side 10 11 12 13 14 15 16 9 17 1. 2. 4 3. 4. 5 5. 6 6. 7. 7 8. 9. 8 10. 11. 12. 13. 14. 15. 16. 17. 18. ...
Projector exterior view Front/upper side 1 2 3 Rear/lower side 10 11 12 13 14 15 16 9 17 1. 2. 4 3. 4. 5 5. 6 6. 7. 7 8. 9. 8 10. 11. 12. 13. 14. 15. 16. 17. 18. ...
User Manual
Page 10
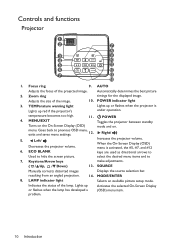
... and to make adjustments. ( / Up, / Down) 13. LAMP indicator light Selects an available picture setup mode. Lights up red if the projector's 10. TEMPerature warning light Lights up or flashes when the lamp has developed a problem. menu is under operation. SOURCE Manually corrects distorted images Displays...-Screen Display (OSD) menu item. 10 Introduction Focus ring 9. temperature becomes too high. 11. MODE/ENTER 8. MENU/EXIT Toggles the projector between standby Turns on the On-Screen Display (OSD) mode and on. When the On-Screen Display (OSD) Decreases the...
... and to make adjustments. ( / Up, / Down) 13. LAMP indicator light Selects an available picture setup mode. Lights up red if the projector's 10. TEMPerature warning light Lights up or flashes when the lamp has developed a problem. menu is under operation. SOURCE Manually corrects distorted images Displays...-Screen Display (OSD) menu item. 10 Introduction Focus ring 9. temperature becomes too high. 11. MODE/ENTER 8. MENU/EXIT Toggles the projector between standby Turns on the On-Screen Display (OSD) mode and on. When the On-Screen Display (OSD) Decreases the...
User Manual
Page 11
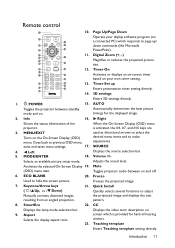
... 8 18 size. 9 18 12. is provided for the displayed image. 2. SOURCE 4. Selects an available picture setup mode. Mute (OSD) menu item. Toggles projector audio between standby mode and on 2 7 3 15 a connected PC) which is activated, the #4, #7, and #16 keys are 3. Keystone/Arrow keys 21.... . Remote control 1 10. Left 5. Page Up/Page Down Operate your own timer setting. 12 21 13. AUTO Toggles the projector between on the On-Screen Display (OSD) desired menu items and to previous OSD menu, adjustments. exits and saves menu settings. ...
... 8 18 size. 9 18 12. is provided for the displayed image. 2. SOURCE 4. Selects an available picture setup mode. Mute (OSD) menu item. Toggles projector audio between standby mode and on 2 7 3 15 a connected PC) which is activated, the #4, #7, and #16 keys are 3. Keystone/Arrow keys 21.... . Remote control 1 10. Left 5. Page Up/Page Down Operate your own timer setting. 12 21 13. AUTO Toggles the projector between on the On-Screen Display (OSD) desired menu items and to previous OSD menu, adjustments. exits and saves menu settings. ...
User Manual
Page 12
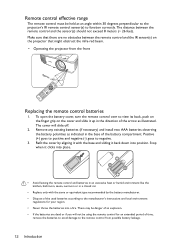
... open the battery cover, turn the remote control over to view its back, push on the finger grip on the projector that might obstruct the infra-red beam. • Operating the projector from possible battery leakage. 12 Introduction Refit the cover by aligning it back down into position. Make sure that there... for your region. • Never throw the batteries into a fire. The cover will not be held at an angle within 30 degrees perpendicular to the projector's IR remote control sensor(s) to negative. 3.
... open the battery cover, turn the remote control over to view its back, push on the finger grip on the projector that might obstruct the infra-red beam. • Operating the projector from possible battery leakage. 12 Introduction Refit the cover by aligning it back down into position. Make sure that there... for your region. • Never throw the batteries into a fire. The cover will not be held at an angle within 30 degrees perpendicular to the projector's IR remote control sensor(s) to negative. 3.
User Manual
Page 13
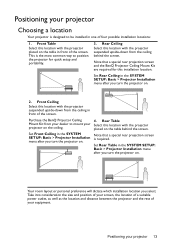
... screen. Rear Table Select this location with the projector suspended upside-down from your dealer to position the projector for this location with the projector placed on . Purchase the BenQ Projector Ceiling Mount Kit from the ceiling in the SYSTEM SETUP: Basic > Projector Installation menu after you turn the projector on . 2. Set Rear Table in front of...
... screen. Rear Table Select this location with the projector suspended upside-down from your dealer to position the projector for this location with the projector placed on . Purchase the BenQ Projector Ceiling Mount Kit from the ceiling in the SYSTEM SETUP: Basic > Projector Installation menu after you turn the projector on . 2. Set Rear Table in front of...
User Manual
Page 14
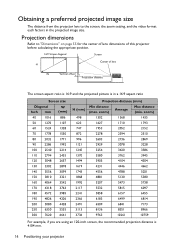
... distance (mm) Min distance (max. Obtaining a preferred projected image size The distance from the projector lens to "Dimensions" on page 55 for the center of lens dimensions of this projector before calculating the appropriate position. 16:9 Screen diagonal Screen Center of lens H W Vertical offset ...Projection distance The screen aspect ratio is 16:9 and the projected picture is 4104 mm. 14 Positioning your projector zoom) 1302 1368 1435 1627 1710 1793 1953 2052 2152 2278 2394 2510 2603 2736 2869 2929 3078 3228 3254 3420 3586 3580...
... distance (mm) Min distance (max. Obtaining a preferred projected image size The distance from the projector lens to "Dimensions" on page 55 for the center of lens dimensions of this projector before calculating the appropriate position. 16:9 Screen diagonal Screen Center of lens H W Vertical offset ...Projection distance The screen aspect ratio is 16:9 and the projected picture is 4104 mm. 14 Positioning your projector zoom) 1302 1368 1435 1627 1710 1793 1953 2052 2152 2278 2394 2510 2603 2736 2869 2929 3078 3228 3254 3420 3586 3580...

User Manual
Page 15
... help you permanently install it best suits your installation location. BenQ recommends that it , so as to permanently install the projector, you should physically test the projection size and distance using the actual projector in the "Projection distance (mm)" column is required. Positioning your projector 15 If your measured projection distance is 4.8 m (4800 mm...
... help you permanently install it best suits your installation location. BenQ recommends that it , so as to permanently install the projector, you should physically test the projection size and distance using the actual projector in the "Projection distance (mm)" column is required. Positioning your projector 15 If your measured projection distance is 4.8 m (4800 mm...
User Manual
Page 16
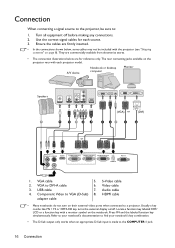
... Locate a function key labeled CRT/ LCD or a function key with a monitor symbol on page 8). Ensure the cables are for each projector model. They are commercially available from electronics stores. • The connection illustrations below are firmly inserted. • In the connections shown ... to : 1. The rear connecting jacks available on their external video ports when connected to a projector. Connection When connecting a signal source to the projector, be included with the projector (see "Shipping contents" on the notebook. Usually a key combo like FN + F3 or ...
... Locate a function key labeled CRT/ LCD or a function key with a monitor symbol on page 8). Ensure the cables are for each projector model. They are commercially available from electronics stores. • The connection illustrations below are firmly inserted. • In the connections shown ... to : 1. The rear connecting jacks available on their external video ports when connected to a projector. Connection When connecting a signal source to the projector, be included with the projector (see "Shipping contents" on the notebook. Usually a key combo like FN + F3 or ...
User Manual
Page 17
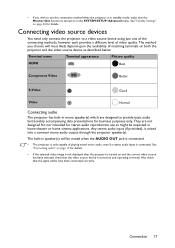
...and operating correctly. Connection 17 They are designed to use as might be muted when the AUDIO OUT jack is connected. • The projector is only capable of playing mixed mono audio, even if a stereo audio input is turned on page 44 for details. The method you... video quality. Also check that the video source device is mixed into a common mono audio output through the projector speaker(s). Connecting video source devices You need only connect the projector to a video source device using just one of the connecting methods, however each provides a different level of...
...and operating correctly. Connection 17 They are designed to use as might be muted when the AUDIO OUT jack is connected. • The projector is only capable of playing mixed mono audio, even if a stereo audio input is turned on page 44 for details. The method you... video quality. Also check that the video source device is mixed into a common mono audio output through the projector speaker(s). Connecting video source devices You need only connect the projector to a video source device using just one of the connecting methods, however each provides a different level of...
User Manual
Page 18
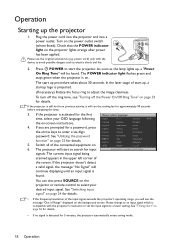
...details. 5. Operation Starting up , a startup logo is on the background screen. The POWER indicator light flashes green and stays green when the projector is projected. (If necessary) Rotate the focus ring to a lower setting. Switch all of the screen. The current input signal being scanned appears...fan for a password, press the arrow keys to select your OSD language following the on the power outlet switch (where fitted). If the projector doesn't detect a valid signal, the message "No Signal" will continue displaying until an input signal is still hot from previous activity, it...
...details. 5. Operation Starting up , a startup logo is on the background screen. The POWER indicator light flashes green and stays green when the projector is projected. (If necessary) Rotate the focus ring to a lower setting. Switch all of the screen. The current input signal being scanned appears...fan for a password, press the arrow keys to select your OSD language following the on the power outlet switch (where fitted). If the projector doesn't detect a valid signal, the message "No Signal" will continue displaying until an input signal is still hot from previous activity, it...
User Manual
Page 19
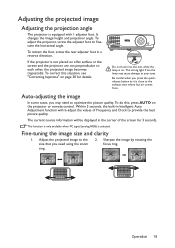
... on a flat surface or the screen and the projector are not perpendicular to the exhaust vent where hot air comes from the lamp may need using the zoom ring. 2. Adjust the projected image to ... details. This function is only available when PC signal (analog RGB) is equipped with 1 adjuster foot. Adjusting the projected image Adjusting the projection angle The projector is selected. To adjust the projector, screw the adjuster foot to your eyes. To do this situation, see "Correcting keystone" on the...
... on a flat surface or the screen and the projector are not perpendicular to the exhaust vent where hot air comes from the lamp may need using the zoom ring. 2. Adjust the projected image to ... details. This function is only available when PC signal (analog RGB) is equipped with 1 adjuster foot. Adjusting the projected image Adjusting the projection angle The projector is selected. To adjust the projector, screw the adjuster foot to your eyes. To do this situation, see "Correcting keystone" on the...
User Manual
Page 20
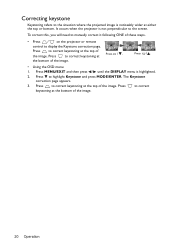
... will need to correct keystoning at either the top or bottom. Press to correct keystoning at the bottom of these steps. • Press / on the projector or remote control to correct keystoning at Press / . Press to the screen. Press / . • Using the OSD menu 1. Press to display the Keystone correction page...
... will need to correct keystoning at either the top or bottom. Press to correct keystoning at the bottom of these steps. • Press / on the projector or remote control to correct keystoning at Press / . Press to the screen. Press / . • Using the OSD menu 1. Press to display the Keystone correction page...


