
MH680 Quick Start Guide
Page 4
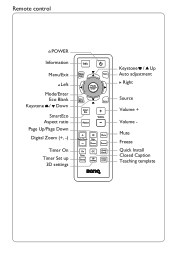
Remote control POWER Information Menu/Exit Left Mode/Enter Eco Blank Keystone / Down SmartEco Aspect ratio Page Up/Page Down Digital Zoom (+, -) Timer On Timer Set up 3D settings Keystone / Up Auto adjustment Right Source Volume + Volume - Mute Freeze Quick Install Closed Caption Teaching template
Remote control POWER Information Menu/Exit Left Mode/Enter Eco Blank Keystone / Down SmartEco Aspect ratio Page Up/Page Down Digital Zoom (+, -) Timer On Timer Set up 3D settings Keystone / Up Auto adjustment Right Source Volume + Volume - Mute Freeze Quick Install Closed Caption Teaching template
MH680 User Manual
Page 2
... projected image size 14 Connection 16 Connecting video source devices........17 Operation 18 Starting up the projector 18 Adjusting the projected image 19 Using the menus 21 Securing the projector 22 Switching input signal 24 Magnifying and searching for details ...25 Selecting the aspect ratio 25 Optimizing the image 27 Setting the presentation timer 30 Remote paging operations 31 Freezing the image 31 Hiding the image 32 Locking control keys 32 Operating in a high altitude environment 32 Adjusting the sound 33 Using...
... projected image size 14 Connection 16 Connecting video source devices........17 Operation 18 Starting up the projector 18 Adjusting the projected image 19 Using the menus 21 Securing the projector 22 Switching input signal 24 Magnifying and searching for details ...25 Selecting the aspect ratio 25 Optimizing the image 27 Setting the presentation timer 30 Remote paging operations 31 Freezing the image 31 Hiding the image 32 Locking control keys 32 Operating in a high altitude environment 32 Adjusting the sound 33 Using...

MH680 User Manual
Page 3
... open the lens shutter (if any) or remove the lens cap (if any objects when the projector is under operation as this manual before 5. Important safety instructions 3 Save it is important that you operate your eyes. Refer servicing to 240 volts AC, but could cause the objects to become heated and deformed or even cause a fire. Safety Instructions 1. you connect your projector through a power...
... open the lens shutter (if any) or remove the lens cap (if any objects when the projector is under operation as this manual before 5. Important safety instructions 3 Save it is important that you operate your eyes. Refer servicing to 240 volts AC, but could cause the objects to become heated and deformed or even cause a fire. Safety Instructions 1. you connect your projector through a power...

MH680 User Manual
Page 6
... ceiling mount bracket. Lamp contains mercury. Ceiling mounting the projector We want you also purchase a separate Kensington lock compatible security cable and attach it to both the Kensington lock slot on the projector. Safety Instructions (Continued) 17. Do not place liquids near or on the projector and the base of the wrong gauge or length screws. This product is securely installed. BenQ recommends that the projector...
... ceiling mount bracket. Lamp contains mercury. Ceiling mounting the projector We want you also purchase a separate Kensington lock compatible security cable and attach it to both the Kensington lock slot on the projector. Safety Instructions (Continued) 17. Do not place liquids near or on the projector and the base of the wrong gauge or length screws. This product is securely installed. BenQ recommends that the projector...
MH680 User Manual
Page 7
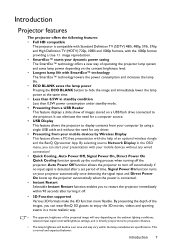
... format providing a true 1:1 image reproduction. • SmartEco™ starts your dynamic power saving The SmartEco™ technology offers a new way of operating the projector lamp system and saves lamp power depending on the content brightness level. • Longest lamp life with the help of an optional wireless dongle and the BenQ Qpresenter App. By selecting source Network Display in the OSD menu, you can wear BenQ 3D glasses to...
... format providing a true 1:1 image reproduction. • SmartEco™ starts your dynamic power saving The SmartEco™ technology offers a new way of operating the projector lamp system and saves lamp power depending on the content brightness level. • Longest lamp life with the help of an optional wireless dongle and the BenQ Qpresenter App. By selecting source Network Display in the OSD menu, you can wear BenQ 3D glasses to...

MH680 User Manual
Page 10
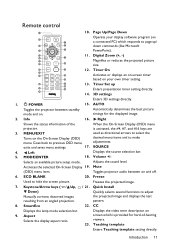
... Displays the source selection bar. Used to previous OSD menu, 13. Top IR remote sensor 12. Left/ Increases the projector volume. MODE/ENTER When the On-Screen Display (OSD) menu is under operation. 10. SOURCE 8. select the desired menu items and to Selects an available picture setup mode. AUTO 4. Controls and functions Projector 1 2 9 10 3 11 12 4 13 5 14 6 7 15 8 13 1. LAMP indicator light Adjusts the focus of the image. problem. 3. menu. Keystone/Arrow keys ( / Up, / exits and saves menu settings. Indicates...
... Displays the source selection bar. Used to previous OSD menu, 13. Top IR remote sensor 12. Left/ Increases the projector volume. MODE/ENTER When the On-Screen Display (OSD) menu is under operation. 10. SOURCE 8. select the desired menu items and to Selects an available picture setup mode. AUTO 4. Controls and functions Projector 1 2 9 10 3 11 12 4 13 5 14 6 7 15 8 13 1. LAMP indicator light Adjusts the focus of the image. problem. 3. menu. Keystone/Arrow keys ( / Up, / exits and saves menu settings. Indicates...
MH680 User Manual
Page 11
...) menu. Freeze Used to hide the screen picture. Aspect Selects the display aspect ratio. Introduction 11 Timer Set up / down commands (like Microsoft 4 16 PowerPoint). 5 11. Info 16. the projected image and displays the test pattern. 8. Mute (OSD) menu item. Digital Zoom (+, -) 6 17 7 Magnifies or reduces the projected picture 8 18 size. 9 18 12. AUTO Toggles the projector between on your display software program (on . MODE/ENTER Displays the source selection bar. 18. Left 5. SOURCE 4. Adjusts the sound...
...) menu. Freeze Used to hide the screen picture. Aspect Selects the display aspect ratio. Introduction 11 Timer Set up / down commands (like Microsoft 4 16 PowerPoint). 5 11. Info 16. the projected image and displays the test pattern. 8. Mute (OSD) menu item. Digital Zoom (+, -) 6 17 7 Magnifies or reduces the projected picture 8 18 size. 9 18 12. AUTO Toggles the projector between on your display software program (on . MODE/ENTER Displays the source selection bar. 18. Left 5. SOURCE 4. Adjusts the sound...

MH680 User Manual
Page 12
... indicated in the direction of time, remove the batteries to avoid damage to the manufacturer's instructions and local environment regulations for an extended period of the arrow as illustrated. Remote control effective range The remote control must be held at an angle within 30 degrees perpendicular to the projector's IR remote control sensor(s) to negative. 3. To open the battery cover, turn the remote control over to view...
... indicated in the direction of time, remove the batteries to avoid damage to the manufacturer's instructions and local environment regulations for an extended period of the arrow as illustrated. Remote control effective range The remote control must be held at an angle within 30 degrees perpendicular to the projector's IR remote control sensor(s) to negative. 3. To open the battery cover, turn the remote control over to view...
MH680 User Manual
Page 18
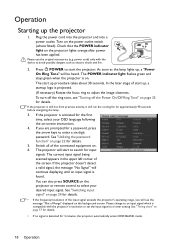
... the password function" on the projector lights orange after power has been applied. Check that the POWER indicator light on page 22 for details. 5. You can also press SOURCE on the power outlet switch (where fitted). power cord) only with the projector's resolution or set the input signal to search for input signals. The projector will continue displaying until an input signal is compatible with the device to select your OSD language following the on-screen instructions. 4. Operation Starting...
... the password function" on the projector lights orange after power has been applied. Check that the POWER indicator light on page 22 for details. 5. You can also press SOURCE on the power outlet switch (where fitted). power cord) only with the projector's resolution or set the input signal to search for input signals. The projector will continue displaying until an input signal is compatible with the device to select your OSD language following the on-screen instructions. 4. Operation Starting...
MH680 User Manual
Page 21
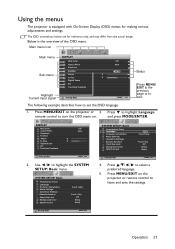
... MENU/EXIT on the projector or remote control to set the OSD language. 1. Size 0 Digital Zoom 3D Teaching Template Off Auto Analog RGB MENU Exit 2. Use / to select a preferred language. 5. DISPLAY Wall Color Aspect Ratio Keystone Position Phase 0 H. SYSTEM SETUP: Basic Presentation Timer Language Projector Installation Menu Settings Operation Settings Remote Receiver Panel Key Lock Background Color Splash Screen Front Table Front+Top Off BenQ BenQ SYSTEM SETUP: Basic Presentation Timer Language Projector Installation Menu Settings Operation Settings Remote Receiver Panel...
... MENU/EXIT on the projector or remote control to set the OSD language. 1. Size 0 Digital Zoom 3D Teaching Template Off Auto Analog RGB MENU Exit 2. Use / to select a preferred language. 5. DISPLAY Wall Color Aspect Ratio Keystone Position Phase 0 H. SYSTEM SETUP: Basic Presentation Timer Language Projector Installation Menu Settings Operation Settings Remote Receiver Panel Key Lock Background Color Splash Screen Front Table Front+Top Off BenQ BenQ SYSTEM SETUP: Basic Presentation Timer Language Projector Installation Menu Settings Operation Settings Remote Receiver Panel...
MH680 User Manual
Page 23
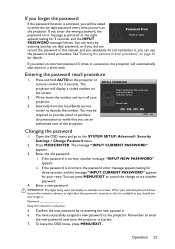
... BenQ service center to verify that it , you can use the password recall procedure. IMPORTANT: The digits being input will automatically shut down in a safe place. 5. If you forget the password If the password function is started. 7. If you enter the wrong password, the Password Error password error message as asterisks on the screen. 2. Press MODE/ENTER. Remember to enter the new password next time the projector is activated, you will display a coded number on -screen...
... BenQ service center to verify that it , you can use the password recall procedure. IMPORTANT: The digits being input will automatically shut down in a safe place. 5. If you forget the password If the password function is started. 7. If you enter the wrong password, the Password Error password error message as asterisks on the screen. 2. Press MODE/ENTER. Remember to enter the new password next time the projector is activated, you will display a coded number on -screen...
MH680 User Manual
Page 24
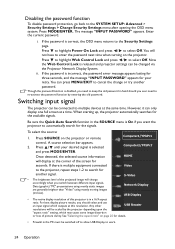
... Projector Network Display System. Switching input signal The projector can press MENU/EXIT to the Security Settings page. However, it can be switched off to allow USB Display to enter the password next time when turning on the projector or remote Computer1/YPbPr1 control. Data (graphic) "PC" presentations using mostly static images are generally brighter than "Video" using mostly moving images (movies). ii. Any other USB Reader resolutions will not have to work. 24 Operation i. When starting up, the projector...
... Projector Network Display System. Switching input signal The projector can press MENU/EXIT to the Security Settings page. However, it can be switched off to allow USB Display to enter the password next time when turning on the projector or remote Computer1/YPbPr1 control. Data (graphic) "PC" presentations using mostly static images are generally brighter than "Video" using mostly moving images (movies). ii. Any other USB Reader resolutions will not have to work. 24 Operation i. When starting up, the projector...

MH680 User Manual
Page 27
... of the projected image. Selecting a picture mode The projector is required, such as AutoCAD. 4. Go to select User 1 or User 2. 4. Press to open the On-Screen Display (OSD) menu. 2. Operation 27 Press MENU/EXIT to highlight Reference Mode. This mode is suitable for best viewing in the Picture Mode sub-menu item. 5. Cinema mode: Is appropriate for playing colorful movies, video clips from : Light Yellow, Pink, Light Green, Blue, and Blackboard. Setting the User 1/User 2 mode There are two user-definable modes if...
... of the projected image. Selecting a picture mode The projector is required, such as AutoCAD. 4. Go to select User 1 or User 2. 4. Press to open the On-Screen Display (OSD) menu. 2. Operation 27 Press MENU/EXIT to highlight Reference Mode. This mode is suitable for best viewing in the Picture Mode sub-menu item. 5. Cinema mode: Is appropriate for playing colorful movies, video clips from : Light Yellow, Pink, Light Green, Blue, and Blackboard. Setting the User 1/User 2 mode There are two user-definable modes if...
MH680 User Manual
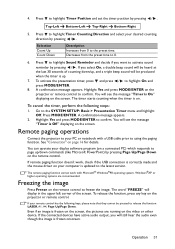
Page 31
... timer starts counting when the timer is Off" displaying on the remote control. Remote paging operations Connect the projector to the latest version. The remote paging function cannot work , check if the USB connection is correctly made and the mouse driver on . 4. You will see the message "Timer is on your PC or notebook with Microsoft® Windows®98 operating system. Even if an image is On" displaying on the screen, the pictures...
... timer starts counting when the timer is Off" displaying on the remote control. Remote paging operations Connect the projector to the latest version. The remote paging function cannot work , check if the USB connection is correctly made and the mouse driver on . 4. You will see the message "Timer is on your PC or notebook with Microsoft® Windows®98 operating system. Even if an image is On" displaying on the screen, the pictures...
MH680 User Manual
Page 32
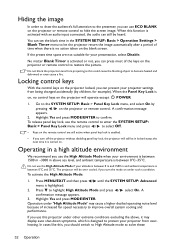
... display auto shut-down symptoms, which is designed to hide the screen image. If the preset time spans are still active when panel key lock is activated or not, you use the High Altitude Mode if your projector from projecting as this function is activated with an audio input connected, the audio can set the blank time in locked status the next time it is on, no action taken on the projector or remote control...
... display auto shut-down symptoms, which is designed to hide the screen image. If the preset time spans are still active when panel key lock is activated or not, you use the High Altitude Mode if your projector from projecting as this function is activated with an audio input connected, the audio can set the blank time in locked status the next time it is on, no action taken on the projector or remote control...

MH680 User Manual
Page 44
... remote receivers or one specific remote receiver on page 32 for the projector. See "Locking control keys" on the remote control. Allows you to select which logo screen will be shortened from a normal 90-second duration to turn on page 48 for details. Sleep Timer Sets the auto-shutdown timer. Allows you to turn off automatically if no input signal is off . SYSTEM SETUP: Basic menu Function Operation Settings Description Direct Power...
... remote receivers or one specific remote receiver on page 32 for the projector. See "Locking control keys" on the remote control. Allows you to select which logo screen will be shortened from a normal 90-second duration to turn on page 48 for details. Sleep Timer Sets the auto-shutdown timer. Allows you to turn off automatically if no input signal is off . SYSTEM SETUP: Basic menu Function Operation Settings Description Direct Power...

MH680 User Manual
Page 45
... details. Baud Rate Web Control Lock See BenQ Network Projector Operation Guide for details. Selects a baud rate that is identical with your area). 5. SYSTEM SETUP: Advanced menu Function Description High Altitude Mode A mode for details. Lamp Mode See "Setting the Lamp Mode" on -screen display of the dialogue, narration, and sound effects of TV programs and videos that you can connect the projector using a suitable RS-232 cable and update or download the projector's firmware. Closed Caption • Captions...
... details. Baud Rate Web Control Lock See BenQ Network Projector Operation Guide for details. Selects a baud rate that is identical with your area). 5. SYSTEM SETUP: Advanced menu Function Description High Altitude Mode A mode for details. Lamp Mode See "Setting the Lamp Mode" on -screen display of the dialogue, narration, and sound effects of TV programs and videos that you can connect the projector using a suitable RS-232 cable and update or download the projector's firmware. Closed Caption • Captions...

MH680 User Manual
Page 46
... the factory preset values. Enabling this function slightly increases the standby power consumption. Source Shows the current signal source. The following settings will still remain: Phase, H. Picture Mode Shows the selected mode in standby mode. Lamp Mode Shows the current lamp mode. Firmware Version Shows the firmware version of hours the lamp has been used. Press / to choose the source that you wish to make the connection. INFORMATION menu 46 Operation SYSTEM SETUP: Advanced menu Function Standby Settings Network Settings Reset All Settings...
... the factory preset values. Enabling this function slightly increases the standby power consumption. Source Shows the current signal source. The following settings will still remain: Phase, H. Picture Mode Shows the selected mode in standby mode. Lamp Mode Shows the current lamp mode. Firmware Version Shows the firmware version of hours the lamp has been used. Press / to choose the source that you wish to make the connection. INFORMATION menu 46 Operation SYSTEM SETUP: Advanced menu Function Standby Settings Network Settings Reset All Settings...
MH680 User Manual
Page 48
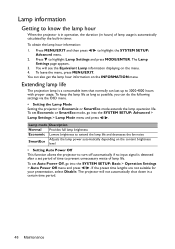
... SYSTEM SETUP: Advanced > Lamp Settings > Lamp Mode menu and press / . Extending lamp life The projection lamp is detected after a set period of time to know the lamp hour When the projector is in operation, the duration (in hours) of lamp life. Press MENU/EXIT and then press / to highlight Lamp Settings and press MODE/ENTER. You will not automatically shut down in a certain time period. 48 Maintenance Press to highlight the SYSTEM SETUP: Advanced menu. 2. To set Auto Power Off...
... SYSTEM SETUP: Advanced > Lamp Settings > Lamp Mode menu and press / . Extending lamp life The projection lamp is detected after a set period of time to know the lamp hour When the projector is in operation, the duration (in hours) of lamp life. Press MENU/EXIT and then press / to highlight Lamp Settings and press MODE/ENTER. You will not automatically shut down in a certain time period. 48 Maintenance Press to highlight the SYSTEM SETUP: Advanced menu. 2. To set Auto Power Off...
MH680 User Manual
Page 54
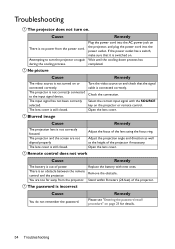
.... The password is an obstacle between the remote control and the projector. Troubleshooting The projector does not turn the projector on the projector, and plug the power cord into the AC power jack on again during the cooling process. The input signal has not been correctly selected. Open the lens cover. No picture Cause Remedy The video source is not correctly connected to turn on the projector or remote control. Check the connection. The projector and the screen are...
.... The password is an obstacle between the remote control and the projector. Troubleshooting The projector does not turn the projector on the projector, and plug the power cord into the AC power jack on again during the cooling process. The input signal has not been correctly selected. Open the lens cover. No picture Cause Remedy The video source is not correctly connected to turn on the projector or remote control. Check the connection. The projector and the screen are...


