User Manual
Page 1
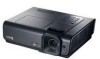
MP724/MP727/MP735 Digital Projector User Manual Welcome
MP724/MP727/MP735 Digital Projector User Manual Welcome
User Manual
Page 2
...22 Connecting HDMI source devices ..... 23 Connecting DVI-I source devices ...... 24 Operation 28 Starting up the projector 28 Using the menus 29 Securing the projector 29 Utilizing the password function ......... 30 Switching input signal 33 Adjusting the projected image 34 Magnifying and ......... 46 Adjusting the sound 47 Personalizing the projector menu display 48 Shutting down the projector 48 Menu operation 49 Maintenance 57 Care of the projector 57 Lamp information 58 Troubleshooting 64 Specifications 65 Projector specifications 65 Dimensions 66 Timing chart 66 Warranty...
...22 Connecting HDMI source devices ..... 23 Connecting DVI-I source devices ...... 24 Operation 28 Starting up the projector 28 Using the menus 29 Securing the projector 29 Utilizing the password function ......... 30 Switching input signal 33 Adjusting the projected image 34 Magnifying and ......... 46 Adjusting the sound 47 Personalizing the projector menu display 48 Shutting down the projector 48 Menu operation 49 Maintenance 57 Care of the projector 57 Lamp information 58 Troubleshooting 64 Specifications 65 Projector specifications 65 Dimensions 66 Timing chart 66 Warranty...
User Manual
Page 3
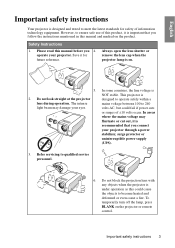
...important that you 4. Refer servicing to operate safely within a lens during operation. Important safety instructions 3 English Important safety instructions Your projector is designed and tested to meet the latest standards for future reference. However, to ensure safe use of ±10 volts occur. ...The intense mains voltage between 100 to become heated and deformed or even cause a fire. Do not look straight at the projector designed to qualified service personnel. 6. volts AC, but could cause the objects to 240 light beam may fluctuate or cut out, ...
...important that you 4. Refer servicing to operate safely within a lens during operation. Important safety instructions 3 English Important safety instructions Your projector is designed and tested to meet the latest standards for future reference. However, to ensure safe use of ±10 volts occur. ...The intense mains voltage between 100 to become heated and deformed or even cause a fire. Do not look straight at the projector designed to qualified service personnel. 6. volts AC, but could cause the objects to 240 light beam may fluctuate or cut out, ...
User Manual
Page 4
...heated air and odor from its own removable cover. Excessive operation projector. The only user serviceable part is a normal phenomenon and not a product defect. 4 Important safety instructions Allow the projector to cool for replacement. 10. Never replace the lamp assembly or... any electronic components unless the projector is under operation, you ever undo or remove any other covers. English Safety Instructions...
...heated air and odor from its own removable cover. Excessive operation projector. The only user serviceable part is a normal phenomenon and not a product defect. 4 Important safety instructions Allow the projector to cool for replacement. 10. Never replace the lamp assembly or... any electronic components unless the projector is under operation, you ever undo or remove any other covers. English Safety Instructions...

User Manual
Page 5
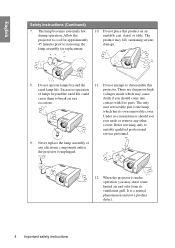
...more than 15 degrees front to back. Doing so may become excessively high, such as the inside the projector may result in a fire. 15. Do not cover this projector with an ambient temperature above 35°C / 95°F - If the ventilation holes are higher than ... fall over, causing injury or resulting in any other item. - the following environments. - Do not stand the projector on end vertically. Locations where temperatures may cause the projector to , the lamp. - English Safety Instructions (Continued) 13. Do not block the ventilation holes. Locations where ...
...more than 15 degrees front to back. Doing so may become excessively high, such as the inside the projector may result in a fire. 15. Do not cover this projector with an ambient temperature above 35°C / 95°F - If the ventilation holes are higher than ... fall over, causing injury or resulting in any other item. - the following environments. - Do not stand the projector on end vertically. Locations where temperatures may cause the projector to , the lamp. - English Safety Instructions (Continued) 13. Do not block the ventilation holes. Locations where ...
User Manual
Page 6
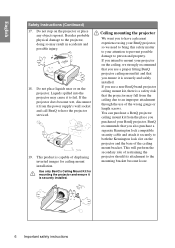
...due to have a pleasant experience using your BenQ projector, so we strongly recommend that you intend to both the Kensington lock slot on the ceiling, we need to bring this safety matter to your BenQ projector. You can purchase a BenQ projector ceiling mount kit from the power supply's wall... socket and call BenQ to an improper attachment through the use of the ceiling mount bracket. This product is...
...due to have a pleasant experience using your BenQ projector, so we strongly recommend that you intend to both the Kensington lock slot on the ceiling, we need to bring this safety matter to your BenQ projector. You can purchase a BenQ projector ceiling mount kit from the power supply's wall... socket and call BenQ to an improper attachment through the use of the ceiling mount bracket. This product is...

User Manual
Page 7
...for better control of the projected image will decline over time and may vary within the lamp manufacturers specifications. The projector offers the following features. • Wall color correction allowing projection on the ambient lighting conditions, selected input signal ...contrast/brightness settings, and is normal and expected behavior. English Introduction Projector features The projector integrates high-performance optical engine projection and a user-friendly design to projection distance. • The lamp brightness...
...for better control of the projected image will decline over time and may vary within the lamp manufacturers specifications. The projector offers the following features. • Wall color correction allowing projection on the ambient lighting conditions, selected input signal ...contrast/brightness settings, and is normal and expected behavior. English Introduction Projector features The projector integrates high-performance optical engine projection and a user-friendly design to projection distance. • The lamp brightness...
User Manual
Page 8
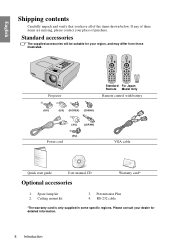
... The supplied accessories will be suitable for detailed information. 8 Introduction RS-232 cable *The warranty card is only supplied in some specific regions. Presentation Plus 4. Projector Standard For Japan Remote Model Only Remote control with battery (UK) (US) (KOREA) (CHINA) (AU) (JAPAN) (EU) Power cord VGA cable Quick start guide User...
... The supplied accessories will be suitable for detailed information. 8 Introduction RS-232 cable *The warranty card is only supplied in some specific regions. Presentation Plus 4. Projector Standard For Japan Remote Model Only Remote control with battery (UK) (US) (KOREA) (CHINA) (AU) (JAPAN) (EU) Power cord VGA cable Quick start guide User...
User Manual
Page 9
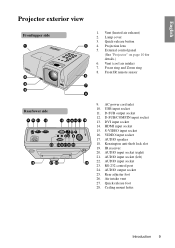
.... RS-232 control port 24. Quick-release button 5 4. Vent (cool air intake) 7. USB input socket 11. AUDIO input socket 23. Air intake vent 27. English Projector exterior view Front/upper side 1 2 3 4 1. Vent (heated air exhaust) 2. AUDIO output socket 25. Focus ring and Zoom ring 8. Front IR remote sensor 6 7 78 Rear/lower...
.... RS-232 control port 24. Quick-release button 5 4. Vent (cool air intake) 7. USB input socket 11. AUDIO input socket 23. Air intake vent 27. English Projector exterior view Front/upper side 1 2 3 4 1. Vent (heated air exhaust) 2. AUDIO output socket 25. Focus ring and Zoom ring 8. Front IR remote sensor 6 7 78 Rear/lower...

User Manual
Page 10
... picture mode" on page 45 for details. See "Utilizing FAQ function" on page 39 for details. See "Starting up or flashes when the projector is activated, the #7, #10, and #12 keys are used as directional arrows to select the desired menu items and to adjust the projected... image appearance. MENU/EXIT Turns on . See "Using the menus" on page 63 for details. English Controls and functions Projector 6. 9 1 2 3 10 4 5 7. 11 6 7 12 8. 8 13 10 9. 1. LAMP indicator light Indicates the status of the lamp. See "Indicators" on page 29 ...
... picture mode" on page 45 for details. See "Utilizing FAQ function" on page 39 for details. See "Starting up or flashes when the projector is activated, the #7, #10, and #12 keys are used as directional arrows to select the desired menu items and to adjust the projected... image appearance. MENU/EXIT Turns on . See "Using the menus" on page 63 for details. English Controls and functions Projector 6. 9 1 2 3 10 4 5 7. 11 6 7 12 8. 8 13 10 9. 1. LAMP indicator light Indicates the status of the lamp. See "Indicators" on page 29 ...

User Manual
Page 11
... standby 7. See "Starting up arrow when connected through USB Navigates and changes settings in the projector" on page 29 Down arrow when connected through USB 9. Left cursor Enter key when connected through DO NOT POINT IN EYES. OSD. USB to...and "Shutting down OSD. KEYSTONE keys ( / ) Manually corrects distorted images resulting from an angled projection. See "Using the menus" on page 29 the projector" on page 44 for details. Navigates and changes settings in the 5. Page up the Navigates and changes settings in the to a PC. See "Remote ...
... standby 7. See "Starting up arrow when connected through USB Navigates and changes settings in the projector" on page 29 Down arrow when connected through USB 9. Left cursor Enter key when connected through DO NOT POINT IN EYES. OSD. USB to...and "Shutting down OSD. KEYSTONE keys ( / ) Manually corrects distorted images resulting from an angled projection. See "Using the menus" on page 29 the projector" on page 44 for details. Navigates and changes settings in the 5. Page up the Navigates and changes settings in the to a PC. See "Remote ...

User Manual
Page 12
... out of the reach of the remote control prior to a PC. PAGE DOWN 12. OK timings for details. 13. SOURCE Adjusts volume. LASER: Press to projector. 16. to using it and the indicator lights up red. English 11. See "Remote menu. Right cursor See "Using the menus" on page 29 for...
... out of the reach of the remote control prior to a PC. PAGE DOWN 12. OK timings for details. 13. SOURCE Adjusts volume. LASER: Press to projector. 16. to using it and the indicator lights up red. English 11. See "Remote menu. Right cursor See "Using the menus" on page 29 for...
User Manual
Page 13
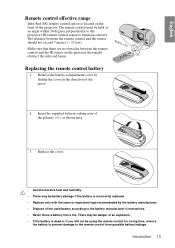
... Make sure that might obstruct the infra-red beam. The remote control must be held at an angle within 30 degrees perpendicular to the projector's IR remote control sensor to the remote control from possible battery leakage. Replace the cover. • Avoid excessive heat and humidity. ...in the direction of the polarity (+/-) as shown here. 3. Remove the battery compartment cover by the battery manufacturer. • Dispose of the projector. Introduction 13 Insert the supplied batteries taking note of the arrow. 2. There may be using the remote control for a long time, remove...
... Make sure that might obstruct the infra-red beam. The remote control must be held at an angle within 30 degrees perpendicular to the projector's IR remote control sensor to the remote control from possible battery leakage. Replace the cover. • Avoid excessive heat and humidity. ...in the direction of the polarity (+/-) as shown here. 3. Remove the battery compartment cover by the battery manufacturer. • Dispose of the projector. Introduction 13 Insert the supplied batteries taking note of the arrow. 2. There may be using the remote control for a long time, remove...
User Manual
Page 14
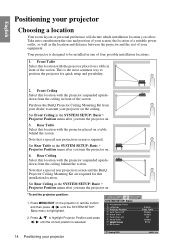
...Off Blank Timer Panel Key Lock Sleep Timer Splash Screen My Screen 14 Positioning your projector Analog RGB English Front Table Disable Disable Off Disable BenQ MENU Exit Purchase the BenQ Projector Ceiling Mounting Kit from the ceiling behind the screen. Note that a special rear ... Note that a special rear projection screen and the BenQ Projector Ceiling Mounting Kit are required for quick setup and portability. 2. Rear Ceiling Select this installation location. Set Rear Ceiling in the SYSTEM SETUP: Basic > Projector Position menu after you select. Press / to be...
...Off Blank Timer Panel Key Lock Sleep Timer Splash Screen My Screen 14 Positioning your projector Analog RGB English Front Table Disable Disable Off Disable BenQ MENU Exit Purchase the BenQ Projector Ceiling Mounting Kit from the ceiling behind the screen. Note that a special rear ... Note that a special rear projection screen and the BenQ Projector Ceiling Mounting Kit are required for quick setup and portability. 2. Rear Ceiling Select this installation location. Set Rear Ceiling in the SYSTEM SETUP: Basic > Projector Position menu after you select. Press / to be...

User Manual
Page 15
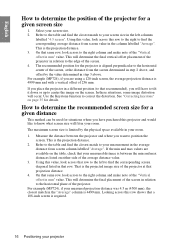
...distance from the center of the screen (projection distance), and the vertical offset height of the projector from the screen, the projected image size increases, and the vertical offset also increases proportionately. BenQ has provided a table of screen sizes to assist you will need to account for your...). To be able to project a complete 16:9 (widescreen) aspect ratio image on MP724 or MP727, the projector can see from the diagram on a table and will be vertically offset from the projector lens to the screen, the zoom setting (if available), and the video format each factors in...
...distance from the center of the screen (projection distance), and the vertical offset height of the projector from the screen, the projected image size increases, and the vertical offset also increases proportionately. BenQ has provided a table of screen sizes to assist you will need to account for your...). To be able to project a complete 16:9 (widescreen) aspect ratio image on MP724 or MP727, the projector can see from the diagram on a table and will be vertically offset from the projector lens to the screen, the zoom setting (if available), and the video format each factors in...
User Manual
Page 16
...screen, at that row. For example (MP724), if your measured projection distance was 4.5 m (4500 mm), the closest match in your projector See "Correcting keystone" on either side of the screen. 4. How to determine the recommended screen size for a given distance This method...average projection distance is aligned perpendicular to find the corresponding average distance from the screen determined in step 2 above . Using this projector and would like to your room. That is the projection distance. 2. Looking across to find the corresponding screen diagonal listed in ...
...screen, at that row. For example (MP724), if your measured projection distance was 4.5 m (4500 mm), the closest match in your projector See "Correcting keystone" on either side of the screen. 4. How to determine the recommended screen size for a given distance This method...average projection distance is aligned perpendicular to find the corresponding average distance from the screen determined in step 2 above . Using this projector and would like to your room. That is the projection distance. 2. Looking across to find the corresponding screen diagonal listed in ...

User Manual
Page 17
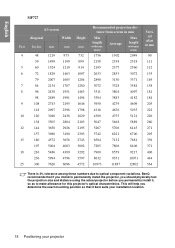
Maximum zoom Minimum zoom Screen Center of this projector before calculating the appropriate position. English MP724/727 projection dimensions Refer to "Dimensions" on page 66 for the center of lens dimensions of lens Vertical ... from screen in mm 102 126 128 154 169 179 205 209 230 252 256 294 307 335 384 420 461 504 640 Positioning your projector 17 Vertical offset in mm Min length (with min. zoom) Average Max length (with max. zoom) 1853 1999 2146 2278 2458 2638 2316 2499 2682...
Maximum zoom Minimum zoom Screen Center of this projector before calculating the appropriate position. English MP724/727 projection dimensions Refer to "Dimensions" on page 66 for the center of lens dimensions of lens Vertical ... from screen in mm 102 126 128 154 169 179 205 209 230 252 256 294 307 335 384 420 461 504 640 Positioning your projector 17 Vertical offset in mm Min length (with min. zoom) Average Max length (with max. zoom) 1853 1999 2146 2278 2458 2638 2316 2499 2682...
User Manual
Page 18
...18 Positioning your projector BenQ recommends that if you intend to permanently install the projector, you should physically test the projection size and distance using the actual projector before you determine the exact mounting position so that it , so as to optical component variations. English MP727 4:3 screen diagonal ... 226 260 271 295 339 371 406 444 564 There is 3% tolerance among these numbers due to make allowance for this projector's optical characteristics. zoom) 1756 1902 2049 2158 2338 2518 2195 2377 2560 2633 2853 3072 2890 3130 3371 3072 3328 3584...
...18 Positioning your projector BenQ recommends that if you intend to permanently install the projector, you should physically test the projection size and distance using the actual projector before you determine the exact mounting position so that it , so as to optical component variations. English MP727 4:3 screen diagonal ... 226 260 271 295 339 371 406 444 564 There is 3% tolerance among these numbers due to make allowance for this projector's optical characteristics. zoom) 1756 1902 2049 2158 2338 2518 2195 2377 2560 2633 2853 3072 2890 3130 3371 3072 3328 3584...
User Manual
Page 19
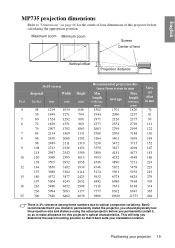
...help you determine the exact mounting position so that if you intend to permanently install the projector, you should physically test the projection size and distance using the actual projector before calculating the appropriate position. tance from screen in mm 74 91 93 111 122...location. Average length (with max. English MP735 projection dimensions Refer to "Dimensions" on page 66 for this projector before you permanently install it best suits your projector 19 BenQ recommends that it , so as to optical component variations. zoom) zoom) 1582 1701 1820 1944 2090 2237...
...help you determine the exact mounting position so that if you intend to permanently install the projector, you should physically test the projection size and distance using the actual projector before calculating the appropriate position. tance from screen in mm 74 91 93 111 122...location. Average length (with max. English MP735 projection dimensions Refer to "Dimensions" on page 66 for this projector before you permanently install it best suits your projector 19 BenQ recommends that it , so as to optical component variations. zoom) zoom) 1582 1701 1820 1944 2090 2237...

User Manual
Page 20
...Connect the other the other end of the the other end to the AUDIO socket of the computer. See "Remote paging operations" on the projector. 2. USB cable 2. Press FN and the labeled function key simultaneously. computer. See "Audio Settings" on the notebook. Usually a key combo...a DVI-I output with a HDMI socket. Connect computer. Audio cable function key with a monitor symbol on page 51 for each source. 3. To connect the projector to a notebook or desktop computer: • With a VGA cable: • With a DVI-I cable: • With a HDMI cable: Your computer Your...
...Connect the other the other end of the the other end to the AUDIO socket of the computer. See "Remote paging operations" on the projector. 2. USB cable 2. Press FN and the labeled function key simultaneously. computer. See "Audio Settings" on the notebook. Usually a key combo...a DVI-I output with a HDMI socket. Connect computer. Audio cable function key with a monitor symbol on page 51 for each source. 3. To connect the projector to a notebook or desktop computer: • With a VGA cable: • With a DVI-I cable: • With a HDMI cable: Your computer Your...


