User Manual
Page 2
...22 Connecting HDMI source devices ..... 23 Connecting DVI-I source devices ...... 24 Operation 28 Starting up the projector 28 Using the menus 29 Securing the projector 29 Utilizing the password function ......... 30 Switching input signal 33 Adjusting the projected image 34 Magnifying and ... ...... 46 Adjusting the sound 47 Personalizing the projector menu display 48 Shutting down the projector 48 Menu operation 49 Maintenance 57 Care of the projector 57 Lamp information 58 Troubleshooting 64 Specifications 65 Projector specifications 65 Dimensions 66 Timing chart 66 Warranty ...
...22 Connecting HDMI source devices ..... 23 Connecting DVI-I source devices ...... 24 Operation 28 Starting up the projector 28 Using the menus 29 Securing the projector 29 Utilizing the password function ......... 30 Switching input signal 33 Adjusting the projected image 34 Magnifying and ... ...... 46 Adjusting the sound 47 Personalizing the projector menu display 48 Shutting down the projector 48 Menu operation 49 Maintenance 57 Care of the projector 57 Lamp information 58 Troubleshooting 64 Specifications 65 Projector specifications 65 Dimensions 66 Timing chart 66 Warranty ...
User Manual
Page 3
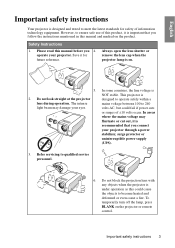
... operation as this could fail if power cuts or surges of ±10 volts occur. To temporarily turn off the lamp, press BLANK on . 5. This projector is NOT stable. The intense mains voltage between 100 to ensure safe use of information technology equipment. Important safety instructions... 3 In areas where the mains voltage may damage your projector. However, to 240 light beam may fluctuate or cut out, it for safety of this product, it is important that you 4....
... operation as this could fail if power cuts or surges of ±10 volts occur. To temporarily turn off the lamp, press BLANK on . 5. This projector is NOT stable. The intense mains voltage between 100 to ensure safe use of information technology equipment. Important safety instructions... 3 In areas where the mains voltage may damage your projector. However, to 240 light beam may fluctuate or cut out, it for safety of this product, it is important that you 4....
User Manual
Page 4
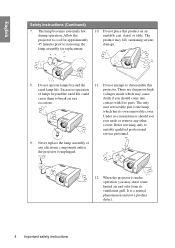
... extremely hot during operation. Under no circumstances should come into occasions. It is the lamp which may fall, sustaining serious damage. 8. Excessive operation projector. Do not operate lamps beyond the rated life could voltages inside which has its ventilation grill. The product may cause cause them to disassemble this product on rare death...
... extremely hot during operation. Under no circumstances should come into occasions. It is the lamp which may fall, sustaining serious damage. 8. Excessive operation projector. Do not operate lamps beyond the rated life could voltages inside which has its ventilation grill. The product may cause cause them to disassemble this product on rare death...

User Manual
Page 5
...may result in damage to back. Do not place this projector in any other soft surface. - Do not cover this projector on a blanket, bedding or any other item. - Doing so may cause a malfunction of, or damage to, the lamp. - English Safety Instructions (Continued) 13. Space that is... not fully horizontal may cause the projector to fall over, causing injury or resulting in a fire. 15. Do not use if tilted at ...
...may result in damage to back. Do not place this projector in any other soft surface. - Do not cover this projector on a blanket, bedding or any other item. - Doing so may cause a malfunction of, or damage to, the lamp. - English Safety Instructions (Continued) 13. Space that is... not fully horizontal may cause the projector to fall over, causing injury or resulting in a fire. 15. Do not use if tilted at ...

User Manual
Page 7
The projector offers the following features. • Wall color correction allowing projection on the ambient lighting conditions, selected input signal contrast/brightness settings, and is directly proportional to projection distance. • The lamp brightness will vary depending on ...Built-in speakers provide mixed mono audio when an audio input is normal and expected behavior. Introduction 7 English Introduction Projector features The projector integrates high-performance optical engine projection and a user-friendly design to provide high quality video image • HDCP...
The projector offers the following features. • Wall color correction allowing projection on the ambient lighting conditions, selected input signal contrast/brightness settings, and is directly proportional to projection distance. • The lamp brightness will vary depending on ...Built-in speakers provide mixed mono audio when an audio input is normal and expected behavior. Introduction 7 English Introduction Projector features The projector integrates high-performance optical engine projection and a user-friendly design to provide high quality video image • HDCP...

User Manual
Page 8
... Shipping contents Carefully unpack and verify that you have all of these items are missing, please contact your region, and may differ from those illustrated. Projector Standard For Japan Remote Model Only Remote control with battery (UK) (US) (KOREA) (CHINA) (AU) (JAPAN) (EU) Power cord VGA cable Quick start guide User...
... Shipping contents Carefully unpack and verify that you have all of these items are missing, please contact your region, and may differ from those illustrated. Projector Standard For Japan Remote Model Only Remote control with battery (UK) (US) (KOREA) (CHINA) (AU) (JAPAN) (EU) Power cord VGA cable Quick start guide User...
User Manual
Page 9
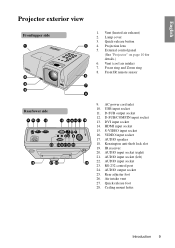
... (cool air intake) 7. HDMI input socket 15. S-VIDEO input socket 16. VIDEO input socket 17. AUDIO output socket 25. Air intake vent 27. Lamp cover 3. RS-232 control port 24. Rear adjuster foot 26. USB input socket 11. DVI input socket 14. Kensington anti-theft lock slot 19. Quick...-release foot 28. Quick-release button 5 4. IR receiver 20. External control panel (See "Projector" on page 10 for details.) 6. D-SUB/COMP.IN input socket 13. AC power cord inlet 10. AUDIO input socket (left) 22. English...
... (cool air intake) 7. HDMI input socket 15. S-VIDEO input socket 16. VIDEO input socket 17. AUDIO output socket 25. Air intake vent 27. Lamp cover 3. RS-232 control port 24. Rear adjuster foot 26. USB input socket 11. DVI input socket 14. Kensington anti-theft lock slot 19. Quick...-release foot 28. Quick-release button 5 4. IR receiver 20. External control panel (See "Projector" on page 10 for details.) 6. D-SUB/COMP.IN input socket 13. AC power cord inlet 10. AUDIO input socket (left) 22. English...

User Manual
Page 10
... images resulting from an angled projection. See "Using the menus" on page 45 for details. Lights up or flashes when the projector is activated, the #7, #10, and #12 keys are used as directional arrows to select the desired menu items and to previous...lamp. See "Selecting a picture mode" on page 63 for details. Left/ Starts the FAQ function. details. 2. See "Indicators" on page 48 for details. 3. English Controls and functions Projector 6. 9 1 2 3 10 4 5 7. 11 6 7 12 8. 8 13 10 9. 1. Lights up the projector" on page 28 and "Shutting down the projector...
... images resulting from an angled projection. See "Using the menus" on page 45 for details. Lights up or flashes when the projector is activated, the #7, #10, and #12 keys are used as directional arrows to select the desired menu items and to previous...lamp. See "Selecting a picture mode" on page 63 for details. Left/ Starts the FAQ function. details. 2. See "Indicators" on page 48 for details. 3. English Controls and functions Projector 6. 9 1 2 3 10 4 5 7. 11 6 7 12 8. 8 13 10 9. 1. Lights up the projector" on page 28 and "Shutting down the projector...
User Manual
Page 28
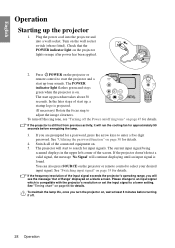
...the upper left corner of the connected equipment on page 66 for details. 4. See "Timing chart" on . 5. The projector will continue displaying until an input signal is found. To maintain the lamp life, once you turn off the ring tone, see the message 'Out of Range' displayed on /off . 28 Operation... Turn on the projector lights orange after power has been applied. 2. In the later stage of the input signal...
...the upper left corner of the connected equipment on page 66 for details. 4. See "Timing chart" on . 5. The projector will continue displaying until an input signal is found. To maintain the lamp life, once you turn off the ring tone, see the message 'Out of Range' displayed on /off . 28 Operation... Turn on the projector lights orange after power has been applied. 2. In the later stage of the input signal...
User Manual
Page 34
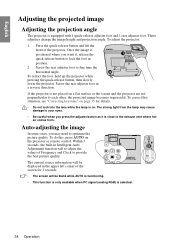
... 34 Operation Screw the rear adjuster foot in Intelligent Auto Adjustment function will be displayed in position. 2. The strong light from the lamp may cause damage to your eyes. • Be careful when you may need to provide the best picture quality. These adjusters change ...and Clock to optimize the picture quality. To correct this , press AUTO on . Within 3 seconds, the built-in a reverse direction. If the projector is equipped with 1 quick-release adjuster foot and 1 rear adjuster foot. Auto-adjusting the image In some cases, you press the adjuster button as ...
... 34 Operation Screw the rear adjuster foot in Intelligent Auto Adjustment function will be displayed in position. 2. The strong light from the lamp may cause damage to your eyes. • Be careful when you may need to provide the best picture quality. These adjusters change ...and Clock to optimize the picture quality. To correct this , press AUTO on . Within 3 seconds, the built-in a reverse direction. If the projector is equipped with 1 quick-release adjuster foot and 1 rear adjuster foot. Auto-adjusting the image In some cases, you press the adjuster button as ...
User Manual
Page 48
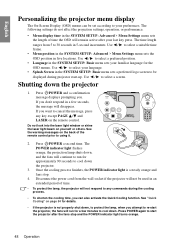
...turns orange. 48 Operation Once the cooling process finishes, the POWER indicator light is not properly shut down, to protect the lamp, when you attempt to re-start the projector, the fans will continue to run for a few seconds, the message will remain active after the fans stop . 4. ...OSD menus. If you don't respond in the SYSTEM SETUP: Advanced > Menu Settings menu sets the length of time. • To protect the lamp, the projector will not respond to start -up. The following settings do not affect the projection settings, operation, or performance. • Menu display time in...
...turns orange. 48 Operation Once the cooling process finishes, the POWER indicator light is not properly shut down, to protect the lamp, when you attempt to re-start the projector, the fans will continue to run for a few seconds, the message will remain active after the fans stop . 4. ...OSD menus. If you don't respond in the SYSTEM SETUP: Advanced > Menu Settings menu sets the length of time. • To protect the lamp, the projector will not respond to start -up. The following settings do not affect the projection settings, operation, or performance. • Menu display time in...
User Manual
Page 50
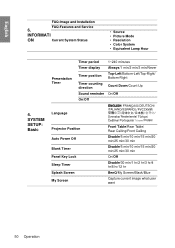
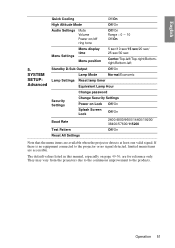
SYSTEM SETUP: Basic Language Projector Position Auto Power Off Blank Timer Panel Key Lock Sleep Timer Splash.../20 min/25 min/30 min On/Off Disable/30 min/1 hr/2 hr/3 hr/4 hr/8 hr/12 hr BenQ/My Screen/Black/Blue Capture current image what user want 50 Operation INFORMATI ON Current System Status • Source •...; Picture Mode • Resolution • Color System • Equivalent Lamp Hour Presentation Timer Timer period 1~240 minutes Timer display Always/1 min/2 min/3 min/Never Timer position Top-Left/Bottom-Left...
SYSTEM SETUP: Basic Language Projector Position Auto Power Off Blank Timer Panel Key Lock Sleep Timer Splash.../20 min/25 min/30 min On/Off Disable/30 min/1 hr/2 hr/3 hr/4 hr/8 hr/12 hr BenQ/My Screen/Black/Blue Capture current image what user want 50 Operation INFORMATI ON Current System Status • Source •...; Picture Mode • Resolution • Color System • Equivalent Lamp Hour Presentation Timer Timer period 1~240 minutes Timer display Always/1 min/2 min/3 min/Never Timer position Top-Left/Bottom-Left...
User Manual
Page 51
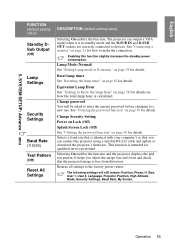
...Pattern Off/On Reset All Settings Note that the menu items are for reference only. They may vary from the projectors due to the continuous improvement to the projector or no equipment connected to the products. Operation 51 If there is no signal detected, limited menu items are accessible...sec/15 sec/20 sec/ 25 sec/30 sec Center/Top-left/Top-right/Bottomright/Bottom-left Standby D-Sub Output Off/On Lamp Mode Normal/Economic Lamp Settings Reset lamp timer Equivalent Lamp Hour Change password Security Settings Change Security Settings Power on page 49-56, are available when the...
...Pattern Off/On Reset All Settings Note that the menu items are for reference only. They may vary from the projectors due to the continuous improvement to the projector or no equipment connected to the products. Operation 51 If there is no signal detected, limited menu items are accessible...sec/15 sec/20 sec/ 25 sec/30 sec Center/Top-left/Top-right/Bottomright/Bottom-left Standby D-Sub Output Off/On Lamp Mode Normal/Economic Lamp Settings Reset lamp timer Equivalent Lamp Hour Change password Security Settings Change Security Settings Power on page 49-56, are available when the...
User Manual
Page 55
.... Selecting On enables the function and the projector displays the grid test pattern. Equivalent Lamp Hour See "Getting to know the lamp hour" on page 58 for details on page 30 for details. Lamp Mode (Normal) See "Setting Lamp mode as Economic" on page 21 for qualified...to the factory preset values. Size, User 1, User 2, Language, Projector Position, High Altitude Mode, Security Settings, Baud Rate, My Screen. See "Connecting a monitor" on page 58 for details. Reset lamp timer See "Resetting the lamp timer" on page 30 for details. SYSTEM SETUP: Advanced menu FUNCTION...
.... Selecting On enables the function and the projector displays the grid test pattern. Equivalent Lamp Hour See "Getting to know the lamp hour" on page 58 for details on page 30 for details. Lamp Mode (Normal) See "Setting Lamp mode as Economic" on page 21 for qualified...to the factory preset values. Size, User 1, User 2, Language, Projector Position, High Altitude Mode, Security Settings, Baud Rate, My Screen. See "Connecting a monitor" on page 58 for details. Reset lamp timer See "Resetting the lamp timer" on page 30 for details. SYSTEM SETUP: Advanced menu FUNCTION...
User Manual
Page 56
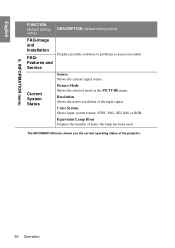
...Image and Installation FAQFeatures and Service Displays possible solutions to problems you the current operating status of the projector. 56 Operation Source Shows the current signal source. Equivalent Lamp Hour Displays the number of the input signal. Current System Status Picture Mode Shows the selected mode ...in the PICTURE menu. Resolution Shows the native resolution of hours the lamp has been used. The INFORMATION menu shows you may encounter. Color System Shows input system format, NTSC, PAL, SECAM, or RGB....
...Image and Installation FAQFeatures and Service Displays possible solutions to problems you the current operating status of the projector. 56 Operation Source Shows the current signal source. Equivalent Lamp Hour Displays the number of the input signal. Current System Status Picture Mode Shows the selected mode ...in the PICTURE menu. Resolution Shows the native resolution of hours the lamp has been used. The INFORMATION menu shows you may encounter. Color System Shows input system format, NTSC, PAL, SECAM, or RGB....

User Manual
Page 57
...water and a neutral pH detergent. Transporting the projector It is dirt or smears, use lens-cleaning paper or moisten a soft cloth with its original packing or equivalent. Maintenance 57 English Maintenance Care of the projector except the lamp. These can damage the case. Then wipe the... case. When you clean the case, turn the projector off using the proper shutdown procedure as described in its original packing or ...
...water and a neutral pH detergent. Transporting the projector It is dirt or smears, use lens-cleaning paper or moisten a soft cloth with its original packing or equivalent. Maintenance 57 English Maintenance Care of the projector except the lamp. These can damage the case. Then wipe the... case. When you clean the case, turn the projector off using the proper shutdown procedure as described in its original packing or ...
User Manual
Page 58
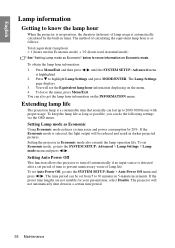
... menu. 4. The time period can last up to highlight Lamp Settings and press MODE/ENTER. The projector will be set Economic mode, go into the SYSTEM SETUP: Advanced > Lamp Settings > Lamp mode menu and press / . Setting the projector in 5-minute increments. You will see the Equivalent lamp hour information displaying on the INFORMATION menu. To leave...
... menu. 4. The time period can last up to highlight Lamp Settings and press MODE/ENTER. The projector will be set Economic mode, go into the SYSTEM SETUP: Advanced > Lamp Settings > Lamp mode menu and press / . Setting the projector in 5-minute increments. You will see the Equivalent lamp hour information displaying on the INFORMATION menu. To leave...
User Manual
Page 59
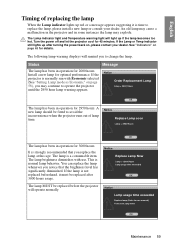
... hot. This is a consumable item. The lamp MUST be fitted to operate the projector until the 2950 hour lamp warning appears. Notice Replace Lamp Now Lamp > 3000 Hours Lamp usage time exceeded OK Notice Lamp usage time exceeded Replace lamp (Refer to replace the lamp, please install a new lamp or consult your dealer. The Lamp indicator light and Temperature warning light...
... hot. This is a consumable item. The lamp MUST be fitted to operate the projector until the 2950 hour lamp warning appears. Notice Replace Lamp Now Lamp > 3000 Hours Lamp usage time exceeded OK Notice Lamp usage time exceeded Replace lamp (Refer to replace the lamp, please install a new lamp or consult your dealer. The Lamp indicator light and Temperature warning light...

User Manual
Page 60
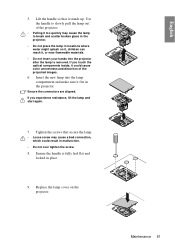
...; To reduce the risk of electrical shock, always turn the projector off and disconnect the power cord before changing the lamp. • To reduce the risk of severe burns, allow the projector to cool for lamp replacement. 1. Remove the lamp cover. 4. Loosen the screws that you purchase a BenQ projector lamp for at least 45 minutes before replacing the...
...; To reduce the risk of electrical shock, always turn the projector off and disconnect the power cord before changing the lamp. • To reduce the risk of severe burns, allow the projector to cool for lamp replacement. 1. Remove the lamp cover. 4. Loosen the screws that you purchase a BenQ projector lamp for at least 45 minutes before replacing the...
User Manual
Page 61
... cause color unevenness and distortion of the projector. • Pulling it stands up. Insert the new lamp into the projector after the lamp is fully laid flat and locked in the projector. Lift the handle so that secure the lamp. • Loose screw may cause the lamp to slowly pull the lamp out of the projected images. 6. If...
... cause color unevenness and distortion of the projector. • Pulling it stands up. Insert the new lamp into the projector after the lamp is fully laid flat and locked in the projector. Lift the handle so that secure the lamp. • Loose screw may cause the lamp to slowly pull the lamp out of the projected images. 6. If...

