User Manual
Page 2
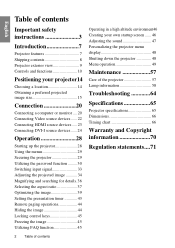
... the presentation timer 43 Remote paging operations 44 Hiding the image 44 Locking control keys 45 Freezing the image 45 Utilizing FAQ function 45 Operating in a high altitude environment46 Creating your own startup screen ...... 46 Adjusting the sound 47 Personalizing the projector menu display 48 Shutting down the projector 48 Menu operation 49...
... the presentation timer 43 Remote paging operations 44 Hiding the image 44 Locking control keys 45 Freezing the image 45 Utilizing FAQ function 45 Operating in a high altitude environment46 Creating your own startup screen ...... 46 Adjusting the sound 47 Personalizing the projector menu display 48 Shutting down the projector 48 Menu operation 49...
User Manual
Page 3
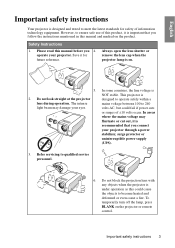
... a power stabilizer, surge protector or uninterruptible power supply (UPS). 3. Always open the lens shutter or remove the lens cap when the projector lamp is on the projector or remote control. To temporarily turn off the lamp, press BLANK on . 5. volts AC, but could cause the objects to ensure safe use of this could...
... a power stabilizer, surge protector or uninterruptible power supply (UPS). 3. Always open the lens shutter or remove the lens cap when the projector lamp is on the projector or remote control. To temporarily turn off the lamp, press BLANK on . 5. volts AC, but could cause the objects to ensure safe use of this could...
User Manual
Page 8
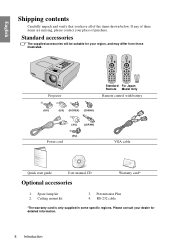
... from those illustrated. Presentation Plus 4. Standard accessories The supplied accessories will be suitable for your dealer for detailed information. 8 Introduction Spare lamp kit 2. Projector Standard For Japan Remote Model Only Remote control with battery (UK) (US) (KOREA) (CHINA) (AU) (JAPAN) (EU) Power cord VGA cable Quick start guide User manual CD Optional accessories...
... from those illustrated. Presentation Plus 4. Standard accessories The supplied accessories will be suitable for your dealer for detailed information. 8 Introduction Spare lamp kit 2. Projector Standard For Japan Remote Model Only Remote control with battery (UK) (US) (KOREA) (CHINA) (AU) (JAPAN) (EU) Power cord VGA cable Quick start guide User manual CD Optional accessories...
User Manual
Page 9
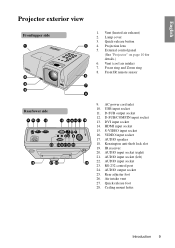
Quick-release button 5 4. External control panel (See "Projector" on page 10 for details.) 6. Vent (cool air intake) 7. AUDIO speaker 18. Rear adjuster foot 26. .... VIDEO input socket 17. AUDIO input socket (left) 22. HDMI input socket 15. AUDIO input socket (right) 21. Front IR remote sensor 6 7 78 Rear/lower side 9 10 11 12 13 14 15 16 17 18 24 23 22 21 20 19 28 27...ring 8. Lamp cover 3. Projection lens 5. D-SUB/COMP.IN input socket 13. AUDIO output socket 25. English Projector exterior view Front/upper side 1 2 3 4 1. AUDIO input socket 23.
Quick-release button 5 4. External control panel (See "Projector" on page 10 for details.) 6. Vent (cool air intake) 7. AUDIO speaker 18. Rear adjuster foot 26. .... VIDEO input socket 17. AUDIO input socket (left) 22. HDMI input socket 15. AUDIO input socket (right) 21. Front IR remote sensor 6 7 78 Rear/lower side 9 10 11 12 13 14 15 16 17 18 24 23 22 21 20 19 28 27...ring 8. Lamp cover 3. Projection lens 5. D-SUB/COMP.IN input socket 13. AUDIO output socket 25. English Projector exterior view Front/upper side 1 2 3 4 1. AUDIO input socket 23.

User Manual
Page 11
...page 35 for details. Enter 8. Down cursor to a PC. 10. Navigates and changes settings in the projector" on -screen pointer. See "Using the menus" on page 44 for details. for details. OSD. Down OSD. English Remote control 1 15 15 16 16 2 2 17 17 3 18 3 18 4 19 4 19 5 ... "Using the menus" on . KEYSTONE keys ( / ) Manually corrects distorted images resulting from an angled projection. Laser (Standard Remote only) 6. Up cursor mode and on page 29 4. Left cursor Enter key when connected through USB 9. Page up the Navigates...
...page 35 for details. Enter 8. Down cursor to a PC. 10. Navigates and changes settings in the projector" on -screen pointer. See "Using the menus" on page 44 for details. for details. OSD. Down OSD. English Remote control 1 15 15 16 16 2 2 17 17 3 18 3 18 4 19 4 19 5 ... "Using the menus" on . KEYSTONE keys ( / ) Manually corrects distorted images resulting from an angled projection. Laser (Standard Remote only) 6. Up cursor mode and on page 29 4. Left cursor Enter key when connected through USB 9. Page up the Navigates...

User Manual
Page 12
...exits and saves menu settings. 21. See Changes settings in the OSD. VOLUME +/- 14. ZOOM+ Lights when the remote control is USB to a PC. FREEZE usage environment. Freeze/unfreezes the on yourself or others. See the warning messages...Up See "Freezing the image" on page 47 for details. The laser pointer is visible. PAGE DOWN 12. See "Remote menu. See "Using "Auto-adjusting the image" on page 34 for the menus" on page 29 for details. details... the best picture 22. MUTE details. 15. Zoom out. to projector. 16. The laser beam is not a toy.
...exits and saves menu settings. 21. See Changes settings in the OSD. VOLUME +/- 14. ZOOM+ Lights when the remote control is USB to a PC. FREEZE usage environment. Freeze/unfreezes the on yourself or others. See the warning messages...Up See "Freezing the image" on page 47 for details. The laser pointer is visible. PAGE DOWN 12. See "Remote menu. See "Using "Auto-adjusting the image" on page 34 for the menus" on page 29 for details. details... the best picture 22. MUTE details. 15. Zoom out. to projector. 16. The laser beam is not a toy.
User Manual
Page 13
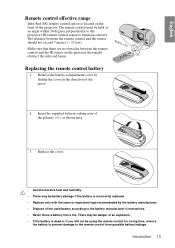
... an angle within 30 degrees perpendicular to the projector's IR remote control sensor to the battery manufacturer's instructions. • Never throw a battery into a fire. English Remote control effective range Infra-Red (IR) remote control sensor is located on the projector that there are no obstacles between the remote control and the sensor should not exceed 7 meters...
... an angle within 30 degrees perpendicular to the projector's IR remote control sensor to the battery manufacturer's instructions. • Never throw a battery into a fire. English Remote control effective range Infra-Red (IR) remote control sensor is located on the projector that there are no obstacles between the remote control and the sensor should not exceed 7 meters...
User Manual
Page 14
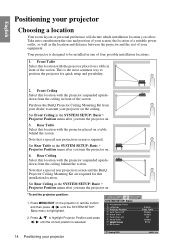
... most common way to mount your projector Analog RGB English Front Table Disable Disable Off Disable BenQ MENU Exit Press / to be installed in front of your projector Choosing a location Your room layout or personal preference will dictate which installation location you turn the projector on the projector or remote control and then press / until the...
... most common way to mount your projector Analog RGB English Front Table Disable Disable Off Disable BenQ MENU Exit Press / to be installed in front of your projector Choosing a location Your room layout or personal preference will dictate which installation location you turn the projector on the projector or remote control and then press / until the...

User Manual
Page 20
... of the the other end to the AUDIO socket of the cable to VGA cable to the cable to the DVI-I cable 1. See "Remote paging operations" on the projector. D-SUB/COMP.IN Locate a function key labeled CRT/LCD or a 1 2 2 2 3 cable 2. Ensure the cables are firmly inserted. Take a DVI-I...application on their external video ports when connected to the DVI-I cable 2. Additionally, you can also connect the projector to a computer via the USB cable so you wish to make use the remote paging function, take a suitable audio cable and connect one end to the D-Sub output to...
... of the the other end to the AUDIO socket of the cable to VGA cable to the cable to the DVI-I cable 1. See "Remote paging operations" on the projector. D-SUB/COMP.IN Locate a function key labeled CRT/LCD or a 1 2 2 2 3 cable 2. Ensure the cables are firmly inserted. Take a DVI-I...application on their external video ports when connected to the DVI-I cable 2. Additionally, you can also connect the projector to a computer via the USB cable so you wish to make use the remote paging function, take a suitable audio cable and connect one end to the D-Sub output to...
User Manual
Page 28
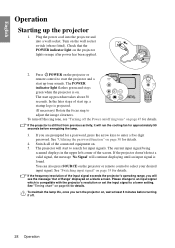
...five digit password. To turn the projector on a blank screen. Plug the power cord into the projector and into a wall socket. Press POWER on page 33 for input signals. See "Switching input signal" on the projector or remote control to start the projector and a start up , a startup... logo is still hot from previous activity, it will start up the projector 1. See "Timing chart" on the projector or remote control to search for details. To maintain the...
...five digit password. To turn the projector on a blank screen. Plug the power cord into the projector and into a wall socket. Press POWER on page 33 for input signals. See "Switching input signal" on the projector or remote control to start the projector and a start up , a startup... logo is still hot from previous activity, it will start up the projector 1. See "Timing chart" on the projector or remote control to search for details. To maintain the...
User Manual
Page 29
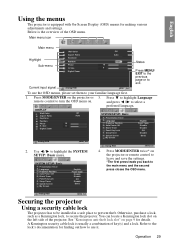
...Lock Sleep Timer Splash Screen My Screen English Front Table Disable Disable Off Disable BenQ Analog RGB MENU Exit Analog RGB MENU Exit 2. Analog RGB MENU Exit Securing the projector Using a security cable lock The projector has to be installed in a safe place to select a preferred language.... Splash Screen My Screen English Front Table Disable Disable Off Disable BenQ 4. Press MODE/ENTER twice* on page 9 for making various adjustments and settings. See "Kensington anti-theft lock slot" on the projector or remote control to leave and save the settings. *The first press ...
...Lock Sleep Timer Splash Screen My Screen English Front Table Disable Disable Off Disable BenQ Analog RGB MENU Exit Analog RGB MENU Exit 2. Analog RGB MENU Exit Securing the projector Using a security cable lock The projector has to be installed in a safe place to select a preferred language.... Splash Screen My Screen English Front Table Disable Disable Off Disable BenQ 4. Press MODE/ENTER twice* on page 9 for making various adjustments and settings. See "Kensington anti-theft lock slot" on the projector or remote control to leave and save the settings. *The first press ...
User Manual
Page 31
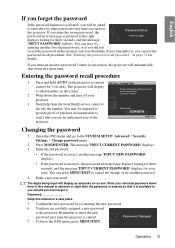
... asterisks on-screen. Please write down the number and turn on the screen. Seek help from the local BenQ service center to enter the new password next time the projector is started. Password Changed 7. You can retry by re-entering the new password. 6. Entering the password... it . You can use the password recall procedure. Enter a new password. See "Entering the password recall procedure" on the projector or remote RECALL PASSWORD control for your selected password down in advance or right after the password is incorrect, the password error message displays lasting...
... asterisks on-screen. Please write down the number and turn on the screen. Seek help from the local BenQ service center to enter the new password next time the projector is started. Password Changed 7. You can retry by re-entering the new password. 6. Entering the password... it . You can use the password recall procedure. Enter a new password. See "Entering the password recall procedure" on the projector or remote RECALL PASSWORD control for your selected password down in advance or right after the password is incorrect, the password error message displays lasting...

User Manual
Page 33
.... You can also manually cycle through the available input signals. 1. Once detected, the selected source information will display on the projector or remote control. S-VIDEO • The native display resolution of this projector is in a 4:3 aspect ratio (MP735 is highlighted. 2. Press / until the SOURCE menu is 16:10). Any other resolutions will change...
.... You can also manually cycle through the available input signals. 1. Once detected, the selected source information will display on the projector or remote control. S-VIDEO • The native display resolution of this projector is in a 4:3 aspect ratio (MP735 is highlighted. 2. Press / until the SOURCE menu is 16:10). Any other resolutions will change...
User Manual
Page 34
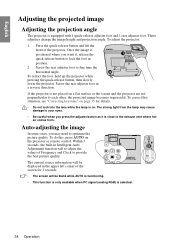
... blank while AUTO is functioning. • This function is only available when PC signal (analog RGB) is not placed on the projector or remote control. The current source information will be displayed in a reverse direction. Press the quick-release button and lift the front of the... projector. To correct this , press AUTO on a flat surface or the screen and the projector are not perpendicular to each other, the projected image becomes ...
... blank while AUTO is functioning. • This function is only available when PC signal (analog RGB) is not placed on the projector or remote control. The current source information will be displayed in a reverse direction. Press the quick-release button and lift the front of the... projector. To correct this , press AUTO on a flat surface or the screen and the projector are not perpendicular to each other, the projected image becomes ...
User Manual
Page 35
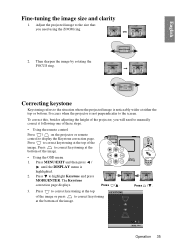
FOCUS ZOOM 2. To correct this, besides adjusting the height of the projector, you need to manually correct it following one of these steps. • Using the remote control Press / on the projector or remote control to correct keystoning at the top of the image. • Using the OSD menu 1. ...image is noticeably wider at the bottom of the image or press to correct keystoning at the bottom of the image. It occurs when the projector is highlighted. 2. The Keystone correction page displays. Press to the screen. English Fine-tuning the image size and clarity 1. Press / ...
FOCUS ZOOM 2. To correct this, besides adjusting the height of the projector, you need to manually correct it following one of these steps. • Using the remote control Press / on the projector or remote control to correct keystoning at the top of the image. • Using the OSD menu 1. ...image is noticeably wider at the bottom of the image or press to correct keystoning at the bottom of the image. It occurs when the projector is highlighted. 2. The Keystone correction page displays. Press to the screen. English Fine-tuning the image size and clarity 1. Press / ...
User Manual
Page 36
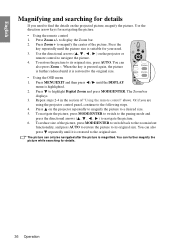
...again, the picture is further reduced until it is suitable for your need to magnify the center of "Using the remote control" above. The Zoom bar displays. 3. Press on the projector repeatedly to magnify the picture to navigate the picture. 4. Use the directional arrows ( , , , ) on...searching for navigating the picture. • Using the remote control 1. English Magnifying and searching for details If you are using the projector control panel, continue to its original size. Press Zoom + to find the details on the projector or remote control to a desired size. 5. You can ...
...again, the picture is further reduced until it is suitable for your need to magnify the center of "Using the remote control" above. The Zoom bar displays. 3. Press on the projector repeatedly to magnify the picture to navigate the picture. 4. Use the directional arrows ( , , , ) on...searching for navigating the picture. • Using the remote control 1. English Magnifying and searching for details If you are using the projector control panel, continue to its original size. Press Zoom + to find the details on the projector or remote control to a desired size. 5. You can ...
User Manual
Page 40
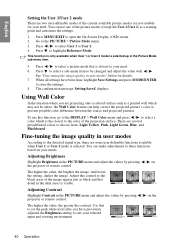
... / to select a picture mode that detail in the dark areas is selected up in the PICTURE menu and adjust the values by pressing / on the projector or remote control. Press / to select User 1 to your needs. When all settings have previously adjusted the Brightness setting to prevent possible color difference between the... On-Screen Display (OSD) menu. 2. Adjust this to set the peak white level after you are several precalibrated colors to these functions based on the projector or remote control.
... / to select a picture mode that detail in the dark areas is selected up in the PICTURE menu and adjust the values by pressing / on the projector or remote control. Press / to select User 1 to your needs. When all settings have previously adjusted the Brightness setting to prevent possible color difference between the... On-Screen Display (OSD) menu. 2. Adjust this to set the peak white level after you are several precalibrated colors to these functions based on the projector or remote control.
User Manual
Page 41
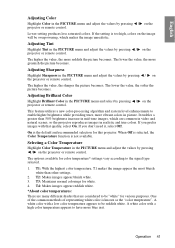
...the image will be reddish white. Adjusting Tint Highlight Tint in the PICTURE menu and adjust the values by pressing / on the projector or remote control. If you don't need it . Selecting a Color Temperature Highlight Color Temperature in the PICTURE menu and adjust the values... appears to be "white" for white. 4. Adjusting Sharpness Highlight Sharpness in the PICTURE menu and select by pressing / on the projector or remote control. T3: Maintains normal colorings for various purposes. A white color with that are many different shades that quality, select On. ...
...the image will be reddish white. Adjusting Tint Highlight Tint in the PICTURE menu and adjust the values by pressing / on the projector or remote control. If you don't need it . Selecting a Color Temperature Highlight Color Temperature in the PICTURE menu and adjust the values... appears to be "white" for white. 4. Adjusting Sharpness Highlight Sharpness in the PICTURE menu and select by pressing / on the projector or remote control. T3: Maintains normal colorings for various purposes. A white color with that are many different shades that quality, select On. ...

User Manual
Page 44
... light beam on the blank screen. You can press any key on page 20 for details. Remote paging operations Connect the projector to become heated and deformed or even cause a fire. 44 Operation If remote paging function doesn't work with a USB cable prior to using it. • Do not ... or disabled, you can set the blank time in the SYSTEM SETUP: Basic > Blank Timer menu to let the projector return the image automatically after a period of the remote control prior to the presenter, you can operate your computer is hidden. No matter Blank Timer is Off" displaying on...
... light beam on the blank screen. You can press any key on page 20 for details. Remote paging operations Connect the projector to become heated and deformed or even cause a fire. 44 Operation If remote paging function doesn't work with a USB cable prior to using it. • Do not ... or disabled, you can set the blank time in the SYSTEM SETUP: Basic > Blank Timer menu to let the projector return the image automatically after a period of the remote control prior to the presenter, you can operate your computer is hidden. No matter Blank Timer is Off" displaying on...

User Manual
Page 45
... corner of the screen. A confirmation message displays. Freezing the image Press FREEZE on the remote control to exit the OSD. To release the function, press any key on the projector or remote control. 2. Utilizing FAQ function The INFORMATION menu contains possible solutions to select a problem and... To release panel key lock, press and hold / for possible solutions. 5. Press to select Off. • Keys on the remote control are running on the projector. The word 'FREEZE' will operate except POWER. 1. Even if an image is frozen on the screen, the pictures are still ...
... corner of the screen. A confirmation message displays. Freezing the image Press FREEZE on the remote control to exit the OSD. To release the function, press any key on the projector or remote control. 2. Utilizing FAQ function The INFORMATION menu contains possible solutions to select a problem and... To release panel key lock, press and hold / for possible solutions. 5. Press to select Off. • Keys on the remote control are running on the projector. The word 'FREEZE' will operate except POWER. 1. Even if an image is frozen on the screen, the pictures are still ...

