

User Manual
Page 1
MP730 Digital Projector User Manual Welcome
MP730 Digital Projector User Manual Welcome
User Manual
Page 3
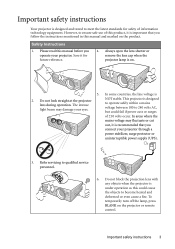
...it is recommended that you follow the instructions mentioned in this manual before you connect your projector through a power stabilizer, surge protector or uninterruptible power supply (UPS). 3. Please read this manual and marked on the product. In areas where the mains ...voltage may damage your projector. Important safety instructions 3 Important safety instructions Your projector is 2. In some countries, the line voltage is designed...
...it is recommended that you follow the instructions mentioned in this manual before you connect your projector through a power stabilizer, surge protector or uninterruptible power supply (UPS). 3. Please read this manual and marked on the product. In areas where the mains ...voltage may damage your projector. Important safety instructions 3 Important safety instructions Your projector is 2. In some countries, the line voltage is designed...

User Manual
Page 7
...the ambient lighting conditions, selected input source contrast/brightness settings, and is normal and expected behavior. Introduction 7 Introduction Projector features The projector integrates high-performance optical engine projection and a user-friendly design to deliver high reliability and ease of use •... problems with one quick button press • Presentation timer for a better control of time during presentations • High quality manual zoom lens • One-key auto-adjustment to display the best picture quality • Digital keystone correction to correct distorted ...
...the ambient lighting conditions, selected input source contrast/brightness settings, and is normal and expected behavior. Introduction 7 Introduction Projector features The projector integrates high-performance optical engine projection and a user-friendly design to deliver high reliability and ease of use •... problems with one quick button press • Presentation timer for a better control of time during presentations • High quality manual zoom lens • One-key auto-adjustment to display the best picture quality • Digital keystone correction to correct distorted ...

User Manual
Page 8
... with batteries Quick start guide User manual CD Soft cover Warranty card* Safety manual* (UK) (US) (EU) (AU) (KOREA) (CHINA) Power cord Optional accessories 1. Please consult your place of the items shown below. Presentation Plus 4. RS232 cable 8 Introduction Spare lamp kit 2. PUSH Projector Soft carry case Remote control with...Standard accessories The supplied accessories will be suitable for your region, and may differ from those illustrated. *The warranty card and safety manual are missing, please contact your dealer for connection to a PC or video equipment.
... with batteries Quick start guide User manual CD Soft cover Warranty card* Safety manual* (UK) (US) (EU) (AU) (KOREA) (CHINA) Power cord Optional accessories 1. Please consult your place of the items shown below. Presentation Plus 4. RS232 cable 8 Introduction Spare lamp kit 2. PUSH Projector Soft carry case Remote control with...Standard accessories The supplied accessories will be suitable for your region, and may differ from those illustrated. *The warranty card and safety manual are missing, please contact your dealer for connection to a PC or video equipment.

User Manual
Page 10
... light 5 Indicates the status of the image. Turns on page 44 for 7 12 details. 8 13 10. Lights up red if the projector's temperature becomes too high. Adjusts the size of the lamp. "Switching input signal" on page 61 for details. 2 9 8. See "...up 10 or flashes when the lamp has developed a 6 11 problem. Controls and functions Projector 7. Left/ Starts the FAQ function. Keystone/Arrow buttons ( / Up, / 14 Down) 10 Manually corrects distorted images resulting from an angled projection. See "Fine-tuning the image size and...
... light 5 Indicates the status of the image. Turns on page 44 for 7 12 details. 8 13 10. Lights up red if the projector's temperature becomes too high. Adjusts the size of the lamp. "Switching input signal" on page 61 for details. 2 9 8. See "...up 10 or flashes when the lamp has developed a 6 11 problem. Controls and functions Projector 7. Left/ Starts the FAQ function. Keystone/Arrow buttons ( / Up, / 14 Down) 10 Manually corrects distorted images resulting from an angled projection. See "Fine-tuning the image size and...
User Manual
Page 11
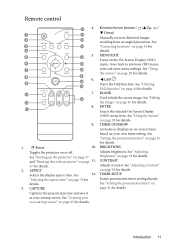
... details. TIMER ON/SHOW Activates or displays an on-screen timer based on or off. BRIGHTNESS Adjusts brightness. II Power 10. Toggles the projector on your own timer setting. CONTRAST Adjusts contrast. ENTER Enacts the selected On-Screen Display (OSD) menu item. See 12. Keystone/Arrow ...buttons ( / Up, / Down) Manually corrects distorted images resulting from an angled projection. MENU/EXIT Turns on page 41 for details. Goes back to hide the screen image. ...
... details. TIMER ON/SHOW Activates or displays an on-screen timer based on or off. BRIGHTNESS Adjusts brightness. II Power 10. Toggles the projector on your own timer setting. CONTRAST Adjusts contrast. ENTER Enacts the selected On-Screen Display (OSD) menu item. See 12. Keystone/Arrow ...buttons ( / Up, / Down) Manually corrects distorted images resulting from an angled projection. MENU/EXIT Turns on page 41 for details. Goes back to hide the screen image. ...
User Manual
Page 29
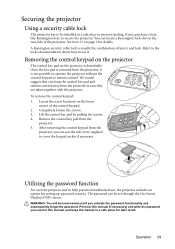
... if necessary. You can be inconvenienced if you used in this manual (if necessary) and write the password you activate the password functionality and subsequently forget the password. Removing the control keypad on the projector The control key pad on the rear side of key(s) and lock...key pad from the projector in a safe place for later recall. After removing the control keypad from the projector, it is not possible to use it. The password can locate a Kensington lock slot on the projector is usually the combination of the projector. Print out this manual, and keep the...
... if necessary. You can be inconvenienced if you used in this manual (if necessary) and write the password you activate the password functionality and subsequently forget the password. Removing the control keypad on the projector The control key pad on the rear side of key(s) and lock...key pad from the projector in a safe place for later recall. After removing the control keypad from the projector, it is not possible to use it. The password can locate a Kensington lock slot on the projector is usually the combination of the projector. Print out this manual, and keep the...

User Manual
Page 30
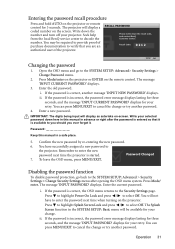
...OSD menu, press MENU/EXIT. See "Entering the password recall procedure" on the projector. IMPORTANT: The digits being input will automatically shut down here in this manual in this manual in the SYSTEM SETUP: Basic menu will be used unless the correct password is ...My Screen function in a safe place. 7. Password Error Please try again. 30 Operation Password Keep this manual, and you enter an incorrect password 5 times in succession, the projector will display as pictured to the SYSTEM SETUP: Advanced > Security Settings menu. Write your selected password down...
...OSD menu, press MENU/EXIT. See "Entering the password recall procedure" on the projector. IMPORTANT: The digits being input will automatically shut down here in this manual in this manual in the SYSTEM SETUP: Basic menu will be used unless the correct password is ...My Screen function in a safe place. 7. Password Error Please try again. 30 Operation Password Keep this manual, and you enter an incorrect password 5 times in succession, the projector will display as pictured to the SYSTEM SETUP: Advanced > Security Settings menu. Write your selected password down...
User Manual
Page 31
... > Change Security Settings menu after the password is available to enter the password next time when turning on the screen. Password Keep this manual in a safe place. 5. Password Changed 7. Press to highlight Power On Lock and press / to decode the number. You may be... available for your retry. Recall Code: 0 2 1 2 MENU Exit Changing the password 1. Write your projector. To leave the OSD menu, press MENU/EXIT. i. Seek help from the local BenQ service center to select Off. Enter a new password. IMPORTANT: The digits being input will display a coded...
... > Change Security Settings menu after the password is available to enter the password next time when turning on the screen. Password Keep this manual in a safe place. 5. Password Changed 7. Press to highlight Power On Lock and press / to decode the number. You may be... available for your retry. Recall Code: 0 2 1 2 MENU Exit Changing the password 1. Write your projector. To leave the OSD menu, press MENU/EXIT. i. Seek help from the local BenQ service center to select Off. Enter a new password. IMPORTANT: The digits being input will display a coded...

User Manual
Page 32
...in hand should select and use . 32 Operation Though the password function is disabled, you need to re-activate the password function by the projector depending upon the 'aspect ratio' setting, which outputs at a time. A source selection bar displays. 2. If there is highlighted. 2. ... function is only available when the HDMI input socket is selected and press Mode/enter on the projector or ENTER on the projector or remote control. However, it can also manually cycle through the available input sources. 1. Data (graphic) "PC" presentations using mostly static images...
...in hand should select and use . 32 Operation Though the password function is disabled, you need to re-activate the password function by the projector depending upon the 'aspect ratio' setting, which outputs at a time. A source selection bar displays. 2. If there is highlighted. 2. ... function is only available when the HDMI input socket is selected and press Mode/enter on the projector or ENTER on the projector or remote control. However, it can also manually cycle through the available input sources. 1. Data (graphic) "PC" presentations using mostly static images...
User Manual
Page 34
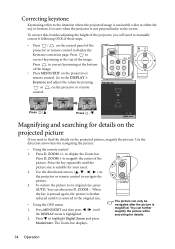
... following ONE of these steps. • Press / on the control panel of the image. • Press MENU/EXIT on the projector or remote control. Press to manually correct it is suitable for details. 34 Operation You can further magnify the picture while searching for your need. 2. Press MENU/EXIT...the screen. Press / . Press D. To correct this, besides adjusting the height of the picture. Press / . ZOOM + to magnify the center of the projector, you need to find the details on the projected picture If you will need to highlight Digital Zoom and press Mode/enter.
... following ONE of these steps. • Press / on the control panel of the image. • Press MENU/EXIT on the projector or remote control. Press to manually correct it is suitable for details. 34 Operation You can further magnify the picture while searching for your need. 2. Press MENU/EXIT...the screen. Press / . Press D. To correct this, besides adjusting the height of the picture. Press / . ZOOM + to magnify the center of the projector, you need to find the details on the projected picture If you will need to highlight Digital Zoom and press Mode/enter.
User Manual
Page 57
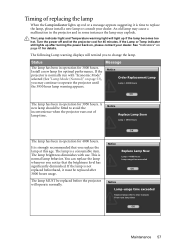
...page 53), you to replace the lamp, please install a new lamp or consult your dealer. Turn the power off and let the projector cool for optimal performance. If the lamp is not replaced beforehand, it is strongly recommended that you notice that the brightness level has significantly... diminished. The lamp MUST be fitted to User manual) Then reset lamp timer OK Maintenance 57 Timing of lamp time. Notice Order Replacement Lamp Lamp > 3000 Hours OK The lamp ...
...page 53), you to replace the lamp, please install a new lamp or consult your dealer. Turn the power off and let the projector cool for optimal performance. If the lamp is not replaced beforehand, it is strongly recommended that you notice that the brightness level has significantly... diminished. The lamp MUST be fitted to User manual) Then reset lamp timer OK Maintenance 57 Timing of lamp time. Notice Order Replacement Lamp Lamp > 3000 Hours OK The lamp ...

User Manual
Page 67
... publication and to make changes from country to operate the projector in a dusty environment. To obtain warranty service, immediately...such revision or changes. *DLP, Digital Micromirror Device and DMD are copyrights of purchase date will be replacement of any particular purpose. Others are trademarks of BenQ Corporation. Proof of their... respective companies or organizations. Copyright Copyright 2007 by any means, electronic, mechanical, magnetic, optical, chemical, manual or otherwise, without obligation ...
... publication and to make changes from country to operate the projector in a dusty environment. To obtain warranty service, immediately...such revision or changes. *DLP, Digital Micromirror Device and DMD are copyrights of purchase date will be replacement of any particular purpose. Others are trademarks of BenQ Corporation. Proof of their... respective companies or organizations. Copyright Copyright 2007 by any means, electronic, mechanical, magnetic, optical, chemical, manual or otherwise, without obligation ...

