User Manual
Page 1
MP730 Digital Projector User Manual Welcome
MP730 Digital Projector User Manual Welcome

User Manual
Page 2
...21 Connecting a computer or monitor... 21 Connecting Video source devices....... 22 Operation 27 Starting up the projector 27 Using the menus 28 Securing the projector 29 Switching input signal 32 Adjusting the projected image 33 Magnifying and searching for details on the ... screen .......45 Adjusting the sound 46 Personalizing the projector menu display 46 Shutting down the projector 47 Menu operation 48 Maintenance 55 Care of the projector 55 Lamp information 56 Troubleshooting 62 Specifications 63 Projector specifications 63 Dimensions 64 Timing chart 65 Warranty and...
...21 Connecting a computer or monitor... 21 Connecting Video source devices....... 22 Operation 27 Starting up the projector 27 Using the menus 28 Securing the projector 29 Switching input signal 32 Adjusting the projected image 33 Magnifying and searching for details on the ... screen .......45 Adjusting the sound 46 Personalizing the projector menu display 46 Shutting down the projector 47 Menu operation 48 Maintenance 55 Care of the projector 55 Lamp information 56 Troubleshooting 62 Specifications 63 Projector specifications 63 Dimensions 64 Timing chart 65 Warranty and...
User Manual
Page 3
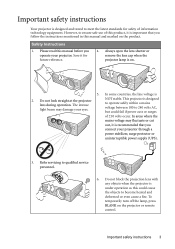
... or cut out, it is important that you connect your projector through a power stabilizer, surge protector or uninterruptible power supply (UPS). 3. This projector is on. 5. Do not block the projection lens with any objects when the projector is 2. Important safety instructions 3 Safety Instructions 1. Do not... lamp, press BLANK on the product. In areas where the mains voltage may damage your projector. However, to ensure safe use of this manual and marked on the projector or remote control. NOT stable. Always open the lens shutter or remove the lens cap when...
... or cut out, it is important that you connect your projector through a power stabilizer, surge protector or uninterruptible power supply (UPS). 3. This projector is on. 5. Do not block the projection lens with any objects when the projector is 2. Important safety instructions 3 Safety Instructions 1. Do not... lamp, press BLANK on the product. In areas where the mains voltage may damage your projector. However, to ensure safe use of this manual and marked on the projector or remote control. NOT stable. Always open the lens shutter or remove the lens cap when...

User Manual
Page 4
...and not a product defect. 4 Important safety instructions It is under operation, you ever undo or remove any electronic components unless the projector is the lamp which may fall, sustaining serious damage. 11. Excessive operation of lamps beyond the rated lamp life. Under no circumstances ...should come into contact with live parts. Allow the projector to cool for replacement. 10. The only user serviceable part is unplugged. 12. Never replace the lamp assembly or any other covers....
...and not a product defect. 4 Important safety instructions It is under operation, you ever undo or remove any electronic components unless the projector is the lamp which may fall, sustaining serious damage. 11. Excessive operation of lamps beyond the rated lamp life. Under no circumstances ...should come into contact with live parts. Allow the projector to cool for replacement. 10. The only user serviceable part is unplugged. 12. Never replace the lamp assembly or any other covers....

User Manual
Page 5
... with a cloth or any other soft surface. - Doing so may result in any other item. - Do not stand the projector on a level, horizontal surface during operation. - Locations where the altitudes are seriously obstructed, overheating inside of more than 3000 m (10000 feet). 3000 m (10000 feet) 16.... Do not block the ventilation holes. Locations where excessive humidity, dust, or cigarette smoke may become excessively high, such as the inside the projector may cause the projector to fall over, causing injury or resulting in damage to , the lamp. - Do not cover this...
... with a cloth or any other soft surface. - Doing so may result in any other item. - Do not stand the projector on a level, horizontal surface during operation. - Locations where the altitudes are seriously obstructed, overheating inside of more than 3000 m (10000 feet). 3000 m (10000 feet) 16.... Do not block the ventilation holes. Locations where excessive humidity, dust, or cigarette smoke may become excessively high, such as the inside the projector may cause the projector to fall over, causing injury or resulting in damage to , the lamp. - Do not cover this...

User Manual
Page 6
... mount installation. Safety Instructions (Continued) 17. If you use a proper fitting BenQ projector ceiling mount kit and that you purchased your projector on the projector. BenQ recommends that the projector may fall from the power supply's wall socket and call BenQ to fail. You can purchase a BenQ projector ceiling mount kit from the place you ensure it securely to...
... mount installation. Safety Instructions (Continued) 17. If you use a proper fitting BenQ projector ceiling mount kit and that you purchased your projector on the projector. BenQ recommends that the projector may fall from the power supply's wall socket and call BenQ to fail. You can purchase a BenQ projector ceiling mount kit from the place you ensure it securely to...

User Manual
Page 7
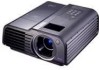
...allowing color adjustments to your liking • Detachable keypad on the projector to prevent stealing • Splash Screen lock to prevent unauthorized use • Selectable quick cooling function makes the projector cool in a shorter time • FAQ to troubleshoot operational problems ...over time and may vary within the lamp manufacturers specifications. This is normal and expected behavior. Introduction 7 Introduction Projector features The projector integrates high-performance optical engine projection and a user-friendly design to deliver high reliability and ease of the projected ...
...allowing color adjustments to your liking • Detachable keypad on the projector to prevent stealing • Splash Screen lock to prevent unauthorized use • Selectable quick cooling function makes the projector cool in a shorter time • FAQ to troubleshoot operational problems ...over time and may vary within the lamp manufacturers specifications. This is normal and expected behavior. Introduction 7 Introduction Projector features The projector integrates high-performance optical engine projection and a user-friendly design to deliver high reliability and ease of the projected ...

User Manual
Page 8
... will be suitable for connection to a PC or video equipment. Presentation Plus 4. RS232 cable 8 Introduction Spare lamp kit 2. PUSH Projector Soft carry case Remote control with the cables required for your region, and may differ from those illustrated. *The warranty card and safety... manual are missing, please contact your dealer for detailed information. Shipping contents The projector is shipped with batteries Quick start guide User manual CD Soft cover Warranty card* Safety manual* (UK) (US) (EU) (AU) ...
... will be suitable for connection to a PC or video equipment. Presentation Plus 4. RS232 cable 8 Introduction Spare lamp kit 2. PUSH Projector Soft carry case Remote control with the cables required for your region, and may differ from those illustrated. *The warranty card and safety... manual are missing, please contact your dealer for detailed information. Shipping contents The projector is shipped with batteries Quick start guide User manual CD Soft cover Warranty card* Safety manual* (UK) (US) (EU) (AU) ...
User Manual
Page 9
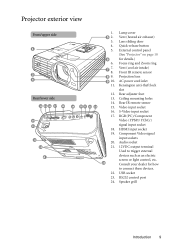
...devices such as an electric screen or light control, etc. 24 Consult your dealer for details.) 6. RS232 control port 24. External control panel (See "Projector" on page 10 6 for how to connect these devices. 22. Front IR remote sensor 8 9. AC power cord inlet 11. Rear IR remote sensor... 19 20 21 22 23 15. Vent (cool air intake) 8. Speaker grill Introduction 9 Projector exterior view Front/upper side 1 2 3 4 PUSH Rear/lower side 14 15 16 17 18 10 11 12 13 4 1. Kensington anti-theft lock slot ...
...devices such as an electric screen or light control, etc. 24 Consult your dealer for details.) 6. RS232 control port 24. External control panel (See "Projector" on page 10 6 for how to connect these devices. 22. Front IR remote sensor 8 9. AC power cord inlet 11. Rear IR remote sensor... 19 20 21 22 23 15. Vent (cool air intake) 8. Speaker grill Introduction 9 Projector exterior view Front/upper side 1 2 3 4 PUSH Rear/lower side 14 15 16 17 18 10 11 12 13 4 1. Kensington anti-theft lock slot ...

User Manual
Page 10
...the image size and clarity" on page 44 for details. 13. Right/ 33 for the displayed image. See "Indicators" on or off. See Toggles the projector on page page 28 for details. 61 for details. 2 9 8. Selects an available picture setup mode. Goes back to hide the screen image. See "Hiding... the size of the lamp. adjusting the image" on page 61 for details. See "Panel Key Lock" on page 61 for details. Lights up the projector" on page 47 for details. 4. See "Indicators" on page 52 for details. See "Using the menus" on page 32 for details. SOURCE 5. ...
...the image size and clarity" on page 44 for details. 13. Right/ 33 for the displayed image. See "Indicators" on or off. See Toggles the projector on page page 28 for details. 61 for details. 2 9 8. Selects an available picture setup mode. Goes back to hide the screen image. See "Hiding... the size of the lamp. adjusting the image" on page 61 for details. See "Panel Key Lock" on page 61 for details. Lights up the projector" on page 47 for details. 4. See "Indicators" on page 52 for details. See "Using the menus" on page 32 for details. SOURCE 5. ...
User Manual
Page 11
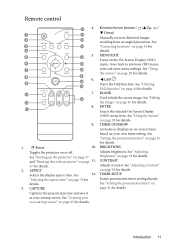
Toggles the projector on page 41 for details. 3. See "Setting the presentation timer" on or off. TIMER SETUP Enters presentation timer setting directly. "Selecting the aspect ratio" on ... previous OSD menu, exits and saves menu settings. ENTER Enacts the selected On-Screen Display (OSD) menu item. See "Starting up the projector" on page 27 and "Shutting down the projector" on page 34 for details. See "Correcting keystone" on page 11. 47 for details. CAPTURE Captures the projected picture and save...
Toggles the projector on page 41 for details. 3. See "Setting the presentation timer" on or off. TIMER SETUP Enters presentation timer setting directly. "Selecting the aspect ratio" on ... previous OSD menu, exits and saves menu settings. ENTER Enacts the selected On-Screen Display (OSD) menu item. See "Starting up the projector" on page 27 and "Shutting down the projector" on page 34 for details. See "Correcting keystone" on page 11. 47 for details. CAPTURE Captures the projected picture and save...

User Manual
Page 12
... the displayed image. It is necessary to make adjustments. Do not look into the laser light window or shine the laser light beam on the projector. The laser pointer is a 15. When the On-Screen Display (OSD) menu is for details. 21. The LASER Pointer is not a toy. The..." on page 42 for details. 18. Indicator light 22. 13. MODE details on the projected picture" on the right for details. MUTE Toggles projector audio between on the Magnifies or reduces the projected image remote control is visible. See "Using the menus" on page 32 for details. 19. ...
... the displayed image. It is necessary to make adjustments. Do not look into the laser light window or shine the laser light beam on the projector. The laser pointer is a 15. When the On-Screen Display (OSD) menu is for details. 21. The LASER Pointer is not a toy. The..." on page 42 for details. 18. Indicator light 22. 13. MODE details on the projected picture" on the right for details. MUTE Toggles projector audio between on the Magnifies or reduces the projected image remote control is visible. See "Using the menus" on page 32 for details. 19. ...
User Manual
Page 13
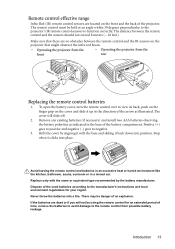
...the manufacturer's instructions and local environment regulations for an extended period of the projector. Introduction 13 The cover will not be held at an angle within 30 degrees perpendicular to the projector's IR remote control sensors to negative. 3. The distance between the remote ...control and the IR sensors on the projector that might obstruct the infra-red beam. • Operating the projector from the • Operating the projector from possible battery leakage. Dispose of an explosion. Stop when it back down into...
...the manufacturer's instructions and local environment regulations for an extended period of the projector. Introduction 13 The cover will not be held at an angle within 30 degrees perpendicular to the projector's IR remote control sensors to negative. 3. The distance between the remote ...control and the IR sensors on the projector that might obstruct the infra-red beam. • Operating the projector from the • Operating the projector from possible battery leakage. Dispose of an explosion. Stop when it back down into...

User Manual
Page 14
... layout or personal preference will dictate which installation location you turn the projector on . 4. Positioning your projector Choosing a location Your projector is designed to be installed in one of your equipment. 14 Positioning your projector Note that a special rear projection screen and the BenQ Projector Ceiling Mounting Kit are required for quick setup and portability. 2. Rear...
... layout or personal preference will dictate which installation location you turn the projector on . 4. Positioning your projector Choosing a location Your projector is designed to be installed in one of your equipment. 14 Positioning your projector Note that a special rear projection screen and the BenQ Projector Ceiling Mounting Kit are required for quick setup and portability. 2. Rear...
User Manual
Page 15
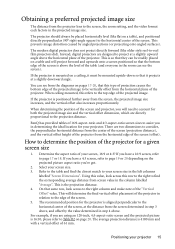
... always be readily placed on pages 17-20, that same row, look across to the edge of the projector for your screen, 16:9 or 4:3? BenQ has provided tables of the table (and everyone in determining the ideal location for a given screen size 1. Refer to the table and find the corresponding ...
... always be readily placed on pages 17-20, that same row, look across to the edge of the projector for your screen, 16:9 or 4:3? BenQ has provided tables of the table (and everyone in determining the ideal location for a given screen size 1. Refer to the table and find the corresponding ...
User Manual
Page 16
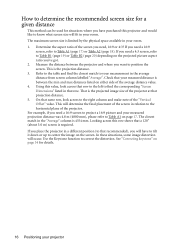
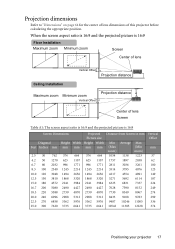
... the min and max distances listed on the screen. Check that your measured distance is the projection distance. 3. This will occur. If you place the projector in the average distance from screen column labelled "Average". The maximum screen size is 4554 mm. If you need a 16:9 screen to project a 16... will have to tilt it down or up to center the image on either side of the average distance value. 4. This is between the projector and where you want to position the screen. How to determine the recommended screen size for a given distance This method can be used for ...
... the min and max distances listed on the screen. Check that your measured distance is the projection distance. 3. This will occur. If you place the projector in the average distance from screen column labelled "Average". The maximum screen size is 4554 mm. If you need a 16:9 screen to project a 16... will have to tilt it down or up to center the image on either side of the average distance value. 4. This is between the projector and where you want to position the screen. How to determine the recommended screen size for a given distance This method can be used for ...
User Manual
Page 17
... 7620 3735 6641 3735 6641 10542 11385 12228 Vertical Offset mm 37 62 100 125 149 187 224 249 274 299 336 374 Positioning your projector 17 When the screen aspect ratio is 16:9 and the projected picture is 16:9 Floor Installation Maximum zoom Minimum zoom Screen Center of lens Vertical...
... 7620 3735 6641 3735 6641 10542 11385 12228 Vertical Offset mm 37 62 100 125 149 187 224 249 274 299 336 374 Positioning your projector 17 When the screen aspect ratio is 16:9 and the projected picture is 16:9 Floor Installation Maximum zoom Minimum zoom Screen Center of lens Vertical...

User Manual
Page 18
... 22.5 270 6858 3362 5976 3362 5379 8538 9221 9904 264 25.0 300 7620 3735 6641 3735 5976 9486 10245 11004 293 18 Positioning your projector
... 22.5 270 6858 3362 5976 3362 5379 8538 9221 9904 264 25.0 300 7620 3735 6641 3735 5976 9486 10245 11004 293 18 Positioning your projector

User Manual
Page 19
... 7620 4572 6096 4572 6096 11612 12541 13470 Vertical Offset mm 18 30 49 61 73 91 110 122 134 146 165 183 Positioning your projector 19
... 7620 4572 6096 4572 6096 11612 12541 13470 Vertical Offset mm 18 30 49 61 73 91 110 122 134 146 165 183 Positioning your projector 19

User Manual
Page 20
... test the projection size and distance using the actual projector in Table A1, Table A2, Table B1, and Table B2 due to make allowance for this projector's optical characteristics. This will help you permanently install it best suits your installation location. 20 Positioning your projector BenQ recommends that it , so as to optical component...
... test the projection size and distance using the actual projector in Table A1, Table A2, Table B1, and Table B2 due to make allowance for this projector's optical characteristics. This will help you permanently install it best suits your installation location. 20 Positioning your projector BenQ recommends that it , so as to optical component...


