
User Manual
Page 1
MS524AE/MW526AE/MH530FHD Digital Projector User Manual V1.02
MS524AE/MW526AE/MH530FHD Digital Projector User Manual V1.02

User Manual
Page 2
...a computer or monitor...21 Connecting Video source devices.......22 Operation 26 Starting up the projector 26 Adjusting the projected image 27 Using the menus 30 Securing the projector 31 Switching input signal 33 Magnifying and searching for details ...34 Selecting the aspect ratio...altitude environment 42 Adjusting the sound 42 Personalizing the projector menu display 43 Select the lamp saver mode 43 2 Table of contents Shutting down the projector 44 Menu operation 45 Maintenance 58 Care of the projector 58 Lamp information 59 Troubleshooting......... 67 Specifications 68 ...
...a computer or monitor...21 Connecting Video source devices.......22 Operation 26 Starting up the projector 26 Adjusting the projected image 27 Using the menus 30 Securing the projector 31 Switching input signal 33 Magnifying and searching for details ...34 Selecting the aspect ratio...altitude environment 42 Adjusting the sound 42 Personalizing the projector menu display 43 Select the lamp saver mode 43 2 Table of contents Shutting down the projector 44 Menu operation 45 Maintenance 58 Care of the projector 58 Lamp information 59 Troubleshooting......... 67 Specifications 68 ...

User Manual
Page 3
...mentioned in this product, it is important that you operate your projector. This projector is NOT stable. Do not look straight at the projector lens during operation. In areas where the mains voltage may damage your projector through a power stabilizer, surge protector or uninterruptible power supply (UPS...or surges of this manual and marked on . 5. Important safety instructions Your projector is on the product. Always open the lens shutter or remove the lens cap when the projector lamp is designed and tested to qualified service personnel. 6. Refer servicing to meet...
...mentioned in this product, it is important that you operate your projector. This projector is NOT stable. Do not look straight at the projector lens during operation. In areas where the mains voltage may damage your projector through a power stabilizer, surge protector or uninterruptible power supply (UPS...or surges of this manual and marked on . 5. Important safety instructions Your projector is on the product. Always open the lens shutter or remove the lens cap when the projector lamp is designed and tested to qualified service personnel. 6. Refer servicing to meet...
User Manual
Page 4
... 45 minutes prior to disassemble 8. this product on rare occasions. Never replace the lamp assembly or any other covers. Allow the projector to cool for replacement. 10. The product may sense some heated air and odor from its ventilation grill. Do not operate lamps... inside which may cause death if you may fall, sustaining serious damage. 11. When the projector is under operation, you should you ever undo or remove any electronic components unless the projector is a normal phenomenon and not a product defect. 4 Important safety instructions Excessive operation of...
... 45 minutes prior to disassemble 8. this product on rare occasions. Never replace the lamp assembly or any other covers. Allow the projector to cool for replacement. 10. The product may sense some heated air and odor from its ventilation grill. Do not operate lamps... inside which may cause death if you may fall, sustaining serious damage. 11. When the projector is under operation, you should you ever undo or remove any electronic components unless the projector is a normal phenomenon and not a product defect. 4 Important safety instructions Excessive operation of...

User Manual
Page 5
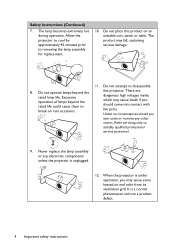
... windows rolled up. - Safety Instructions (Continued) 13. Do not block the ventilation holes. Locations where the altitudes are seriously obstructed, overheating inside the projector may become excessively high, such as the inside of , or damage to, the lamp. 3000 m (10000 feet) 0 m (0 feet) Important safety instructions 5... Using the projector when it is poorly ventilated or confined. Do not place inflammables near fire alarms - Do not use if tilted at an angle of more than ...
... windows rolled up. - Safety Instructions (Continued) 13. Do not block the ventilation holes. Locations where the altitudes are seriously obstructed, overheating inside the projector may become excessively high, such as the inside of , or damage to, the lamp. 3000 m (10000 feet) 0 m (0 feet) Important safety instructions 5... Using the projector when it is poorly ventilated or confined. Do not place inflammables near fire alarms - Do not use if tilted at an angle of more than ...

User Manual
Page 6
... objects upon it is capable of displaying inverted images for mounting the projector and ensure it . Use only BenQ's Ceiling Mount Kit for ceiling mount installation. Do not place liquids near or on end 18. disconnect it to have the projector serviced. 17. This product is securely installed. 6 Important safety instructions Safety Instructions...
... objects upon it is capable of displaying inverted images for mounting the projector and ensure it . Use only BenQ's Ceiling Mount Kit for ceiling mount installation. Do not place liquids near or on end 18. disconnect it to have the projector serviced. 17. This product is securely installed. 6 Important safety instructions Safety Instructions...

User Manual
Page 7
... ECO BLANK bottom to immediately hide the image, lowering the lamp power at the same time your projector when the power is fed. • Instant Restart Selectable Instant Restart function enables you can wear BenQ 3D glassed to show the best picture quality immediately • Quick Cooling, Auto Power Off, Direct Power...
... ECO BLANK bottom to immediately hide the image, lowering the lamp power at the same time your projector when the power is fed. • Instant Restart Selectable Instant Restart function enables you can wear BenQ 3D glassed to show the best picture quality immediately • Quick Cooling, Auto Power Off, Direct Power...
User Manual
Page 8
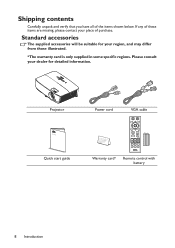
Shipping contents Carefully unpack and verify that you have all of purchase. If any of these items are missing, please contact your dealer for your region, and may differ from those illustrated. *The warranty card is only supplied in some specific regions. Projector Power cord VGA cable QDiugiictkal SPtraortjeGctuoirde Quick start guide Warranty card* Remote control with battery 8 Introduction Please consult your place of the items shown below. Standard accessories The supplied accessories will be suitable for detailed information.
Shipping contents Carefully unpack and verify that you have all of purchase. If any of these items are missing, please contact your dealer for your region, and may differ from those illustrated. *The warranty card is only supplied in some specific regions. Projector Power cord VGA cable QDiugiictkal SPtraortjeGctuoirde Quick start guide Warranty card* Remote control with battery 8 Introduction Please consult your place of the items shown below. Standard accessories The supplied accessories will be suitable for detailed information.
User Manual
Page 10
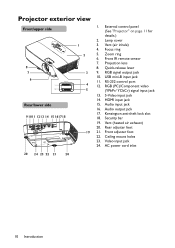
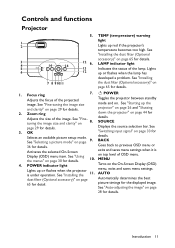
... air exhaust) 20. AC power cord inlet 20 24 23 22 21 20 10 Introduction Front IR remote sensor 7. Projection lens 8. S-Video input jack 14. Projector exterior view Front/upper side 1 2 8 7 3 6 4 5 Rear/lower side 91011 1213 14 15 161718 19 1. Lamp cover 3. Focus ring 5. Video input jack 24. Front adjuster ...foot 22. Security bar 19. Zoom ring 6. RGB signal output jack 10. External control panel (See "Projector" on page 11 for details.) 2. RS-232 control port 12. Audio input jack 16.
... air exhaust) 20. AC power cord inlet 20 24 23 22 21 20 10 Introduction Front IR remote sensor 7. Projection lens 8. S-Video input jack 14. Projector exterior view Front/upper side 1 2 8 7 3 6 4 5 Rear/lower side 91011 1213 14 15 161718 19 1. Lamp cover 3. Focus ring 5. Video input jack 24. Front adjuster ...foot 22. Security bar 19. Zoom ring 6. RGB signal output jack 10. External control panel (See "Projector" on page 11 for details.) 2. RS-232 control port 12. Audio input jack 16.
User Manual
Page 11
...indicator light 13 Indicates the status of the image. See "Starting up or flashes when the projector menu, exits and saves menu settings. Zoom ring down the projector" on page 29 for details. 10. OK "Switching input signal" on page 30 for details...44 for Selects an available picture setup mode. AUTO dust filter (Optional accessory)" on page 26 and "Shutting 2. Focus ring 7. details. projector" on page Automatically determines the best 65 for details. 1. Introduction 11 details. See "Installing 7 8 91011 the dust filter (Optional accessory...
...indicator light 13 Indicates the status of the image. See "Starting up or flashes when the projector menu, exits and saves menu settings. Zoom ring down the projector" on page 29 for details. 10. OK "Switching input signal" on page 30 for details...44 for Selects an available picture setup mode. AUTO dust filter (Optional accessory)" on page 26 and "Shutting 2. Focus ring 7. details. projector" on page Automatically determines the best 65 for details. 1. Introduction 11 details. See "Installing 7 8 91011 the dust filter (Optional accessory...
User Manual
Page 12
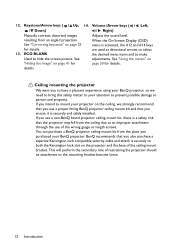
...mounting bracket become loose. 12 Introduction details. If you use of restraining the projector should its attachment to your BenQ projector. If you use a non-BenQ brand projector ceiling mount kit, there is a safety risk that the projector may fall from the ceiling due to an improper attachment through the use a...the sound level. ECO BLANK When the On-Screen Display (OSD) menu is securely and safely installed. You can purchase a BenQ projector ceiling mount kit from an angled projection. Keystone/Arrow keys ( / Up, 14. See adjustments. See "Correcting keystone" on the...
...mounting bracket become loose. 12 Introduction details. If you use of restraining the projector should its attachment to your BenQ projector. If you use a non-BenQ brand projector ceiling mount kit, there is a safety risk that the projector may fall from the ceiling due to an improper attachment through the use a...the sound level. ECO BLANK When the On-Screen Display (OSD) menu is securely and safely installed. You can purchase a BenQ projector ceiling mount kit from an angled projection. Keystone/Arrow keys ( / Up, 14. See adjustments. See "Correcting keystone" on the...
User Manual
Page 13
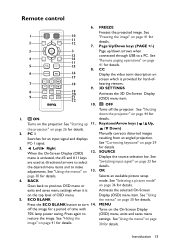
... on page 44 for details. See "Shutting down arrows when 13 connected through USB to make details. See "Starting up /down the projector" on page 30 for 1. See are used as directional arrows to select "Switching input signal" on page 41 for the desired menu items...time with Turns on page 41 for an input signal and displays resulting from an angled projection. adjustments. MENU off the projector. settings. Keystone/Arrow keys ( / Up, the projector" on 17 screen which is provided for details. / Down) 2. CC 6 16 Display the video term description on ...
... on page 44 for details. See "Shutting down arrows when 13 connected through USB to make details. See "Starting up /down the projector" on page 30 for 1. See are used as directional arrows to select "Switching input signal" on page 41 for the desired menu items...time with Turns on page 41 for an input signal and displays resulting from an angled projection. adjustments. MENU off the projector. settings. Keystone/Arrow keys ( / Up, the projector" on 17 screen which is provided for details. / Down) 2. CC 6 16 Display the video term description on ...

User Manual
Page 14
...ratio. SMART ECO Automatically determines the best Displays the lamp mode selection bar picture timings for details. 18. Volume keys (VOL / ) projector. 21. Make sure that there are no obstacles between on the front of the 16. See "Auto-adjusting the image" 20. ... the sound level. Digital Zoom keys (ZOOM +/-) Magnifies or reduces the projected picture size. QUICK INSTALL Displays the QUICK INSTALL menu including Projector Installation, Test Pattern, and Keystone. 22. The distance between the remote control and the sensor should not exceed 8 meters (~ 26 feet...
...ratio. SMART ECO Automatically determines the best Displays the lamp mode selection bar picture timings for details. 18. Volume keys (VOL / ) projector. 21. Make sure that there are no obstacles between on the front of the 16. See "Auto-adjusting the image" 20. ... the sound level. Digital Zoom keys (ZOOM +/-) Magnifies or reduces the projected picture size. QUICK INSTALL Displays the QUICK INSTALL menu including Projector Installation, Test Pattern, and Keystone. 22. The distance between the remote control and the sensor should not exceed 8 meters (~ 26 feet...

User Manual
Page 16
...installation locations: 1. Your projector is the most common way to mount your equipment. Rear Table Select this location with the projector placed near the floor behind the screen. Set Rear Table in one of the screen. Purchase the BenQ Projector Ceiling Mounting Kit from ...the ceiling behind the screen. Front Ceiling Select this location with the projector suspended upside-down from the ceiling in front of your projector on . 16 Positioning your projector Choosing a location Your room layout ...
...installation locations: 1. Your projector is the most common way to mount your equipment. Rear Table Select this location with the projector placed near the floor behind the screen. Set Rear Table in one of the screen. Purchase the BenQ Projector Ceiling Mounting Kit from ...the ceiling behind the screen. Front Ceiling Select this location with the projector suspended upside-down from the ceiling in front of your projector on . 16 Positioning your projector Choosing a location Your room layout ...
User Manual
Page 17
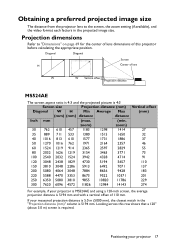
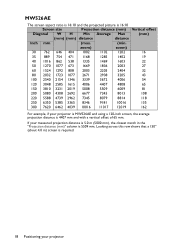
...6350 5080 3810 9855 10820 11786 229 300 7620 6096 4572 11826 12984 14143 274 For example, if your projector is MS524AE and using a 120-inch screen, the average projection distance is 5194 mm. Obtaining a preferred projected image size The distance... Projection distance (mm) Vertical offset Diagonal W H Min Average Max (mm) (mm) (mm) distance distance Inch mm (max. (min. If your projector 17 Diagonal Diagonal Screen H Center of lens W W Vertical offset Projection distance MS524AE The screen aspect ratio is 4:3 and the projected picture is required. Looking across this...
...6350 5080 3810 9855 10820 11786 229 300 7620 6096 4572 11826 12984 14143 274 For example, if your projector is MS524AE and using a 120-inch screen, the average projection distance is 5194 mm. Obtaining a preferred projected image size The distance... Projection distance (mm) Vertical offset Diagonal W H Min Average Max (mm) (mm) (mm) distance distance Inch mm (max. (min. If your projector 17 Diagonal Diagonal Screen H Center of lens W W Vertical offset Projection distance MS524AE The screen aspect ratio is 4:3 and the projected picture is required. Looking across this...
User Manual
Page 18
... 2962 7345 8079 8814 118 250 6350 5385 3365 8346 9181 10016 135 300 7620 6462 4039 10016 11017 12019 162 For example, if your projector is MW526AE and using a 120-inch screen, the average projection distance is 5509 mm. Looking across this row shows that a 150'' (about 4.0 m) screen is 16...) (mm) (mm) distance distance Inch mm (max. (min. MW526AE The screen aspect ratio is 16:10 and the projected picture is required. 18 Positioning your projector
... 2962 7345 8079 8814 118 250 6350 5385 3365 8346 9181 10016 135 300 7620 6462 4039 10016 11017 12019 162 For example, if your projector is MW526AE and using a 120-inch screen, the average projection distance is 5509 mm. Looking across this row shows that a 150'' (about 4.0 m) screen is 16...) (mm) (mm) distance distance Inch mm (max. (min. MW526AE The screen aspect ratio is 16:10 and the projected picture is required. 18 Positioning your projector

User Manual
Page 19
...exact mounting position so that it , so as to make allowance for this row shows that if you intend to permanently install the projector, you should physically test the projection size and distance using a 120-inch screen, the average projection distance is 16:9 Screen size... 8535 9352 218 300 7620 6641 3736 9271 10253 11234 262 For example, if your projector 19 BenQ recommends that a 150'' (about 4.0 m) screen is 5100 mm. Positioning your projector is MH530FHD and using the actual projector in the "Projection distance (mm)" column is required. Looking across this...
...exact mounting position so that it , so as to make allowance for this row shows that if you intend to permanently install the projector, you should physically test the projection size and distance using a 120-inch screen, the average projection distance is 16:9 Screen size... 8535 9352 218 300 7620 6641 3736 9271 10253 11234 262 For example, if your projector 19 BenQ recommends that a 150'' (about 4.0 m) screen is 5100 mm. Positioning your projector is MH530FHD and using the actual projector in the "Projection distance (mm)" column is required. Looking across this...

User Manual
Page 20
VGA to VGA (DSub) adapter cable 8. Component Video to DVI-A cable 4. Video cable 20 Connection Turn all equipment off before making any connections. 2. Use the correct signal cables for each source. 3. S-Video cable 2. HDMI cable 6. USB Cable 5. Connection When connecting a signal source to the projector, be sure to: 1. Ensure the cables are firmly inserted. 1 2 3 1 45 6 745 8 5 1. VGA cable 3. Audio cable (PC/RCA jack) 7.
VGA to VGA (DSub) adapter cable 8. Component Video to DVI-A cable 4. Video cable 20 Connection Turn all equipment off before making any connections. 2. Use the correct signal cables for each source. 3. S-Video cable 2. HDMI cable 6. USB Cable 5. Connection When connecting a signal source to the projector, be sure to: 1. Ensure the cables are firmly inserted. 1 2 3 1 45 6 745 8 5 1. VGA cable 3. Audio cable (PC/RCA jack) 7.
User Manual
Page 21
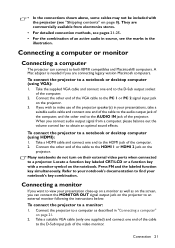
...): 1. Many notebooks do not turn on page 8). When you are commercially available from a computer, please balance out the volume control bar to a projector. Take a suitable VGA cable (only one supplied) and connect one end of the cable to the audio output jack of the computer, and the ...• In the connections shown above, some cables may not be included with a monitor symbol on the projector to an external monitor following the instructions below: To connect the projector to find your presentations, take a suitable audio cable and connect one end of the cable to the AUDIO ...
...): 1. Many notebooks do not turn on page 8). When you are commercially available from a computer, please balance out the volume control bar to a projector. Take a suitable VGA cable (only one supplied) and connect one end of the cable to the audio output jack of the computer, and the ...• In the connections shown above, some cables may not be included with a monitor symbol on the projector to an external monitor following the instructions below: To connect the projector to find your presentations, take a suitable audio cable and connect one end of the cable to the AUDIO ...
User Manual
Page 22
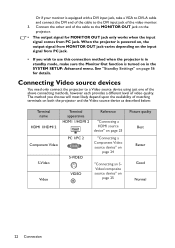
...availability of the cable to the MONITOR OUT jack on in the SYSTEM SETUP: Advanced menu. Connecting Video source devices You need only connect the projector to a Video source device using just one of the above connecting methods, however each provides a different level of the video monitor. 3. The... connect the DVI end of the cable to the DVI input jack of video quality. Connect the other end of matching terminals on both the projector and the Video source device as described below: Terminal name HDMI 1/HDMI 2 Terminal appearance HDM1 1/HDMI 2 Reference "Connecting a HDMI source device" ...
...availability of the cable to the MONITOR OUT jack on in the SYSTEM SETUP: Advanced menu. Connecting Video source devices You need only connect the projector to a Video source device using just one of the above connecting methods, however each provides a different level of the video monitor. 3. The... connect the DVI end of the cable to the DVI input jack of video quality. Connect the other end of matching terminals on both the projector and the Video source device as described below: Terminal name HDMI 1/HDMI 2 Terminal appearance HDM1 1/HDMI 2 Reference "Connecting a HDMI source device" ...


