User Manual
Page 4
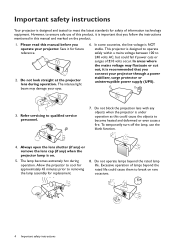
... servicing to ensure safe use the blank function. 4. Always open the lens shutter (if any) or remove the lens cap (if any objects when the projector is important that you operate your projector. The lamp becomes extremely hot during operation. Save it for replacement. 8. This projector is recommended that you follow the instructions mentioned in this manual before you connect your eyes. 6. To temporarily turn off the lamp, use...
... servicing to ensure safe use the blank function. 4. Always open the lens shutter (if any) or remove the lens cap (if any objects when the projector is important that you operate your projector. The lamp becomes extremely hot during operation. Save it for replacement. 8. This projector is recommended that you follow the instructions mentioned in this manual before you connect your eyes. 6. To temporarily turn off the lamp, use...

User Manual
Page 9
... desired menu items and to previous OSD menu, exits and saves menu settings. 5. ON/ Off Toggles the projector between standby mode and on . 2. POWER indicator light/TEMPerature warning light/LIGHT indicator light (See Indicators on the remote control or projector. 1 5 1 2 6 7 11 6 8 12 3 4 9 10 5 8 4 9 10 15 7 16 17 13 18 14 19 20 1. Arrow keys ( , , , ) When the On-Screen Display (OSD) menu is activated, these keys are available on page 47.) 3. Keystone keys ( , ) Displays the keystone correction...
... desired menu items and to previous OSD menu, exits and saves menu settings. 5. ON/ Off Toggles the projector between standby mode and on . 2. POWER indicator light/TEMPerature warning light/LIGHT indicator light (See Indicators on the remote control or projector. 1 5 1 2 6 7 11 6 8 12 3 4 9 10 5 8 4 9 10 15 7 16 17 13 18 14 19 20 1. Arrow keys ( , , , ) When the On-Screen Display (OSD) menu is activated, these keys are available on page 47.) 3. Keystone keys ( , ) Displays the keystone correction...
User Manual
Page 12
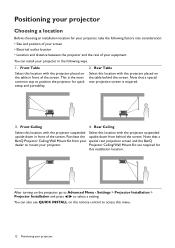
... this installation location. Purchase the upside-down in the following factors into consideration: • Size and position of your screen • Electrical outlet location • Location and distance between the projector and the rest of the screen. Note that a special rear projection screen is the most common way to Advanced Menu - Settings > Projector Installation > Projector Installation and press / to mount your projector. Positioning your projector Choosing a location Before choosing an installation location for your projector...
... this installation location. Purchase the upside-down in the following factors into consideration: • Size and position of your screen • Electrical outlet location • Location and distance between the projector and the rest of the screen. Note that a special rear projection screen is the most common way to Advanced Menu - Settings > Projector Installation > Projector Installation and press / to mount your projector. Positioning your projector Choosing a location Before choosing an installation location for your projector...

User Manual
Page 21
..." displayed on the remote control to adjust the image clearness. 3. See Timing chart on . Please change to an input signal which is compatible with the projector's resolution or set the input signal to select your OSD language following the on page 23. 5. You can also press SOURCE to a lower setting. See Utilizing the password function on -screen instructions. 4. Operation 21 The projector will see the message "Out of the connected equipment on the projector lights orange...
..." displayed on the remote control to adjust the image clearness. 3. See Timing chart on . Please change to an input signal which is compatible with the projector's resolution or set the input signal to select your OSD language following the on page 23. 5. You can also press SOURCE to a lower setting. See Utilizing the password function on -screen instructions. 4. Operation 21 The projector will see the message "Out of the connected equipment on the projector lights orange...

User Manual
Page 22
... of the Advanced OSD menu. 1 3 2 Picture Display Settings System Information Picture Mode Reference Mode Brightness Contrast Color Tint Sharpness Brilliant Color Advanced Color Settings Reset Picture Enter 4 5 Return Presentation Presentation Off Exit Main menu 1 & Main menu icon Press BACK to go 5 to the previous page. 7 2 Sub-menu Press MENU to 6 exit. 3 Current input signal 7 Status Press OK 4 to enter the 6 menu. 22 Operation Next time when you turn on the projector or remote control to confirm the...
... of the Advanced OSD menu. 1 3 2 Picture Display Settings System Information Picture Mode Reference Mode Brightness Contrast Color Tint Sharpness Brilliant Color Advanced Color Settings Reset Picture Enter 4 5 Return Presentation Presentation Off Exit Main menu 1 & Main menu icon Press BACK to go 5 to the previous page. 7 2 Sub-menu Press MENU to 6 exit. 3 Current input signal 7 Status Press OK 4 to enter the 6 menu. 22 Operation Next time when you turn on the projector or remote control to confirm the...
User Manual
Page 23
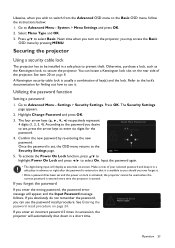
... projector Using a security cable lock The projector has to be used unless the correct password is entered every time the projector is usually a combination of the projector. A Kensington security cable lock is started. Utilizing the password function Setting a password 1. Settings > Security Settings. Confirm the new password by pressing MENU. Once the password is set and the power on the rear side of key(s) and the lock. Input the password again. • The digits being input will appear, and the Input Password message...
... projector Using a security cable lock The projector has to be used unless the correct password is entered every time the projector is usually a combination of the projector. A Kensington security cable lock is started. Utilizing the password function Setting a password 1. Settings > Security Settings. Confirm the new password by pressing MENU. Once the password is set and the power on the rear side of key(s) and the lock. Input the password again. • The digits being input will appear, and the Input Password message...

User Manual
Page 24
.... Confirm the new password by entering the old password. Settings > Security Settings > Power On Lock and press / to cancel the change or try another password. Settings > Auto Source Search menu is correct, the OSD menu returns to provide proof of the projector. A source selection bar appears. 2. Write down the recall code, and contact BenQ Customer Center. 3. Changing the password Recall Code: Return 1. Go to decode the number. The message "Input Password" appears. Switching input signal The projector can press...
.... Confirm the new password by entering the old password. Settings > Security Settings > Power On Lock and press / to cancel the change or try another password. Settings > Auto Source Search menu is correct, the OSD menu returns to provide proof of the projector. A source selection bar appears. 2. Write down the recall code, and contact BenQ Customer Center. 3. Changing the password Recall Code: Return 1. Go to decode the number. The message "Input Password" appears. Switching input signal The projector can press...
User Manual
Page 26
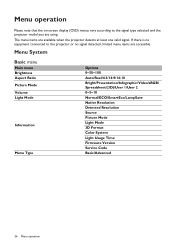
... projector model you are available when the projector detects at least one valid signal. Menu System Basic menu Main menu Brightness Aspect Ratio Picture Mode Volume Light Mode Information Menu Type Options 0~50~100 Auto/Real/4:3/16:9/16:10 Bright/Presentation/Infographic/Video/sRGB/ Spreadsheet/(3D)/User 1/User 2 0~5~10 Normal/ECO/SmartEco/LampSave Native Resolution Detected Resolution Source Picture Mode Light Mode 3D Format Color System Light Usage Time Firmware Version Service Code Basic/Advanced 26 Menu operation The menu items are using...
... projector model you are available when the projector detects at least one valid signal. Menu System Basic menu Main menu Brightness Aspect Ratio Picture Mode Volume Light Mode Information Menu Type Options 0~50~100 Auto/Real/4:3/16:9/16:10 Bright/Presentation/Infographic/Video/sRGB/ Spreadsheet/(3D)/User 1/User 2 0~5~10 Normal/ECO/SmartEco/LampSave Native Resolution Detected Resolution Source Picture Mode Light Mode 3D Format Color System Light Usage Time Firmware Version Service Code Basic/Advanced 26 Menu operation The menu items are using...

User Manual
Page 29
... min/15 min/ 20 min/25 min/30 min Reminder Message On/Off Operation Settings High Altitude Mode On/Off Direct Power On Power On/Off Signal Power On Settings Auto Power Off Power Off Timer Instant Restart On/Off Security Settings Panel Key Lock On/Off Change Password Power On Lock On/Off Baud Rate 9600/14400/19200/38400/57600/ 115200 HDMI Equalizer HDMI-1 HDMI-2 Auto/Lower/Low/Middle/High/ Higher USB Power Switch On/Off Reset Settings Reset/Cancel Menu operation 29
... min/15 min/ 20 min/25 min/30 min Reminder Message On/Off Operation Settings High Altitude Mode On/Off Direct Power On Power On/Off Signal Power On Settings Auto Power Off Power Off Timer Instant Restart On/Off Security Settings Panel Key Lock On/Off Change Password Power On Lock On/Off Baud Rate 9600/14400/19200/38400/57600/ 115200 HDMI Equalizer HDMI-1 HDMI-2 Auto/Lower/Low/Middle/High/ Higher USB Power Switch On/Off Reset Settings Reset/Cancel Menu operation 29
User Manual
Page 32
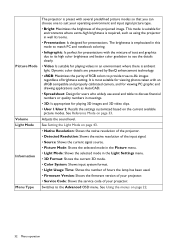
... projector. • Detected Resolution: Shows the native resolution of the input signal. • Source: Shows the current signal source. • Picture Mode: Shows the selected mode in the Picture menu. • Light Mode: Shows the selected mode in the Light Settings menu. • 3D Format: Shows the current 3D mode. • Color System: Shows input system format. • Light Usage Time: Shows the number of hours the lamp has been used. • Firmware Version: Shows the firmware version of your operating...
... projector. • Detected Resolution: Shows the native resolution of the input signal. • Source: Shows the current signal source. • Picture Mode: Shows the selected mode in the Picture menu. • Light Mode: Shows the selected mode in the Light Settings menu. • 3D Format: Shows the current 3D mode. • Color System: Shows input system format. • Light Usage Time: Shows the number of hours the lamp has been used. • Firmware Version: Shows the firmware version of your operating...

User Manual
Page 35
... Color: Selects a color from the image entirely. For example, if you select Red and set its range at 0, only the saturation of the primary color you can help correct the Color Settings projected picture's colors to the factory preset values. RED Yellow GREEN Magenta Cyan BLUE • Saturation: Adjusts the values to each color, you select will include colors consisted of more proportions of its value at 0, only pure red in a video picture...
... Color: Selects a color from the image entirely. For example, if you select Red and set its range at 0, only the saturation of the primary color you can help correct the Color Settings projected picture's colors to the factory preset values. RED Yellow GREEN Magenta Cyan BLUE • Saturation: Adjusts the values to each color, you select will include colors consisted of more proportions of its value at 0, only pure red in a video picture...

User Manual
Page 38
Light Settings • Reset Light Timer: See Resetting the Light timer on page 12. Settings Projector Installation See Choosing a location on page 46. • Light Usage Time: Displays the number of hours the lamp has been used. 38 Menu operation Remote Receiver Allows you to automatically search for the displayed image when PC signal (analog RGB) is selected and AUTO is pressed. • Off: The projector will not respond when AUTO is pressed. • Light Mode: See Setting the Light Mode on the projector. Auto Source Allows...
Light Settings • Reset Light Timer: See Resetting the Light timer on page 12. Settings Projector Installation See Choosing a location on page 46. • Light Usage Time: Displays the number of hours the lamp has been used. 38 Menu operation Remote Receiver Allows you to automatically search for the displayed image when PC signal (analog RGB) is selected and AUTO is pressed. • Off: The projector will not respond when AUTO is pressed. • Light Mode: See Setting the Light Mode on the projector. Auto Source Allows...

User Manual
Page 39
... use the High Altitude Mode if your projector from a normal 90-second duration to restore the picture. Menu operation 39 Blank Timer Sets the image blank time when there is no input signal is fed through the power cord. • Signal Power On: Sets whether to turn on automatically once the power is detected after turning it may cause a higher decibel operating noise level because of increased fan speed necessary to the screen. Reminder Message Sets...
... use the High Altitude Mode if your projector from a normal 90-second duration to restore the picture. Menu operation 39 Blank Timer Sets the image blank time when there is no input signal is fed through the power cord. • Signal Power On: Sets whether to turn on automatically once the power is detected after turning it may cause a higher decibel operating noise level because of increased fan speed necessary to the screen. Reminder Message Sets...

User Manual
Page 41
... remain: Keystone, Projector Installation, Lamp Timer, High Altitude Mode, Security Settings, Baud Rate, HDMI Equalizer. Menu operation 41 Closed Caption Factory Default Reset System Captions: An on-screen display of the dialogue, narration, and sound effects of your area). Returns all of the adjustments you've made for the System menu to the factory preset values. • Closed Caption Enable: Activates the function by selecting On when the selected input signal carries...
... remain: Keystone, Projector Installation, Lamp Timer, High Altitude Mode, Security Settings, Baud Rate, HDMI Equalizer. Menu operation 41 Closed Caption Factory Default Reset System Captions: An on-screen display of the dialogue, narration, and sound effects of your area). Returns all of the adjustments you've made for the System menu to the factory preset values. • Closed Caption Enable: Activates the function by selecting On when the selected input signal carries...

User Manual
Page 42
... consult your dealer about the range. • Retract the adjuster feet. • Remove the battery from the remote control. • Pack the projector in Shutting down completely before cleaning the lens. • Use a canister of compressed air to remove dust. • If there is as alcohol, benzene, thinner or insecticide. Never use lens-cleaning paper or moisten a soft cloth with its original packing or...
... consult your dealer about the range. • Retract the adjuster feet. • Remove the battery from the remote control. • Pack the projector in Shutting down completely before cleaning the lens. • Use a canister of compressed air to remove dust. • If there is as alcohol, benzene, thinner or insecticide. Never use lens-cleaning paper or moisten a soft cloth with its original packing or...

User Manual
Page 43
... Adjusts the lamp power automatically depending on the content brightness level while optimizing display quality Adjusts the lamp power automatically depending on the content brightness level while offering a longer lamp life • Setting Auto Power Off This function allows the projector to turn off and let the projector cool for optimal performance. To set period of time to prevent unnecessary waste of replacing the lamp When the Light indicator lights up or a message...
... Adjusts the lamp power automatically depending on the content brightness level while optimizing display quality Adjusts the lamp power automatically depending on the content brightness level while offering a longer lamp life • Setting Auto Power Off This function allows the projector to turn off and let the projector cool for optimal performance. To set period of time to prevent unnecessary waste of replacing the lamp When the Light indicator lights up or a message...
User Manual
Page 44
... Loosen the screw(s) that you replace the lamp at this lamp in the above messages are numbers that has shattered into sharp pieces. • To reduce the risk of the projector until the lamp has cooled. 2. Turn the power off and disconnect the power cord before changing the lamp. • To reduce the risk of severe burns, allow the projector to user manual) then reset the lamp timer Order a new lamp at...
... Loosen the screw(s) that you replace the lamp at this lamp in the above messages are numbers that has shattered into sharp pieces. • To reduce the risk of the projector until the lamp has cooled. 2. Turn the power off and disconnect the power cord before changing the lamp. • To reduce the risk of severe burns, allow the projector to user manual) then reset the lamp timer Order a new lamp at...

User Manual
Page 46
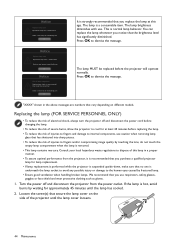
... lamp is displayed asking if you want to reset the lamp timer. Resetting the Light timer 15. Settings > Light Settings and press OK. Go to "0". The lamp time will be reset to Advanced Menu - A warning message is not new or replaced as this could result in malfunction. • Do not over tighten the screw. 14. .Connect the power and restart the projector. Highlight Reset and press OK. After the startup logo, open the On-Screen Display (OSD) menu...
... lamp is displayed asking if you want to reset the lamp timer. Resetting the Light timer 15. Settings > Light Settings and press OK. Go to "0". The lamp time will be reset to Advanced Menu - A warning message is not new or replaced as this could result in malfunction. • Do not over tighten the screw. 14. .Connect the power and restart the projector. Highlight Reset and press OK. After the startup logo, open the On-Screen Display (OSD) menu...

User Manual
Page 48
...) of the lens using the focus ring. Attempting to the input signal device. Remedy Turn the video source on and check that it is not correctly connected to turn on. Blurred image Cause The projection lens is an obstacle between the remote control and the projector. Remove the obstacle. You are too far away from the power cord. The password is no power from the projector. Cause There is incorrect. Open the lens cover. Replace both of...
...) of the lens using the focus ring. Attempting to the input signal device. Remedy Turn the video source on and check that it is not correctly connected to turn on. Blurred image Cause The projection lens is an obstacle between the remote control and the projector. Remove the obstacle. You are too far away from the power cord. The password is no power from the projector. Cause There is incorrect. Open the lens cover. Replace both of...
User Manual
Page 53
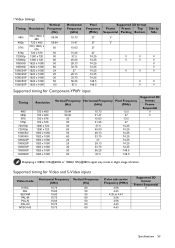
... 74.25 74.25 74.25 74.25 74.25 74.25 74.25 148.5 148.5 Supported 3D format Frame Sequential V V V Displaying a 1080i(1125i)@60Hz or 1080i(1125i)@50Hz signal may result in slight image vibration. • Video timings Timing 480i 480p 576i 576p 720/50p 720/60p 1080/50i 1080/60i 1080/24P 1080/25P 1080... Video and S-Video inputs Video mode NTSC PAL SECAM PAL-M PAL-N PAL-60 NTSC4.43 Horizontal Frequency (kHz) 15.73 15.63 15.63 15.73 15.63 15.73 15.73 Vertical Frequency (Hz) 60 50 50 60 50 60 60 Color sub-carrier Frequency (MHz) 3.58 4.43 4.25 or 4.41 3.58 3.58 4.43 4.43 Supported...
... 74.25 74.25 74.25 74.25 74.25 74.25 74.25 148.5 148.5 Supported 3D format Frame Sequential V V V Displaying a 1080i(1125i)@60Hz or 1080i(1125i)@50Hz signal may result in slight image vibration. • Video timings Timing 480i 480p 576i 576p 720/50p 720/60p 1080/50i 1080/60i 1080/24P 1080/25P 1080... Video and S-Video inputs Video mode NTSC PAL SECAM PAL-M PAL-N PAL-60 NTSC4.43 Horizontal Frequency (kHz) 15.73 15.63 15.63 15.73 15.63 15.73 15.73 Vertical Frequency (Hz) 60 50 50 60 50 60 60 Color sub-carrier Frequency (MHz) 3.58 4.43 4.25 or 4.41 3.58 3.58 4.43 4.43 Supported...


