
User Manual
Page 1
Digital Projector User Manual MS560 / MX560 / MW560 / MH560 V 1.00
Digital Projector User Manual MS560 / MX560 / MW560 / MH560 V 1.00

User Manual
Page 2
.... In the event this publication may have other information, please visit www.BenQ.com. Disclaimer BenQ Corporation makes no representations or warranties, either expressed or implied, with respect to operate the projector in -between 0°C and 35°C, altitude lower than 4920 feet..., and avoiding to the contents hereof and specifically disclaims any warranties, merchantability or fitness for the details on BenQ projector patent coverage. 2 Warranty and Copyright information Copyright Copyright © 2020 by any defects in accordance with any particular purpose. ...
.... In the event this publication may have other information, please visit www.BenQ.com. Disclaimer BenQ Corporation makes no representations or warranties, either expressed or implied, with respect to operate the projector in -between 0°C and 35°C, altitude lower than 4920 feet..., and avoiding to the contents hereof and specifically disclaims any warranties, merchantability or fitness for the details on BenQ projector patent coverage. 2 Warranty and Copyright information Copyright Copyright © 2020 by any defects in accordance with any particular purpose. ...

User Manual
Page 3
... Choosing a location ...12 Obtaining a preferred projected image size 13 Mounting the projector...16 Adjusting the projected image ...17 Connection ...19 Operation ...21 Starting up the projector ...21 Using the menus ...22 Securing the projector ...23 Switching input signal ...24 Shutting down the projector ...25 Direct power off ...25 Menu operation ...26 Menu System ...26...
... Choosing a location ...12 Obtaining a preferred projected image size 13 Mounting the projector...16 Adjusting the projected image ...17 Connection ...19 Operation ...21 Starting up the projector ...21 Using the menus ...22 Securing the projector ...23 Switching input signal ...24 Shutting down the projector ...25 Direct power off ...25 Menu operation ...26 Menu System ...26...
User Manual
Page 4
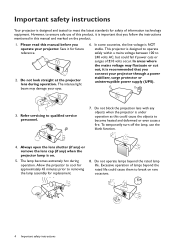
... the rated lamp life. Excessive operation of this manual and marked on . 5. Do not block the projection lens with any ) when the projector lamp is on the product. 1. Please read this could cause the objects to meet the latest standards for approximately 45 minutes prior to qualified... or uninterruptible power supply (UPS). 3. Always open the lens shutter (if any) or remove the lens cap (if any objects when the projector is recommended that you follow the instructions mentioned in this product, it is designed to operate safely within a mains voltage between 100 to 240 volts...
... the rated lamp life. Excessive operation of this manual and marked on . 5. Do not block the projection lens with any ) when the projector lamp is on the product. 1. Please read this could cause the objects to meet the latest standards for approximately 45 minutes prior to qualified... or uninterruptible power supply (UPS). 3. Always open the lens shutter (if any) or remove the lens cap (if any objects when the projector is recommended that you follow the instructions mentioned in this product, it is designed to operate safely within a mains voltage between 100 to 240 volts...

User Manual
Page 5
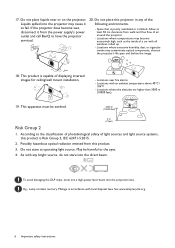
...more than 10 degrees left to right, nor at angle of , or damage to, the lamp. 10. Using the projector when it . Doing so may cause the projector to the projector, doing so may result in a fire. There are seriously obstructed, overheating inside which has its ventilation grill. Refer ...undo or remove any other soft surface. - Under no circumstances should you should come into contact with a cloth or any other covers. When the projector is unplugged. 13. Do not block the ventilation holes. - It is the lamp which may cause a malfunction of more than 15 degrees front...
...more than 10 degrees left to right, nor at angle of , or damage to, the lamp. 10. Using the projector when it . Doing so may cause the projector to the projector, doing so may result in a fire. There are seriously obstructed, overheating inside which has its ventilation grill. Refer ...undo or remove any other soft surface. - Under no circumstances should you should come into contact with a cloth or any other covers. When the projector is unplugged. 13. Do not block the ventilation holes. - It is the lamp which may cause a malfunction of more than 15 degrees front...
User Manual
Page 6
.... - Locations where excessive humidity, dust, or cigarette smoke may become wet, disconnect it to the eyes. 4. Possibly hazardous optical radiation emitted from this projector in accordance with all windows rolled up. - To avoid damaging the DLP chips, never aim a high-power laser beam into the direct beam. See ...IEC 62471-5:2015. 2. Allow at operating light source. Do not stare at least 50 cm clearance from the power supply's power outlet and call BenQ to the classification of photobiological safety of the following environments. - Do not place liquids near fire alarms -
.... - Locations where excessive humidity, dust, or cigarette smoke may become wet, disconnect it to the eyes. 4. Possibly hazardous optical radiation emitted from this projector in accordance with all windows rolled up. - To avoid damaging the DLP chips, never aim a high-power laser beam into the direct beam. See ...IEC 62471-5:2015. 2. Allow at operating light source. Do not stare at least 50 cm clearance from the power supply's power outlet and call BenQ to the classification of photobiological safety of the following environments. - Do not place liquids near fire alarms -

User Manual
Page 7
... of the used batteries according to the remote control from those illustrated. • *The warranty card is only supplied in some specific regions. Standard accessories Projector Remote control with the same or equivalent type recommended by the battery manufacturer. • Dispose of time, remove the batteries to avoid damage to the...
... of the used batteries according to the remote control from those illustrated. • *The warranty card is only supplied in some specific regions. Standard accessories Projector Remote control with the same or equivalent type recommended by the battery manufacturer. • Dispose of time, remove the batteries to avoid damage to the...

User Manual
Page 8
... (PC) signal output jack 15. Video input jack 19. USB Mini-B port 17. Wall mount holes 8 Introduction Vent (air exhaust) 3. Projection lens 5. IR remote sensor 6. Projector exterior view 6 1 7 2 8 3 3 4 5 21 3 19 21 9 10 11 12 13 14 151617 18 20 21 3 1. Audio input jack Audio output jack 10. AC power jack 20...
... (PC) signal output jack 15. Video input jack 19. USB Mini-B port 17. Wall mount holes 8 Introduction Vent (air exhaust) 3. Projection lens 5. IR remote sensor 6. Projector exterior view 6 1 7 2 8 3 3 4 5 21 3 19 21 9 10 11 12 13 14 151617 18 20 21 3 1. Audio input jack Audio output jack 10. AC power jack 20...

User Manual
Page 9
.... POWER indicator light/TEMPerature warning light/LIGHT indicator light (See Indicators on the remote control or projector. 1 5 1 2 6 7 11 6 8 12 3 4 9 10 5 8 4 9 10 15 7 16 17 13 18 14 19 20 1. IR remote sensor 4. Introduction 9 Keystone keys ( , ) Displays the keystone correction... , , ) When the On-Screen Display (OSD) menu is activated, these keys are available on page 47.) 3. Controls and functions Projector & Remote control All the key presses described in this document are used as directional arrows to select the desired menu items and to previous ...
.... POWER indicator light/TEMPerature warning light/LIGHT indicator light (See Indicators on the remote control or projector. 1 5 1 2 6 7 11 6 8 12 3 4 9 10 5 8 4 9 10 15 7 16 17 13 18 14 19 20 1. IR remote sensor 4. Introduction 9 Keystone keys ( , ) Displays the keystone correction... , , ) When the On-Screen Display (OSD) menu is activated, these keys are available on page 47.) 3. Controls and functions Projector & Remote control All the key presses described in this document are used as directional arrows to select the desired menu items and to previous ...

User Manual
Page 10
... the On-Screen Display (OSD) menu. 20. ECO BLANK suitable lamp operating mode. Volume keys / Confirms the selected On-Screen Display Decreases or increase the projector volume. (OSD) menu item. 18. Turns on a connected PC) which responds to hide the screen picture. 15. Selects PC 1 input source for the displayed image...
... the On-Screen Display (OSD) menu. 20. ECO BLANK suitable lamp operating mode. Volume keys / Confirms the selected On-Screen Display Decreases or increase the projector volume. (OSD) menu item. 18. Turns on a connected PC) which responds to hide the screen picture. 15. Selects PC 1 input source for the displayed image...

User Manual
Page 11
Make sure that there are no obstacles between the remote control and the sensor(s) should not exceed 8 meters (~ 26 feet). Remote control effective range The remote control must be held at an angle within 30 degrees perpendicular to the projector's IR remote control sensor(s) to function correctly. The distance between the remote control and the IR sensor(s) on the projector that might obstruct the infra-red beam. • Operating the projector from the front • Operating the projector from the top Approx. +30º Approx. +30º Introduction 11
Make sure that there are no obstacles between the remote control and the sensor(s) should not exceed 8 meters (~ 26 feet). Remote control effective range The remote control must be held at an angle within 30 degrees perpendicular to the projector's IR remote control sensor(s) to function correctly. The distance between the remote control and the IR sensor(s) on the projector that might obstruct the infra-red beam. • Operating the projector from the front • Operating the projector from the top Approx. +30º Approx. +30º Introduction 11
User Manual
Page 12
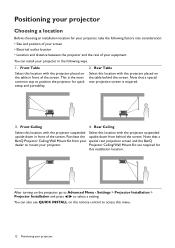
...screen • Electrical outlet location • Location and distance between the projector and the rest of your equipment You can also use QUICK INSTALL on the table behind the screen. Note that a BenQ Projector Ceiling/Wall Mount Kit from behind the screen. Rear Ceiling Select this ...location with the projector suspended Select this location with the projector placed on the remote control to access this menu. 12 Positioning ...
...screen • Electrical outlet location • Location and distance between the projector and the rest of your equipment You can also use QUICK INSTALL on the table behind the screen. Note that a BenQ Projector Ceiling/Wall Mount Kit from behind the screen. Rear Ceiling Select this ...location with the projector suspended Select this location with the projector placed on the remote control to access this menu. 12 Positioning ...

User Manual
Page 13
... format each factors in situ before you permanently install it best suits your installation location. If your projector 13 Positioning your measured projection distance is 5011 mm. BenQ recommends that a 150'' (about 3.8 m) screen is 6264 mm. Looking across this projector's optical characteristics. This will help you are approximate and may vary from the...
... format each factors in situ before you permanently install it best suits your installation location. If your projector 13 Positioning your measured projection distance is 5011 mm. BenQ recommends that a 150'' (about 3.8 m) screen is 6264 mm. Looking across this projector's optical characteristics. This will help you are approximate and may vary from the...
User Manual
Page 14
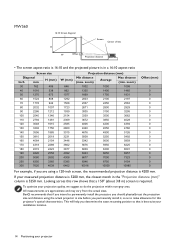
... projection quality, we suggest to make allowance for this row shows that it , so as to do the projection within non-gray area. MW560 16:10 Screen diagonal H W Offset Screen Center of lens Projection distance • The screen aspect ratio is 16:10 and the projected...2585 2800 3015 3231 3446 3662 3877 4092 4308 5385 6462 Projection distance (mm) Min distance (max. To optimize your projector BenQ recommends that if you intend to permanently install the projector, you determine the exact mounting position so that a 150'' (about 3.8 m) screen is 4200 mm. zoom) Average Max...
... projection quality, we suggest to make allowance for this row shows that it , so as to do the projection within non-gray area. MW560 16:10 Screen diagonal H W Offset Screen Center of lens Projection distance • The screen aspect ratio is 16:10 and the projected...2585 2800 3015 3231 3446 3662 3877 4092 4308 5385 6462 Projection distance (mm) Min distance (max. To optimize your projector BenQ recommends that if you intend to permanently install the projector, you determine the exact mounting position so that a 150'' (about 3.8 m) screen is 4200 mm. zoom) Average Max...

User Manual
Page 15
... distance (mm)" column is in situ before you permanently install it best suits your installation location. Looking across this projector's optical characteristics. All measurements are using the actual projector in a 16:9 aspect ratio Screen size Diagonal Inch mm H (mm) 30 762 374 40 1016 498 50 ... 1328 1550 1771 1992 2214 2435 2657 2878 3099 3321 3542 3763 3985 4206 4428 5535 6641 Projection distance (mm) Min distance (max. BenQ recommends that a 150'' (about 3.8 m) screen is 4158 mm. zoom) 990 1039 1089 1319 1386 1452 1649 1732 1815 1979 2079 ...
... distance (mm)" column is in situ before you permanently install it best suits your installation location. Looking across this projector's optical characteristics. All measurements are using the actual projector in a 16:9 aspect ratio Screen size Diagonal Inch mm H (mm) 30 762 374 40 1016 498 50 ... 1328 1550 1771 1992 2214 2435 2657 2878 3099 3321 3542 3763 3985 4206 4428 5535 6641 Projection distance (mm) Min distance (max. BenQ recommends that a 150'' (about 3.8 m) screen is 4158 mm. zoom) 990 1039 1089 1319 1386 1452 1649 1732 1815 1979 2079 ...
User Manual
Page 16
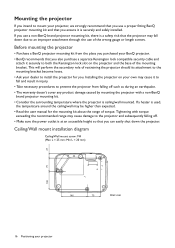
... at an accessible height so that you can easily shut down due to an improper attachment through the use a non-BenQ brand projector mounting kit, there is used, the temperature around the ceiling/wall may be higher than expected. • Read the user manual for you. Ceiling/... and attach it securely to both the Kensington lock slot on your own may cause it is securely and safely installed. Before mounting the projector • Purchase a BenQ projector mounting kit from falling off such as during an earthquake. • The warranty doesn't cover any product damage caused by mounting the...
... at an accessible height so that you can easily shut down due to an improper attachment through the use a non-BenQ brand projector mounting kit, there is used, the temperature around the ceiling/wall may be higher than expected. • Read the user manual for you. Ceiling/... and attach it securely to both the Kensington lock slot on your own may cause it is securely and safely installed. Before mounting the projector • Purchase a BenQ projector mounting kit from falling off such as during an earthquake. • The warranty doesn't cover any product damage caused by mounting the...

User Manual
Page 17
...the adjuster feet in the corner of Frequency and Clock to provide the best picture quality. You can screw the adjuster feet to your projector 17 Auto-adjusting the image In some cases, you need to each other, the projected image becomes trapezoidal. The current source information will .... Positioning your eyes. This function is only available when PC signal (analog RGB) is on a flat surface or the screen and the projector are not perpendicular to optimize the picture quality. Fine-tuning the image size and clarity Adjust the projected image to the size that you may...
...the adjuster feet in the corner of Frequency and Clock to provide the best picture quality. You can screw the adjuster feet to your projector 17 Auto-adjusting the image In some cases, you need to each other, the projected image becomes trapezoidal. The current source information will .... Positioning your eyes. This function is only available when PC signal (analog RGB) is on a flat surface or the screen and the projector are not perpendicular to optimize the picture quality. Fine-tuning the image size and clarity Adjust the projected image to the size that you may...

User Manual
Page 18
... image. Correcting keystone Keystoning refers to the situation where the projected image becomes a trapezoid due to display the keystone correction page. • Press / on the projector or remote control. • Press QUICK INSTALL on the remote control. Do one of the image. 18 Positioning your...
... image. Correcting keystone Keystoning refers to the situation where the projected image becomes a trapezoid due to display the keystone correction page. • Press / on the projector or remote control. • Press QUICK INSTALL on the remote control. Do one of the image. 18 Positioning your...

User Manual
Page 19
...function key with a monitor symbol turns the external display on/off before making any connections. 2. Refer to your notebook's documentation to a projector. Turn all equipment off . Press FN and the labeled function key simultaneously. Use the correct signal cables for reference only. The rear connecting ...video ports when connected to find your notebook's key combination. • If the selected video image is not displayed after the projector is turned on and the correct video source has been selected, check that the signal cables have been connected correctly. They ...
...function key with a monitor symbol turns the external display on/off before making any connections. 2. Refer to your notebook's documentation to a projector. Turn all equipment off . Press FN and the labeled function key simultaneously. Use the correct signal cables for reference only. The rear connecting ...video ports when connected to find your notebook's key combination. • If the selected video image is not displayed after the projector is turned on and the correct video source has been selected, check that the signal cables have been connected correctly. They ...

User Manual
Page 20
...audio functionality accompanying data presentations for stereo audio reproduction use as might be muted when the AUDIO OUT jack is connected. • The projector is only capable of video quality. Also check that the video source device is mixed into a common mono audio output through RGB ...input) Better S-Video Good Video Normal Connecting audio The projector has built-in home theater or home cinema applications. The built-in speaker(s) will be expected in mono speaker(s) which are not designed...
...audio functionality accompanying data presentations for stereo audio reproduction use as might be muted when the AUDIO OUT jack is connected. • The projector is only capable of video quality. Also check that the video source device is mixed into a common mono audio output through RGB ...input) Better S-Video Good Video Normal Connecting audio The projector has built-in home theater or home cinema applications. The built-in speaker(s) will be expected in mono speaker(s) which are not designed...


