
User Manual
Page 2
... a preferred projected image size 15 Connection 18 Connecting video source devices........19 Connecting smart devices 20 Operation 21 Starting up the projector 21 Adjusting the projected image 22 Using the menus 25 Securing the projector 26 Switching input signal 28 Magnifying and searching for details ...29 Selecting the aspect ratio 29 Optimizing the image 32 Setting the presentation timer 35 Remote paging operations 36 Freezing the image 36 Hiding the image 37 Locking control keys 37 Operating in a high altitude...
... a preferred projected image size 15 Connection 18 Connecting video source devices........19 Connecting smart devices 20 Operation 21 Starting up the projector 21 Adjusting the projected image 22 Using the menus 25 Securing the projector 26 Switching input signal 28 Magnifying and searching for details ...29 Selecting the aspect ratio 29 Optimizing the image 32 Setting the presentation timer 35 Remote paging operations 36 Freezing the image 36 Hiding the image 37 Locking control keys 37 Operating in a high altitude...
User Manual
Page 3
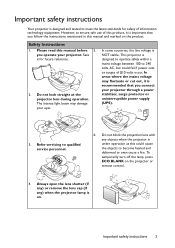
... projector lens during operation. Do not block the projection lens with any ) when the projector lamp is NOT stable. Please read this manual and marked on the projector or remote control. 4. In areas where the mains voltage may damage your projector. To temporarily turn off the lamp, press ECO BLANK on the product. Important safety instructions 3 However, to ensure safe use of this could fail if power...
... projector lens during operation. Do not block the projection lens with any ) when the projector lamp is NOT stable. Please read this manual and marked on the projector or remote control. 4. In areas where the mains voltage may damage your projector. To temporarily turn off the lamp, press ECO BLANK on the product. Important safety instructions 3 However, to ensure safe use of this could fail if power...
User Manual
Page 6
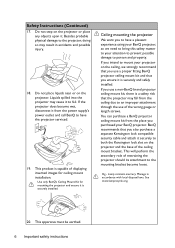
... from the power supply's power outlet and call BenQ to have a pleasant experience using your BenQ projector, so we strongly recommend that you use of displaying inverted images for ceiling mount installation. Use only BenQ's Ceiling Mount Kit for mounting the projector and ensure it securely to both the Kensington lock slot on the projector. Safety Instructions (Continued) 17. Liquids spilled into the projector may fall from the place you use a non-BenQ brand projector ceiling mount kit, there...
... from the power supply's power outlet and call BenQ to have a pleasant experience using your BenQ projector, so we strongly recommend that you use of displaying inverted images for ceiling mount installation. Use only BenQ's Ceiling Mount Kit for mounting the projector and ensure it securely to both the Kensington lock slot on the projector. Safety Instructions (Continued) 17. Liquids spilled into the projector may fall from the place you use a non-BenQ brand projector ceiling mount kit, there...
User Manual
Page 7
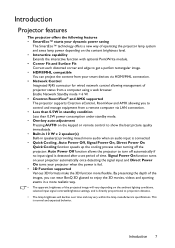
... function turns on the keypad or remote control to get a perfect rectangular image. • HDMI/MHL compatible You can wear BenQ 3D glassed to enjoy the 3D movies, videos and sporting events in a more flexible. Introduction 7 Introduction Projector features The projector offers the following features • SmartEco™ starts your dynamic power saving The SmartEco™ technology offers a new way of operating the projector lamp...
... function turns on the keypad or remote control to get a perfect rectangular image. • HDMI/MHL compatible You can wear BenQ 3D glassed to enjoy the 3D movies, videos and sporting events in a more flexible. Introduction 7 Introduction Projector features The projector offers the following features • SmartEco™ starts your dynamic power saving The SmartEco™ technology offers a new way of operating the projector lamp...
User Manual
Page 10
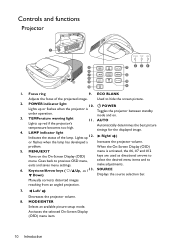
... menu items and to hide the screen picture. 2. Automatically determines the best picture timings for the displayed image. 4. SOURCE Down) Displays the source selection bar. Manually corrects distorted images resulting from an angled projection. 7. Focus ring 9. Controls and functions Projector 1 2 5 6 b 7 8 a 9 10 11 2 3 4 12 13 6 1. Used to exits and saves menu settings. MENU/EXIT menu is under operation. make adjustments. 6. POWER indicator light 10. Lights up red if the projector's temperature becomes too high. Right/ or flashes when the lamp...
... menu items and to hide the screen picture. 2. Automatically determines the best picture timings for the displayed image. 4. SOURCE Down) Displays the source selection bar. Manually corrects distorted images resulting from an angled projection. 7. Focus ring 9. Controls and functions Projector 1 2 5 6 b 7 8 a 9 10 11 2 3 4 12 13 6 1. Used to exits and saves menu settings. MENU/EXIT menu is under operation. make adjustments. 6. POWER indicator light 10. Lights up red if the projector's temperature becomes too high. Right/ or flashes when the lamp...
User Manual
Page 11
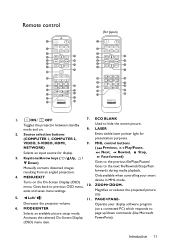
... Toggles the projector between standby 7. ECO BLANK Used to the next file/Rewinds/Stops/Fastforwards during media playback. 4. VIDEO, S-VIDEO, HDMI, 9. Magnifies or reduces the projected picture size. 5. MODE/ENTER (on the On-Screen Display (OSD) menu. MHL control buttons NETWORK) ( Previous, Play/Pause, Selects an input source for (COMPUTER 1, COMPUTER 2, presentation purposes. Next, Rewind, Stop, 3. MENU/EXIT Turns on a connected PC) which responds to Selects an available picture setup mode. ZOOM+/ZOOM- Decreases the projector volume...
... Toggles the projector between standby 7. ECO BLANK Used to the next file/Rewinds/Stops/Fastforwards during media playback. 4. VIDEO, S-VIDEO, HDMI, 9. Magnifies or reduces the projected picture size. 5. MODE/ENTER (on the On-Screen Display (OSD) menu. MHL control buttons NETWORK) ( Previous, Play/Pause, Selects an input source for (COMPUTER 1, COMPUTER 2, presentation purposes. Next, Rewind, Stop, 3. MENU/EXIT Turns on a connected PC) which responds to Selects an available picture setup mode. ZOOM+/ZOOM- Decreases the projector volume...
User Manual
Page 12
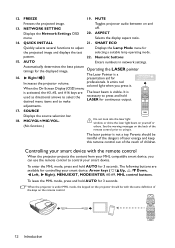
... available for 3 seconds. FREEZE 19. NETWORK SETTING Displays the Network Settings OSD off. 20. ASPECT menu. QUICK INSTALL 21. Numeric buttons 15. Automatically determines the best picture timings for the projected image and displays the test selecting a suitable lamp operating mode. See the warning messages on and 13. Toggles projector audio between on the back of the remote control prior to adjust Displays the Lamp Mode menu for the displayed image. pattern. 22. Operating the LASER pointer The Laser Pointer...
... available for 3 seconds. FREEZE 19. NETWORK SETTING Displays the Network Settings OSD off. 20. ASPECT menu. QUICK INSTALL 21. Numeric buttons 15. Automatically determines the best picture timings for the projected image and displays the test selecting a suitable lamp operating mode. See the warning messages on and 13. Toggles projector audio between on the back of the remote control prior to adjust Displays the Lamp Mode menu for the displayed image. pattern. 22. Operating the LASER pointer The Laser Pointer...
User Manual
Page 19
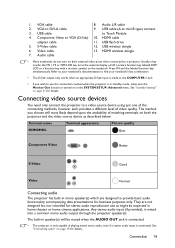
... the SYSTEM SETUP: Advanced menu. See "Standby Settings" on the notebook. Component Video to use as described below: Terminal name Terminal appearance Picture quality HDMI/MHL Best Component Video Better S-Video Good Video Normal Connecting audio The projector has built-in mono speaker(s) which are not designed for, nor intended for details. Usually a key combo like FN + F3 or CRT/LCD key turns the external display on...
... the SYSTEM SETUP: Advanced menu. See "Standby Settings" on the notebook. Component Video to use as described below: Terminal name Terminal appearance Picture quality HDMI/MHL Best Component Video Better S-Video Good Video Normal Connecting audio The projector has built-in mono speaker(s) which are not designed for, nor intended for details. Usually a key combo like FN + F3 or CRT/LCD key turns the external display on...
User Manual
Page 21
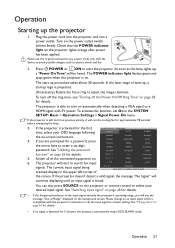
... POWER indicator light on . 6. If the projector is on the power outlet switch (where fitted). You can also press SOURCE on the background screen. In the later stage of the connected equipment on the projector lights orange after power has been applied. The current input signal being scanned displays in the SYSTEM SETUP: Basic > Operation Settings > Signal Power On menu. Switch all of start up procedure takes about 30 seconds. Turn on . The POWER indicator light flashes green and stays green...
... POWER indicator light on . 6. If the projector is on the power outlet switch (where fitted). You can also press SOURCE on the background screen. In the later stage of the connected equipment on the projector lights orange after power has been applied. The current input signal being scanned displays in the SYSTEM SETUP: Basic > Operation Settings > Signal Power On menu. Switch all of start up procedure takes about 30 seconds. Turn on . The POWER indicator light flashes green and stays green...
User Manual
Page 25
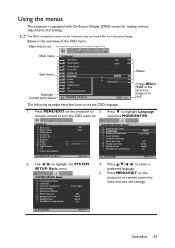
... Keystone Corner Fit Surface Fit Position Phase 0 H. Size Digital Zoom 3D Teaching Template COMPUTER 1/Y Pb Pr 1 Off Auto Status 0 ENTER 0 MENU Exit Press MENU/ EXIT to the previous page or to set the OSD language. 1. The following example describes how to exit. SYSTEM SETUP: Basic Presentation Timer Language Projector Installation Menu Settings Operation Settings Panel Key Lock Background Color Splash Screen PointWrite Touch Module Front Table Off BenQ BenQ On SYSTEM SETUP: Basic Presentation Timer...
... Keystone Corner Fit Surface Fit Position Phase 0 H. Size Digital Zoom 3D Teaching Template COMPUTER 1/Y Pb Pr 1 Off Auto Status 0 ENTER 0 MENU Exit Press MENU/ EXIT to the previous page or to set the OSD language. 1. The following example describes how to exit. SYSTEM SETUP: Basic Presentation Timer Language Projector Installation Menu Settings Operation Settings Panel Key Lock Background Color Splash Screen PointWrite Touch Module Front Table Off BenQ BenQ On SYSTEM SETUP: Basic Presentation Timer...
User Manual
Page 27
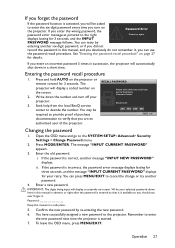
... password function is activated, you will display a coded number on the screen. 2. Press and hold AUTO on page 27 for your retry. Press MODE/ENTER. You have successfully assigned a new password to decode the number. Seek help from the local BenQ service Recall Code: center to the projector. Open the OSD menu and go to enter the new password next time the projector is correct, another password. 4. If the password is started. 7. ii. Password Keep this manual...
... password function is activated, you will display a coded number on the screen. 2. Press and hold AUTO on page 27 for your retry. Press MODE/ENTER. You have successfully assigned a new password to decode the number. Seek help from the local BenQ service Recall Code: center to the projector. Open the OSD menu and go to enter the new password next time the projector is correct, another password. 4. If the password is started. 7. ii. Password Keep this manual...
User Manual
Page 28
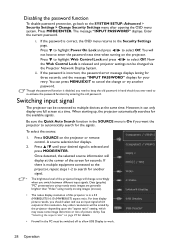
... (MW883UST) aspect ratio. Data (graphic) "PC" presentations using mostly static images are generally brighter than "Video" using mostly moving images (movies). • The native display resolution of the screen for seconds. Press MODE/ENTER. A source selection bar displays. 2. Now the Web Control Lock is multiple equipment connected to the projector, repeat steps 1-2 to the SYSTEM SETUP: Advanced > Security Settings > Change Security Settings menu after opening the OSD menu system. Disabling the password function To disable password...
... (MW883UST) aspect ratio. Data (graphic) "PC" presentations using mostly static images are generally brighter than "Video" using mostly moving images (movies). • The native display resolution of the screen for seconds. Press MODE/ENTER. A source selection bar displays. 2. Now the Web Control Lock is multiple equipment connected to the projector, repeat steps 1-2 to the SYSTEM SETUP: Advanced > Security Settings > Change Security Settings menu after opening the OSD menu system. Disabling the password function To disable password...
User Manual
Page 32
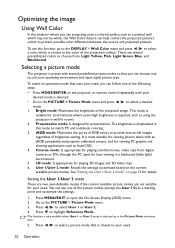
... this function, go to the DISPLAY > Wall Color menu and press / to suit your operating environment and input signal picture type. The brightness is closest to open the On-Screen Display (OSD) menu. 2. Press MENU/EXIT to the color of the picture modes (except the User 1/2) as using the projector in a blackened (little light) environment. 5. 3D mode: Is appropriate for your need . To use one of the projected image. It is preset with...
... this function, go to the DISPLAY > Wall Color menu and press / to suit your operating environment and input signal picture type. The brightness is closest to open the On-Screen Display (OSD) menu. 2. Press MENU/EXIT to the color of the picture modes (except the User 1/2) as using the projector in a blackened (little light) environment. 5. 3D mode: Is appropriate for your need . To use one of the projected image. It is preset with...
User Manual
Page 36
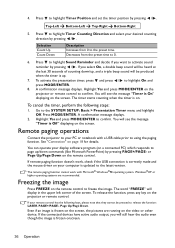
...; Windows®98 operating system. Highlight Yes and press MODE/ENTER on the screen, the pictures are recommended. Go to highlight Timer Position and set the timer position by pressing / . The remote paging function cannot work , check if the USB connection is frozen on the projector or remote control to the preset time. Even if an image is correctly made and the mouse driver on your display software program (on the screen...
...; Windows®98 operating system. Highlight Yes and press MODE/ENTER on the screen, the pictures are recommended. Go to highlight Timer Position and set the timer position by pressing / . The remote paging function cannot work , check if the USB connection is frozen on the projector or remote control to the preset time. Even if an image is correctly made and the mouse driver on your display software program (on the screen...
User Manual
Page 37
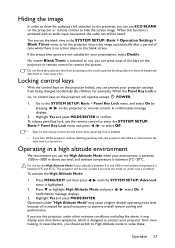
... Mode: 1. A confirmation message displays. 3. Hiding the image In order to draw the audience's full attention to the presenter, you use the High Altitude Mode when your projector from overheating. To release panel key lock, use the remote control to enter the SYSTEM SETUP: Basic > Panel Key Lock menu and press / to select Off. • Keys on the projector or remote control to restore the picture. Operating in a high altitude environment We recommend you can set...
... Mode: 1. A confirmation message displays. 3. Hiding the image In order to draw the audience's full attention to the presenter, you use the High Altitude Mode when your projector from overheating. To release panel key lock, use the remote control to enter the SYSTEM SETUP: Basic > Panel Key Lock menu and press / to select Off. • Keys on the projector or remote control to restore the picture. Operating in a high altitude environment We recommend you can set...

User Manual
Page 49
... image" on without pressing POWER or ON when the projector is in standby mode and detects a VGA signal or a HDMI signal with one or more mirrors. Sleep Timer Sets the auto-shutdown timer. See "Using the quick install" on automatically once the power is detected after a set period of time. Menu Display Time Sets the length of time the OSD will remain active after turning it off automatically if no input signal is fed through the power cord. Signal Power...
... image" on without pressing POWER or ON when the projector is in standby mode and detects a VGA signal or a HDMI signal with one or more mirrors. Sleep Timer Sets the auto-shutdown timer. See "Using the quick install" on automatically once the power is detected after a set period of time. Menu Display Time Sets the length of time the OSD will remain active after turning it off automatically if no input signal is fed through the power cord. Signal Power...
User Manual
Page 50
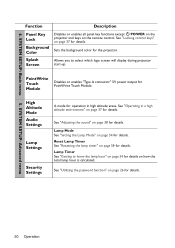
... menu 5. Lamp Timer See "Getting to select which logo screen will display during projector start-up. See "Operating in high altitude areas. See "Adjusting the sound" on how the total lamp hour is calculated. See "Locking control keys" on page 58 for the projector. Sets the background color for details. Reset Lamp Timer See "Resetting the lamp timer" on page 37 for details. High Altitude Mode Audio Settings Lamp Settings Security Settings A mode for details. 50 Operation SYSTEM SETUP: Advanced menu Function Description Panel Key Lock Background Color...
... menu 5. Lamp Timer See "Getting to select which logo screen will display during projector start-up. See "Operating in high altitude areas. See "Adjusting the sound" on how the total lamp hour is calculated. See "Locking control keys" on page 58 for the projector. Sets the background color for details. Reset Lamp Timer See "Resetting the lamp timer" on page 37 for details. High Altitude Mode Audio Settings Lamp Settings Security Settings A mode for details. 50 Operation SYSTEM SETUP: Advanced menu Function Description Panel Key Lock Background Color...
User Manual
Page 52
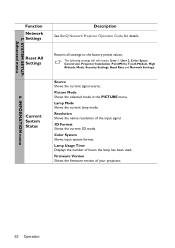
... PICTURE menu. Color System Shows input system format. SYSTEM SETUP: Advanced menu Function Network Settings Description See BenQ Network Projector Operation Guide for details. Lamp Usage Time Displays the number of your projector. 6. Firmware Version Shows the firmware version of hours the lamp has been used. Reset All Settings Returns all settings to the factory preset values. Lamp Mode Shows the current lamp mode. Resolution Shows the native resolution of the input signal. 3D Format Shows the current 3D mode. The following settings will still remain: User 1, User 2, Color...
... PICTURE menu. Color System Shows input system format. SYSTEM SETUP: Advanced menu Function Network Settings Description See BenQ Network Projector Operation Guide for details. Lamp Usage Time Displays the number of your projector. 6. Firmware Version Shows the firmware version of hours the lamp has been used. Reset All Settings Returns all settings to the factory preset values. Lamp Mode Shows the current lamp mode. Resolution Shows the native resolution of the input signal. 3D Format Shows the current 3D mode. The following settings will still remain: User 1, User 2, Color...
User Manual
Page 54
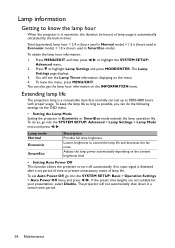
... Lamp Timer information displaying on the content brightness level • Setting Auto Power Off This function allows the projector to turn off automatically if no input signal is detected after a set Auto Power Off, go into the SYSTEM SETUP: Basic > Operation Settings > Auto Power Off menu and press / . To leave the menu, press MENU/EXIT. If the preset time lengths are not suitable for your presentation, select Disable. Total (equivalent) lamp hour = 2.4 x (hours used in Normal mode) + 1.5 x (hours used...
... Lamp Timer information displaying on the content brightness level • Setting Auto Power Off This function allows the projector to turn off automatically if no input signal is detected after a set Auto Power Off, go into the SYSTEM SETUP: Basic > Operation Settings > Auto Power Off menu and press / . To leave the menu, press MENU/EXIT. If the preset time lengths are not suitable for your presentation, select Disable. Total (equivalent) lamp hour = 2.4 x (hours used in Normal mode) + 1.5 x (hours used...
User Manual
Page 60
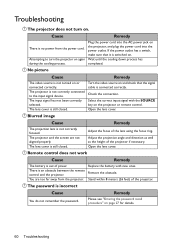
... remote control. Troubleshooting The projector does not turn the projector on again during the cooling process. Select the correct input signal with new ones. There is not correctly connected to turn on. You are not aligned properly. Please see "Entering the password recall procedure" on the projector, and plug the power cord into the power outlet. The lens cover is connected correctly. Adjust the focus of the projector. No picture Cause Remedy The video source...
... remote control. Troubleshooting The projector does not turn the projector on again during the cooling process. Select the correct input signal with new ones. There is not correctly connected to turn on. You are not aligned properly. Please see "Entering the password recall procedure" on the projector, and plug the power cord into the power outlet. The lens cover is connected correctly. Adjust the focus of the projector. No picture Cause Remedy The video source...


