
User Manual
Page 2
... image 36 Hiding the image 37 Locking control keys 37 Operating in a high altitude environment 37 Adjusting the sound 38 2 Table of contents Using the test pattern 38 Using the teaching templates 39 Presenting from a USB Reader 40 Shutting down the projector 41 Direct power off 41 Menu operation 42 Maintenance...
... image 36 Hiding the image 37 Locking control keys 37 Operating in a high altitude environment 37 Adjusting the sound 38 2 Table of contents Using the test pattern 38 Using the teaching templates 39 Presenting from a USB Reader 40 Shutting down the projector 41 Direct power off 41 Menu operation 42 Maintenance...
User Manual
Page 3
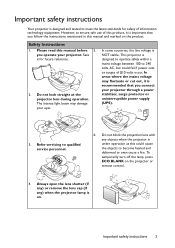
... if power cuts or surges of ±10 volts occur. Do not block the projection lens with any ) when the projector lamp is designed and tested to meet the latest standards for future reference. 2. Important safety instructions 3 However, to become heated and deformed or even cause a fire. In areas where the...
... if power cuts or surges of ±10 volts occur. Do not block the projection lens with any ) when the projector lamp is designed and tested to meet the latest standards for future reference. 2. Important safety instructions 3 However, to become heated and deformed or even cause a fire. In areas where the...
User Manual
Page 12
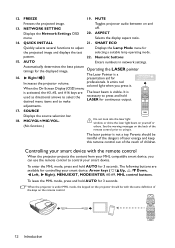
.... Numeric buttons 15. Right/ presentation aid for continuous output. is necessary to adjust Displays the Lamp Mode menu for the projected image and displays the test selecting a suitable lamp operating mode. FREEZE 19. When the projector is visible. adjustments. 17. See the warning messages on the back of the remote control...
.... Numeric buttons 15. Right/ presentation aid for continuous output. is necessary to adjust Displays the Lamp Mode menu for the projected image and displays the test selecting a suitable lamp operating mode. FREEZE 19. When the projector is visible. adjustments. 17. See the warning messages on the back of the remote control...

User Manual
Page 14
..., and 2D Keystone quickly. See "Correcting keystone" on page 14 for details. • 2D Keystone. Using the test pattern 3. See "Using the test pattern" on the remote control and press / to be installed in one of the following possible installation locations: Front Ceiling Rear Ceiling 2. Press QUICK INSTALL ...
..., and 2D Keystone quickly. See "Correcting keystone" on page 14 for details. • 2D Keystone. Using the test pattern 3. See "Using the test pattern" on the remote control and press / to be installed in one of the following possible installation locations: Front Ceiling Rear Ceiling 2. Press QUICK INSTALL ...
User Manual
Page 17
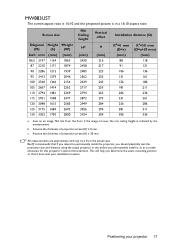
... is 30 mm. Positioning your installation location. Assume the thickness of projection screen(X) is 0 mm. BenQ recommends that if you intend to permanently install the projector, you should physically test the projection size and distance using the actual projector in a 16:10 aspect ratio Screen size Diagonal ...measurement. This will help you permanently install it best suits your projector 17 base on an image 762 mm from the actual sizes. MW883UST The screen aspect ratio is 16:10 and the projected picture is in situ before you determine the exact mounting position so that ...
... is 30 mm. Positioning your installation location. Assume the thickness of projection screen(X) is 0 mm. BenQ recommends that if you intend to permanently install the projector, you should physically test the projection size and distance using the actual projector in a 16:10 aspect ratio Screen size Diagonal ...measurement. This will help you permanently install it best suits your projector 17 base on an image 762 mm from the actual sizes. MW883UST The screen aspect ratio is 16:10 and the projected picture is in situ before you determine the exact mounting position so that ...
User Manual
Page 34
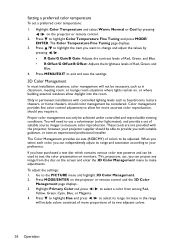
...suitable guidance, or even an experienced professional installer. The Color Temperature Fine Tuning page displays. 3. If you have purchased a test disc which contains various color test patterns and can be necessary, such as boardrooms, lecture theaters, or home theaters, should you want to change and adjust ...where building external windows allow for more proportions of Red, Green, and Blue. 4. Only in the range will not be used to test the color presentation on the screen and enter the 3D Color Management menu to make adjustments. These tools are not provided with the ...
...suitable guidance, or even an experienced professional installer. The Color Temperature Fine Tuning page displays. 3. If you have purchased a test disc which contains various color test patterns and can be necessary, such as boardrooms, lecture theaters, or home theaters, should you want to change and adjust ...where building external windows allow for more proportions of Red, Green, and Blue. 4. Only in the range will not be used to test the color presentation on the screen and enter the 3D Color Management menu to make adjustments. These tools are not provided with the ...
User Manual
Page 38
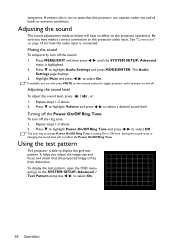
...on the remote control to highlight Audio Settings and press MODE/ENTER. Adjusting the sound The sound adjustments made a correct connection to display the grid test pattern. Press MENU/EXIT and then press / until the SYSTEM SETUP: Advanced menu is setting On or Off here. The Audio Settings page displays...See "Connection" on and off. If available, you have made as below will not affect the Power On/Off Ring Tone. Using the test pattern The projector is connected. Be sure you can operate under any and all harsh or extreme conditions. Press to toggle projector audio between ...
...on the remote control to highlight Audio Settings and press MODE/ENTER. Adjusting the sound The sound adjustments made a correct connection to display the grid test pattern. Press MENU/EXIT and then press / until the SYSTEM SETUP: Advanced menu is setting On or Off here. The Audio Settings page displays...See "Connection" on and off. If available, you have made as below will not affect the Power On/Off Ring Tone. Using the test pattern The projector is connected. Be sure you can operate under any and all harsh or extreme conditions. Press to toggle projector audio between ...
User Manual
Page 44
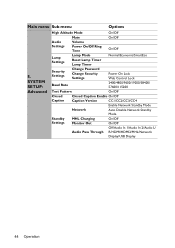
... Normal/Economic/SmartEco Security Settings Change Password Change Security Settings Power On Lock Web Control Lock Baud Rate 2400/4800/9600/19200/38400/ 57600/115200 Test Pattern On/Off Closed Closed Caption Enable On/Off Caption Caption Version CC1/CC2/CC3/CC4 Enable Network Standby Mode Network Auto Disable Network Standby...
... Normal/Economic/SmartEco Security Settings Change Password Change Security Settings Power On Lock Web Control Lock Baud Rate 2400/4800/9600/19200/38400/ 57600/115200 Test Pattern On/Off Closed Closed Caption Enable On/Off Caption Caption Version CC1/CC2/CC3/CC4 Enable Network Standby Mode Network Auto Disable Network Standby...
User Manual
Page 51
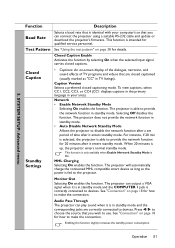
... when Enable Network Standby Mode is up, the projector enters normal standby mode. Press / to make the connection. See "Using the test pattern" on page 18 for how to choose the source that you wish to make the connection. Selecting Off disables the function. Monitor...Disable Network Standby Mode Allows the projector to provide the network function in TV listings). SYSTEM SETUP: Advanced menu Function Description Baud Rate Test Pattern Selects a baud rate that are correctly connected to provide the network function for 20 minutes after it is able to disable the ...
... when Enable Network Standby Mode is up, the projector enters normal standby mode. Press / to make the connection. See "Using the test pattern" on page 18 for how to choose the source that you wish to make the connection. Selecting Off disables the function. Monitor...Disable Network Standby Mode Allows the projector to provide the network function in TV listings). SYSTEM SETUP: Advanced menu Function Description Baud Rate Test Pattern Selects a baud rate that are correctly connected to provide the network function for 20 minutes after it is able to disable the ...