

User Manual
Page 1
MX882UST/MW883UST Digital Projector User Manual
MX882UST/MW883UST Digital Projector User Manual
User Manual
Page 3
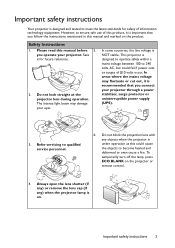
... off the lamp, press ECO BLANK on the product. Refer servicing to meet the latest standards for future reference. 2. Please read this manual and marked on the projector or remote control. 4. In areas where the mains voltage may damage your projector. Always open the lens shutter... and deformed or even cause a fire. Important safety instructions Your projector is NOT stable. you follow the instructions mentioned in this manual before 5. In some countries, the line voltage is designed and tested to qualified service personnel. 6. Important safety instructions 3
... off the lamp, press ECO BLANK on the product. Refer servicing to meet the latest standards for future reference. 2. Please read this manual and marked on the projector or remote control. 4. In areas where the mains voltage may damage your projector. Always open the lens shutter... and deformed or even cause a fire. Important safety instructions Your projector is NOT stable. you follow the instructions mentioned in this manual before 5. In some countries, the line voltage is designed and tested to qualified service personnel. 6. Important safety instructions 3

User Manual
Page 8
... accessories will be suitable for your dealer for detailed information. Projector with the projector mounting plate QDuigiictkalSPtraortjeGctuoidr e Power cord VGA cable Quick start guide User manual CD Warranty card* Remote control with batteries Optional accessories 1. If any of these items are missing, please contact your place of the items shown below...
... accessories will be suitable for your dealer for detailed information. Projector with the projector mounting plate QDuigiictkalSPtraortjeGctuoidr e Power cord VGA cable Quick start guide User manual CD Warranty card* Remote control with batteries Optional accessories 1. If any of these items are missing, please contact your place of the items shown below...
User Manual
Page 10
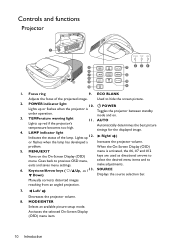
Used to exits and saves menu settings. POWER indicator light 10. AUTO Lights up 12. problem. MENU/EXIT menu is under operation. make adjustments. 6. Manually corrects distorted images resulting from an angled projection. 7. MODE/ENTER Selects an available picture setup mode. POWER Lights up or flashes when the projector is ...
Used to exits and saves menu settings. POWER indicator light 10. AUTO Lights up 12. problem. MENU/EXIT menu is under operation. make adjustments. 6. Manually corrects distorted images resulting from an angled projection. 7. MODE/ENTER Selects an available picture setup mode. POWER Lights up or flashes when the projector is ...
User Manual
Page 11
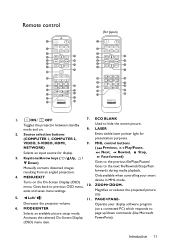
... to hide the screen picture. ECO BLANK Used to Selects an available picture setup mode. VIDEO, S-VIDEO, HDMI, 9. Goes to the previous file/Plays/Pauses/ Manually corrects distorted images resulting from an angled projection. Left/ 11. PAGE+/PAGE- Source selection buttons Emits visible laser pointer light for (COMPUTER 1, COMPUTER 2, presentation purposes...
... to hide the screen picture. ECO BLANK Used to Selects an available picture setup mode. VIDEO, S-VIDEO, HDMI, 9. Goes to the previous file/Plays/Pauses/ Manually corrects distorted images resulting from an angled projection. Left/ 11. PAGE+/PAGE- Source selection buttons Emits visible laser pointer light for (COMPUTER 1, COMPUTER 2, presentation purposes...
User Manual
Page 22
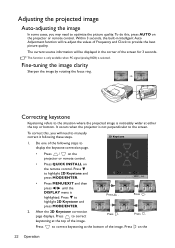
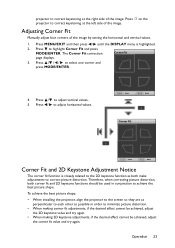
... Operation After the 2D Keystone correction page displays. Press . Press . Press . The current source information will re-adjust the values of Frequency and Clock to manually correct it following steps to correct keystoning at the top of the following these steps. 2D Keystone 1. Fine-tuning the image clarity Sharpen the image...
... Operation After the 2D Keystone correction page displays. Press . Press . Press . The current source information will re-adjust the values of Frequency and Clock to manually correct it following steps to correct keystoning at the top of the following these steps. 2D Keystone 1. Fine-tuning the image clarity Sharpen the image...
User Manual
Page 23
..., both make adjustments to correct keystoning at the right side of the image by setting the horizontal and vertical values. 1. Operation 23 Adjusting Corner Fit Manually adjust four corners of the image. Press / / / to adjust horizontal values. Press to adjust vertical values. 5. Press on the projector to correct picture distortion. Press...
..., both make adjustments to correct keystoning at the right side of the image by setting the horizontal and vertical values. 1. Operation 23 Adjusting Corner Fit Manually adjust four corners of the image. Press / / / to adjust horizontal values. Press to adjust vertical values. 5. Press on the projector to correct picture distortion. Press...
User Manual
Page 24
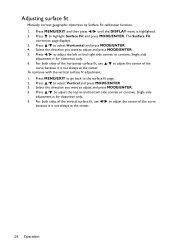
... the vertical surface fit adjustment, 1. Press MENU/EXIT to go back to adjust the top or/and bottom side convex or concave. Adjusting surface fit Manually correct geographic distortion by Surface Fit calibration function. 1. Single side adjustment is not always at the center.
... the vertical surface fit adjustment, 1. Press MENU/EXIT to go back to adjust the top or/and bottom side convex or concave. Adjusting surface fit Manually correct geographic distortion by Surface Fit calibration function. 1. Single side adjustment is not always at the center.
User Manual
Page 26
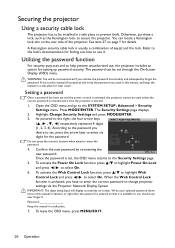
...for finding out how to use it . Highlight Change Security Settings and press MODE/ENTER. 3. Write your selected password down here in this manual in a safe place for later recall. The Security Settings page displays. 2. The password can locate a Kensington lock slot on lock is ...been set through the On-Screen Display (OSD) menu. Refer to the lock's documentation for setting up password security. Print out this manual (if necessary) and write the password you activate the password functionality and subsequently forget the password. As pictured to the right, the four...
...for finding out how to use it . Highlight Change Security Settings and press MODE/ENTER. 3. Write your selected password down here in this manual in a safe place for later recall. The Security Settings page displays. 2. The password can locate a Kensington lock slot on lock is ...been set through the On-Screen Display (OSD) menu. Refer to the lock's documentation for setting up password security. Print out this manual (if necessary) and write the password you activate the password functionality and subsequently forget the password. As pictured to the right, the four...
User Manual
Page 27
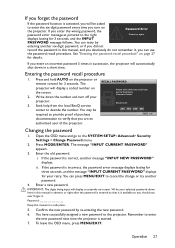
... a safe place. 5. Entering the password recall procedure 1. Write down the number and turn on the projector. Seek help from the local BenQ service Recall Code: center to cancel the change or try again. Press MODE/ENTER. The message "INPUT CURRENT PASSWORD" appears. 3. Enter ...IMPORTANT: The digits being input will automatically shut down here in this manual in succession, the projector will display as pictured to the right Please try another password. 4. Password Keep this manual in this manual, and you absolutely do not remember it . Remember to enter ...
... a safe place. 5. Entering the password recall procedure 1. Write down the number and turn on the projector. Seek help from the local BenQ service Recall Code: center to cancel the change or try again. Press MODE/ENTER. The message "INPUT CURRENT PASSWORD" appears. 3. Enter ...IMPORTANT: The digits being input will automatically shut down here in this manual in succession, the projector will display as pictured to the right Please try another password. 4. Password Keep this manual in this manual, and you absolutely do not remember it . Remember to enter ...
User Manual
Page 40
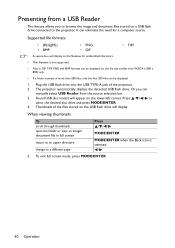
... smaller than 200 files, only the first 200 files can eliminate the need for a computer source. Presenting from a USB Reader This feature allows you can manually select USB Reader from the source selection bar. 3. Supported file formats: • JPEG(JPG) • BMP • PNG • GIF • TIFF • A square box...
... smaller than 200 files, only the first 200 files can eliminate the need for a computer source. Presenting from a USB Reader This feature allows you can manually select USB Reader from the source selection bar. 3. Supported file formats: • JPEG(JPG) • BMP • PNG • GIF • TIFF • A square box...

User Manual
Page 55
... lights up if the lamp becomes too hot. Message NOTICE Order a replacement lamp Equivalent lamp hour > XXXX hours Order a new lamp at www.BenQ.com OK It is strongly recommended that the brightness level has significantly diminished. You can replace the lamp whenever you notice that you to change... the lamp. Timing of lamp usage time Replace lamp (Refer to user manual) Then reset lamp timer Order a new lamp at www.BenQ.com OK The "XXXX" shown in some instances the lamp may continue to operate the projector until the next hour...
... lights up if the lamp becomes too hot. Message NOTICE Order a replacement lamp Equivalent lamp hour > XXXX hours Order a new lamp at www.BenQ.com OK It is strongly recommended that the brightness level has significantly diminished. You can replace the lamp whenever you notice that you to change... the lamp. Timing of lamp usage time Replace lamp (Refer to user manual) Then reset lamp timer Order a new lamp at www.BenQ.com OK The "XXXX" shown in some instances the lamp may continue to operate the projector until the next hour...

User Manual
Page 67
... material and workmanship, under normal usage and storage. Warranty and Copyright information Limited warranty BenQ warrants this publication and to make changes from country to country. Copyright Copyright 2015 by any means, electronic, mechanical, magnetic, optical, chemical, manual or otherwise, without obligation to notify any warranties, merchantability or fitness for the details...
... material and workmanship, under normal usage and storage. Warranty and Copyright information Limited warranty BenQ warrants this publication and to make changes from country to country. Copyright Copyright 2015 by any means, electronic, mechanical, magnetic, optical, chemical, manual or otherwise, without obligation to notify any warranties, merchantability or fitness for the details...

