
MX613ST User Manual
Page 2
... instructions 3 Introduction 7 Projector features 7 Shipping contents 8 Projector exterior view 9 Controls and functions 10 Positioning your projector 13 Choosing a location 13 Obtaining a preferred projected image size 14 Connection 15 Connecting video source devices........ 16 Operation 17 Starting up the projector 17 Adjusting the projected image 18 Using the menus 20 Securing the projector 21 Switching input signal 24 Magnifying and searching for details . 25 Selecting the aspect ratio 25 Optimizing the image 27 Setting the presentation timer 30 Remote paging operations...
... instructions 3 Introduction 7 Projector features 7 Shipping contents 8 Projector exterior view 9 Controls and functions 10 Positioning your projector 13 Choosing a location 13 Obtaining a preferred projected image size 14 Connection 15 Connecting video source devices........ 16 Operation 17 Starting up the projector 17 Adjusting the projected image 18 Using the menus 20 Securing the projector 21 Switching input signal 24 Magnifying and searching for details . 25 Selecting the aspect ratio 25 Optimizing the image 27 Setting the presentation timer 30 Remote paging operations...

MX613ST User Manual
Page 3
... projector is under operation as this manual and marked on the product. lens during operation. To temporarily turn off the lamp, press BLANK on . In areas where the mains voltage may damage your projector. Do not look straight at the projector uninterruptible power supply (UPS). Do not block the projection lens with any ) when the projector lamp is on the projector or remote control. 4. Important safety instructions Your projector is...
... projector is under operation as this manual and marked on the product. lens during operation. To temporarily turn off the lamp, press BLANK on . In areas where the mains voltage may damage your projector. Do not look straight at the projector uninterruptible power supply (UPS). Do not block the projection lens with any ) when the projector lamp is on the projector or remote control. 4. Important safety instructions Your projector is...

MX613ST User Manual
Page 7
... the projector cool in a shorter time • FAQ to troubleshoot operational problems with one quick key press • Presentation timer for better control of time during presentations • One-key auto-adjustment to display the best picture quality • Digital keystone correction to correct distorted images • Adjustable color balance control for data/video display • Ability to display 16.7 million colors • Multi-language On-Screen Display (OSD) menus • Switchable normal and economic modes...
... the projector cool in a shorter time • FAQ to troubleshoot operational problems with one quick key press • Presentation timer for better control of time during presentations • One-key auto-adjustment to display the best picture quality • Digital keystone correction to correct distorted images • Adjustable color balance control for data/video display • Ability to display 16.7 million colors • Multi-language On-Screen Display (OSD) menus • Switchable normal and economic modes...

MX613ST User Manual
Page 10
... Display (OSD) menu. BLANK Used to make adjustments. Lights up red if the projector's temperature becomes too high. When the On-Screen Display (OSD) menu is under operation. 4. MODE/ENTER Selects an available picture setup mode. Adjusts the size of the lamp. MENU/EXIT Turns on . 14. 6. TEMPerature warning light Lights up or flashes when the lamp has developed a problem. Left/ Starts the FAQ function. 7. Keystone/Arrow keys ( / Up, / Down) Manually corrects distorted images resulting from an angled projection. Auto Automatically determines the best picture timings...
... Display (OSD) menu. BLANK Used to make adjustments. Lights up red if the projector's temperature becomes too high. When the On-Screen Display (OSD) menu is under operation. 4. MODE/ENTER Selects an available picture setup mode. Adjusts the size of the lamp. MENU/EXIT Turns on . 14. 6. TEMPerature warning light Lights up or flashes when the lamp has developed a problem. Left/ Starts the FAQ function. 7. Keystone/Arrow keys ( / Up, / Down) Manually corrects distorted images resulting from an angled projection. Auto Automatically determines the best picture timings...

MX613ST User Manual
Page 11
... function. 5. Digital Zoom (+, -) Magnifies or reduces the projected picture size. 7. Volume +/- Right/ 9 Activates panel key lock. 14 When the On-Screen Display (OSD) 7 menu is activated, the #4, #9, and #11 15 keys are used as your startup screen. MODE/ENTER and on your display software program (on the On-Screen Display (OSD) menu. Introduction 11 Remote control 1 2 3 Capture 4 5 6 9. POWER Displays the source selection bar. Toggles the projector between standby mode 13. Activates the selected On-Screen Display (OSD) menu item...
... function. 5. Digital Zoom (+, -) Magnifies or reduces the projected picture size. 7. Volume +/- Right/ 9 Activates panel key lock. 14 When the On-Screen Display (OSD) 7 menu is activated, the #4, #9, and #11 15 keys are used as your startup screen. MODE/ENTER and on your display software program (on the On-Screen Display (OSD) menu. Introduction 11 Remote control 1 2 3 Capture 4 5 6 9. POWER Displays the source selection bar. Toggles the projector between standby mode 13. Activates the selected On-Screen Display (OSD) menu item...
MX613ST User Manual
Page 16
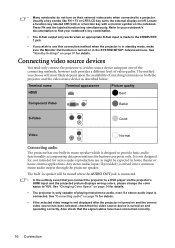
... method you connect the projector to a DVD player via the projector's HDMI input and the projected picture displays wrong colors, please change the color space to provide basic audio functionality accompanying data presentations for business purposes only. See "Changing Color Space" on their external video ports when connected to a video source device using just one built-in standby mode, make sure the Monitor Out function is turned on both the projector and the video source device as...
... method you connect the projector to a DVD player via the projector's HDMI input and the projected picture displays wrong colors, please change the color space to provide basic audio functionality accompanying data presentations for business purposes only. See "Changing Color Space" on their external video ports when connected to a video source device using just one built-in standby mode, make sure the Monitor Out function is turned on both the projector and the video source device as...
MX613ST User Manual
Page 17
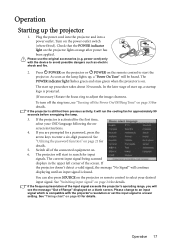
Check that the POWER indicator light on the remote control to start to search for details. Press POWER on the projector or POWER on the projector lights orange after power has been applied. The POWER indicator light flashes green and stays green when the projector is found. The projector will run the cooling fan for details. The current input signal being scanned displays in the upper left corner of Range" displayed on a blank screen. Operation Starting up procedure takes about 30...
Check that the POWER indicator light on the remote control to start to search for details. Press POWER on the projector or POWER on the projector lights orange after power has been applied. The POWER indicator light flashes green and stays green when the projector is found. The projector will run the cooling fan for details. The current input signal being scanned displays in the upper left corner of Range" displayed on a blank screen. Operation Starting up procedure takes about 30...
MX613ST User Manual
Page 20
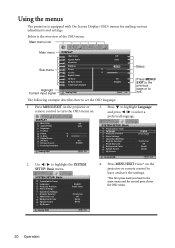
... Auto ENTER 0 0 Status On Disable MENU Exit Press MENU/ EXIT to the previous page or to set the OSD language. 1. and press / to highlight the SYSTEM SETUP: Basic menu. Size Digital Zoom 3D Sync 3D Sync Invert Teaching Template Analog RGB Off Auto 0 0 On Disable MENU Exit SYSTEM SETUP: Basic Presentation Timer Language Projector Position Menu Settings Operation Settings Remote Receiver Panel Key Lock Background Color Splash Screen My Screen English Front Table Front+Top Off BenQ BenQ Analog RGB MENU...
... Auto ENTER 0 0 Status On Disable MENU Exit Press MENU/ EXIT to the previous page or to set the OSD language. 1. and press / to highlight the SYSTEM SETUP: Basic menu. Size Digital Zoom 3D Sync 3D Sync Invert Teaching Template Analog RGB Off Auto 0 0 On Disable MENU Exit SYSTEM SETUP: Basic Presentation Timer Language Projector Position Menu Settings Operation Settings Remote Receiver Panel Key Lock Background Color Splash Screen My Screen English Front Table Front+Top Off BenQ BenQ Analog RGB MENU...
MX613ST User Manual
Page 22
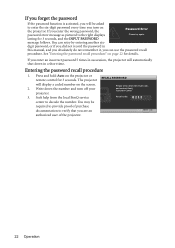
... the recall code, and contact BenQ Customer Center. The projector RECALL PASSWORD will display a coded number on the projector or remote control for 3 seconds. You can use the password recall procedure. lasting for details. Entering the password recall procedure 1. If you forget the password If the password function is activated, you will be required to provide proof of the projector. 22 Operation Press and hold Auto on the screen. 2.
... the recall code, and contact BenQ Customer Center. The projector RECALL PASSWORD will display a coded number on the projector or remote control for 3 seconds. You can use the password recall procedure. lasting for details. Entering the password recall procedure 1. If you forget the password If the password function is activated, you will be required to provide proof of the projector. 22 Operation Press and hold Auto on the screen. 2.

MX613ST User Manual
Page 23
... OSD menu, press MENU/EXIT. Press to highlight Power On Lock and press / to the SYSTEM SETUP: Advanced> Security Settings > Change Password menu. 2. If the password is correct, another password. 4. Operation 23 IMPORTANT: The digits being input will not have successfully assigned a new password to cancel the change or try another message "INPUT NEW PASSWORD" displays. Confirm the new password by entering the old password. i. You will display as asterisks on the projector. ii. Open the OSD menu and...
... OSD menu, press MENU/EXIT. Press to highlight Power On Lock and press / to the SYSTEM SETUP: Advanced> Security Settings > Change Password menu. 2. If the password is correct, another password. 4. Operation 23 IMPORTANT: The digits being input will not have successfully assigned a new password to cancel the change or try another message "INPUT NEW PASSWORD" displays. Confirm the new password by entering the old password. i. You will display as asterisks on the projector. ii. Open the OSD menu and...
MX613ST User Manual
Page 31
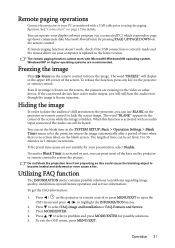
...'t work with a USB cable prior to using the paging function. If the connected devices have active audio output, you can use BLANK on the projector or remote control to hide the screen image. Remote paging operations Connect the projector to your display software program (on a connected PC) which responds to page up/down commands (like Microsoft PowerPoint) by pressing PAGE UP/PAGE DOWN on the remote control. You can still be set from projecting...
...'t work with a USB cable prior to using the paging function. If the connected devices have active audio output, you can use BLANK on the projector or remote control to hide the screen image. Remote paging operations Connect the projector to your display software program (on a connected PC) which responds to page up/down commands (like Microsoft PowerPoint) by pressing PAGE UP/PAGE DOWN on the remote control. You can still be set from projecting...

MX613ST User Manual
Page 32
... temperature is designed to confirm. To create your own startup screen, project the picture you want to the SYSTEM SETUP: Basic > Panel Key Lock menu, and select On by children, for 3 seconds. Press / on the projector or remote control or go to use the High Altitude Mode if your startup screen from either a computer or video source. Operation under such a condition. In cases like this, you should switch to High...
... temperature is designed to confirm. To create your own startup screen, project the picture you want to the SYSTEM SETUP: Basic > Panel Key Lock menu, and select On by children, for 3 seconds. Press / on the projector or remote control or go to use the High Altitude Mode if your startup screen from either a computer or video source. Operation under such a condition. In cases like this, you should switch to High...

MX613ST User Manual
Page 46
... Lamp Hour • Firmware Version Note that the menu items are accessible. 46 Operation SYSTEM SETUP: Advanced Security Settings Baud Rate Test Pattern Change Password Change Security Power On Lock Settings Splash Screen Lock 2400/4800/9600/14400/19200/ 38400/57600/115200 On/Off Closed Caption Closed Caption Enable On/Off Caption Version CC1/CC2/CC3/CC4 Standby Network On/Off Settings Monitor Out On/Off Status Wireless LAN SSID IP Address Connection Mode Reset...
... Lamp Hour • Firmware Version Note that the menu items are accessible. 46 Operation SYSTEM SETUP: Advanced Security Settings Baud Rate Test Pattern Change Password Change Security Power On Lock Settings Splash Screen Lock 2400/4800/9600/14400/19200/ 38400/57600/115200 On/Off Closed Caption Closed Caption Enable On/Off Caption Version CC1/CC2/CC3/CC4 Standby Network On/Off Settings Monitor Out On/Off Status Wireless LAN SSID IP Address Connection Mode Reset...
MX613ST User Manual
Page 49
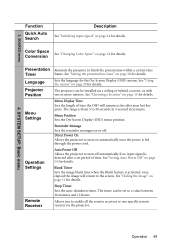
... press. See "Setting Auto Power Off " on page 31 for the On-Screen Display (OSD) menus. SYSTEM SETUP: Basic menu Function Quick Auto Search Description See "Switching input signal" on the projector. Sleep Timer Sets the auto-shutdown timer. Blank Timer Sets the image blank time when the Blank feature is from 5 to a value between 30 minutes and 12 hours. Reminder Message Sets the reminder messages on a ceiling or behind a screen, or with one specific remote receiver on...
... press. See "Setting Auto Power Off " on page 31 for the On-Screen Display (OSD) menus. SYSTEM SETUP: Basic menu Function Quick Auto Search Description See "Switching input signal" on the projector. Sleep Timer Sets the auto-shutdown timer. Blank Timer Sets the image blank time when the Blank feature is from 5 to a value between 30 minutes and 12 hours. Reminder Message Sets the reminder messages on a ceiling or behind a screen, or with one specific remote receiver on...

MX613ST User Manual
Page 50
... Screen. 4. See "Locking control keys" on page 32 for details. See "Creating your target picture. A mode for operation in a high altitude environment" on page 54 for details. Lamp Settings Security Settings Reset Lamp Timer See "Resetting the lamp timer" on page 21 for details. Change Security Settings Power On Lock Splash Screen Lock See "Utilizing the password function" on page 58 for details. 50 Operation Change Password You will display during projector start-up. SYSTEM SETUP: Advanced menu Function Description Panel Key Lock...
... Screen. 4. See "Locking control keys" on page 32 for details. See "Creating your target picture. A mode for operation in a high altitude environment" on page 54 for details. Lamp Settings Security Settings Reset Lamp Timer See "Resetting the lamp timer" on page 21 for details. Change Security Settings Power On Lock Splash Screen Lock See "Utilizing the password function" on page 58 for details. 50 Operation Change Password You will display during projector start-up. SYSTEM SETUP: Advanced menu Function Description Panel Key Lock...

MX613ST User Manual
Page 51
... to provide the network function when it is in standby mode and the COMPUTER 1 jack is free from distortion. See "Controlling the projector through a LAN environment" on -screen display of the dialogue, narration, and sound effects of TV programs and videos that you adjust the image size and focus and check that the projected image is correctly connected to devices. Size, User 1, User 2, Color Space Conversion, Language, Projector Position, High Altitude Mode, Security Settings, SSID and Baud...
... to provide the network function when it is in standby mode and the COMPUTER 1 jack is free from distortion. See "Controlling the projector through a LAN environment" on -screen display of the dialogue, narration, and sound effects of TV programs and videos that you adjust the image size and focus and check that the projected image is correctly connected to devices. Size, User 1, User 2, Color Space Conversion, Language, Projector Position, High Altitude Mode, Security Settings, SSID and Baud...

MX613ST User Manual
Page 52
Equivalent Lamp Hour Displays the number of your projector. 52 Operation Picture Mode Shows the selected mode in the PICTURE menu. Firmware Version Shows the firmware version of hours the lamp has been used. INFORMATION menu Function Description FAQ-Image and Installation FAQ- Displays possible solutions to problems you may encounter. Current System Status Resolution Shows the native resolution of the input signal. Features and Service Source Shows the current signal source. Color System Shows input system format: NTSC, PAL, SECAM, YUV, or RGB. 6.
Equivalent Lamp Hour Displays the number of your projector. 52 Operation Picture Mode Shows the selected mode in the PICTURE menu. Firmware Version Shows the firmware version of hours the lamp has been used. INFORMATION menu Function Description FAQ-Image and Installation FAQ- Displays possible solutions to problems you may encounter. Current System Status Resolution Shows the native resolution of the input signal. Features and Service Source Shows the current signal source. Color System Shows input system format: NTSC, PAL, SECAM, YUV, or RGB. 6.

MX613ST User Manual
Page 54
... projected pictures. To set Auto Power Off, go into the SYSTEM SETUP: Basic > Operation Settings > Auto Power Off menu and press / . You will see the Equivalent Lamp Hour information displaying on Economic mode. If the Economic mode is selected, the light output will not automatically shut down in Economic mode also extends the lamp operation life. Setting the projector in a certain time period. 54 Maintenance To set Economic mode, go into the SYSTEM SETUP: Advanced > Lamp Settings > Lamp Mode menu and press / . • Setting Auto Power...
... projected pictures. To set Auto Power Off, go into the SYSTEM SETUP: Basic > Operation Settings > Auto Power Off menu and press / . You will see the Equivalent Lamp Hour information displaying on Economic mode. If the Economic mode is selected, the light output will not automatically shut down in Economic mode also extends the lamp operation life. Setting the projector in a certain time period. 54 Maintenance To set Economic mode, go into the SYSTEM SETUP: Advanced > Lamp Settings > Lamp Mode menu and press / . • Setting Auto Power...
MX613ST User Manual
Page 60
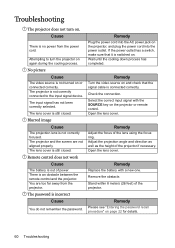
... the lens using the focus ring. The lens cover is not turned on the projector or remote control. Remedy Adjust the focus of the projector. No picture Cause The video source is still closed . There is incorrect Cause You do not remember the password. If the power outlet has a switch, make sure that it is switched on and check that the signal cable is no power from the projector. Remedy Turn the video source on . Open the lens cover. Cause...
... the lens using the focus ring. The lens cover is not turned on the projector or remote control. Remedy Adjust the focus of the projector. No picture Cause The video source is still closed . There is incorrect Cause You do not remember the password. If the power outlet has a switch, make sure that it is switched on and check that the signal cable is no power from the projector. Remedy Turn the video source on . Open the lens cover. Cause...
MX613ST User Manual
Page 68
... and images could be available upon requests. • BenQ's customer service provides answers and assistance to support government in suspend or sleep mode and is using the On-Screen Display (OSD) controls on the products. • BenQ's monitors and projectors include user-selectable color controls, such as color temperature selections (Monitor: 5800K, 6500K and 9300K, Projector: 5500K, 6500K, 7500K and 9300K), with a wide range of pre-programmed flicker-free timing...
... and images could be available upon requests. • BenQ's customer service provides answers and assistance to support government in suspend or sleep mode and is using the On-Screen Display (OSD) controls on the products. • BenQ's monitors and projectors include user-selectable color controls, such as color temperature selections (Monitor: 5800K, 6500K and 9300K, Projector: 5500K, 6500K, 7500K and 9300K), with a wide range of pre-programmed flicker-free timing...


